This article describes the necessary steps to log in to OfficeEMR while using a 2FA Application. The two-factor authentication process requires a user to have a Username, Password, Company, and Token. Depending on your practice's policies, you may be able to log in without a token.

Login to OfficeEMR
- Navigate to Login Screen
- Enter your:
- User Name
- Password
- Company
- Select Login. If your practice has no additional 2FA requirement you will be granted access to the system.
- Once first-factor authentication is passed, you will be prompted to enter the Two Factor Authentication Token from your mobile application configured upon initial setup.
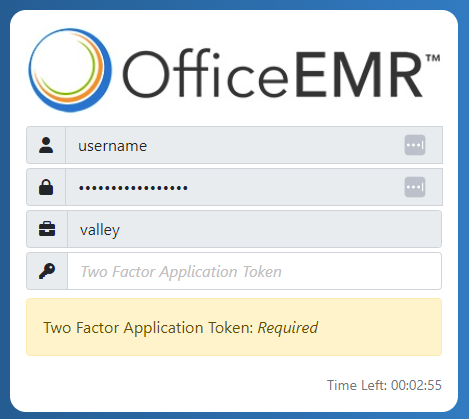
- Once the code is entered you will be granted access to the system.

Patient Comments is a tool to either add a comment or note that is viewable within the Patient Setup. Comments may be setup as an alert in order to notify staff members of important information pertaining to a specific patient.
Add a Comment
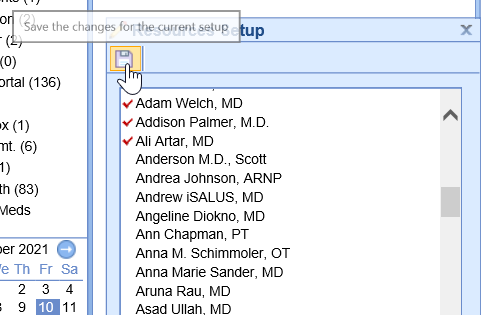
- Open the Patient Setup

- Select Comments from the left navigation menu then the "+" symbol at the bottom

- Type comment into the text area under New Comment and click Save

- Edit Comment by selecting the pencil icon next to the Comment, edit text and click Save
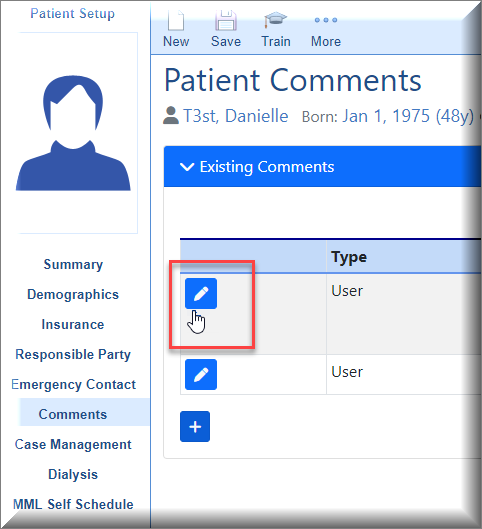

- Default Comments may be used by choosing Append or Replace buttons.
 Append this comment text to current comment This will add verbiage from Default Comment without replacing anything already typed into the Comment field and keeps Default Comments available.

Replace comment with this comment text. This will replace anything already typed into the Comment field and collapse the Default Comments area.
Add an Alert
Follow these steps to add an alert:
- In the comments window, expand the Alert area.

- Set the Effective Date of the alert, and set the Expiration Date if needed. Effective Date is the first day the alert will be visible. Expiration Date is the date the alert will no longer be visible. These dates are important especially when using them for billing activity.

- Select what type of alert you are creating. This tells the system when the alert should pop-up on the screen (ex: When the patient is loaded in the EMR)

- If necessary, you can assign the alert to one or more users or user group. If the alert should pop-up for every user, then omit this step.

- Finally, enter the alert message in the Comment box above Alert and select Save.

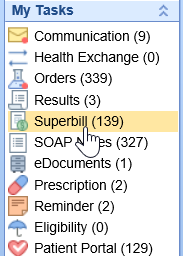
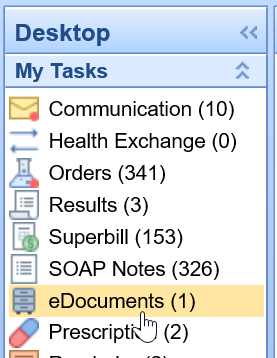
The My Tasks Communication is an “inbox” of communications sent interoffice. Communications can either be sent as a message or a task. Additionally, communications can be a general interoffice message, i.e. informing users of a meeting or linked to a patient chart.
Note: Communications can only be removed from a patient's chart when the attachment has been removed.
Communication Inbox
- To read a communication click on Communication in the My Tasks portal. Your inbox contains messages and tasks sent to you as an individual user or any group in which you are a part of.

2.The My Task Communications is organized by Inbox (new messages), sent messages and deleted messages. The Inbox number count represents unread messages.

3. The Arranged By link allows you to sort messages in your inbox by Date, User, Subject or Priority

4. The icon next to the message indicates if the communication was sent as a Message or Task. The manila envelope represents a message and the clipboard represents a task

5. To read a message or task, click on the message in the inbox. The message will display to the right of the screen. Additionally, the number count will decrease as this is now a “read” message.

Message Toolbar

- New - Create a new message
- Print - Print the message

3. Delete - If no further action is required, select the delete ![]() to remove the message from your inbox (Communications linked to a patient's chart will not be deleted). If the message is sent to a group, it will only be deleted from your inbox.
to remove the message from your inbox (Communications linked to a patient's chart will not be deleted). If the message is sent to a group, it will only be deleted from your inbox.
4. Reply - Reply to the sender only

5. Reply All – Reply to all recipients of the original message

6. Forward – Forward message to another user

7. Complete – If you need to add additional notes to the communication select Complete. This brings up a Complete Message window to type additional notes.

Tasks Overview
Sending a Communication as a Task allow users to track the progress of a communication that would require additional follow-up. Tasks can be sent to an individual user or a group of users.
- Select the Task from your Inbox, task details will display to the right of the inbox
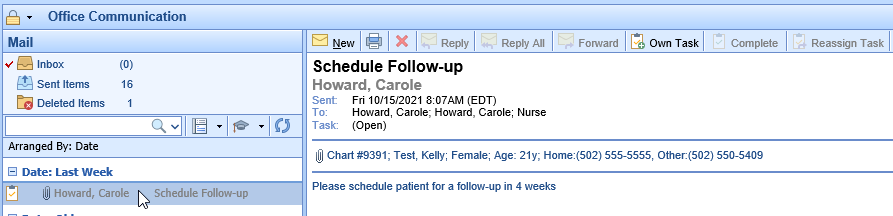

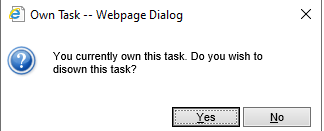
2. Select Own Task on the toolbar if you will be completing this task

3. If another user owns the task, this message will appear
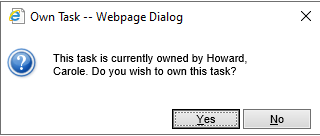
4. Select Own Task again if you want to disown the task, allowing another user to own the task
5. Once a task is owned, additional options appear on the toolbar. 
6. Complete – Completes the task and allows the user to type in notes/messages related to the completion of the task 
7. Reassign Task - Reassigns the task to a new user or group of users
The My Tasks Communication tool allows for interoffice communications that can be initiated from the EMR, iScheduler, Billing Portal or My Task areas. Additionally, you can link a patient chart, claim, or eDocument to the Communication. Communications can be sent without a patient's chart linked or they can be linked to a patient chart when initiated from a patient record.
Send a General Communication to Users/Groups
To create or send a general communication that is not linked to a patient, navigate to My Tasks - Communications
- Select New (manila envelope)

2. The New Message window pops-up

3. Add users and/or groups that will receive this communication by clicking on To. Search for User/Groups, add and click OK

4. Type in the subject on the Subject line, add message details, then click Send

Send a Communication from the EMR Portal
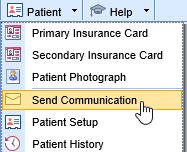
- Open a patient and then use the Patient drop down and select Communication

2. The New Message window appears.

3. Select the To field to select the user/group to send the message to. A communication can be sent to any combination of users and/or groups

4. Subject line- by default the Subject line is New Office Communication, it is best practice to type in a more specific subject line

5. Attachment- by default the Patient Chart is attached to the Communication initiated in the EMR. Click on the Attach (paperclip) to attach additional items to the message

6. Type in body of message and select to Send or Task and optional Importance

7. Select Send to send communication to users/groups in the To field and closed window
8. Select Task communication to send to users/groups as a task they can own for tracking of completion
9. Importance drop down can be utilized to select Low, Normal or High Importance

Send a Communication from the iScheduler Portal
- Open a patient or select patient on the schedule. Use the Patient drop down and select Send Communication

2. The New Message window pops up, fill-in all message options and click Send or Task

Send a Communication Billing Portal
- Receipts Details window

2. Claims Detail window

3. Communications sent from the Claims Detail window automatically attach the Patient Chart and the Claim

Viewing Communications
Once a Communication is sent, it is saved to the Patient’s Chart. The Communications can be viewed in several areas:
- EMR Summary – Encounters

2. EMR Timeline - Communications

3. EMR/iScheduler - Patient Index drop down/Patient Communications


4. Billing Portal – Claims

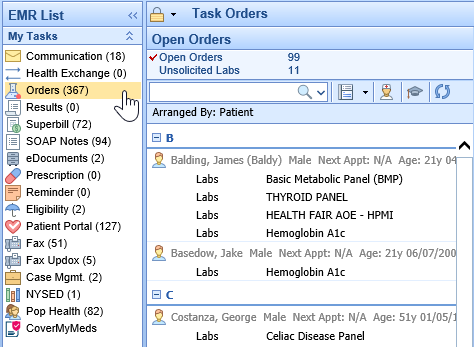
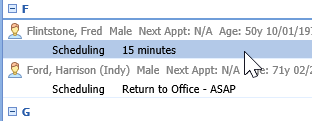
The My Tasks Orders section is used to process orders placed by the providers or ancillary staff. The primary purpose of this section is to manage the list of orders assigned to you and/or your assigned user groups, also known as the Processor. This list can be arranged based on the needs of each user. From the My Task Orders you can Add Order Fulfillment Details, Print Requisitions, Input Authorization Details, change the status of an order and Search for Additional Orders.

Select an Order in the My Task List
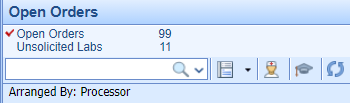
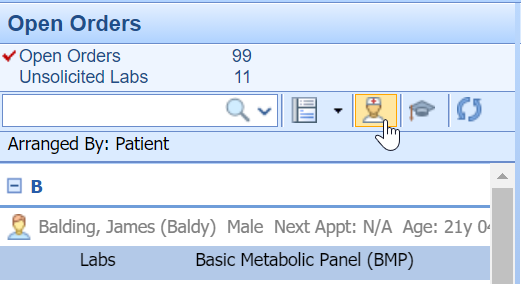
Within the My Tasks - Orders they will be listed beneath the "Open Orders" heading. The Open Orders count displays Open orders in which your user is the Processor or a part of the Processor Group for that order.

Steps to Complete
- Navigate to My Tasks - Orders

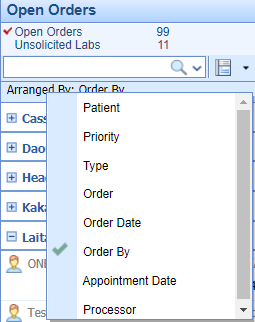
- Select Open Orders
- If you have not already done so, set the Arranged By. This will group orders for a more efficient workflow, i.e. if you will be processing orders for a particular provider, you can arrange by "Ordered by"
- Find the order in the displayed list. Click on the item and the details will be displayed in the viewing pane.


Select Multiple Orders
From the list, you can either select and right-click over a single order or select multiple orders at once by using SHIFT+Click and/or CTRL+Click.
Print a Requisition from My Task Orders
A Requisition, the PDF containing the details of an order that has been placed, can be generated from either the My Task - Orders section or from the history section of Order Entry. This article describes the steps to print/transmit requisitions for one or more orders using the My Tasks List.
Steps to Complete
- After Placing an Order in the Order Entry Chart Tab.
- Navigate to My Task - Orders

- From the list of Open Orders, you can either select and right-click over a single order or select multiple orders at once by using SHIFT+Click and/or CTRL+Click. Select Requisition (More Info On Selecting Orders)

- The Create Requisitions screen will display the groupings for the order you are going to print and errors that may need to be resolved first.
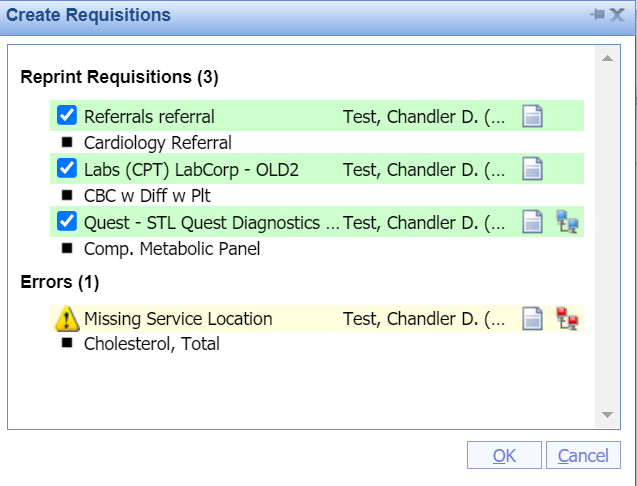
- After selecting OK, the PDFs will be generated and you will be able to Fax the form, Add it to the Patient's Print/Fax Queue, or Print the requisition. If you have an Interface, this may transmit the order to the facility depending on the type of interface.


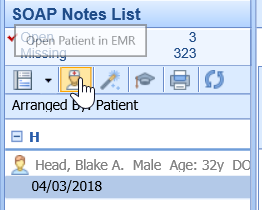
Open Patient in the EMR from My Task Orders
When processing orders via the My Task list, you may need to reference clinical information about the patient. You can open a patient's chart in the EMR from this section with the click of a button. This article describes these steps.
Steps to Complete
- Navigate to My Task - Orders
- Select an Order
- Once a single order has been selected, Open Patient in the EMR from the icon in the toolbar.

Complete an Advanced Search for Orders
The My Task - Orders list will display all open orders assigned to your user as the processor and/or your assigned user group. In the event, you would like to search for orders outside of your queue you may perform an Advanced Search to return a list of orders that meet specific criteria.

Steps to Complete
- Navigate to the My Task - Orders
- Using the Search Field Dropdown, Select Advanced Search
- Using the available criteria:
- Order #
- Chart #
- Requisition #
- Results
- Reviewed
- Order Name
- Type
- Electronic (Electronic Orders are those that have a connected interface)
- Order Date - From/To
- Reviewed Date - From/To
- Route
- Status
- Created By
- Processor
- Reviewed By
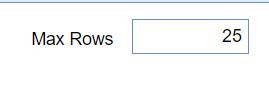
- Set your Max Rows to ensure your return the comprehensive list of results.
- Once you enter your search criteria, select the Magnifying Glass icon from the toolbar.


Complete Order Fulfillment Details via My Task - Orders
Depending on your practice's workflow, the Order Fulfillment template may be completed in the My Task Orders section by the processor as opposed to the individual who placed the order in Order Entry. This article will describe how to add and edit the details of order fulfillment on an open order.
Steps to Complete
- Navigate to My Task Orders
- Select an Order
- If in the order you see the following, select Add to pull up the fulfillment template. If there is no option to add details, then there is no order fulfillment template tied to the selected order item.
- Once the template is displayed add/edit the details and select Close.
- Select Save


Change the Processor on an order via My Task - Orders
To change an order's processor you can complete this while placing the order, in the Order Entry - History, or My Task - Orders. This article explains the steps to complete this in the Order Entry - History chart tab. There are two ways to complete this task within Order Entry - History.
Steps to Complete (Right Click Menu)
- Navigate to the Open Orders within the My Task - Orders.
- From the list, you can either select and right-click over a single order or select multiple orders at once by using SHIFT+Click and/or CTRL+Click.
- Right-click over the selected order(s), Select Status
- From here, use the select list to change the Processor. You may also change the status of the selected order(s) from this screen.

- Save


Steps to Complete (Processing Window)
- Navigate to the Open Orders within the My Task - Orders.

- From here, locate and select the order.
- Within the processing window, select Processor
- This will open a separate window where the processor can be changed via a Search Field
- Save


Change the Status of an Order via My Task - Orders
The order status is used to determine the visibility of the order in the My Task - Orders, Open Orders list. There are three options for order status: Open, Closed, Cancelled. This article will describe the two ways to change the status of an order item within My Task - Orders.
Steps to Complete (Right Click Menu)
- Navigate to the Open Orders within the My Task - Orders.

- From the list, you can either select and right-click over a single order or select multiple orders at once by using SHIFT+Click and/or CTRL+Click.
- Right-click over the selected order(s), Select Status

- From here, use the radio buttons to change the Status to Open, Closed, or Cancel.

- Save


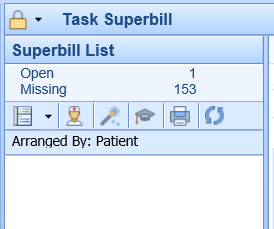
The Superbill task list within the provider's My Task List displays outstanding or incomplete superbills that still need to be completed and/or submitted. The Superbill task list is unique to each individual provider and is based on user activity.
Navigating to the Superbill Task List
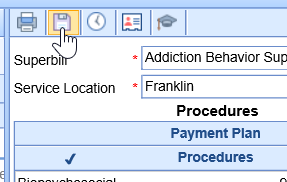
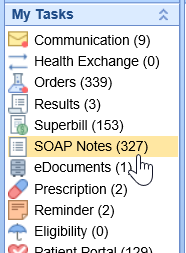
- In the upper, left-hand corner of the database, navigate to the My Task List and select Superbill
- The list will be broken down into two categories: Open and Missing
Open = Superbills that have been saved but have not been released for charges.
- Superbills can be in the Open category when a provider forgets to save the superbill or chooses to not release the Superbill upon saving.
Missing = Superbills that have not been started and/or saved.
- Superbills can be in the Missing category when the provider does not complete the Superbill for a visit. For example, if a patient is checked-out of their appointment, but the Superbill has not been completed the provider will receive a notification that the Superbill is Missing.
- Select a category to generate a list of task items
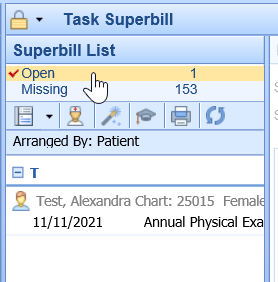
- Select the Date of Service below the patient's name to open the Superbill
- Complete the Superbill by adding any missing Procedure or Diagnosis codes
- Select Save
- When prompted if you wish to release the Superbill, select Yes
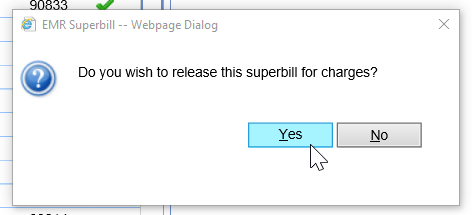
- Completed items will be crossed off the to-do list


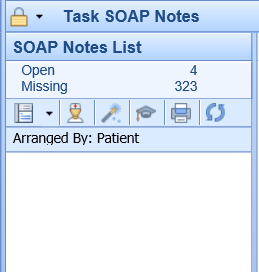
The SOAP Note task list within the provider's My Task List displays outstanding or incomplete SOAP Notes that still need to be completed and/or submitted. The SOAP Note task list is unique to each individual provider and is based on user activity.
Navigating to the SOAP Note Task List
- In the upper, left-hand corner of the database, navigate to the My Task List and select SOAP Notes
- The list will be broken down into two categories: Open and Missing
Open = SOAP Notes that have been saved but have not been signed-off.
- SOAP Notes can be in the Open category when a provider starts the documentation and saves the SOAP Note, but does not officially sign-off.
Missing = SOAP Notes that have not been started and/or signed-off.
- SOAP Notes can be in the Missing category when the provider does not complete the SOAP Note for a visit. For example, if a patient is checked-out of their appointment, but the SOAP Note has not been completed the provider will receive a notification that the SOAP Note is Missing.
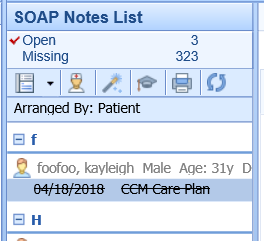
- Select a category to generate a list of task items
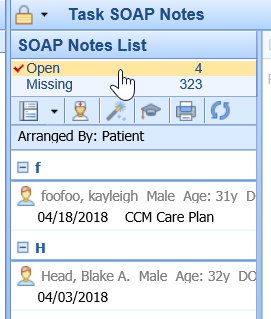
- Select a date of service below a patient's name to generate the SOAP Note
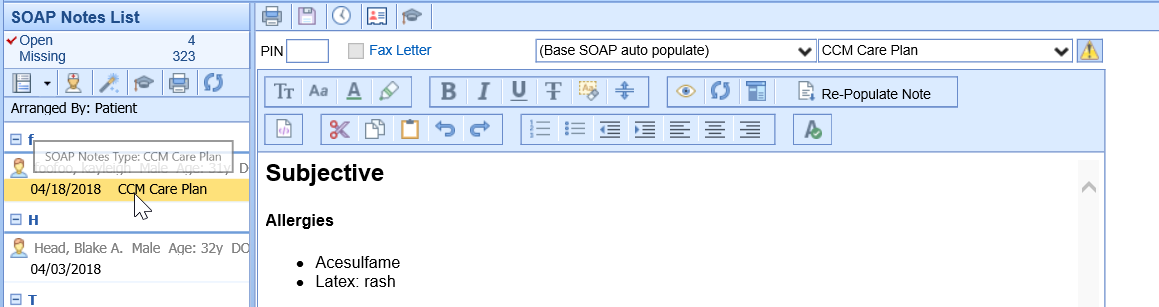
- The provider may enter their pin number and select Save in order to sign-off on the note.

- Completed notes will be crossed off of the to-do list.


Best Practice: In the event that the provider is not ready to sign-off on the note, they may open the note in the EMR to complete any changes.
- Begin by selecting the date of service under the patient's name
- Then navigate to the provider icon (person in the white lab coat)

The patient's chart will open to the date of service where the note is either open/missing. This will allow the provider to add additional documentation, make changes, and sign-off on the completed note.
The eDocuments Task List display a list of electronic documents needing additional review. Users may be sent documents to review either via scanned, imported, or faxed documents.
Navigating to the eDocuments Task List
- In the upper, left-hand corner of the database, navigate to the My Task List and select eDocuments
- The list will be broken into two categories: Pending Review and Reviewed (last month)
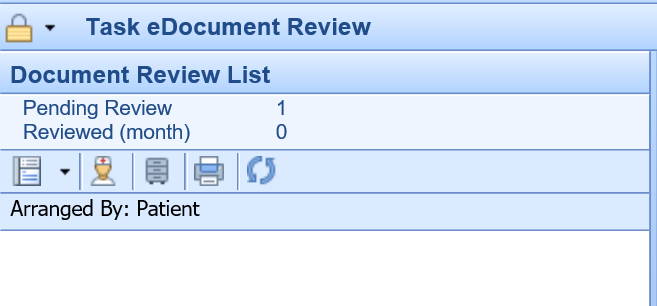


Pending Review = eDocuments that are awaiting final review
Reviewed (Month) = eDocuments that have already been reviewed within the last month
3. Select a category to generate a list of task items

4. Select the Date of Service below the patient's name to open the pending eDocument

5. Once the document has been reviewed, right click over the Date of Service to display a list of document functions

6. To close the task, select Mark as Reviewed

7. Users may add comments to the completed task, otherwise select Completed and then OK

8. Completed items will be crossed off the to-do list

All communications from MyMedicalLocker will display in this To Do list including Secure Communications, Patient Intake submissions, Shared Documents, and Appointment Requests.
To access this screen, navigate to the My Tasks section of the application.

Pending Review
The Pending Review bucket is a list of pending portal messages that have not been processed.

Pending requests can be arranged by Date, Patient, Request (type) or Provider

Click on the message to display list of available actions
- Appointment Request
ACTIONS: Print – Save - Response back to patient - Mark as Reviewed - Patient Index - Open Patient in iScheduler

- Intake Form – forms completed on portal to be merged


ACTIONS: Import Patient Info - Mark as Reviewed - Patient Index

- Document Share – documents uploaded by patient


ACTIONS: Print – Import - Mark as Reviewed - Patient Index

- Message – secure message sent by patient


ACTIONS: Print –Save – Reply - Mark as Reviewed - Patient Index - Communication

- Demographics Import –completed as part of intake
ACTIONS: Print- Import- Patient Index

Reviewed (month)
The Reviewed (month) bucket is a list of portal messages that have been reviewed in the previous month.

Overview of My Task - Fax (UpDox)
The My Tasks Fax (UpDox) portal is used to manage electronic faxes that are sent to your practice. This portal allows you to see new faxes received for numbers that have been assigned to you. Once received, you will use this queue to manage these faxes. Also, users can access the sent box for faxes here as well.

My Task Fax (UpDox) Inbox
Last Modified on 05/11/2021 3:36 pm EDT
The Inbox within the Fax (UpDox) My Task lists provides a user with a queue of faxes that have been sent to a fax number that the logged-in user has access to. From this Inbox, users will be able to make a decision on what to do with each fax that has been received. Users may decide to send the fax as a communication, send the fax to a patient's chart, or delete the fax. This article describes how to complete these various tasks.
Inbox List
The Fax Inbox will contain a list of faxes that have been sent to a fax number that you have been assigned to. The list will contain the following details:
- Received From: This is the fax number that sent the fax to you.
- Sent To: This is the fax number that the fax was sent to.
- Posted: This is the date/time that the fax was received.
- Filename: This is the name of the file that was sent.

Inbox Search
Users will be able to use the Search box at the top of the inbox to search for an item in the inbox. You can search by any of the fields described above. Simply type in the details and click the search icon.

Inbox Work Area
By selecting a fax from the Inbox List, that fax will be displayed to the right in the Inbox Work Area. This is where you will be able to take action on an item from your inbox.
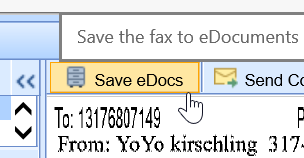
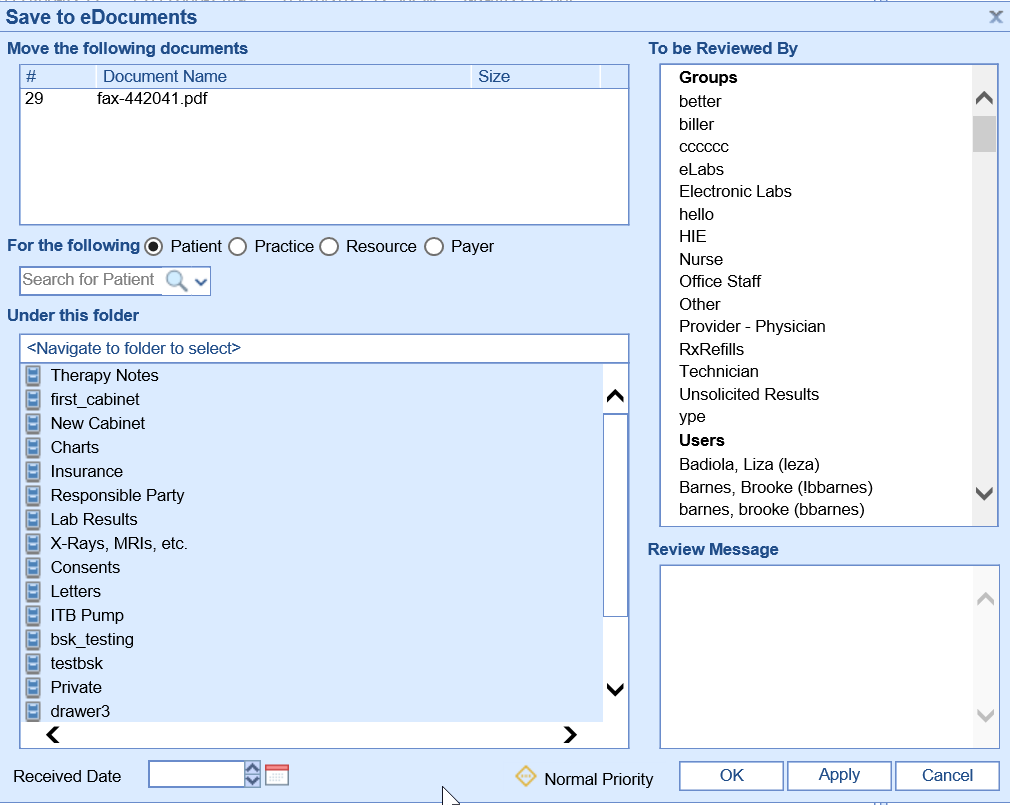
Save to eDocs
The Save to eDocs feature allows a fax to be stored into the eDocuments portion of the application. Most commonly, eDocs are associated with a patient. However, other types of documents can be stored here as well. The system supports documents related to specific resources, payers, or the company as a whole.
- Select the fax from the Inbox List
- Click Save to eDocs
- Complete the Save to eDocs settings:
- For the Following: Based on your selection here, the search and folder navigation will change.
- Patient - Allows the document to be stored at the patient level.
- Practice - Allows the document to be stored at the practice level.
- Resource - Allows the document to be stored at the resource level.
- Payer - Allows the document to be stored at the payer level.
- Search: Based on the type of document you are saving, you will be able to search for that entity as needed.
- Under this Folder: Based on the type of document you are saving, you will see the pre-defined folder structure for that type. Select the Cabinet, Drawer, and Folder you wish to save this document to.
- To Be Reviewed By: By selecting a user to user group from this list, this document will be assigned to the appropriate individual within the My Task eDocuments list.
- Review Message: If sending a document to a user for review, this comment will accompany that review request.
- For the Following: Based on your selection here, the search and folder navigation will change.
- Click OK.
- The item will be removed from your inbox.


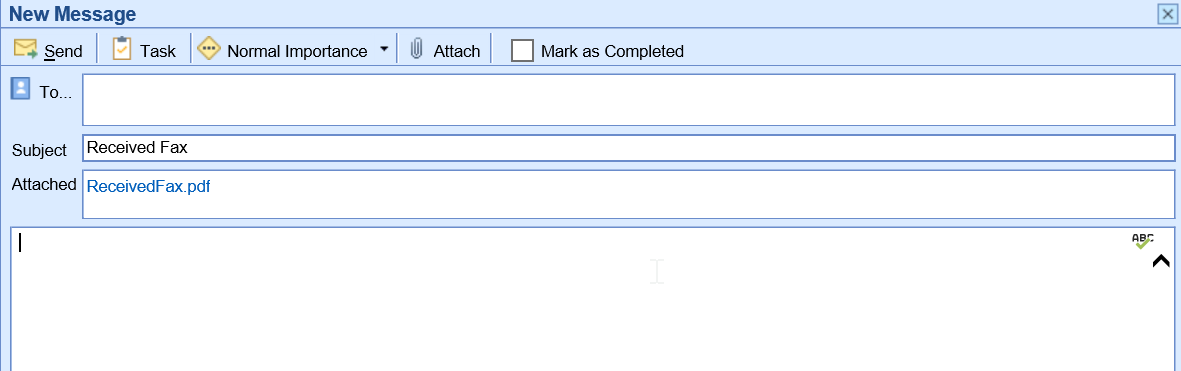
Send Communication
The Send Communication feature allows a fax to be sent as an attachment to a user via My Tasks - Communications. When doing this, the fax is not permanently saved into eDocuments.
- Select the fax from the Inbox List.
- Click Send Communication
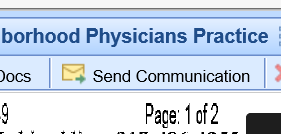
- A new communication window will appear with the fax automatically attached. Complete the communication information and click Send or Task.

- The item will be removed from your inbox.


Delete
The Delete feature allows a fax to be permanently deleted. This is most commonly used for "junk" faxes that are not needed.
- Select the fax from the Inbox List.
- Click Delete
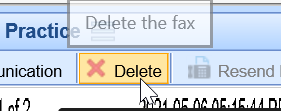
- Confirm that you would like to delete the message.
- This item will be removed from your inbox and permanently deleted.

MyTask Fax (UpDox) Sent Items
The Sent Items within the Fax (UpDox) My Task lists provides a user with a list of faxes that have been sent out by the practice for the fax number that the logged-in user has access to. From this Sent queue, users will be able to see the status of faxes sent and re-send faxes that failed.
Sent Items List
The Fax Sent Queue will contain a list of faxes that have been sent out for fax number that you have been assigned to. The list will contain the following details:
- Status: The status of the sent fax
- Success - A green checkmark icon will be displayed to indicate the fax was successfully sent.
- Retrieve - A download icon will be displayed to indicate the fax status has not been updated. Clicking this will retrieve the most current status.
- In Process - A clock icon will be displayed to indicate the fax is in the queue to be processed. Click this will retrieve the most current status.
- Error - A red circle with an exclamation point will be displayed to indicate the fax failed.
- Sent To - The name of the recipient that received the fax.
- Fax # - The fax number that the fax was sent to.
- Subject - The subject line for the fax.
- Posted - The date the fax was sent.
- Chart # - The chart number for the patient associated with the fax.

Sent Items Search
Users will be able to use the Search box at the top of the sent items list to search for an item in the inbox. You can search by any of the fields described above. Simply type in the details and click the search icon.

Sent Items List Work Area
By selecting a fax from the Sent Items List, that fax will be displayed to the right in the Sent Items Work Area. This is where you will be able to take action on an item from your sent box.
Resend Fax
The Re-Send Fax feature allows a fax to be re-sent as needed. This is especially helpful if the fax does not send successfully the first time.
- Select the fax from the Sent Items List
- Click Resend Fax.
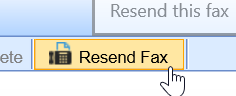
- Complete the Fax Details.
- Click Send.


Send Communication
The Send Communication feature allows a fax to be sent as an attachment to a user via My Tasks - Communications.
- Select the fax from the Inbox List.
- Click Send Communication

- A new communication window will appear with the fax automatically attached. Complete the communication information and click Send or Task.


The iScheduler can be viewed by individual Resource or a Group.
Navigate to iScheduler

Select Resource or Group

Resource View
Select the Resource dropdown to display list of available Resources for that user.

The iScheduler displays a full week for the selected Resource

Group View
Select the Group dropdown to display list of locations or Custom group

The iScheduler displays appointments for any Resource with appointments or appointment Placeholders for that location for the selected day

Custom Group View
On-The-Fly allows you to select one or more Resources for the selected day

Daily Schedule displays all Resources for the selected day

The iScheduler Toolbar is located in the iScheduler portal, at the top left of the screen.

- Today: You have the ability to move to a future or past date in the iScheduler. Click
 to navigate back to the current date.
- Time Period : Select to navigate to a future date based on days, weeks, months or years.


- Search Open: Select to search for open appointments based any combination of Resource, Location, Length, Appt Type within designated time period. To filter by Appt Type, resource needs to be associated with that Appt Type in Resource set-up. Click Search to display results.

- Search Recall: You can add a new Recall or search Recalls from the Search Recall screen.
- Add New Recall: A new recall can be added for future appointments you aren’t ready to schedule. Click on New and enter the details, then select OK

- Search Recall: You can search for a previously added Recall by clicking Search Recall and entering your criteria, i.e. Resource, Begin and End Date, then select Search

- Open: Select Open to view the recall created for that patient

- Open Patient: Select Open Patient to open Patient Setup for selected patient

- Schedule: Takes you to iScheduler to schedule selected patient from list.

- Print Recall List: To print a list of the recalls for your search criteria, select the drop down next to the Search Results menu, then click Select All. You can then select print to print or export the list of patients

- Print Recall Letters: To print letters for patients from your search criteria, select the letter template you want to print for all patients selected on the list, then click Print Letter (this brings individual letters for all patients on the list in a viewer where you can print all letters.

- Intake Schedule: Select Intake Schedule to view scheduled patients intake assignments. By default, the Intake Schedule opens to Today; however, you can use the search criteria to search by Schedule date, Resource Group or Resource. From here you can assign an intake, merge completed forms and view completed forms

- Patient: Select the Patient icon for Patient Setup or drop down options
- Opens Patient Setup for selected patient

- Dropdown options


- Help: Select the Help icon to view shortcuts or the iSalus University

- Shortcuts – view Alt Key and Control Key tips

- Train Me – helpful training materials via the iSalus University

New patients can be added to your database with either the Quick Create, Create MML or Full Patient Setup.
Note: As a rule, always search for the patient prior to adding a new patient to the database.
To Search for a patient, click the search icon in the upper right corner of either the iScheduler or EMR and being typing. This can be a combination of patient First Name, Last Name, SSN or DOB.

If no results are found, use the dropdown arrow and select Create Patient Account

Quick Create
Quick Create allows you to create patient account from this screen with minimal required fields. Enter criteria and select Create

Create MML
Select Create-MML to quick create a patient account and connect to MML

Connect Patient

Full Patient Setup
To create a new account from the full patient Setup, select Setup

You are automatically directed to the New Patient Setup window. Fill out required fields (indicated by *) as well as additional fields, and click Save

- Insurance – enter required and additional fields. Select “Same as Patient” if patient is the guarantor which will populate demographic fields

2. Responsible Party – Select Populate Patient Information if patient is responsible party. If a different party, enter required and additional fields as needed

3. Emergency Contact – add up to two emergency contacts, then click Save

How to Check-In Appointments
- Right click over the patient appointment, select Checked-In

2. The Patient Validation runs looking for missing critical information that would impact billing, Click OK

3. Missing items can be added by clicking on the patient name in the upper left hand corner, taking you to the Patient Setup

4. After making corrections and saving the information, you’ll be back at the Quick Pay screen, where the Patient Validation can be ran again, ensuring all necessary information has been entered

5. If your practice takes Co-pays at check-in, this may be entered from the Quick Pay window

6. Simply enter the Payment Amount, Payment Type (Co-pay), and Payment Method in the Receipt Detail area of the Quick Pay window.

7. Select Create Receipt for cash, check, and non-PaySimple credit card payments. (Read more about our PaySimple credit card integration.)

8. For PaySimple credit card payments, select Take Payment
Most practices will wait to print the receipt until Check-Out in order to include future appointments, proof of visit, and proof of payment on the same printout. However, receipts will generate in the Receipt Transactions area and can be printed during Check-In, if necessary. Simply select the receipt and then select the Print Receipt button located at the bottom of the screen.
How to Check-Out Appointments
- Right click over the appointment, select Checked-Out

2. The Quick Pay screen will load, where the Patient Validation verification can be ran again, ensuring all necessary information has been entered

3. If your practice does not take copays at check-in, this can be entered from this same screen:
4. Simply enter the Payment Amount, Payment Type (Co-pay), and Payment Method in the Receipt Detail area of the Quick Pay window.

5. The green pushpin within the tabs indicate an item is ready to be printed or processed. For example, a pushpin above Orders could indicate that a follow up appointment requires scheduling.

6. Selecting this tab displays Open Orders. Select the order below the patient's name. This will display the order details in the right side of the window. After reviewing the order details, you can schedule the appointment by selecting the double boxes in the upper right hand corner of the QuickPay window. This will minimize the QuickPay window to take you to the iScheduler to schedule the follow-up visit.

7. Once the appointment is scheduled, select the calendar box in the upper, left-hand corner to re-open the QuickPay window

8. Single click on the Processing status to Close the Order

9. Once any follow-up appointments are made and orders are closed, navigate to the Print Queue tab to view all items waiting to be printed. If no additional items need to be printed, navigate back to the Receipt Tab and use the Print Receipt button to print the receipt with the future appointment info.

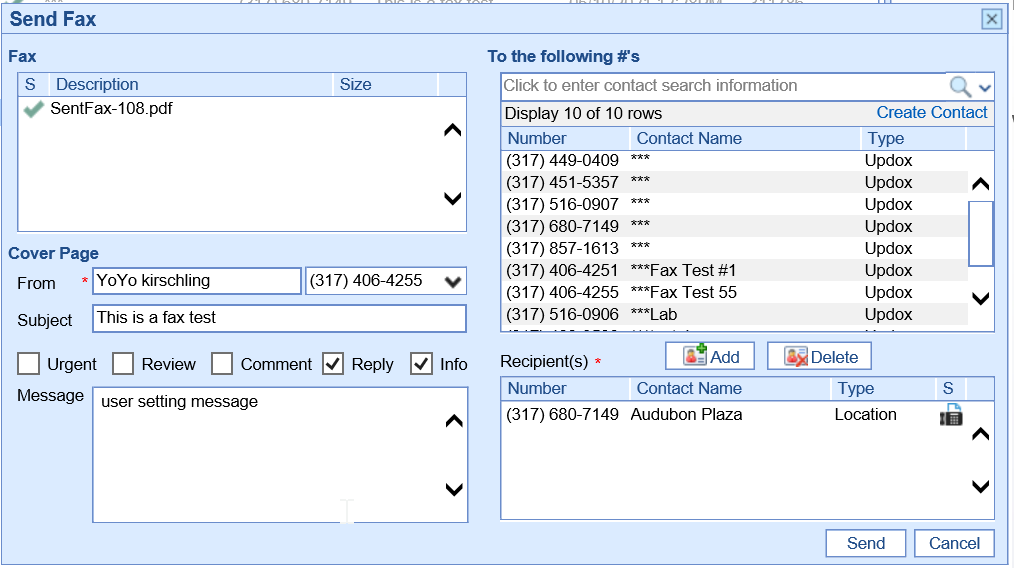
For practices that have configured integrated faxes, you will be able to electronically fax any document that you can print out of the application. Printing documents can occur from nearly any screen in the system.
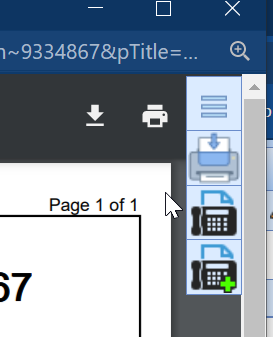
- Select the Print icon by selecting the More button, then select Print.

2. The Print Preview window will appear, select the Fax button. This is found in the upper right-hand corner.
![]()
3. The Send Fax window will display. PCP, Referring and Care Team Members will display as quick add Recipients or you may search for additional Recipients. Select the Recipient, add Subject, Urgent-Review-Comment-Reply-Info option and/or Message, then click Send.

4. To fax a SOAP/Progress Note, click on the Print icon at the top right and then follow steps 2-3 from the Print/Preview screen.

5. To fax a Letter from the Quick Pay window, click on the Print icon and again follow steps 2-3 from the Print/Preview screen.

Most documents are scanned and imported via the eDocuments Portal. Navigate to the eDocuments portal by locating the portals in the lower, left-hand corner of the database.

Scanning Documents
- Search for Patient by clicking on the manila folder to open the search screen. Type in the patient name to view results, then select patient.

- Patient Documents are scanned into the Patient Docs Cabinet. Open the Cabinet, Drawer and then Folder that you want to scan documents to.

- Right click over the Folder to scan a document into that folder.
From the menu, select either:
- Multiscan (SF) to scan a multiple page document as one file.
- Multiscan to scan each page as it’s own unique file.

- The edit window will appear. Begin by creating a Filename.

- Users may wish to add additional data to the document. Click on the following additional fields to add:
- Add a Comment

- Add a Receive Date (Note: This will add the document to the patient's Timeline per the receive date.)

- Press the OK button to scan the document(s). This will launch the PC’s scanner menu.

Importing Documents
To import a document into eDocuments, follow these steps:
- Right-click on the Folder where you want to place the document(s). You must right-click over a folder, not a cabinet or drawer.

- Select the document from your computer and click OK.

The following guide is an overview of the EMR Portal. Users will gain knowledge of the different areas of the EMR portal including setup and some additional helpful tips
To access the EMR, begin by selecting the EMR portal the bottom, left-hand corner of your screen.

Tip: Users can set the EMR as their default screen when logging in to the program by modifying their Default Screen in the User Setup.
Selecting a Schedule
- To view patients on a resource or multiple schedules, click on the pencil to display a list of resources. Select the Pencil Icon to reveal the resource(s) schedule(s). Select the Resources in order to display the appointments scheduled with that Resource.

2. The list of appointments will display in the Office Schedule.

Appointment Display Options
- Select preferences for what is displayed in the Patient List with the various display options.

Open Patient in EMR
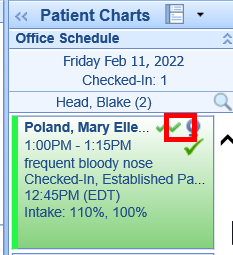
- From the scheduled appointment, select the patient from the schedule. The lime green side bar to the left of the appointment indicates the patient’s chart is currently open.

NOTE: Always open scheduled patients in the EMR from the appointment list. Searching for the patient will not link back to the scheduled appointment for the required SOAP Note or Superbill.
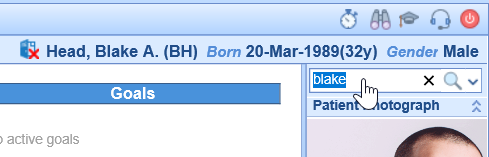
2. To open a patient’s chart that is not on the schedule, search for the patient in the top, right corner of the EMR portal.

Menu Bar
The menu bar across the top of the EMR portal has additional options for navigating and performing tasks in the patient's chart.
Details/History
Toggle between the Timeline Details and History view

Patient Index/Drop down options
Click on icon to open Patient Index or use the drop down for additional menu options

More menu
Print the Patient Facesheet

Patient Display
The patient’s name, DOB and Gender display on the top right of the screen. Simply hover over the name for additional demographic information.

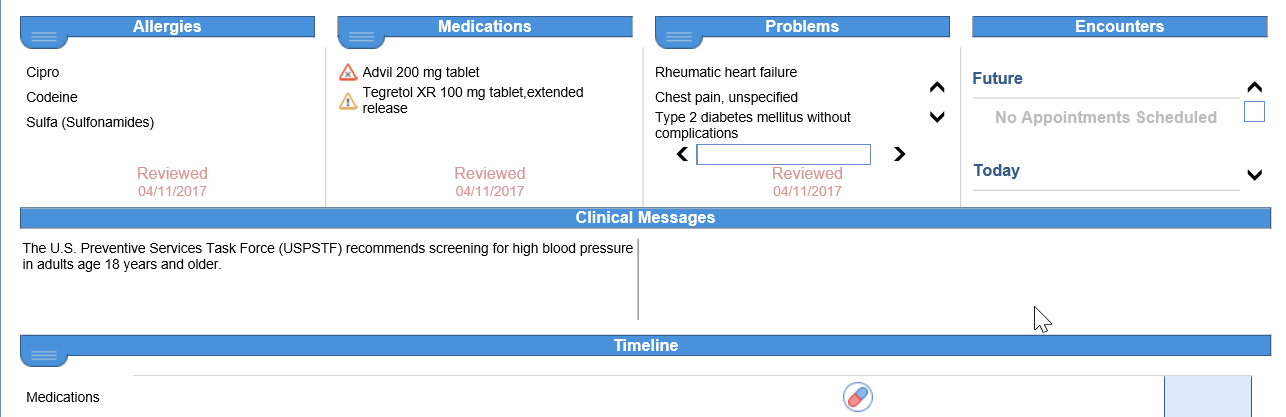
Top Section
Displays Allergies, Medications, Problems and Encounters
- Drop downs
Utilize drop down for Allergies, Medications and Problems to open chart tab or mark as reviewed

- Encounter hyperlink
Double click on encounters to open the appointment list

Clinical Messages
Clinical messages display in this section based on rules/setup

Timeline
The Timeline within the Summary chart tab allows a user to see key data points that have been added to a patient's chart over time. Each clinical marker can be hovered over to see basic information about that new chart time. Once clicked, more details are displayed.

- Hover to display details

- Clipboard
The Clipboard at the bottom left of the Timeline allows users to Reconcile Allergies, Medications and Problems. Keep or Remove items then click Save

- Vitals
To view Vitals Graph/Table, click on the Heart symbol at the bottom left of the timeline

Patient Photograph/Telehealth
This section displays the Patient Photograph. You can also launch a Telehealth session if enrolled.

Patient AMP
The Patient AMP is a quick view of Allergies, Medications, Problems, Vitals and Results

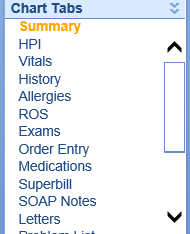
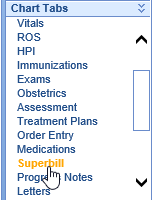
Chart Tabs
Chart Tabs contain templates to document a patient encounter. The list can be customized (see Customize View section) for instructions.

Quick Picks
The Quick Picks tool allows a user to set up custom phrases that can be copy/pasted into any template.

E/M Coding
The E/M Coding optional tool allows a user to calculate E/M code based on new 2021 rules based on MDM (Medical Decision Making) or Time.

Customize View
- Top Section, Timeline and/or Other section view, right click anywhere on the Timeline

Mark or unmark each item you want to view. You can also order each section by moving the up/down arrows

- Chart Tab/AMP view, right click in the Chart Tab area, select Setup Favorites

Select Chart tabs to view as well as select order they display with the up/down arrows, then click Save

- Setup Sections
Right click in the Patient Photograph or Patient AMP area to display Setup Sections option – mark each area to enable and/or display expanded, then click Save

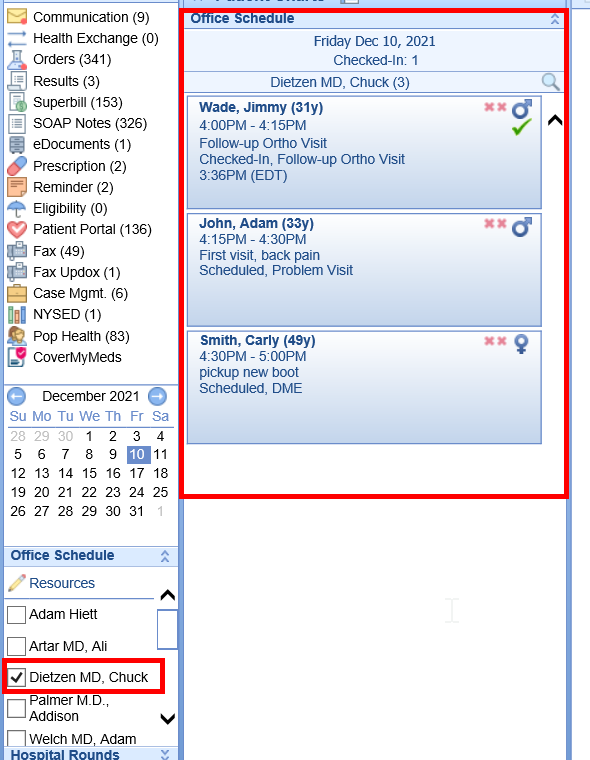
The Office Schedule can be configured in the EMR to display a list of appointments for a specific resource or a group of resources. This allows a user the ability to navigate through a schedule without leaving the EMR portal.
Navigating to the Office Schedule
- From the EMR Portal, the Office Schedule will be displayed on the far, left-hand side under the calendar
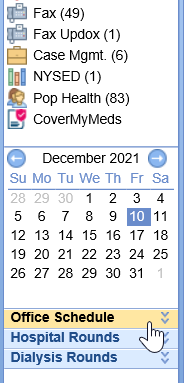

Note: Applicable practices/users may also have access to the Hospital Rounds and Dialysis Rounds schedule.
Setting up the Office Schedule
- Select the Office Schedule bluebar to reveal the settings within the Office Schedule
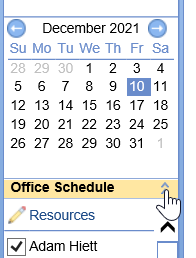
- Using the Pencil icon, select the resources that you wish to display in the Office Schedule settings

- Select the resources you wish to include in your Office Schedule and select Save
- Resources may be selected or deselected to display their schedule within the Office Schedule panel


Schedule Display Settings
| Setting Name | Description |
Disp. Chief Complaint | Displays the chief complaint for the scheduled appointment |
Disp. Appointment Status | Displays the appointment status |
Disp. Room Status | Displays the Room Assignment and Status |
Only Checked-In | Displays on actively checked-in patients |
Time Checked-In | Displays the time the appointment was checked-in |
Superbill/SOAP Status | Displays the Sign-Off status of the Superbill and SOAP Note Note: First icon represents Superbill, second icon represents SOAP Note. Red X's represent incomplete and green checkmarks represent complete. Note: First icon represents Superbill, second icon represents SOAP Note. Red X's represent incomplete and green checkmarks represent complete. |
Auto Refresh | Refreshes the EMR Office Schedule every minute |
Intake Status | Displays the appointment intake status Note: First percentage represents the Total overall intake, Second percentage represents only the require fields. |
For even more control, review the EMR Primary Appointment Color settings. Users may also choose to include EMR Secondary Appointment Color settings.

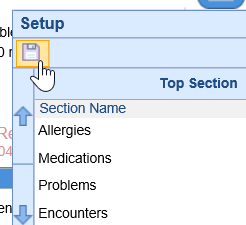
The Summary Chart Tab in the EMR may be configured to a user's desired preferences. This gives a user a custom experience when navigating through a patient's chart in the EMR.
Summary Tiles
The Summary Tiles can be managed to include or/and exclude additional data when viewing a patient's chart.
- Open a patient in the EMR (either from a scheduled appointment, or by searching for a patient)
- From the Summary chart tab, right click over the middle of the tiles in the center of the screen
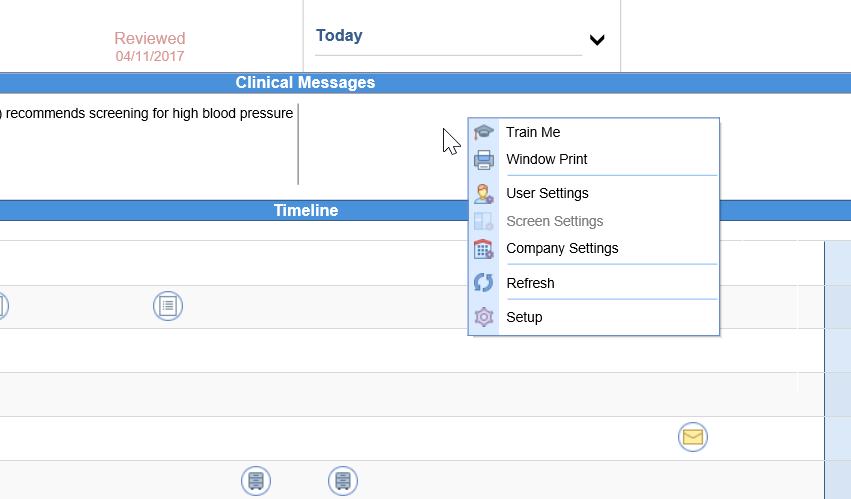
- Navigate to Setup
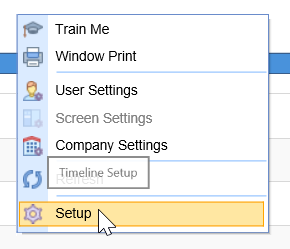
- Choose to Enable to Disable tiles displayed in the Top Section
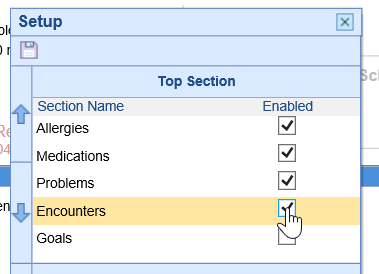
- Select Save

- The tiles at the top of the screen will update with your selections


Timeline Display
Users may choose to update the order of items that are display within the Timeline on the Summary screen.
- Open a patient in the EMR (either from a scheduled appointment, or by searching for a patient)
- From the Summary chart tab, right click over the middle of the tiles in the center of the screen
- Navigate to Setup
- Choose to enable or disable sections that are displayed on the Timeline
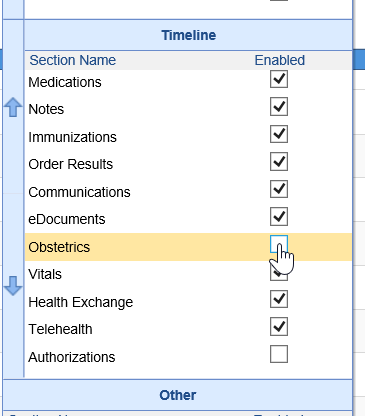
- Rearrange the order of the sections by single-selecting an item and using the "up" and "down" arrows to organize the order of items
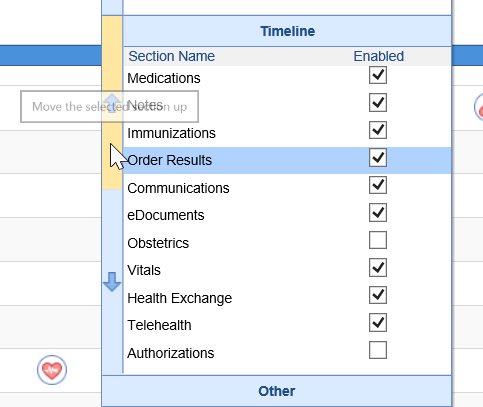
- Select Save
- The Timeline will update with your selections


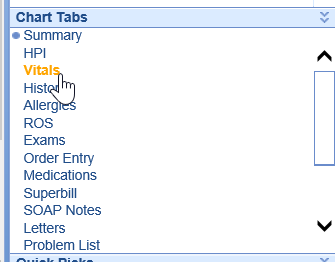
Reorganize Chart Tabs
Users are encouraged to reorganize the order in which the chart tabs are displayed. This gives the user a more customized experience in the system.
- In the lower, right-hand corner of the screen, right-click over the Chart Tabs area
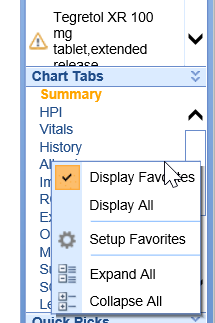
- Select Setup Favorites
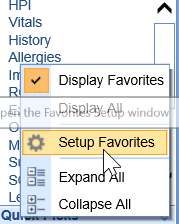
- Choose to enable or disable Chart Tabs that are displayed on the list
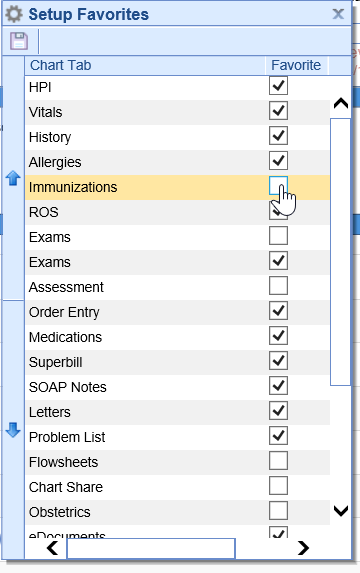
- Rearrange the order of the Chart Tabs by single-selecting a Chart Tab and using the "up" and "down" arrows to organize the order of Chart Tabs
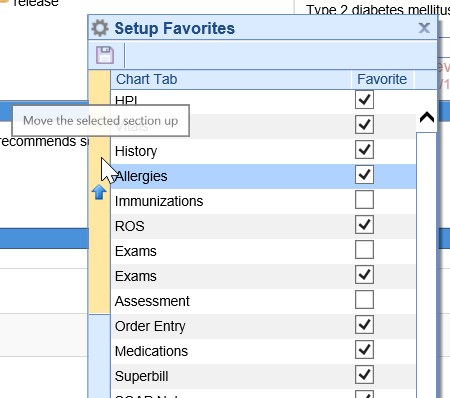
- Select Save
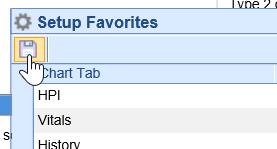
- The Chart Tab list will update with your selections


The Vitals Chart Tab allows a user to document various vitals signs for a patient encounter. The Vitals screen can be viewed using either the English or the Metric units. Vitals can be entered manually by visit or can be copied forward from a previous visit.
Adding New Vitals
- Begin by navigating to the Vitals Chart Tab
- Complete fields by simply entering numeric values for each desired field
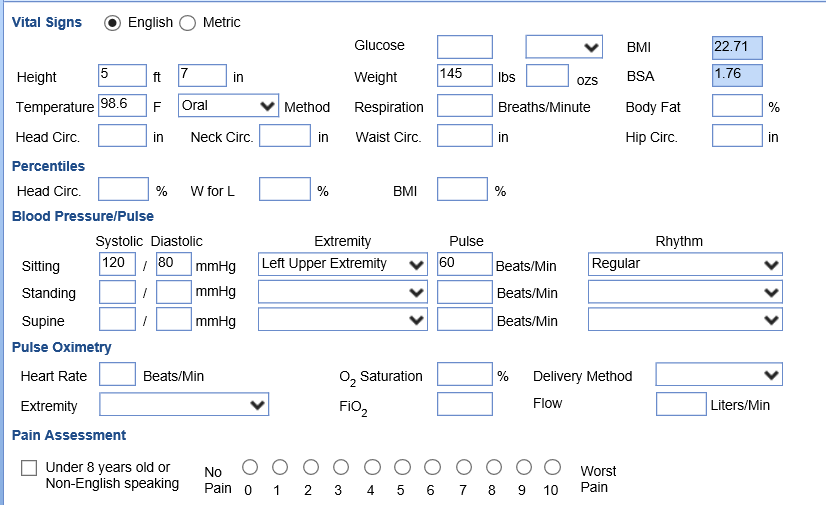
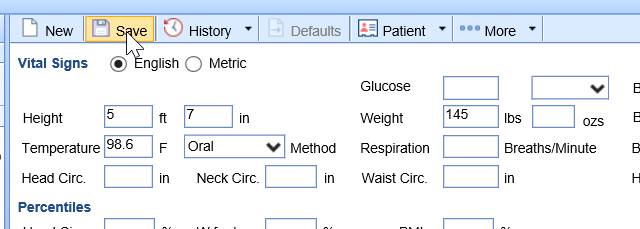
- Select Save or navigate to a new chart tab to save all values


Note: By entering the patient's height and weight, the BMI will automatically calculate and display in the Patient AMP.

Viewing Previous Vitals
Users may need to review previous vitals records before documenting new vitals. They may also choose to graph records to display trends in their completed SOAP Note.
- From the Vital Signs entry screen, navigate to the History button in the toolbar
- The history screen displays previously saved Vitals records


History of Present Illness (HPI) chart tab is used to document any development of the patients’ present illness that was discussed during an office visit. It is an encounter-based chart tab where data differs from encounter to encounter. If the data does happen to be the same or similar there is an option to copy forward from the previous encounter. HPI templates vary based on the specialty of the practice.
Access HPI Chart Tab
- Open patient in EMR from scheduled visit. Select HPI Chart Tab

- Select HPI Template from drop down if more than 1 template

Pro Tip: Users may save a default template that automatically loads in the User Setup
- If your practice has multiple HPI templates, use drop down to access additional HPI templates

Menu Bar
- New- Select the New icon to document a new or additional HPI.

- Select the Save icon to save the current HPI

- History/Details icon. Toggles between current template to history of past templates for that patient


- The Copy icon is available when viewing the History. Click Copy to copy selected HPI to current template

- Patient Index/Patient Drop Down
Easy access to these menu items from the HPI Chart Tab

- …More print
Select …More/Print to print the HPI


- …More Default Setup
Select to create a Default template

Using Default Templates
To load a saved Default for an HPI template, click on the Defaults icon which will display a list of default options, select the default to load

Merge Intake
Intake Templates can be built for a patient to complete on the My Medical Locker that merge to an HPI templates. If there is intake data to merge, this will be indicated by a blue dot. Select the HPI chart tab, and select the items to merge

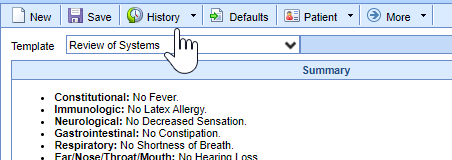
Add a new ROS
- Once in a patient's chart, select the ROS chart tab.

- The ROS screen will load.

- Then you can either click all of the necessary boxes for this patient OR you can click the Defaults button. This will check all the normal boxes and then you can edit as needed.

- Select either the [Base] Practice Defaults or one of the custom user default templates.

- Document the patient's Review of Systems as appropriate.

- Once you have it completed, click Save.

Edit an Existing ROS
- Once in a patient's chart, select the ROS chart tab.


- Click on the History button from the menu bar at the top of the screen.
- Double click on the ROS entry that you want to edit.


- The existing ROS will load, make the necessary changes.
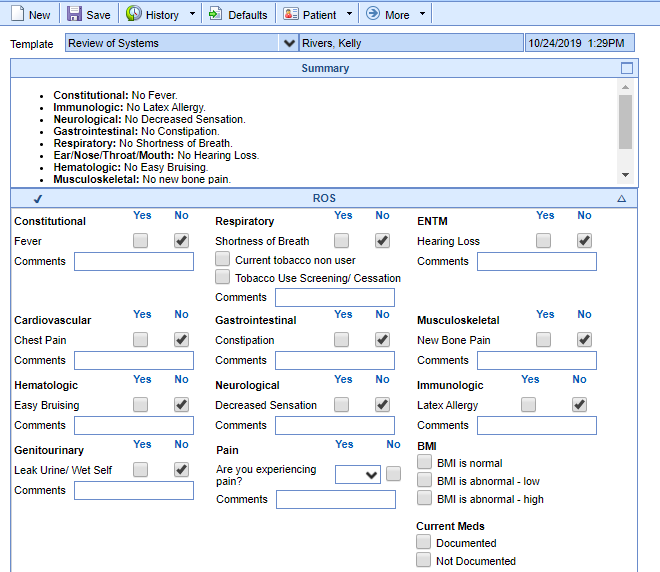

- Press Save when you are done adding all changes.

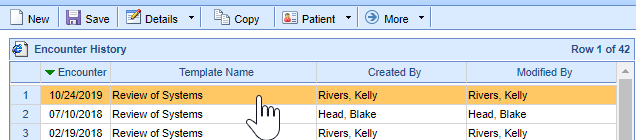
Copy an ROS from a Previous Encounter
- Once in a patient's chart, select the ROS chart tab.


- Click on the History button from the menu bar at the top of the screen.

- Click once on the ROS entry that you want to copy forward.


- Then select Copy from the menu bar.
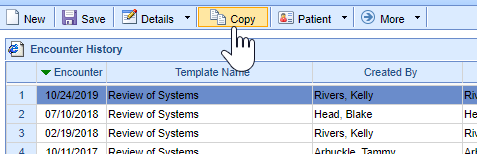

- The previous encounter ROS will load, make the necessary changes.

- Press Save when you are done adding all changes.

User Template Defaults
Users can setup and use template default values for HPI, ROS, Exam, Assessment, Treatment Plan and Order Fulfillment templates
Creating Default Templates
You can create a Default Template following these steps:
- Click on the EMR Portal

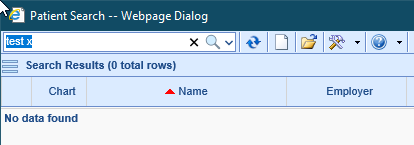
- Open a test patient’s chart using the Patient Search

- Click on the Chart Tab to set template defaults for, i.e. Exam.

- Select the Template to set default values for.

- Select the More menu and then Default Setup option

- Press the New button.

- Enter a Name for the set of defaults

- Check the Only for Me checkbox to keep the defaults private to your user id.

- Go through the template and set the default value.

- Press the Save button.
Pro Tip: You can create multiple defaults for the same template.
Using Default Templates
Default Templates that are saved can be loaded in the EMR utilizing the following steps:
- Load the template that has saved defaults and click the Defaults tab for a list of saved User Defaults. If there is only one default for that template, simply click the Defaults tab

- The items/clicks for that User Default will load into the template

- To clear the default that was loaded, select Clear Template and this will unmark any checked boxes or notes that were saved as a part of the User Default

Pro Tip: You can edit a saved Template Default by clicking the More menu and then Default Setup. Select the default to change, make changes and click Save.
Surgery Ordering Overview
A surgical practice needs an effective workflow for managing the ordering and scheduling of surgeries and procedures. This guide will walk you through how to place an order for a surgery or procedure as well as saving default orders.
1. Select Order Item
- Navigate to Orders Chart Tab, Click on Order Entry

- Select the Order Template to display the order options. Select the blue bar with the Surgery Orders (this will vary by practice)

- Select the Surgery or Procedure

- Ordered by
It is important that the Ordered by is the provider ordering the surgery or procedure. Click on the magnifying glass to change the Ordered By

Tip: The Ordered By can be defaulted to a provider or another user in the User Setup
2. Summary Edit
- Click on the Order – this will open the Summary Item Edit Window. The Order Route and Processor are set by default.

- Assign ICD Code (this can be also done when saving the order)

3. Order Fulfillment
- An order for surgery or procedure will typically have an Order Fulfillment attached. This allows users to enter additional details for scheduling. Enter details for the surgery/procedure, then click Okay

4. Default Setup
This tool allows users to save options that are selected in the fulfillment
- Click on Default Setup (bottom of fulfillment)

- Click New to enter name and proceed to enter details for that surgery default, then click Save
- Load Default- click on Defaults for a list of saved defaults, select the default to load.

5. Save Order
- When all details for the surgery/procedure are complete, click Save.
- Assignment- Associate diagnosis codes to the procedure, then click Save

This guide will demonstrate how surgery scheduling staff can process an order once it has been placed in the EMR.
Access Order
Orders can be accessed for processing either from the EMR/Orders History or My Task Orders
1. EMR/Orders History Access
- Click on History from Orders Template area

- Click on Orders Tab to see a list of patient’s orders.

2. My Task Orders Access
- Navigate to the My Tasks in the EMR and click on Orders. This will display a list of orders in which the current user is assigned as the process or processor group

- Sort- based on workflow- select the Arranged By to sort orders (i.e. if you schedule for a particular provider, you can arrange by “Ordered By” to see that provider’s open orders to be processed)

Processing Orders
- Order Processing window can be opened from EMR or My Task Orders
- If accessing order from EMR, click on the yellow arrow to open the Order Processing screen

- If accessing order from My Task, click on order, the Processing screen will display on the right

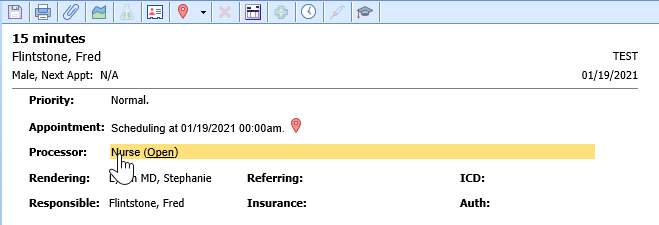
2. Processing options
- Order Priority – click on the word Priority to change priority, i.e. stat

- Appointment: this will display current appointment information
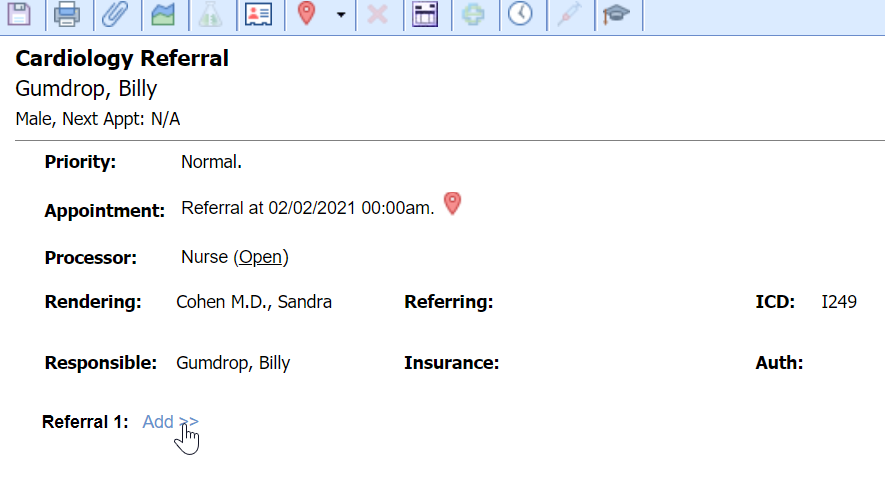
- Processor: The processor is set as default, i.e. Office Staff. The processor can be changed/re-routed by clicking on current Processor.
- This section also displays the status (open). Click on the words “open” to change to close.
- Rendering: The rendering provider for the order. This can be changed by clicking the name and searching for provider/user. Once the Requisition has been printed, this cannot be changed.
- Referring: This is the patient’s referring provider in the Patient Setup.
- ICD: The ICD(s) associated to order. Based on Order type, this field can be set to required during the implementation process.
- Responsible: This pulls from the Patient Setup
- Insurance/Authorization: Enter authorization information, Insurance Coverage and/or Billing Type for the order

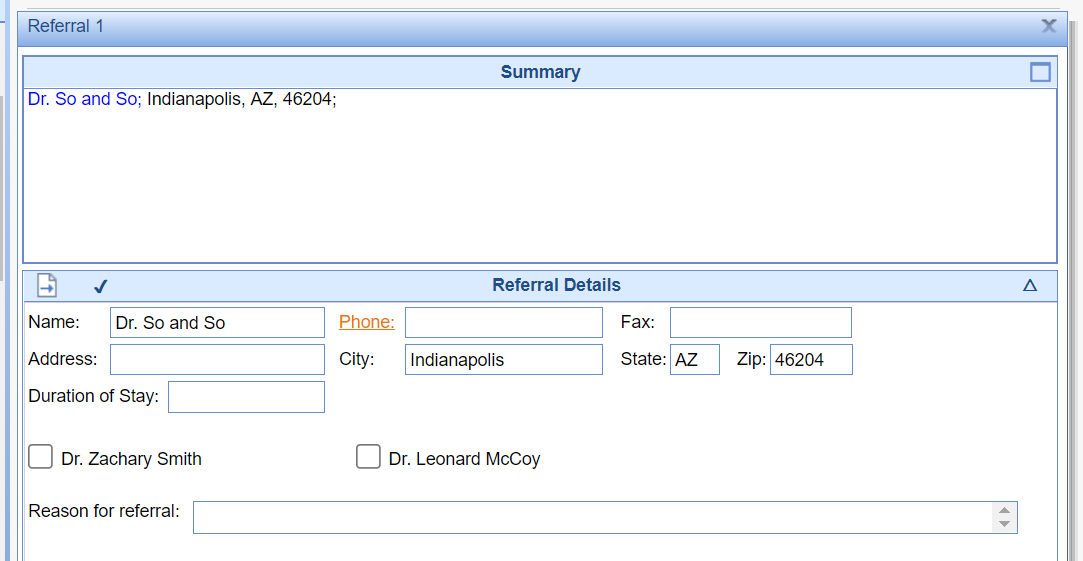
- Scheduling details/fulfillment: Click to review/edit/update details for the surgery/procedure.

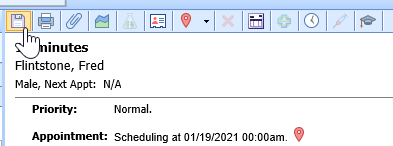
3. Save Order
- Click the Save button if any changes have been made to the Order
4. Print Requisition
- Click the Print icon to print an Order Requisition, then OK in the Create Requisition screen

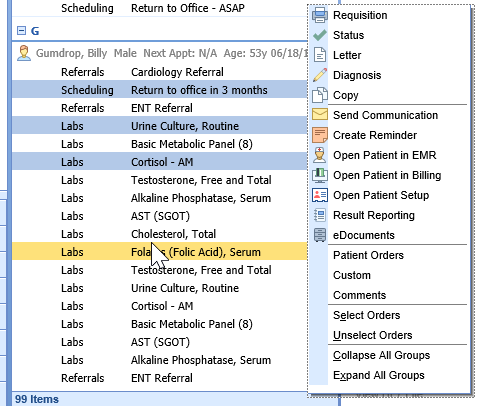
5. Right Click options

- Requisition – prints requisition
- Status – change status of order, i.e. closed
- Letter – allows user to print a letter, i.e. Consent Form

- Diagnosis – update or add diagnosis to the order
- Copy – creates a copy of the order with options to copy values from diagnosis and/or fulfillment details


- Send Communication – brings up New Message window to send a communication regarding the order
- Create Reminder – brings up Reminder window to create a reminder

- Open Patient in EMR – quickly open patient in EMR portal
- Open Patient in Billing – quickly open patient in Billing portal
- eDocuments – open patient’s eDocuments
- Patient Orders – gives list of current patient selected orders
- Comments – opens Patient Comments window to quickly enter patient comment/alert
- Select Orders – highlights all orders in group, allowing for right click options to be applied to all orders highlighted

- Unselect Orders – unselects highlighted orders
- Collapse All Groups – collapses all groups, click + to open one group

- Expand All Groups – re-expands groups if collapsed
Documenting Pharmacy
Follow these steps to search for the patient's desired pharmacy when creating electronic prescriptions:
- Create a new prescription by either performing a drug search or by selecting a prescription favorite.
2. Click on the Pharmacy field.

3. The application will display the patient's Preferred Pharmacies, recently used pharmacies for the patient, pharmacies with the same zip code at the patient's home address, and office favorite pharmacies. Click on a pharmacy or press the Search button to find a different pharmacy.

4. Type in the name, address and/or zip code of the pharmacy you're searching for (e.g. CVS 46060 or CVS lakeview or CVS Noblesville)

5. Single select the Pharmacy you're searching for to view the pharmacy's details and map
6. Double-select the Pharmacy you're searching for to use it for the prescription.

Note: To search for a pharmacy out of your state, de-select the State checkbox next to the Pharmacy Search field.

To search for a Mail Order pharmacy, de-select the State checkbox select the Mail checkbox.
Patient Preferred Pharmacy
Patients have the ability to select their Preferred Pharmacy on the My Medical Locker- based on practice setup.
To view the patient’s preferred pharmacy outside of the Medications Chart Tab, open the Patient Index and use the …More menu list and select Preferred Pharmacy

You can view the patient’s preferred pharmacy. In addition, you can add a new or additional preferred pharmacy by searching for pharmacy and clicking on Add

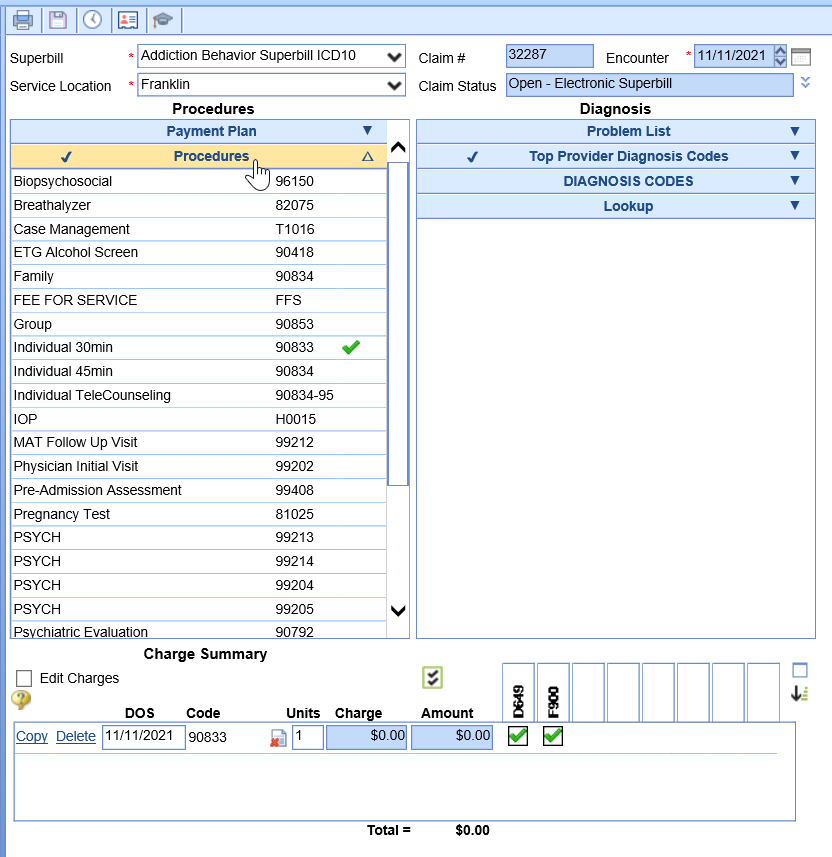
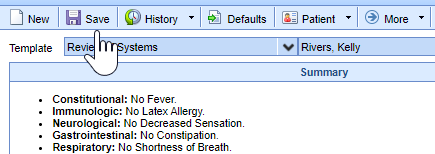
Superbill
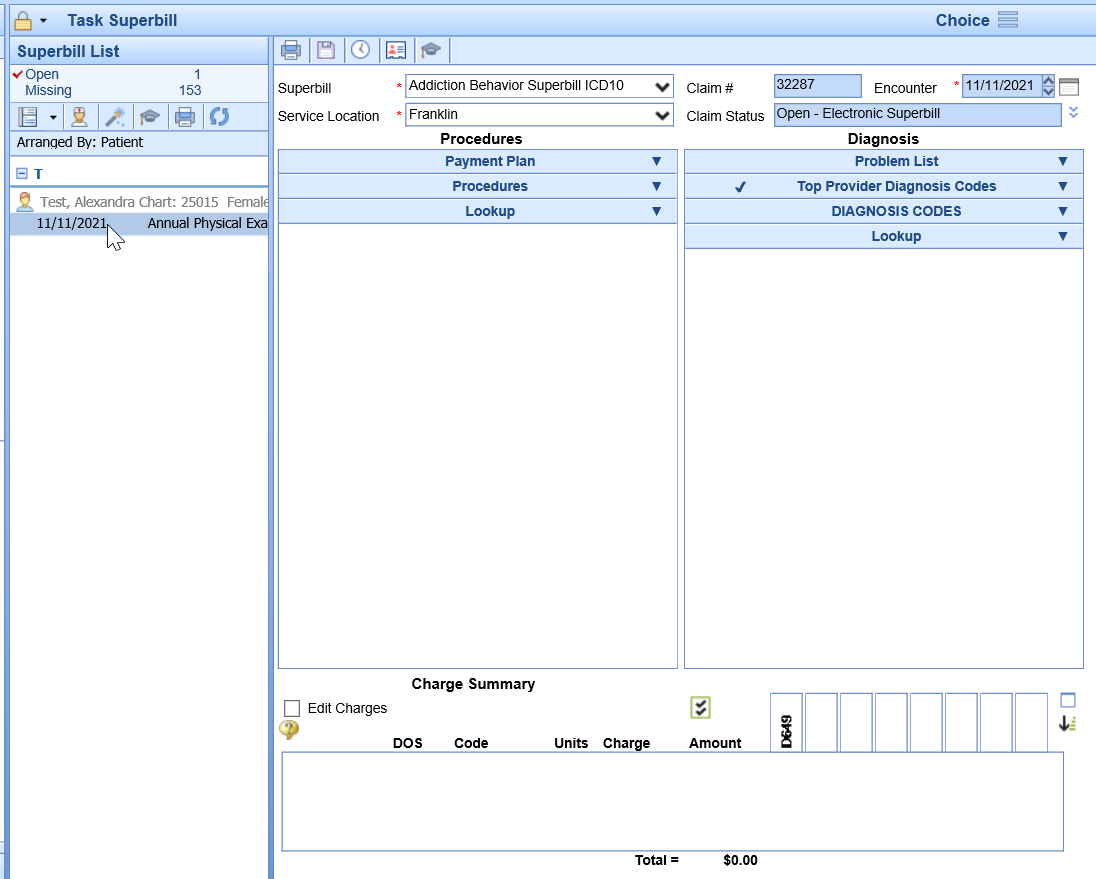
The Superbill Chart Tab allows providers to create claims at the time of service to eliminate lost charge tickets and to promote faster payment. Follow these steps to complete a Superbill from the EMR.
- Open patient from EMR, click on Superbill Chart Tab.
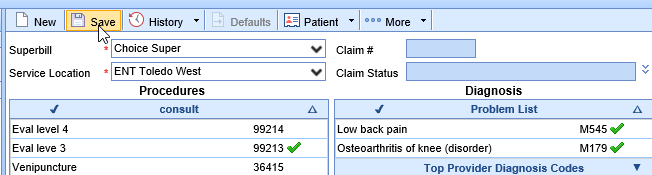
- Select the Superbill and Service Location from the drop down menu
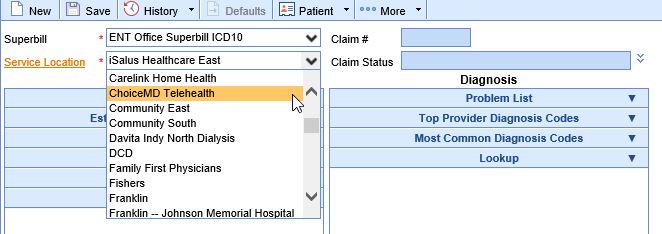
A default Superbill and Location can be assigned to a Resource to load as default
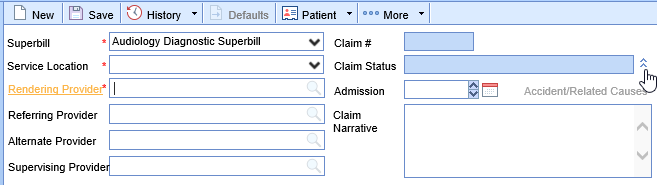
- Edit Service Location, Rendering Provider, Service Provider, Alternate Provider and/or Supervising Provider, click on the Claim Status dropdown. You can also enter an Admission date and/or Claim Narrative
- Add Procedure codes
- From blue bars- open the appropriate blue bar, select the Procedure code(s). Click on appropriate code(s) for the visit.

- From Lookup- search for code via Lookup- enter code in search and select

- From blue bars- open the appropriate blue bar, select the Procedure code(s). Click on appropriate code(s) for the visit.
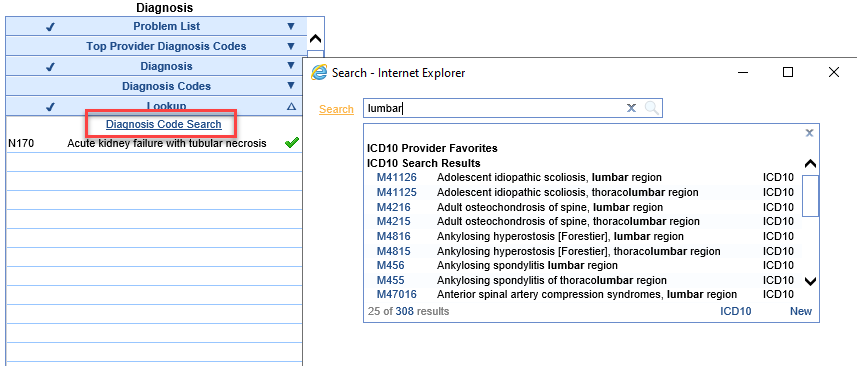
- Add Diagnosis codes
- From Problem List
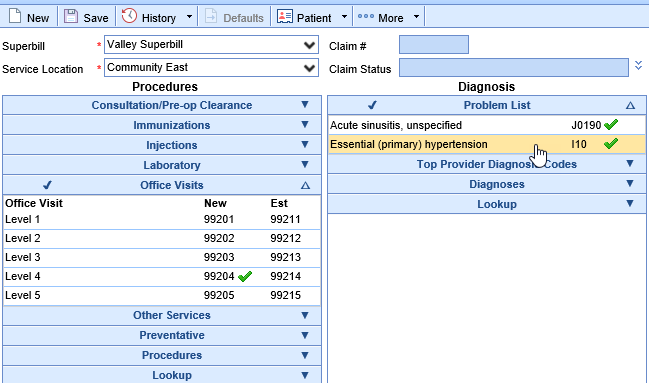
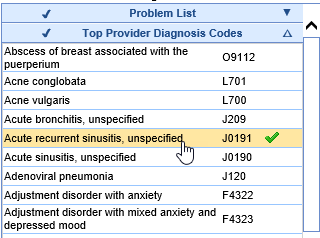
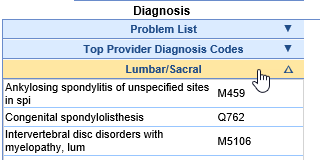
- From Top Provider Diagnosis Codes (populates automatically based on usage)
- Custom blue bars (based on practice preference- you may have custom list of diagnosis codes to select for superbill)
- Lookup: Brings up a Diagnosis Code Search window - search by code or words
- From Problem List


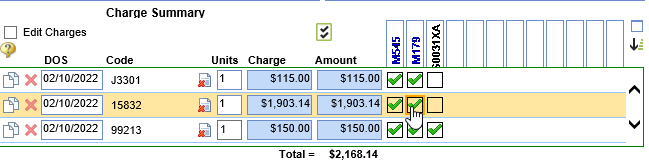
A blue diagnosis code is one on the patient’s problem list. A black diagnosis code is not on the patient’s problem list. Clicking a black diagnosis code will turn it red and push the diagnosis code to the patient’s problem list when the superbill is saved.
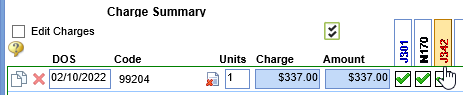
- Add modifiers, click the icon that looks like a piece of paper with a red X:
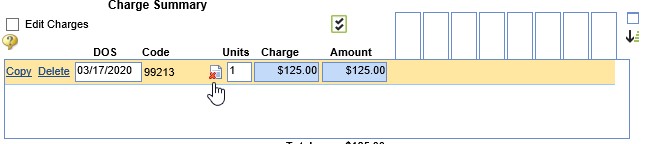
- Type in the appropriate modifier or select one of the used modifiers and click the green arrow to push it over to the appropriate spot. Click OK.
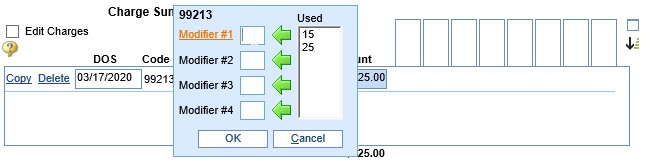
- After a modifier has been added, the piece of paper icon will show with a green plus sign to signify that there is a modifier being used.
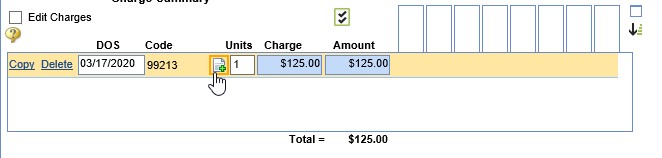
- Type in the appropriate modifier or select one of the used modifiers and click the green arrow to push it over to the appropriate spot. Click OK.
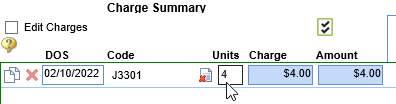
- Add Units- click on the Units box to edit units for the CPT code (daults to 1 unit)
- Associate the procedure codes to the appropriate diagnosis codes
- When all codes are entered, click Save
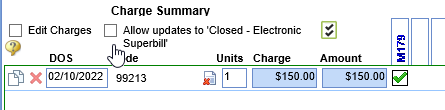
- After Superbill is saved, the Claim Status = Closed Electronic Superbill
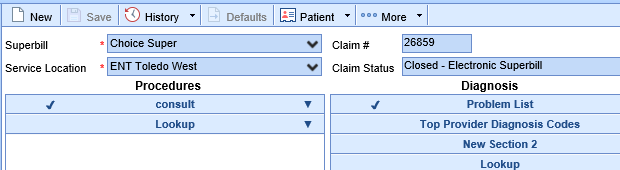
- To make edits to a Closed Electronic Superbill, select Allow updates to 'Closed-Electronic Superbill'- make necessary updates and click Save


The SOAP Note chart tab is a dynamic chart tab in which data pulls for various chart tabs to create a formal visit note. Users may have various SOAP Note letters to choose from when creating a SOAP Note.
Navigating to the SOAP Note Chart Tab
- Begin by documenting all aspects of the visit. (For example, History, Vitals, Allergies, ROS, HPI, Exams, Problem List, Medications, Orders, Treatment Plan, Superbill, etc)

- Navigate to the SOAP Notes chart tab, the system will generate a SOAP Note based on the user's default SOAP Note letter.
- Users may choose to change the SOAP Note letter by selecting a new template from the first dropdown.
 In most cases, the SOAP Note type will generate on it's own based on the SOAP Note letter template settings.
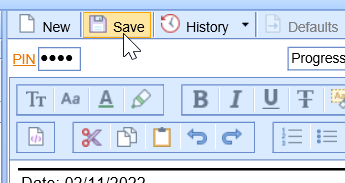
- Once the user has reviewed the note and is ready to sign-off, navigate to the PIN box and enter their unique 4-digit pin. Click Save.
- For scheduled visits, a signed SOAP Note will be indicated using a green check mark on the appointment.


 In most cases, the SOAP Note type will generate on it's own based on the SOAP Note letter template settings.


NOTE: Practices may use various terminology when labeling the final office note. (I.E. Progress Note, Visit Note, SOAP Note, etc)
Billing Overview

The Billing Dashboard is the landing page of the Billing portal. The Billing Dashboard consist of 3 main areas. Today’s Activity, Revenue Cycle Wheel, and Key Performance Indicators. Below we will talk about each of these areas and how its info is to be utilized.
- Today’s Activity: This area will show you the numbers for today’s date of service allowing you to get a glimpse of what is to be expected for your day’s totals. This area is automatically updated to the current date of service.
- Revenue Cycle Wheel: This area acts as a glance on the claims cycle and also doubles as individual users queues when you click the word Revenue Cycle based on setup. Each tile within the Revenue Cycle wheel will allow you to dive in to view what the numbers consist of but also allowing you to bring up the applicable data by hovering over it and clicking the magnifying glass. The Revenue Cycle wheel is essentially where you will initiate your day by clicking on the applicable tile you will be working on a diving into the perspective data you need, whether reviewing and submitting claims, working rejected and denied claims, posting payments, or working on your practice’s aging. The Revenue Cycle wheel consists of 5 tiles.
- Prepare: This tile will show you Missing claims (patients that are checked in/out but no superbill has been documented), Missing Data claims (claims that are missing crucial data to be processed), Ready for Processing Claims (claims that are ready to be reviewed to be submitted) and Claim Issues (claims that have NDC Errors or that fall into a Global Period Days).
- Submit: This tile will consist of claim batches that are either pending to be submitted (Pending Submission), claim batches that are pending to be acknowledged (Response Submission), or claim batches to which all claims have rejected (Error Submissions).
- Manage: This tile will consist of your Rejected and Denied claims, claims that are put into a Biller Defined status, and claims with No response with 7 days (default is 7 days but can be changed per user).
- Post: This tile will consist of your payments pending to be posted. This includes ERA deposits, EOB Deposits, Statement Deposits, and Receipts. They will be listed as Deposit Errors, New Deposits, Receipts, and Posting Errors (some may not show if you do not have any). The Deposit Errors will consist of ERA Deposits with a PLA (Provider Level Adjustment) Adjustment which will need to be looked at to resolve it. The New Deposits will consist of any ERA Deposits, EOB Deposits, and Statement Deposits that have not been posted yet. The Receipts will consist of Error Receipts (receipts that the system has not been able to auto post which require a user to post them). The Posting Errors will consist of claims that have been sent to posting but they have a claim level error which will need to be looked at to resolve it.
- Collect: This tile will consist of your practice’s aging. This will include both insurance and patient aging. By expanding the each aging you will be able to view the aging broken down by aging bucket (0-30 days, 31-60 days, 61-90 days…..)
- Key Performance Indicators (KPI): This area will show you a line graph for a 90 days period dependent on the options you have selected (checkboxes on the left). The options to select to view the data will be a user setting and users will be able to look at the data that is the most pertinent to them. By clicking the jumpbox next to the KPI header you can view additional options to select from and also alter the time frame to view the line graph for.
Entering a New Patient from Billing Portal
The below will guide will walk you through how to create a patient from the Billing Query window in the instance you are manually entering a claim and the patient is not yet in the database.
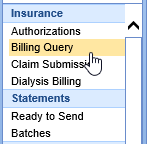
- In the Billing portal select the Billing Query
- On the Billing Query toolbar select the New Options drop down and click Claim.<\li>

- Enter patient’s last name, first name, or date of birth in the textbox to search for the patient. You should always search for the patient first before adding a new patient even if you are almost positive the patient is not in your database.
- Once confirmed the patient does not exist in the database click the New (white sheet of paper) icon.
- In the Patient Setup window complete the patient’s info (fields with a red asterisk are required. The fields that are required for billing are; First Name, Last Name, Address 1, City, State, Zip, DOB, Signature checkbox, Signature Date, Gender, Home phone number, and Responsible Party checkbox "if same as patient"). Click Save and proceed to the insurance tab.

- In the Insurance tab complete the Guarantor section (if patient is the policy holder select Same as Patient to populate the patient demographics. If the policy holder is a spouse or parent select Individual, click Populate Patient information to bring over the address and complete the remainder of the section). Complete the Insurance Policy section by entering a Start Date, Payer, Insured ID, Copay (if applicable), and Group Name and Policy # (if applicable). Click Save. If patient has a secondary insurance click New at the top and repeat these steps to document the secondary insurance. If secondary insurance is not applicable proceed to any additional tabs as applicable (Responsible Party tab if the Responsible Party Same as Patient was not checked in the Demographics tab).


Entering a New Claim from Billing Portal
The below will guide will walk you through how to create a claim from the Billing Query window in the instance you are manually entering a claim.
- In the Billing portal select the Billing Query window.

- On the Billing Query toolbar select the New Options drop down and click Claim.

- Enter patient’s last name, first name, or date of birth in the textbox to search for the patient.
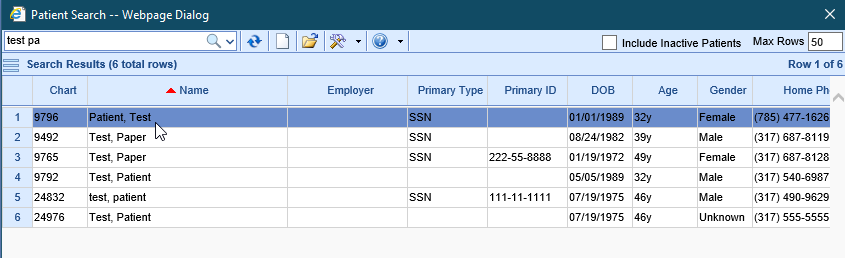
- Double click on the patient’s name to open a new claim window.
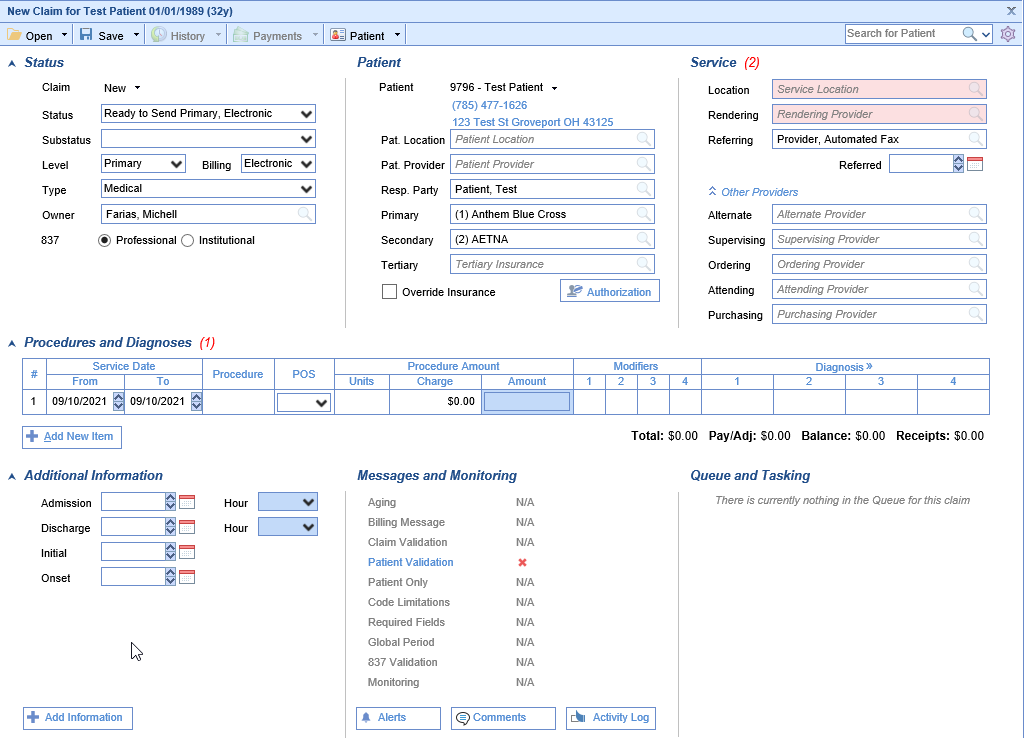
- In the new claim window complete the necessary claim info.


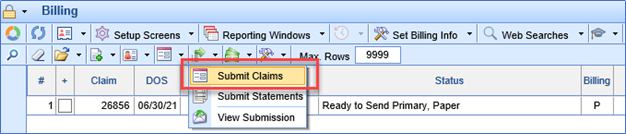
Workflow: Claim Submission Manual
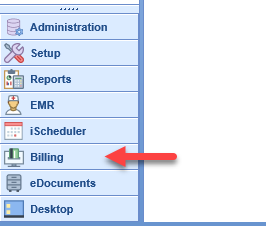
Step 1: Click on Billing

Step 2: Go to the prepare area of the Revenue Wheel.

- Ready for Processing - Claims that are currently ready to be sent out

Step 3: Click
on the Magnifying glass to go into the Closed Electronic Superbill billing query queue.

Step 4: This step assumes all coding has been completed Refer to Coding best practices for this portion. Click and choose the claims you wish to submit manually. You may check and uncheck the whole queue by clicking the plus sign on the second column down or you can check the claims one by one for processing.

Step 5. Once all claims are chosen then it is time to submit the batch. Navigate to the second tool bar and choose the submission options tool (green arrow pointing to the right) click the down arrow next to this tool and click submit claims.

Step 6 : the prepare back opens up click ok

Click ok again:

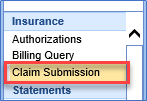
Step 7:
Navigate to Claim Submission:

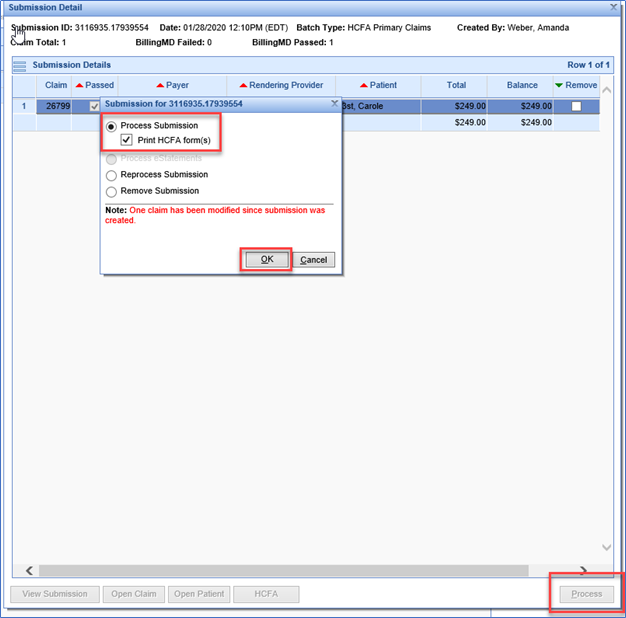
Step 8: find the batch you created:

Step 9 : Click process:

Step 10.
Click OK

Your Submission is being processed

Claim Submission Automated
Here are the steps for turning on the new automatic claims processing functionality. There are two parts to it:
- Setting a status to be included
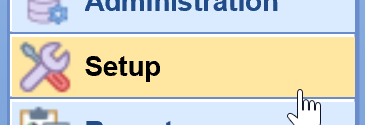
i.Go to Setup:
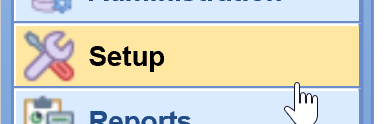
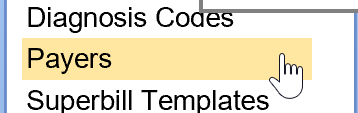
ii.Payers:
iii.Window Settings (gear)
iv.Go to Setup: Claim Status
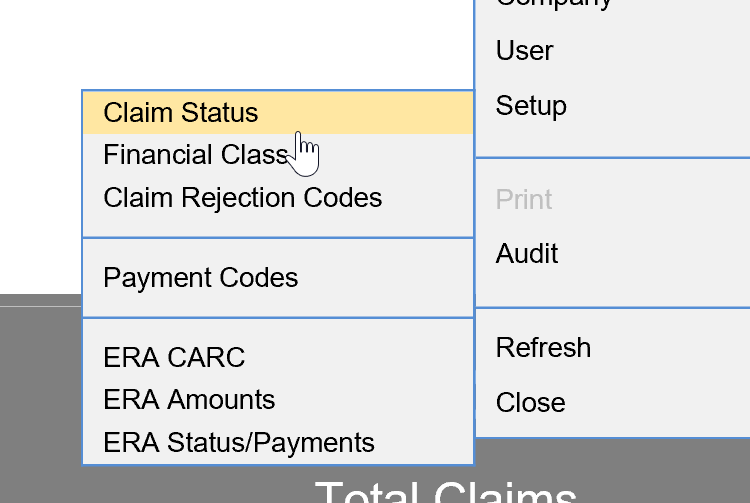
v.Select one of the Ready to Send statuses (Primary/Secondary/Tertiary), either paper or electronic
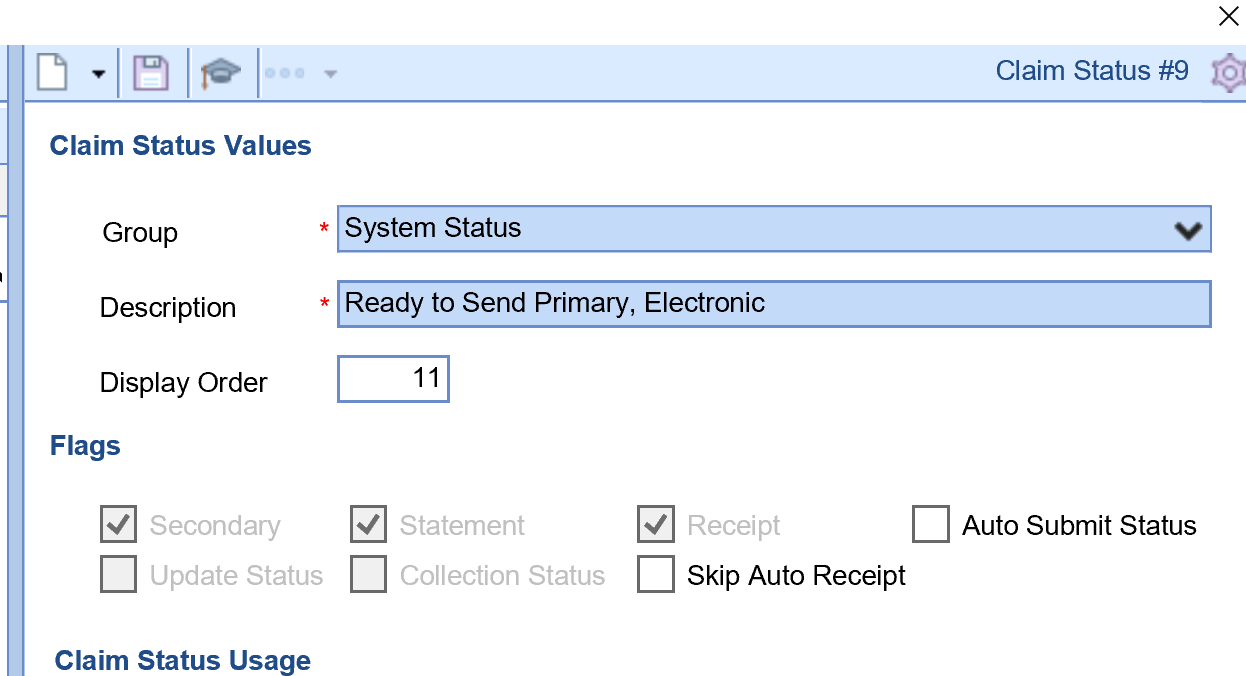
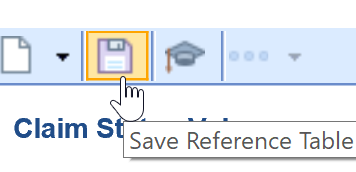
vi.Click the box marked Auto Submit Status

vii.Save
viii.Repeat for as many statuses as need to be set up. Only the Ready to Send statuses are available.
- Turning on the time for claims to be batched/submitted
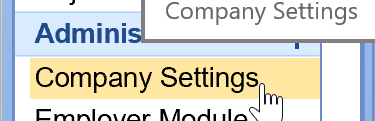
- Go to Setup:
- Turning on the time for claims to be batched/submitted
- Company Settings (or click the binoculars)
- Use 'auto' as your search keyword
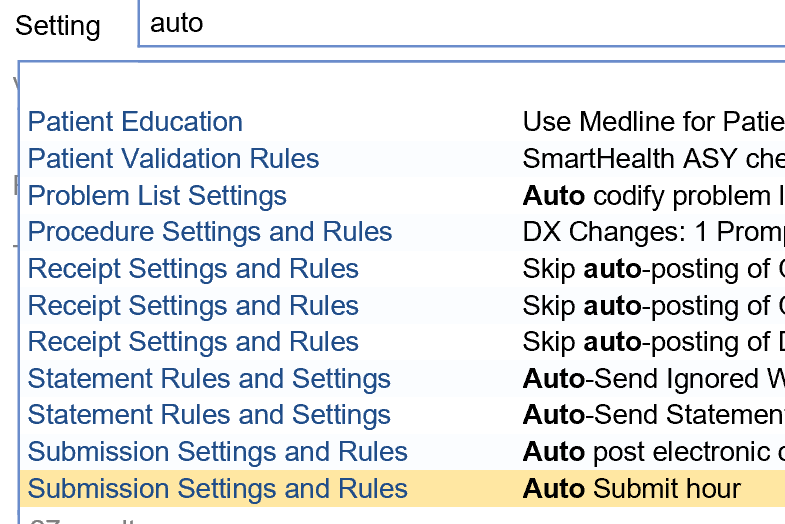
- Select the setting Auto Submit hour
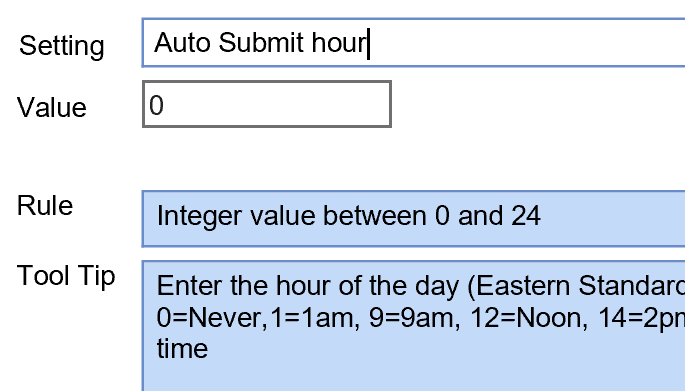
- Set a time using the one or two digit number equal to the time on the 24 hour clock - all times are Eastern Time
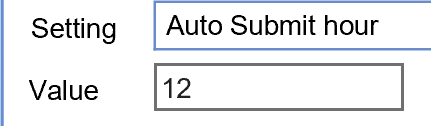
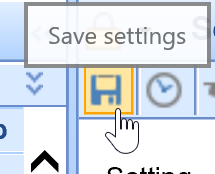
- Save
NOTE: The clearinghouse pickup time is 8 PM (Hour 20) Eastern / 5 PM Pacific for claims to be forwarded the same business day. If the Auto Submit hour is set greater than that, the claims will not be picked up by the clearinghouse until the next business day.


To Identify EStatement deposits from Pay Simple
If you are specifically just looking for the eStatement payments, then you can also click on the More button in Deposits and select Statement ePayments. Set a reporting date and then refresh to get the list.
Steps
- Billing Portal

2. Deposits

3. More

4. Select EPayments

5. Choose dates

6. Refresh the list

You can also search for Statement deposits and look at the check/trace id. The eStatement payments will display CC information instead of a true check number.
7. Go to the billing portal.

8. Click on Deposits

9. Click on Advanced search


10. Search for the trace ID

Please also note that in reports the payer is going to be the responsible party from the statement.
Solution:
If the claim was initially sent out electronically, it can be printed out as a paper claim. But the following steps will need to be taken.
- Locate the claim that needs to be printed. Change the Claim to Ready to Send Primary, Secondary, Etc, Paper

- Create the Claim batch by Submitting Claims.
- Go to Claim Submission and locate your claim batch.
- Select your Claim batch, hit Process and select Process Submission to print the HCFA Form.


Best practice for tracking Authorizations.
When entering an authorization, you must make sure you are entering the auth as it was approved.
For example, if there is a start and end date then put in a start and end date to make sure the system is tracking this authorization for you. The Reason entered is dependent on the authorization reason and that it is for internal use only. Lastly the Referring I would put is optional as is some cases it is not needed.

2. Select “More” Select “Authorizations” to enter authorization information for visit

3. Select the “Referred To” tab. Select the paper with the green + sign at the bottom of the screen to add a new authorization

4. -Enter the reason as “Consult and Treat” -Select Status as “Received” -Select Tracking as “Referred to” -Select Type as “Authorization” -Enter Auth # -Select Insurance -Select Rendering provider -Search & select referring provider (if not populated) -Enter effective start & end date -Enter # Visits authorized Select “OK” Note here you can also enter visits and or units with a warning for the system to track the authorization for you.

Once the Auth is entered the iScheduler will track the authorization for you.
The authorization is also tracked in the billing portal via the claim entry screen
Lastly the provider can see it within the EMR via the Superbill chart tab
How to Pull a referring Provider list
1.Got to the Billing Portal

2. Click on the top tool bar on the down arrow by setup screens tool tip and click provider.

3.Once the provider search opens click on advanced Search.

4. Choose referring

5.Click Search.

6. The list will populate. Now you can print to pdf or export to excel by navigating to the purple gear.
Choose print


You would be able to see past submitted batches via the billing portal.
1.Please navigate to batches under the statements blue bar.
2.Click on Advanced Search.
3. Choose submitted and the dates you are viewing on the statement.
4. Then Click Search.
The previous batches will show in the queue.
Patient transaction history PM report
You may also go to Reports portal,

PM Reports

Choose patient transaction history

Put in the chart #

Then click launch report

Credentials For Payers by Provider
1.Log in:
2.Go to Set up

3.Providers
4. Search for the provider on the upper right

5. Once the provider is selected click on the more button

6. After click on more, click on credentials, the provider credentials box will open:

7. To enter a new credential click on new

8.Find the payer you want to create a credential

9. Choose the tab that the credential needs to be created appropriately.

10. When complete click on apply and ok
Authorization Report in Billing Portal
In this document we will train you how to work through the Authorization Report.
- Navigate to the Billing Portal.

2. Click on Authorizations under the Blue Insurance Bar.

3. Now you can view the search criteria to find an Authorization.

4. After entering your criteria click on search.

5. Then your search result will open in the next tab

6. Double click on the authorization to view the Auth or change information in the Auth.

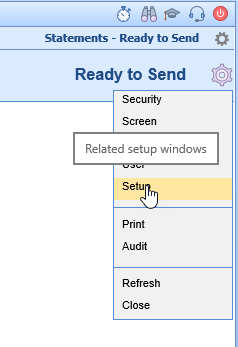
Follow these steps to Access the Statement Setup Screen:
- Log in to the software and Open the Billing Portal.
- Click the Ready to Send link under Statements on the navigation bar.

- Click the Gear icon at the top right of the screen and select Setup.
- The Statements Settings Screen appears.
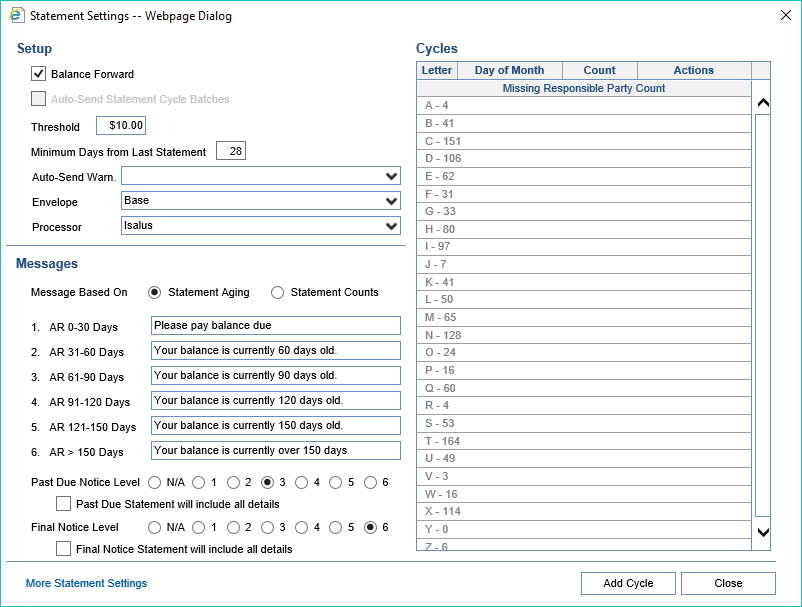


- Click on More Statement settings.

- Click on Messages (Special)

7.Change the messages to your specifications.
8. Click on Contact information, and change to your specifications.

The billing profile is the information that goes on to the statement. Sometimes you may need to update your address or phone number. Please follow these steps below to change your contact information as it relates to billing.
1.Go to the Setup Portal

2. Click on Company Profile

3. Change the profile to billing by navigating to the magnifying glass and choose billing.

4. Click on Contacts and change to your specifications.

When initially moving the Choice product, you may have a deposit that imported into Choice for claims that were not created in Choice. The deposit needs to be entered into the client’s previous system. This document is to demonstrate how to remove the deposit.
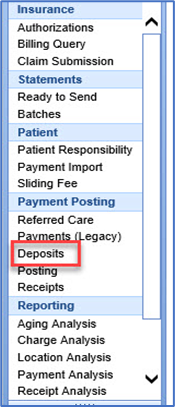
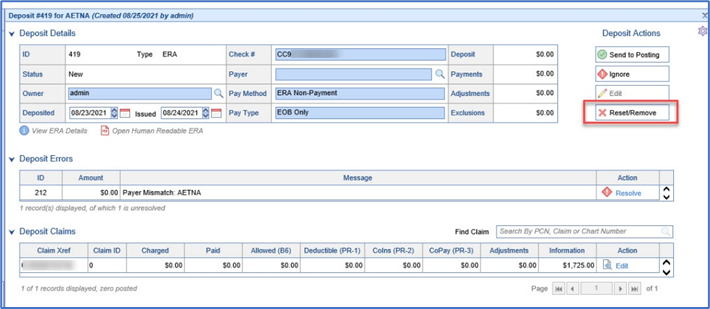
- Go to Billing module and select Deposits under Payment Posting.
- Select the Deposit that needs to be removed.
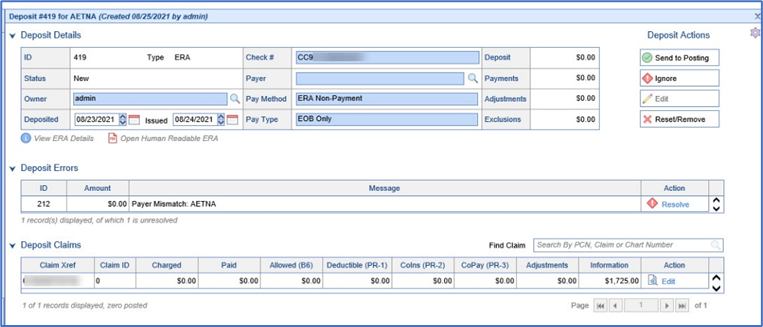
- Prior to removing the Deposit, review it to verify that it needs to be removed. This can be done by reviewing the Human Readable ERA. If the Claim ID is 0 this may also mean the Claim was not created in Choice.
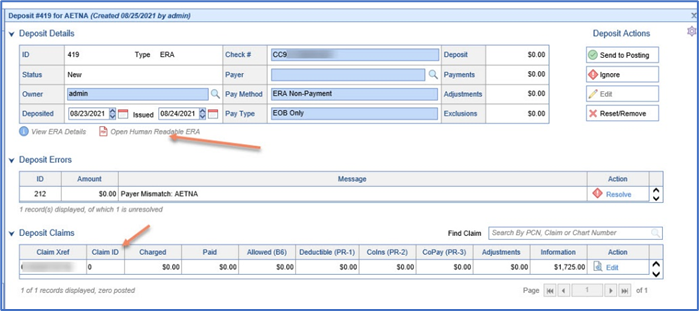
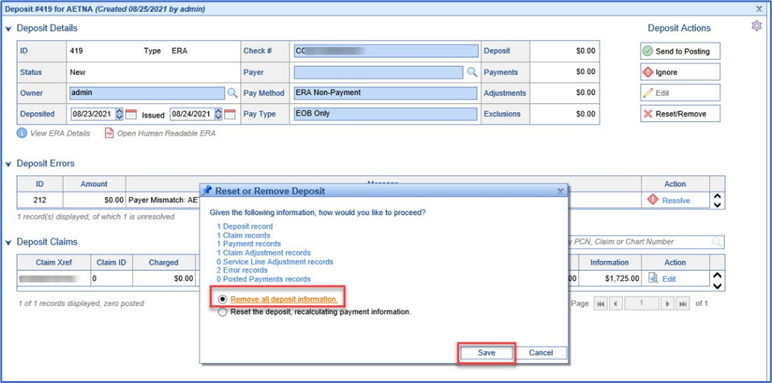
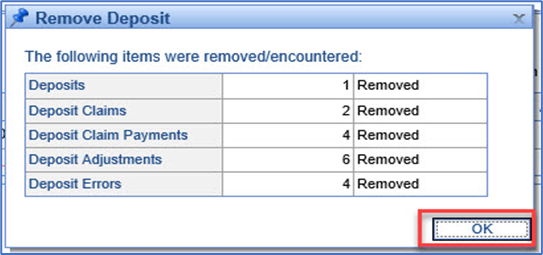
- Click on Reset/Remove to remove the deposit. Note: Once the deposit has been removed, this cannot be undone.
- A Remove Deposit window will appear to confirm the deposit has been removed.


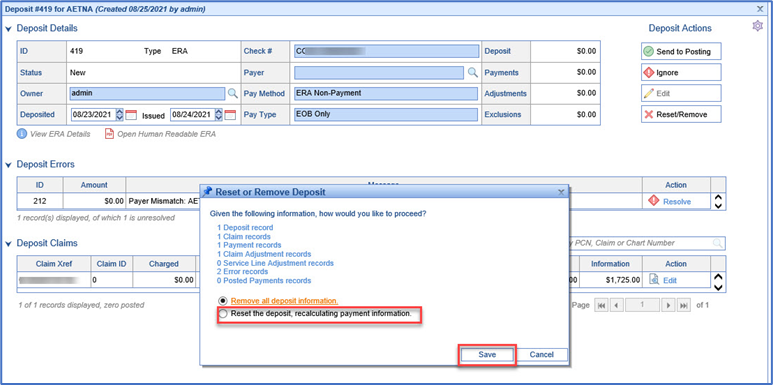
There may be an instance when a deposit will need to be reset. Once a deposit is reset it will revert to its original settings prior to when it was previously posted. A reset deposit can affect various billing reports, as this will now change the post date for the deposit. This document is to demonstrate how to reset the deposit.
- Go to Billing module and select Deposits under Payment Posting.

- Select the Deposit that needs to be reset.

- Prior to resetting the Deposit, review to verify that it needs to be reset. A reset effects all the claims within the deposit. Be aware that a reset of a deposit will affect billing reports due to the change in the post date of the claim.
- Click on Reset/Remove to remove the deposit. Note: Once the deposit has been reset, this cannot be undone.


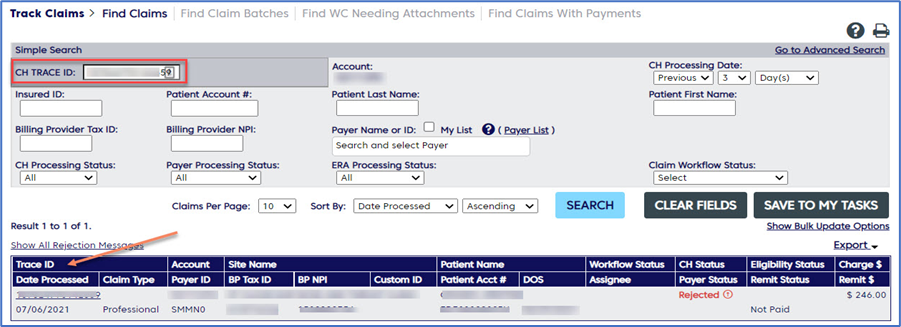
There is a possibility that a biller may need to review a claim in Change Healthcare Clearinghouse. From the clearinghouse the claim can be reviewed in more detail. This document will demonstrate how to retrieve the Clearinghouse Trace number in Choice, and view it in Change Healthcare.
- Open the claim, Click on the drop down arrow to access the Submission History.

- Select the date of the claim submission and locate the Trace #.
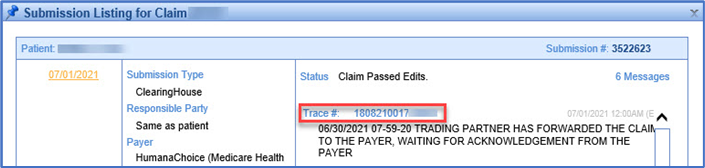
- Right Click on the Trace #, a copy trace box will appear.

- Log into Change Healthcare and select Claims and Tracking, and Find Claims.

- Paste the Trace # taken from Choice into the CH Trace ID field and select Search.


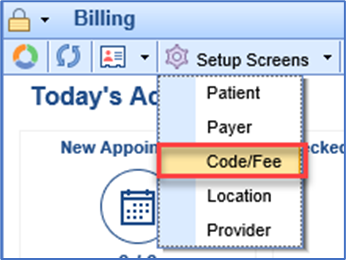
A new client will not have a patient’s previous balance moved from their previous system into Choice. The balance forward can be manually created and added to the patient’s balance.
- Go to Billing > Setup Screens > Code/Fee.
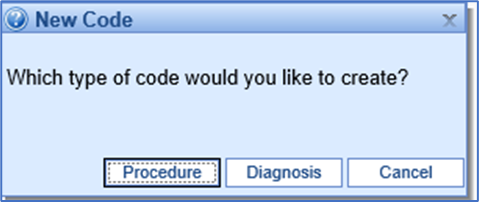
- Select New code.
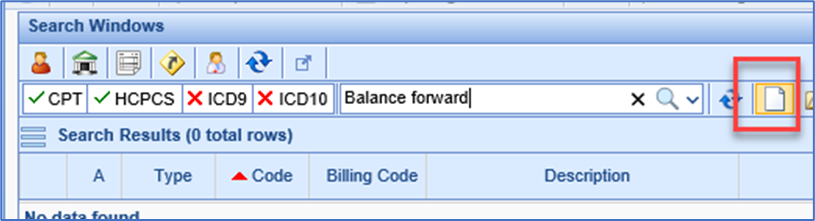
- Select Procedure.
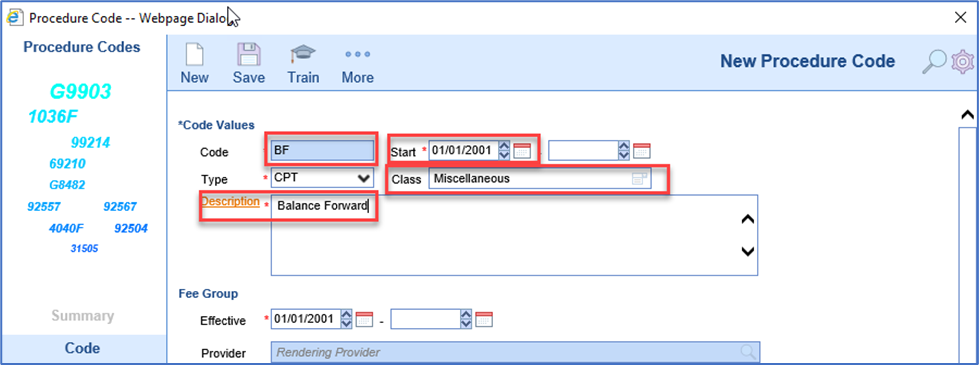
- Give the Balance forward a Code name, enter the Start date, assign it a Class, and enter a Description.
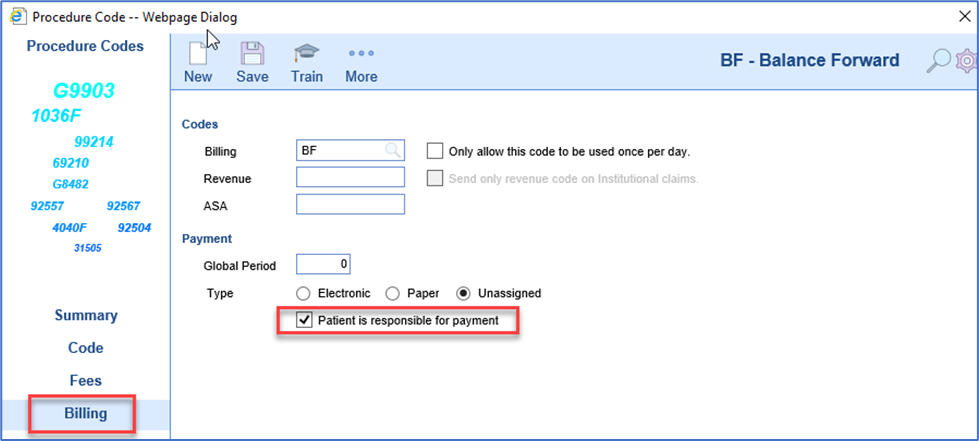
- Under the Billing Section select Patient is Responsible for payment.


Billing Pro Tip: Manually Migrate Patient Balances from Old System; Creating a Balance Forward for a Patient
A new client will not have a patient’s previous balance moved from their previous system to Choice. The balance forward can be manually created and added to the patient’s balance. To create a Balance Forward for a patient, you must first have the balance forward CPT code. Review the Creating a Balance Forward CPT before reviewing this document.
- Go to Billing > Billing Query. Select the New claim option.
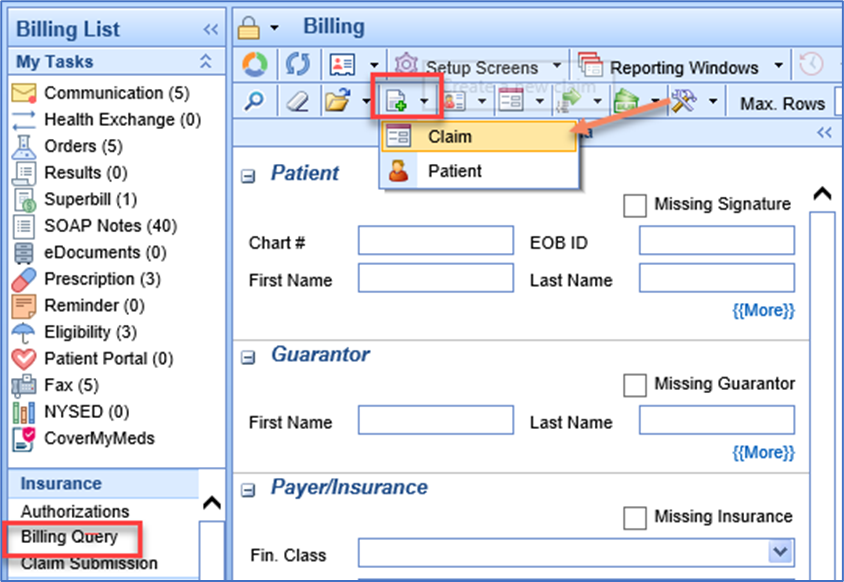
- Search for and select the patient.
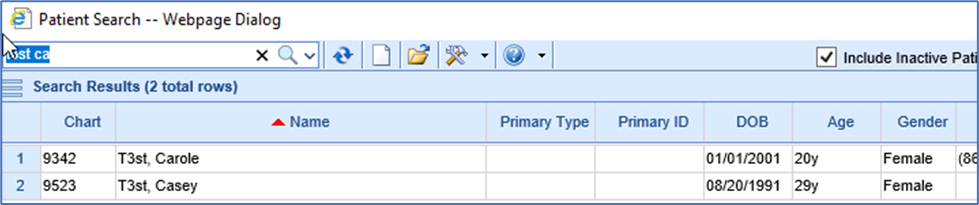
- A new Claim screen should appear. Enter the Service Provider and Location.
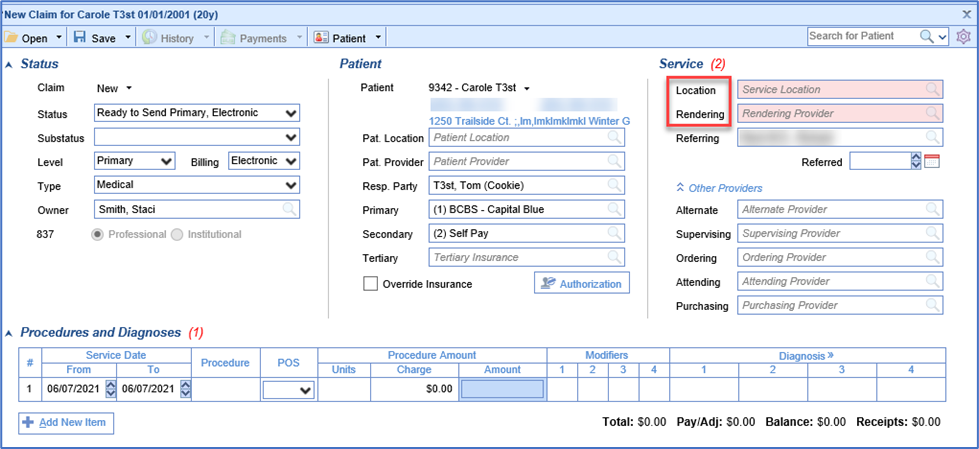
- Enter the Date of Service, the Procedure code for Balance Forward, the Charge amount and Claim status set to Ready to Send, Statement. The Date of service can be any date prior to the date of entry. The date can be the date of Go live, the date of the last patient payment in the old system, or the date of the last Visit in the old system. Remember the date that is selected can affect Billing Reports.
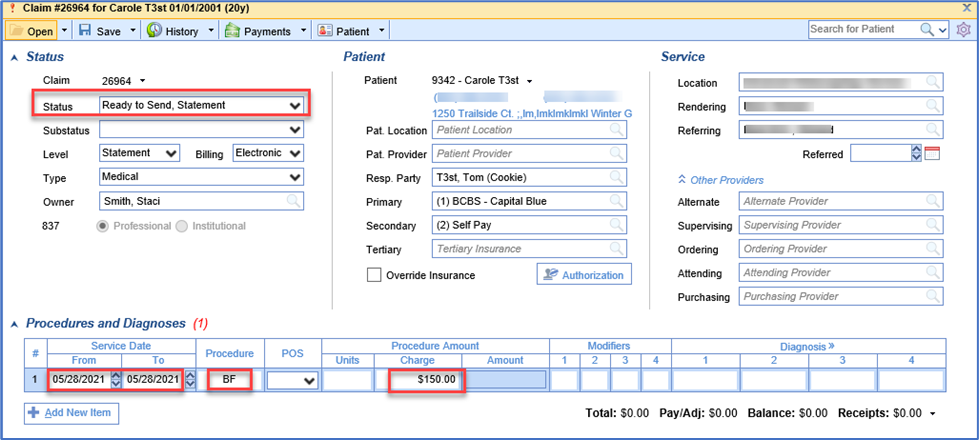
- Click Save.


How to Run Real time Eligibility and Batch Eligibility:
Eligibility in our system can be ran from the schedule or the patient set up. Eligibility can also be set up to run at night.
Batch Eligibility set up:
Navigate to the Eligibility MyTask

Click on Eligibility:
The work queue will open to the right.
Navigate to the upper right and click on the purple gear.
![]()
Choose set up:

Set the parameters for Batch eligibility to run. Choose pulling days, Coverage, NPI, Pulling types, and appointments for batch to run.

Running Eligibility real time from patient set up.
Go to the patient set up:


Click on More:

Click on Eligibility

Double Click on the Carrier you wish to run

Click ok to run Eligibility

View the insurance breakdown.
Note you will want to click on services to see copay.
You can also click on the PDF to get the full breakdown.
From the iScheduler:
Hover over the appointment you may run eligibility by right click or left click over the appointment.
Right click and follow steps above:

Left Click and follow steps above:
How to find the statement report for enhanced delivery payments. The Statement Electronic Payments screen is found inside the Deposits screen
Workflow:
- Go to the billing portal

2. Click on deposits

3. Click on More
![]()
4. Click on deposit Reconciliation

5. Search for deposit type statement

6. Click Search

7. Then you can export or print to pdf.

Currently the collection process within iSalus is manual. Below is an outline of the statements and when letters versus statements are sent via Data Media. Note that this could change depending on your preference of settings within the statement set up. Many practices have created status and sub status to track where statements are in the collection process. You can create several sub statuses to follow. Some examples are collection, pending collection, sent to collections. Also some use 1st letter, 2nd letter, 3rd letter, and final notice.
Statements go out as follows:
1st Statement
2nd Statement
3rd - PAST DUE notice
4th -Past due notice (no statement)
5th -Past due notice (no statement)
6th- FINAL NOTICE (collection Letter)-no statement
Final Notice letters will continue to go out after Final Notice, until we manually change status to Collection.

Whenever you process your statements: Practice preference
Change Claims sub status as follows on 15th of each month prior to sending out batch:
For Account balances under $50.00 (you decide the threshold) :
- (Go to Statements,

- ready to send,
- Unclick show warnings only,
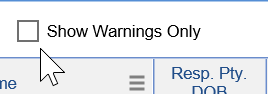
- export to excel, by navigating to the purple gear and clicking print.


- filter by level 4 and balances. Print it (export to excel for a working report) .
- Then go to Billing Query using search criteria by account to make adjustments on balances under $50.00) Once all of this done account should show as follows:
- After 3rd statement is sent-Now Level 4, "Past Due"
- Adjust off account balance "Bad Debt Adjustment", Create Pop-up Alert and change account status to "Collection"
- Level: Statement
Once all of this is done account should show as follows:
- After 6th statement is sent, "Final Notice"
- Status: Statement Sent
- Substatus: Collection Letter Sent
- Level: Statement.
Quarterly-(In addition to Monthly steps) Every Mar/June/Sept/Dec
- Go to Ready to Send, select level 6+, export and print.
- Go to Billing Query, Make Adjustments on any that are UNDER $50.00 as BD Adjustment. Create a Popup alert and change account status to Collection. ( These would be if any were previously missed at Level 4)
- Using Billing query search Criteria, search all account with substatus of "Collection Letter Sent", update substatus to "Pending Dr. Review"
- All Accounts that are making payments status should be as follows:
- Status-Sent Statement
- Level-Statement
- Substatus-Payment Plan
- These accounts will need to be reviewed quarterly as well to make sure payments are being made. If no payment in last 45 days, phone call to patient. Update status back to Pending Dr. Review to include on collection review report.
- 9. Accounts with NO payments within last 30 days- Change Substatus to "Pending Dr. Review"
- 10. Go back to Billing Query search criteria, search all accounts with substatus of "Pending Dr. Review". Export this to excel, sort/filter by Rendering Provider. This will be their collection review report.
11. Print Collection Review report and give to Physician for review. Send Office communication to Nicole that Reports were given to Physicians.
Once report is returned by Physician, Make adjustments according to Physician response as either BAD debt W/O or collections. Add Alert popup, accordingly.
- Go to billing Query and pull a pending collection report.
- Change account Status to Collection.
FAQ: How do I remove items from the Missing Refund report?
1. If assigning credits from the Refund Report, double-click on the claim number with the Missing Refund to open the Patient Transaction History. If not, skip to step 2.
2. Open the Patient Transaction History from whatever screen you are in.
3. In the Patient Transaction History window right click on the payment line creating the credit and select Credits.
4. In the Credit Entry window you will get a pop-up asking if you would like to create a credit, click Yes.
5. In the Credit Entry window, in the Refund To drop down select the refundee you would like the credit to be applied to (if different than what has defaulted), then confirm the payment affected, and set the Level to the appropriate one to match the refundee.
6. Click OK
FAQ: How do I move a credit from one claim to another claim?
Step 1:
1. Pull up the patient's history.
2. Go to the claim which has the credit
3. Right click and select Add Payment
4. Enter a Deposit Date (usually today's date) and a Paid By of Responsible Party
5. SKIP THE PAYMENT LINE ENTIRELY
6. On the Adjustment line, enter a POSITIVE amount equal to the credit being moved
7. Select the Adjustment Type Moved Payment
8. Click Post
9. Close the window to go back to the patient history
Step 2:
1. Go to the claim where you would like to apply the credit
2. Right click and select Add Payment
3. Enter a Deposit Date (usually today's date) and a Paid By of Responsible Party
4. SKIP THE PAYMENT LINE ENTIRELY
5. On the Adjustment line, enter a NEGATIVE amount equal to the credit being moved
6. Select the Adjustment Type Moved Payment
7. Click Post
8. Close the window to go back to the patient history
FAQ: How do I apply a refund to a patient's claim?
1. Pull up the patient's history.
2. Go to the claim which has the balance being refunded.
3. Right click and select Add Payment
4. Enter a Deposit Date (usually the check date) and a Paid By of the Refundee
5. SKIP THE PAYMENT LINE ENTIRELY
6. On the Adjustment line, enter a POSITIVE amount; should be the amount you are refunding
7. Select the appropriate Adjustment Type: either Refund to Patient or Refund to Insurance
8. Click Post
9. Repeat for each procedure line as needed
Refund Reports
Within OfficeEMR™ there may be a time when a claim will be over paid either by the patient or by the payer. In some cases a refund may be required to be done to either party. This is a relatively simple process and can be completed by following the below steps.
1. In the Billing portal click on Open Reporting Windows icon in the toolbar. Click on Refunds. You can view all claims that have credits by running the Refund Report.

2. In the Report Search window click Launch Report.


Once the Refund report is ran you can work the refunds directly from the real time online reports.


How to enter a MSP reason when Medicare is secondary.
RPA Reject: OTHER PAYER INSURANCE TYPE CODE IS MISSING OR INVALID
The claims rejected on RPA frontend because the Insurance Type code/ SBR05 value in Loop 2320 is missing.
The Insurance type code / SBR05 value is required when Medicare is a Secondary Payer.
Please correct and resubmit the claims with Insurance type code in Loop 2320~ SBR05.
- Go to the patient set up.

2. Click on the insurance Tab.

3. Click on Medicare secondary

4. Choose the MSP reason

5. Click Save.

How to Pull a referring Provider list. For various reasons one possibly being marketing, you may need to pull your referring doctors list. Follow the steps below to obtain the list:
1.Got to the Billing Portal

2. Click on the top toolbar on the down arrow by setup screens tool tip and click provider.

3.Once the provider search opens click on advanced Search.

4. Choose referring

5.Click Search.

6. The list will populate. Now you can print to pdf or export to excel by navigating to the purple gear.
Choose print


To Identify EStatement deposits from Pay Simple
If you are specifically just looking for the eStatement payments, then you can also click on the More button in Deposits and select Statement ePayments. Set a reporting date and then refresh to get the list.
Steps
- Billing Portal

2.Deposits

3.More

4.Select EPayments

5.Choose dates

6.Refresh the list

You can also search for Statement deposits and look at the check/trace id. The eStatement payments will display CC information instead of a true check number.
- Go to the billing portal.

2.Click on Deposits

3.Click on Advanced search


4.Search for the trace ID

Please also note that in reports the payer is going to be the responsible party from the statement.
Adding Guarantor
When adding an insurance to a patient account, sometimes the Guarantor is someone other than the patient. There are a few fields necessary to set this up properly to prevent billing issues.
- From the Patient Setup screen, select the Insurance tab. Always select New to add a new insurance.
- Flip Coverage to appropriate designation depending on whether it is primary, secondary, or tertiary.
- Add start date, payer, Insured ID and any other necessary information.
- If Guarantor is the patient, select Same as Patient. If it is an individual other than the patient, select Individual.
- If Guarantor has the same demographic info as the patient, select Populate Patient Information. Edits can be made to fields if needed.
- By default, Signature will only prepopulate if Guarantor is the same as patient. When adding a different Guarantor, it is necessary to check the Signature box and add the date. Typically, this will be the same date the patient signed, or the policy start date. If the signature box is not checked, this will cause claims to fail.
- It is also critical to fill in the relationship to the Guarantor and the DOB.
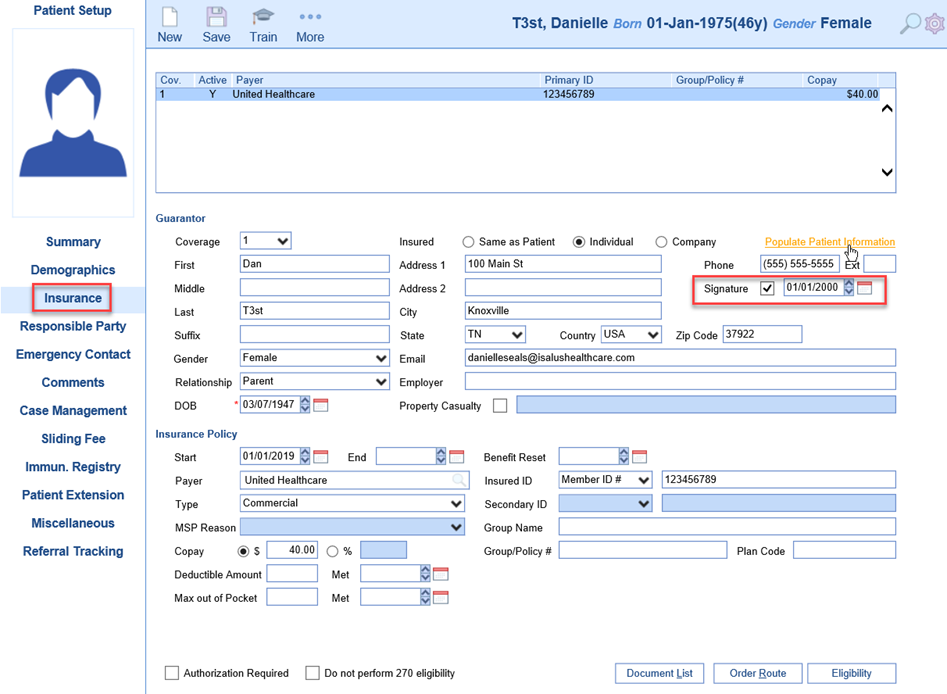

Adding Responsible Party
By default, the system will assign the patient as their own Responsible Party. When the patient is under the age of 18, it is strongly encouraged to assign a legal adult as the Responsible Party. When it comes to billing, there are many errors that can come from not having a legal adult as the Responsible Party. There are other reasons a patient would not be their own Responsible Party as well.
- From the Patient Setup screen, select the tab Responsible Party. Always select New to add a different Responsible Party (RP) and flip the Order to 1 for the default RP. This is so that if a patient ever needs to become their own RP, the setup exists, such as when a minor turns 18.
- Select Individual or Company, depending on the situation.
- If the RP has the same demographic information as the Patient, select Populate Patient Information to fill in majority of the fields. Changes can be made if needed to the address, email, phone fields.
- Be sure to enter Gender, Relationship and DOB for the RP.
- If the practice opts to have statements emailed and the RP elects this option, check the box to Email Patient Statements, enter the Security Type and Security Data. This will be the PIN information to protect patient health information.

Letters -Granting access to users
Users will need to be assigned letter templates that are viewable from their log-in. Based on the letter template, the letter will be viewable in EMR, iScheduler or Billing portal or assigned to be a SOAP note or Intake Letter.
- From Setup
- Navigate to Setup/EMR Setup/Letters (Admin user)

- Click User Setup to bring up the User Assignment page

- Grid Assignment
 Assign letter template to users via Grid Assignment by putting x in box to assign or assign a letter to all users by clicking the letter name. You can also assign all letters to a user by clicking the user name, then click Save.
- User Assignment
Assign multiple letters to multiple users or all items to one or more user

 |
- Default Assignment
Assign the Default Letter to load in the EMR to multiple users from this window

- From User Setup
Letters can be assigned to users via the User Setup window.
- Navigate to Setup/Basic Setup/User Setup or click Current User at the bottom left corner

 Or
Or
- Select User to assign letters
- Single or multi-select letters and click Save

- Select Default Letter Template to load in the Letter Chart Tab
Initially a new user may not see a full listing of the Patient Transaction History under the Patient Setup. The default settings of the Patient Transaction Search may only be set to show Claims with a balance.
The following steps can be used to update this setting.
- Go to the Patient Transaction History screen. This can be done by Double clicking on the Balance line of Patient Setup.
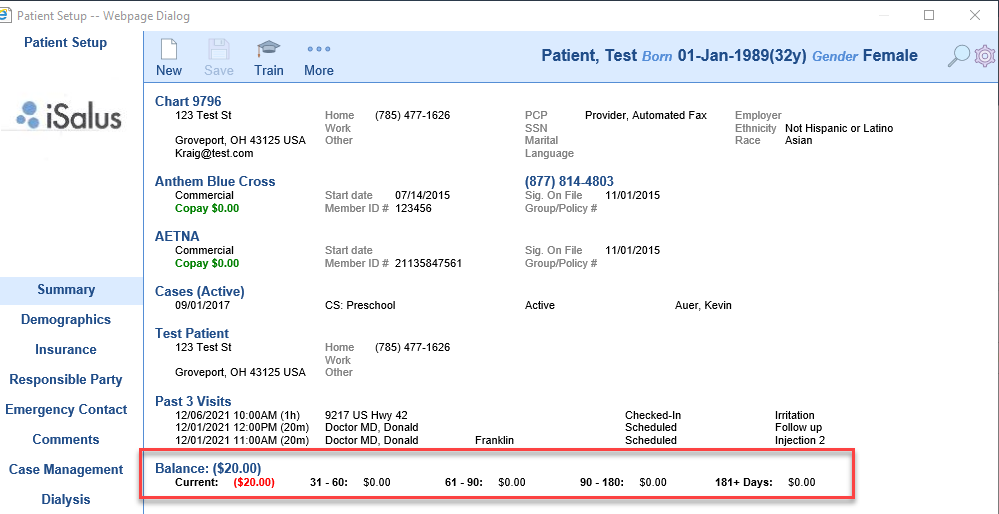
- The Patient Transaction History Webpage Dialog box will appear. Click on the two downward facing arrows.
- Place a check in the Display Zero Checkbox. This will now allow zero balance claims to appear in the Patient Transaction History.


In this document we will train you how to work through the Authorization Report.
- Navigate to the Billing Portal.

2.Click on Authorizations under the Blue Insurance Bar.

3.Now you can view the search criteria to find an Authorization.

4.After entering your criteria click on search.

5.Then your search result will open in the next tab

6.Double click on the authorization to view the Auth or change information in the Auth.

CUSTOM CLAIM VALIDATION EDITS
This article will provide some common claim validation edits and how to enter them at the procedure code set up.
97110 requires modifier GP when billed to Medicare
Fee Group Required based on Medicare Financial Class.
Setup > Procedure Codes > 97110 > Default > Modifier > GP

Radiology Codes must have modifier TC – Medicare
Fee Group Required based on Financial Class.
Setup > Procedure Codes > [Enter Radiology Codes] > Defaults > Modifiers > TC

New radiology codes must have modifier TC – Medicare
Fee Group Required based on Financial Class.
Setup > Procedure Codes > [Enter New Radiology Codes] > Defaults > Modifiers > TC

J3260 - 1 unit equals 80 mg
Setup > Procedure Codes > J3260 > Fees: Per Unit Fee, Units 1

88305 to Medicare must be changed to G0416
Fee Group Required based on Medicare Financial Class.
Setup > Procedure Codes > 88305 > Billing > Billed As > G0416

How to Bill DME Claims in Choice.
- Location can be home
- The Rendering provider will be DME
- The ordering will be the rendering doctor that wrote the script for the DME.
- Here is an incorrect way to bill DME.

Above you would want to add the rendering to the Ordering Provider line to send the claim correctly.
You have to go to Payments (Legacy), open Default Settings, and update the setting here.
1.Navigate to the billing portal

2.Click on Payments Legacy

3. Navigate to Default Settings.

4. Change Statement to Credit card shown in screenshot below:

5. click save.


To Identify EStatement deposits from Pay Simple
If you are specifically just looking for the eStatement payments, then you can also click on the More button in Deposits and select Statement ePayments. Set a reporting date and then refresh to get the list.
Steps
- Billing Portal

2.Deposits

3.More

4. Select EPayments

5.Choose dates

6. Refresh the list

You can also search for Statement deposits and look at the check/trace id. The eStatement payments will display CC information instead of a true check number.
1. Go to the billing portal.

2. Click on Deposits

3. Click on Advanced search


4. Search for the trace ID

Please also note that in reports the payer is going to be the responsible party from the statement.
Billing Toolbar Overview
Within the Billing portal there are two toolbars.
In this guide you will learn the names of the tool bar icons and their functions. Pro tip, any icon you hover over it will tell you the name of the icon you are about to click.
1.The first icon in the billing tool bar is the billing home page icon. This Icon will take you back to the Revenue Cycle Dashboard.

2.The second Icon from the left is the reset billing window. When you click on this icon it refreshes the screen.

3. The next icon is the patient index or patient identification area. The patient icon will allow you several options from here to enter a new patient or look up existing patients.


4. The Setup Screens Icon links the user back to all the setup that is the backbone of the billing creations. The down arrow next to the setup screens tool icon has Payers, Code/ fee, Locations, Providers, and Patient information.


5. The next tool tip is the reporting windows icon. Once you click the down arrow next to the tool tip several canned reports are available in this tool.


6. The next tool tip is the Set Billing info. This tool is used for Refund maintenance, set a sliding fee scale, or to set the working date.

7. Your next tool tip is Web Searches. When you hit the down arrow you can access your analytics cubes, Clearinghouse payer list, ICD10 lookup, and NPI lookup.

8. The last icon on the first took bar is the help.

9.The next tool bar is opened by clicking on Billing Query

10. The first icon is a magnifying glass that you will click on to search billing query.

11. Second icon on the second tool bar is the eraser. It erases and resets your billing query.

12. The next icon is to find a claim. Make a claim entry screen pop out of within billing query, or to export your billing query search to excel.

13. the fourth icon on the second tool bar is to create claims manually. It is the claim options tool tip.

14. The fifth icon on the second tool bar is to provide more functionality within your billing query. If you have a claim highlighted blue in your query you can quickly access history and other functions.

15. The claim options tool tip has the functionality for you to copy claims, set reminders, make a claim comment, Modify several claims at once, Validate claims, and to create custom tasking.

16. The Submission options tool tip is a green arrow pointing to the right. When you click the down arrow next to the icon it allows for you to submit claims batches manually. It also allows you to view EDI submission window from the billing query.

17. The money icon or the payment options icon allows you to post money manually into the claim.

18. The hammer and wrench also known as the display options icon is the tool tip that allows you to change your displayed view via the billing query. This is user specific. If you change your view, please note you will have to click on the magnifying glass tool tip again for that query to take effect.

19. The last area on the second tool bar is the max rows. We recommend you set this to 9999 this way you see all the claim pulled into the billing query.

Billing Query Screen Overview
The billing query has several useful functions for the billing department. It has a claim view and a patient view. In this guide we will review the search functions for the billing query.
- In the Billing portal click on Billing Query
- The billing Query screen will pop open.


- When you complete the search, it will hide/ collapse. To open the query again simply click on Search Criteria for it to open again.

- To enter a search, click on more to find hidden criteria available to narrow your search.
- You can search by patient information, Guarantor information, Payer / Insurance, Claim information, Procedures, Submission information, Statement numbers, Provider, and Location.


Once you have entered your parameters for the search, Click the magnifying glass icon to search and find the claims. You can also use the quick key strokes of CTRL S
![]()
The query will open to the right.

The billing query view default is the claims view. You can then sort the view to patient by going up to the hammer and wrench tool tip and clicking patient view and click the magnifying glass again. Please note if patient view is unchecked then you are in the claim view.

Now you can view patient balances.

When in patient view you can also print letters. Go to the patient icon on the second tool bar. Click the down arrow and choose letters.

Refund claims are claims that have a credit balance. The refund status can be created by either a patient or insurance payment that causes the claim to go into a credit balance. They can be viewed from the Revenue Cycle under Manage. Note:: A Refund status does not mean the refund has been made, only that the claim is in a Credit Balance.

How is the Refund status created?
If a payment made to a claim causes an overpayment or refund, the Create Credit screen will appear. The user has the option to create the Credit.

If the user selects Yes, a claims Details screen will appear to create the New Credit. The user will need to select the potential Refund recipient. The user will then select Save and Close out the window.

The status of the claim will now reflect a Refund status.

For assistance on how to apply a Refund to a claim review the Apply a Refund to a Claim Credit document. Refunds can also be reviewed utilizing the Refund Report.
Claims Search from Billing Query
A single claim or multiple claims can be found using the Billing Query search window.
- Click on Billing

- Go to the Billing Query search window.

- Any number of parameters can be used to search for claims and some areas have a {{More}} button to open additional search criteria:
In this example Chart#, patient name, date of birth can be utilized

- Note that areas can be collapsed and opened by toggling the + or – symbol

- To search for all claims from a particular payer navigate to the Payer/Insurance fields, enter the Payer name:

- Under Claim multiple statuses can be selected:

- There are sections for Procedures, Providers and Locations as well.
- For Provider searches, there’s a dropdown for different types of providers:

- Once all criteria is entered, from the upper left corner use the magnifying glass to search and the chalk symbol will clear all input to begin a new search:

- When the search button is selected, the Billing Query window collapses. To return to the Billing Query search window again, click the vertical Search Criteria bar:

Patient History
The History chart tab is used to capture a patient's past medical, family and social history. It is a "historical" chart tab where data remains as last edited from encounter to encounter.
- Open patient chart in EMR- select History Chart Tab
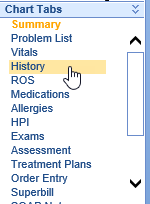
- Document patient's History by clicking appropriate items based on your practice's History template
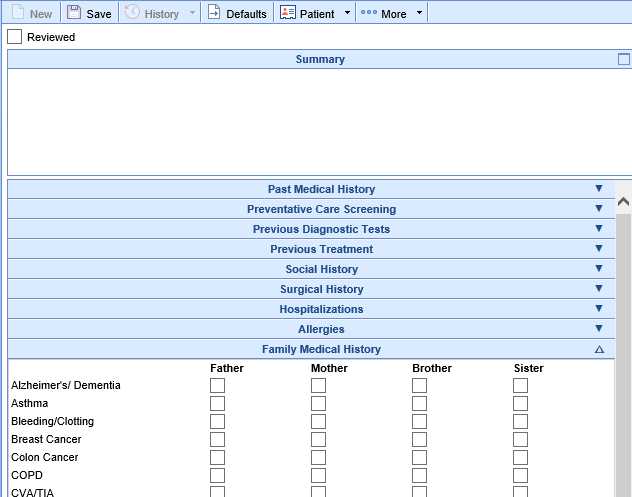
- Click Save when documentation is complete
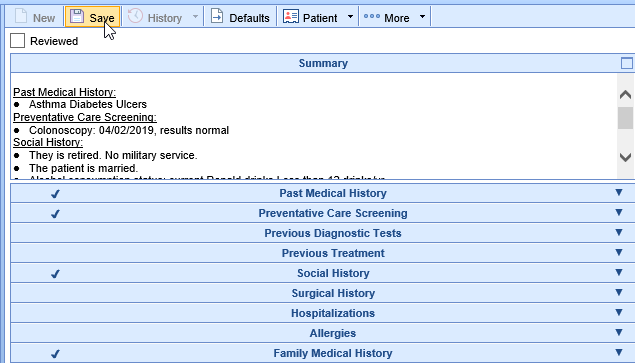
- Subsequent visit- update changes to History, mark Reviewed, then click Save


Understanding Uncategorized History Items
To ensure all selected history items remain visible, practice users should always document a patient’s history using the designated Practice History Template.
When a user documents history on a template not used by other practice users, history items may appear in the Preview section as "Uncategorized."
- Why does this happen? The uncategorized label appears because the items do not exist in the template being used to view the patient’s data.
- How to resolve this? Switch your user view to the correct Practice History Template to ensure all history items are properly categorized.
Look Back Feature to See Dropped Uncategorized Data
If using more than one history template then your history data could be out of sync, and some history items may have been inadvertently deleted. You would know this was occurring because you would see Uncategorized data and when you saved the history - those items would just drop out of view. To address this, we have implemented a look back feature that allows users to view and manually restore deleted history items.
This feature was necessary to correct a bug in our system where:
- Previously, if a user viewed uncategorized history but took no action, OfficeEMR automatically removed those items from view and placed them in the patient’s history audit log.
- Now, uncategorized history remains visible until a user actively and intentionally updates the history item.
Using the Deleted History Lookback Feature
If your practice has more than one history template in use (uncommon), follow these steps to restore deleted history:
Step 1: Enable Access to the Lookback Feature
- An admin must grant your user account the Role: Uncategorized History Deletion.
- By default, this role is turned off for all users.
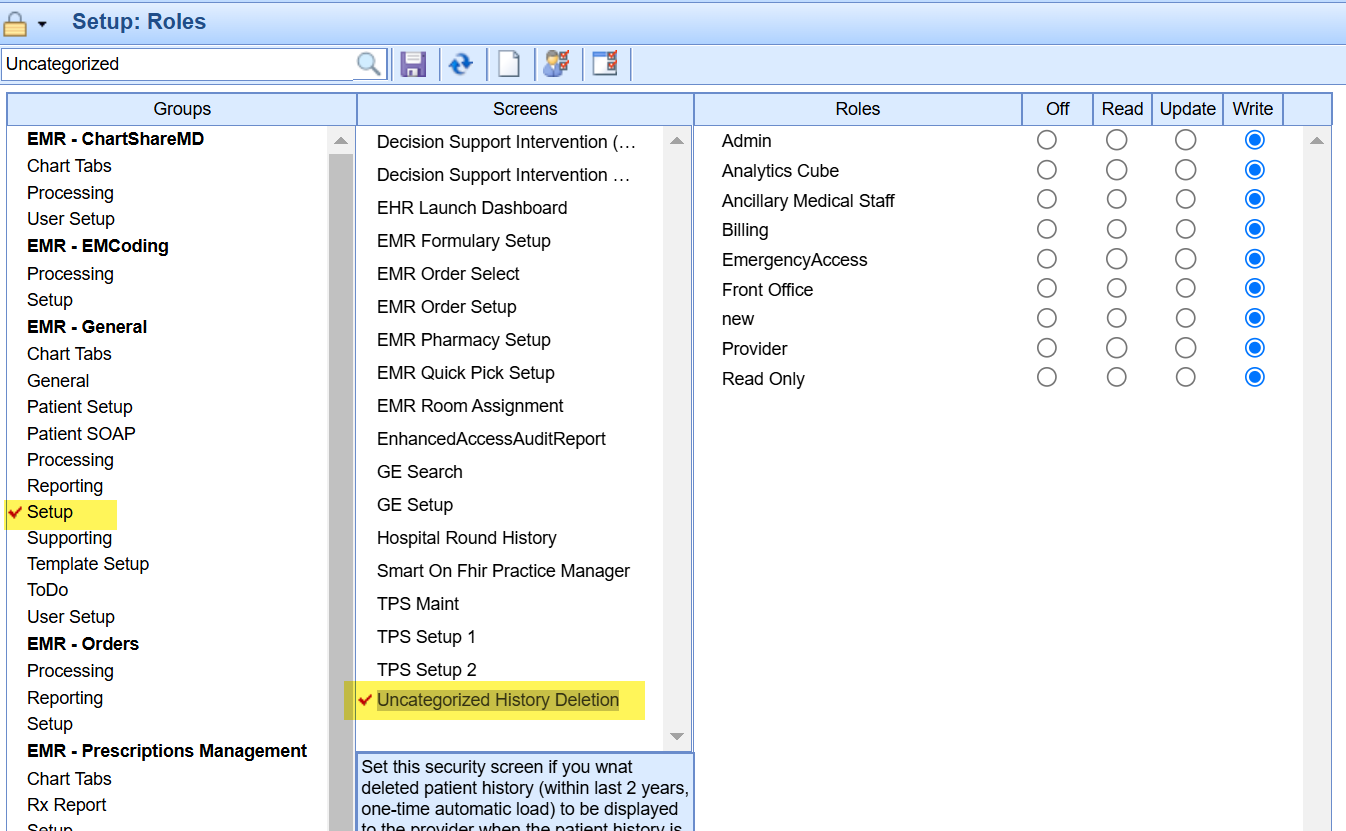

Step 2: View Deleted History Items
- Once the role is enabled, navigate to the patient’s chart and access the History section.
- A one-time pop-up window will appear, displaying any Deleted History items found in the patient’s audit log.
Step 3: Determine Next Steps
- If the Deleted History window displays “No deleted history,” there are no missing history items, and you can simply close the window.

- If deleted history items are displayed, compare them with the patient’s current history and manually update their record as needed.
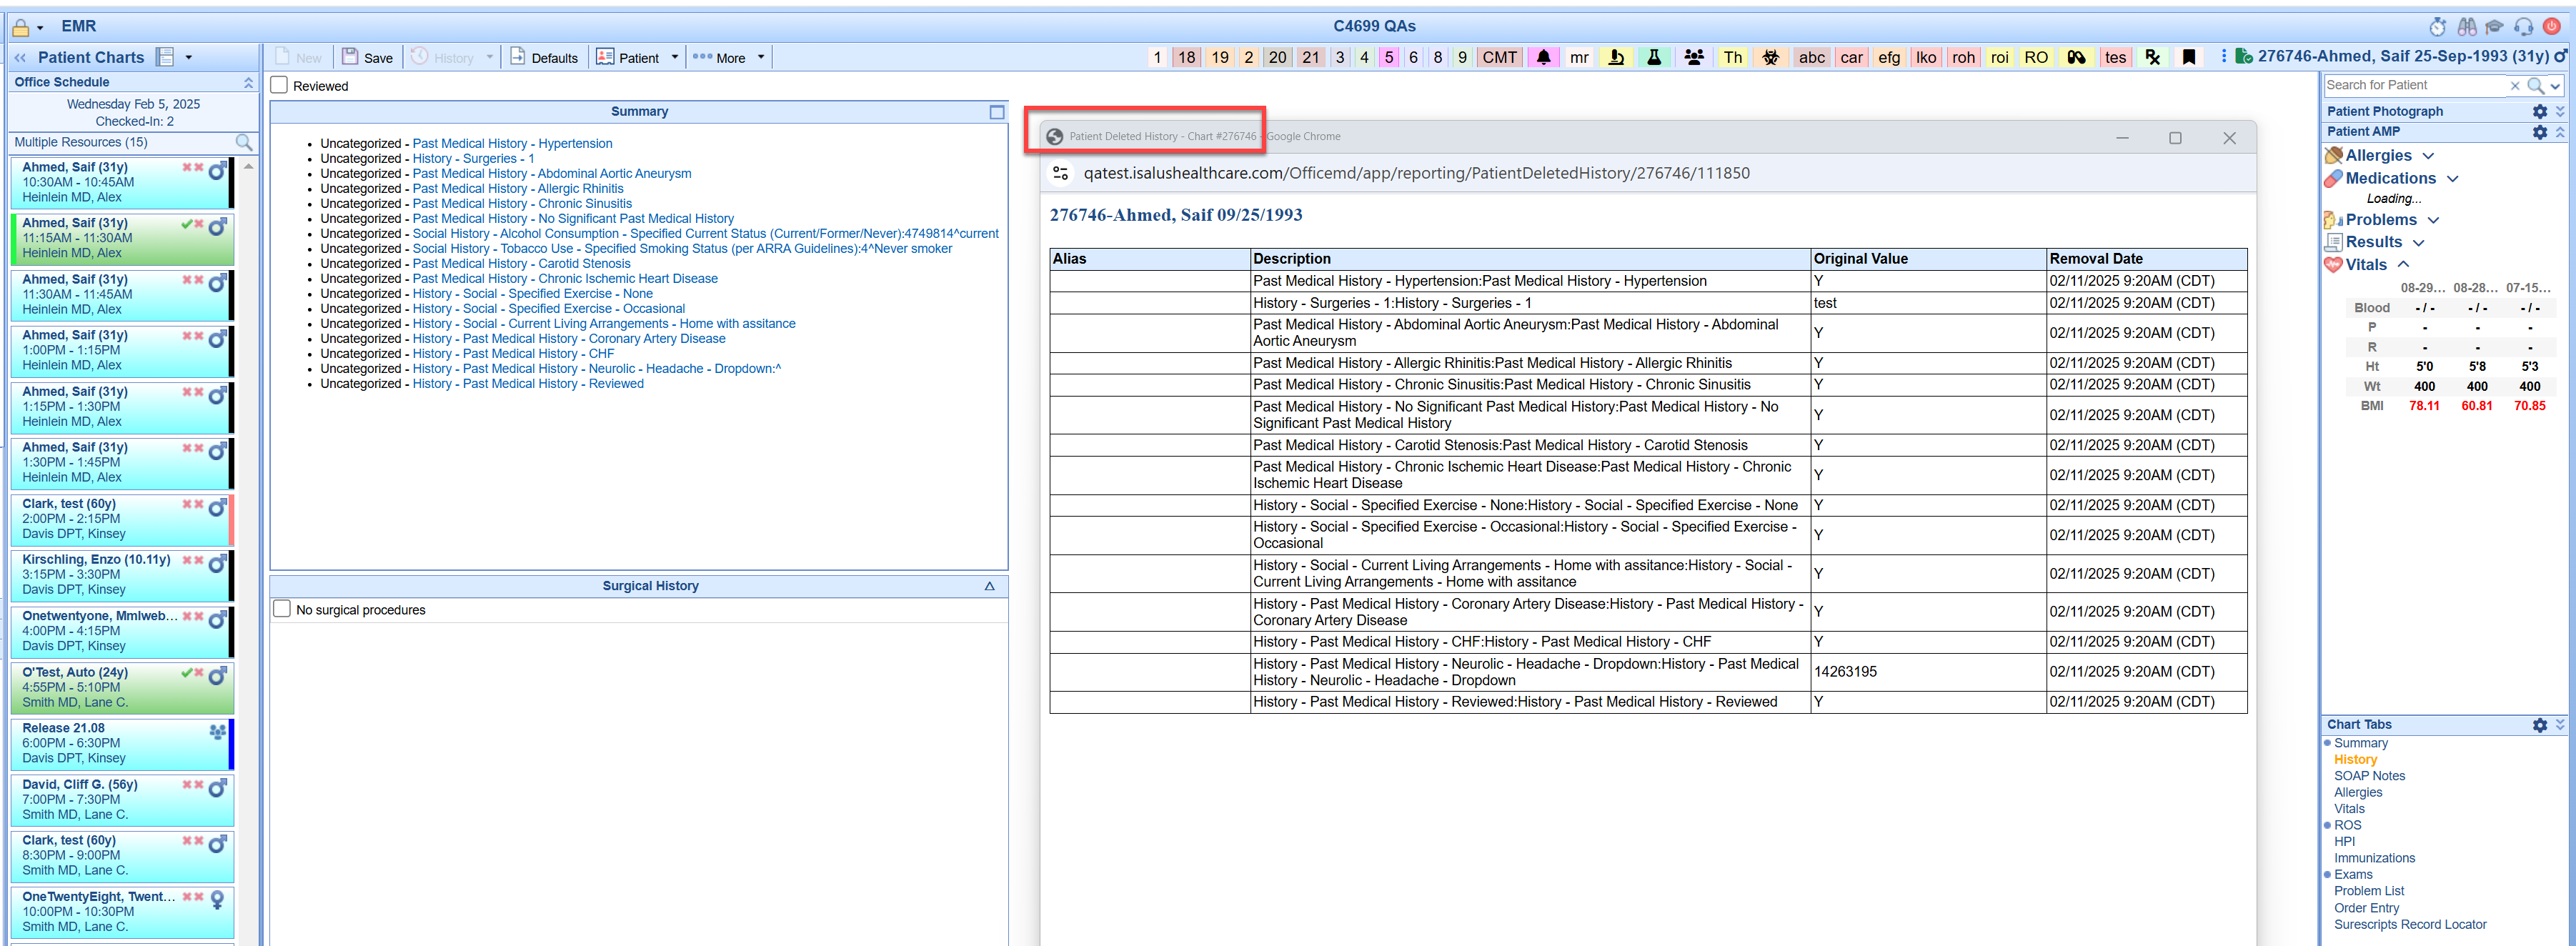


Step 4: Accessing Deleted History Later
- If you closed the Deleted History window but need to access it again, simply:
- Click on the white space to the right of the History template data.
- Select Deleted History to reopen the Deleted History screen.
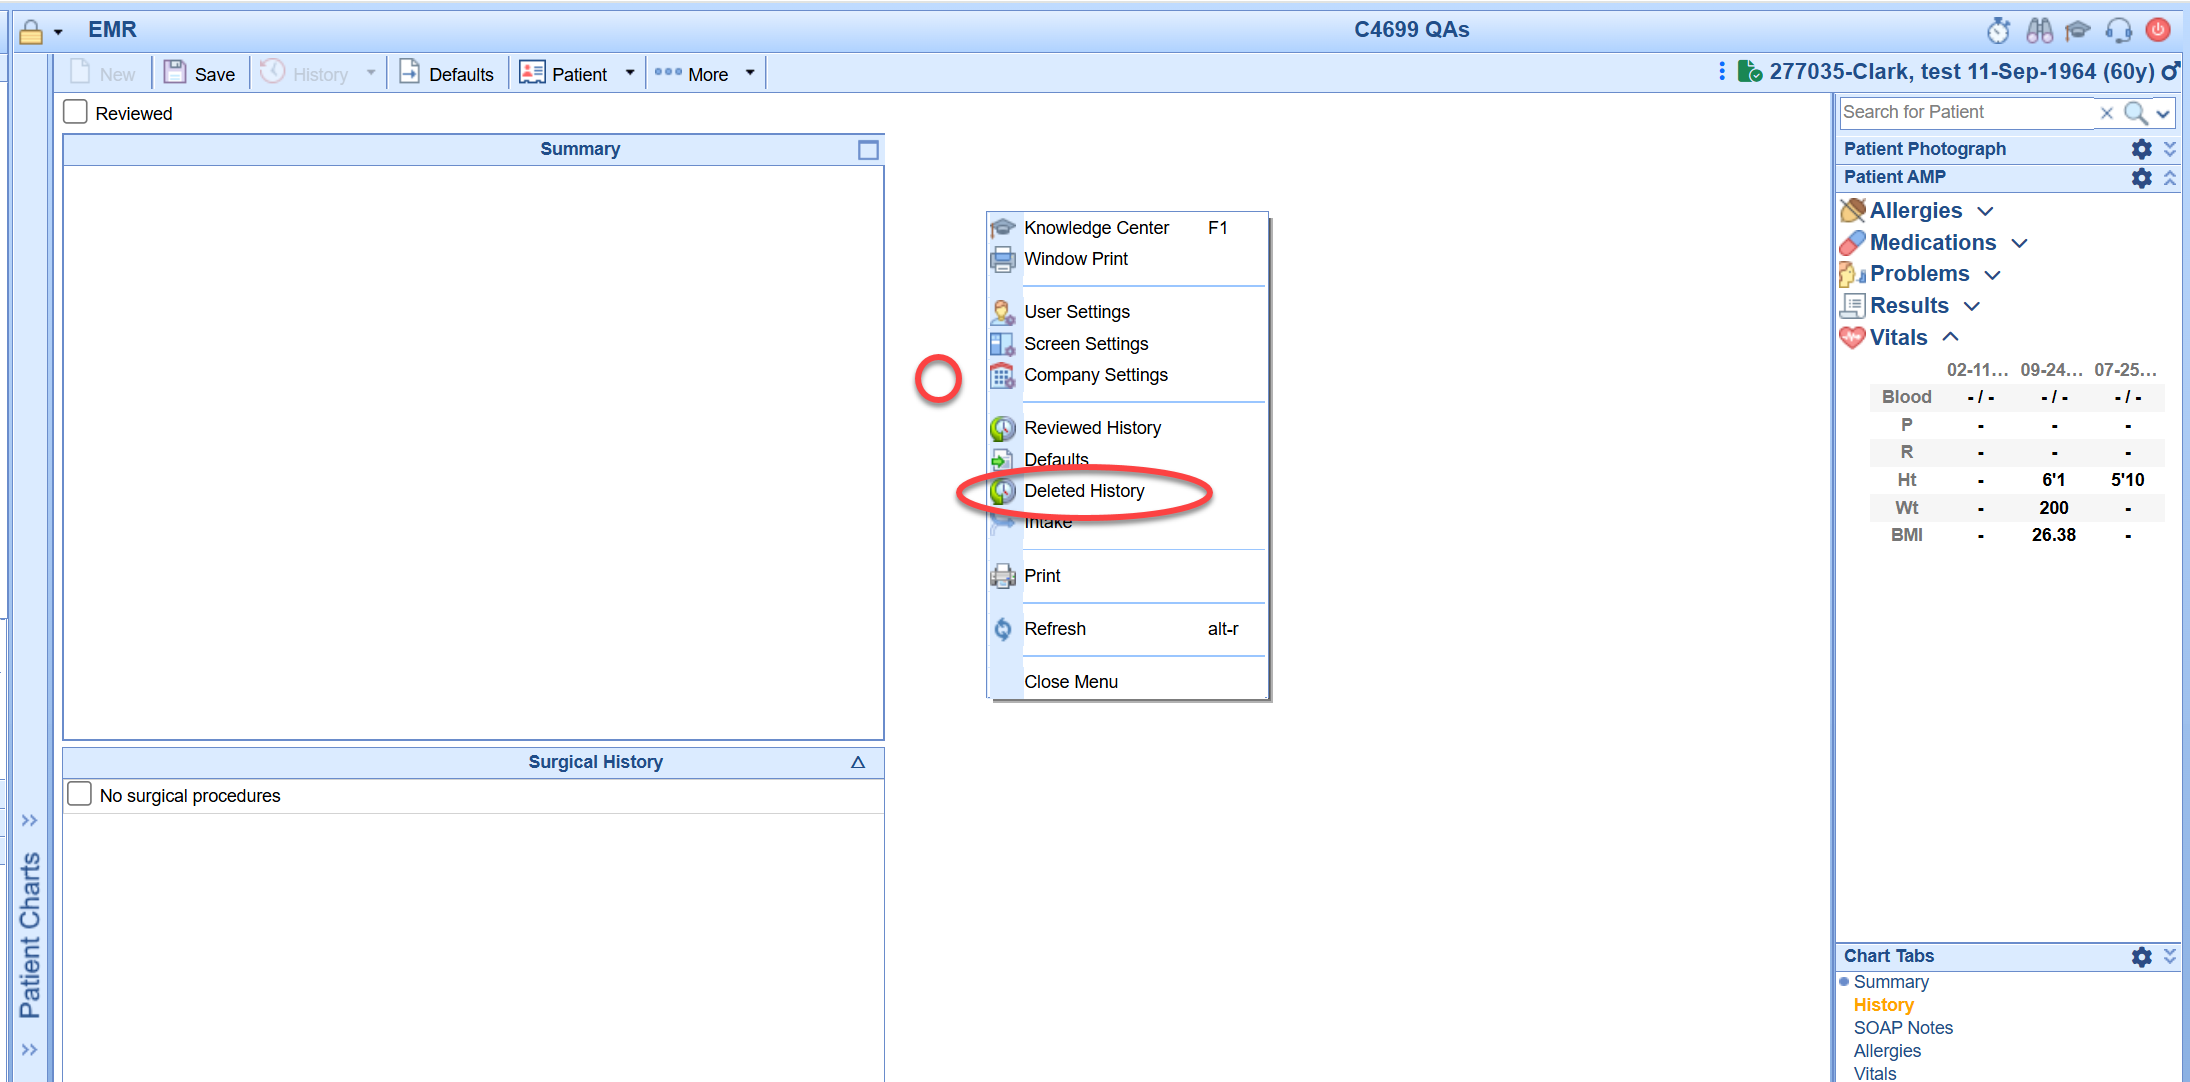

This process ensures accurate documentation of patient history while preventing unintended data loss.
What are Claim Statuses?
Claim Status helps a user to know what needs to be done with a claim or what has been done with a claim. Claim Statuses should be used to assist a user with the work flow of claims.
NOTE: It is ultimately up to the user to make sure that they are working their aged claims appropriately and not focusing just on claim status alone when working claims.
How do I change a Claim Status?
A claim status is changed from within the Claim Entry screen, in the upper left-hand corner:

What Claim Status options are available?
There are four different types of Claim Status available: System Status, Biller Defined Status, Submitted Status, and EMR Status.
System Status: These are statuses that will typically be assigned to the claim as the claims are processed.
- Done - This status means that the claim is completed. This status should only be used when the claim has a zero balance.
- Ready to Send Primary, Electronic - This status means that the claim is ready to be sent electronically to the primary insurance.
- Ready to Send Secondary, Electronic - This status means that the claim is ready to be sent electronically to the secondary insurance.
- Ready to Send Tertiary, Electronic - This status means that the claim is ready to be sent electronically to the tertiary insurance.
- Ready to Send Primary, Paper - This status means that the claim is ready to be sent on paper to the primary insurance.
- Ready to Send Secondary, Paper - This status means that the claim is ready to be sent on paper to the secondary insurance.
- Ready to Send Tertiary, Paper - This status means that the claim is ready to be sent on paper to the tertiary insurance.
- Ready to Send, Statement - This status means that the claim is ready to be billed to the responsible party using a statement.
- Sent, Statement - This status means that the claim has been billed to the responsible party using a statement. The status of the claim will be automatically updated to this status when a statement has been prepared and processed for the claim..
- Sent, Electronic - This status means that the claim has been sent electronically to an insurance. The status of the claim will be automatically updated to this status when the payer acknowledges receipt of receiving the claim electronically.
- Sent, Paper - This status means that the claim has been sent on paper to an insurance. The status of the claim will be automatically updated to this status when a paper claim has been prepared and processed for the claim.
- Refund - This status means that the claim has a refund (credit) balance.
- Rejected - This status means that the claim has failed Billing validations, has been rejected by the clearinghouse, or has been rejected by the payer.
NOTE: The Ready to Send statuses are the default status when a claim is entered manually by a user, rather than through the EMR Superbill. However, an EMR status may switch to a Ready to Send status based on how the claim is being worked.
Biller Defined Status: These statuses are user statuses, and only a user can change the status of a claim to one of these statuses. These statuses are not system assigned (except in one circumstance). NOTE: Biller Defined Status does not indicate that a new status can be added. It indicates that it is a status that is not automatically assigned by the system.
- Appeal - Use this status to indicate that the claim is being appealed.
- Collection - Use this status to indicate that the claim has been sent to collections.
- Crossover - Use this status to indicate that the claim has been crossed over to the secondary payer by Medicare. (This is the one exception; if you are receiving ERAs the system will update a claim to this status automatically upon batch disbursement if the ERA notified us that the claim was crossed over.)
- In Progress - Use this status to indicate that the claim is in progress.
- Info. requested from office - Use this status to indicate that information has been requested from the provider's office for the claim.
- Hold - Use this status to indicate that the claim is on hold.
- Return Mail - Use this status to indicate that the claim has been returned via mail.
- Pending Collection - Use this status to indicate that the claim is currently pending review before being sent to collections.
Submitted Status: These statuses are to show the progress of the claim filing.
- In process - step 1, Electronic - This status means that the claim has just been prepared.
- In process - step 2, Electronic - This status means that the claim has been prepared and is waiting to be processed from Claim Submission, or that the claim has been prepared and processed and is waiting for acknowledgement by the clearinghouse.
- In process - step 3, Electronic - This status means that the claim has been accepted by the clearinghouse and has been forwarded on to the payer electronically.
- In process - step 1, Paper - This status means that the claim has just been prepared.
- In process - step 2, Paper - This status means that the claim has been prepared and is waiting to be processed from Claim Submission.
- In process - step 1, Statement - This status means that the claim has just been prepared.
- In process - step 2, Statement - This status means that the claim has been prepared and is waiting to be processed from Claim Submission.
NOTE: Claims begin aging when they reach status In process - step 3, Electronic. Some payers do not send back an acknowledgement when claims are received; therefore claims in this status are not
“stuck” but should be worked in a manner equal to claims in a Sent Electronic status.
EMR Status: These are the statuses set when a claim has been created via the electronic superbill in the EMR.
- Open - Electronic Superbill - This status means that the claim has been created via an electronic superbill and that the superbill has not yet been released to be processed.
- Closed - Electronic Superbill - This status means that the claim has been created via an electronic superbill and that the superbill has been released for processing.
How to view your enrollments status in Change Healthcare.
1.Log in to : Portal.capario.net
2.Got to Tools and Setup 
3.Click the down Arrow next to tools and setup and choose existing enrollments.

5. View all your enrollments
6. You will then be able to see the status.

On occasion a practice may want to redact financials from the EMR Superbill tab.
Follow the steps below to change the user setting.
User Setting: Display Amounts within Superbill
If checked, the charges, amounts and totals will be displayed on the EMR Superbill. This setting can be found in the User Settings window under Superbill Settings->Display Amounts within Superbill.
If the setting is checked, then the user can see the charges. If the setting is unchecked as “NO”

When unchecked the Superbill EMR tab will view like this.

FAQ: How do I delete a claim?
It is not possible to 'delete' a claim. However, you can 'clear' a claim so that there are no charges/procedures associated with that claim number. To do so, please follow these steps:
- Open the claim to be cleared.
- View the Patient Transaction History and make sure there aren't any payments applied to any procedure lines. If there are, you will need to right-click and delete them.
- In the Quick Claim window, right-click in the Procedure Code box and select Delete. In the Claim Detail window, click into the Procedure Code box and then press ALT-R on your keyboard.
- Repeat as needed for all procedure lines.
- Change the Claim Status to Done, and Save the claim.
If you have followed this process and are unable to remove line items, please contact the Support Team with the claim number and additional information so that we may look into the problem.
