- Navigate to Billing portal. Under Payment Posting select Credit Balance screen
- Use checkboxes at the top of the screen and/or Advanced Search options to view claims with Credit Balances to be worked.
- Double click anywhere on the line to select a claim to work
- Note available checkboxes, dropdowns, monetary information and available actions. More information may be found here
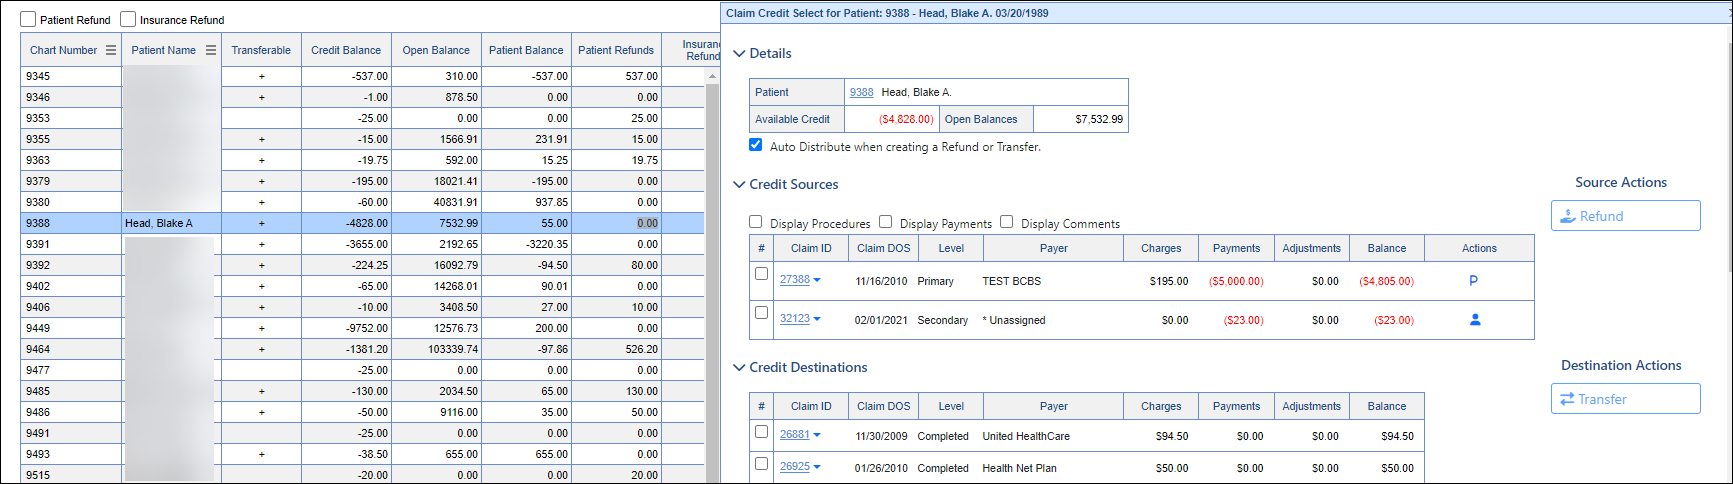
- Decide whether to process as a Refund or Transfer. Items to review are the Transferable status (indicated by the + symbol in the corresponding column) available Credit Sources, Credit Destinations, balances, Refundees, etc.
- Refund: This might be the choice if no Credit Destinations are listed.
- Transfer: Claims that have balances where the credits can be redistributed. *Please note Payer assignees may not be transferred because when a payer pays a claim, it is for that specific claim, procedure, etc.
- Refund: This might be the choice if no Credit Destinations are listed.


Claim Refunds
Upon choosing claims in the Claim Credit Select window and hitting the Refund button, the Refund Screen will display, showing the lines for all selected claims. If “Auto-Distribute” was set to yes, the “Actions” box will be populated with the total credit balance amounts, and the refund will be ready to save once basic information is entered at the top. If "Auto-Distribute" was set to no, the "Actions" boxes will all be at "0".
All Credit Sources selected from the Claim Selection window, will be listed. Under the Actions column, the amount of the credit balance to refund from each Source may be edited.
Once the information is entered and saved, the system will create the needed payment lines to record this refund.
- If the user is refunding the full credit balance on the claim, each line will end up with a negative payment of its current balance.
- If the user is refunding only part of the balance, the system will post negative payments of line balances, starting at the first line and going until it has gathered the requested refund. *Attention should be paid to any balances needing to remain such as true patient payments needing to be applied for claims such as copays, etc.
Real Life Example: Patient has a $5000 deductible. Practice collects in full. Procedure changes resulting in a $195 charge. $4805 would be refunded to patient to account for the overpayment while not causing an additional bill for the $195. 
If a user attempts to save the refund with a payment type that does not affect payments, the system will throw an error: "You have selected a payment type that does not affect payments. Because refunds and transfers affect payment amounts and have the potential to impact provider allocation, we recommend that a payment type that affects payments should be utilized."
Default Payment Types are controlled under Company Settings.
Enter Refund Notes as needed and select Save.
Claim Transfers
Upon choosing credit sources and destinations and hitting the "Transfer” button, the Payment Transfer window displays, showing the lines for all selected claims. If “Auto-Distribute” was set to yes, the “Actions” and “Allocate” boxes will be populated, using all credits from the source claims selected to apply to lines with open balances, starting with the oldest and moving to the newest. The transfers will then be ready to save once all information is entered. If "Auto-Distribute" was set to no, all "Actions" and "Allocate" boxes will be set to "0".
Transfer Selection is in the middle box and and Credit Destination at the bottom matching the information from the Claim Selection screen. The amount of credit to pull from each claim, as well as the amount to transfer to each line with an open balance may be edited.
Once the information is entered and the "Save" button is selected, the system will create the needed payment lines to record this payment transfer.
If a user attempts to save the refund with a payment type that does not affect payments, the system will throw an error: "You have selected a payment type that does not affect payments. Because refunds and transfers affect payment amounts and have the potential to impact provider allocation, we recommend that a payment type that affects payments should be utilized." *Default Payment Types are controlled under Company Settings.
Enter Transfer Notes as needed and select Save.
If the user is transferring the full credit balance for a given credit source, each line will end up with a negative payment of its current balance. If the user is refunding only part of the balance, the system will post negative payments of line balances, starting at the first line and going until it has gathered the requested transfer. Then offsetting payments will be made on the open balance lines in the amount distributed.
Real Life Example: Patient has a credit balance of $300 from claim 45915 but also has balances due totaling $685.01 on other claims. The money may be moved from credit source claim to those claims with balances then sending a statement for the remaining balance to the patient on the next statement run.

6. Once all refunds have been worked, navigate to More > Refund Register Search to continue processing refunds and enter check #'s, etc. More on that process may be found here.
