Executive Summary
Payment Plans |
Billing |
New Features and Updates
Introducing Our New Payment Plans Feature
We are pleased to introduce our new Payment Plan option to collect patient payments. Payment Plans allow patients to make arrangements to pay off high outstanding balances over an extended period of time. Placing a patient on a payment plan may considerably enhance the likelihood of the bill being paid, due to the ease of charging an agreed-upon amount each billing cycle until the full balance is paid.
We recommend that the practice or office establish its own standard operating procedures as "best practices" or guidelines when creating payment plans, based on its personnel, existing practices, and preferences. The practice is responsible for establishing its own allowed eligibility criteria, plan options, and payment options.
Getting started is easy once your practice administrator has set up the required roles in the setup portal. Once granted access, users can begin using the payment plans feature by following these steps:
Configure Company Settings
As a practice, you are responsible for updating the following settings from Setup > Company Settings to meet your business needs.
- Payment Plan - Max. Payment Plan Dollar Amount: Determines the payment plan's total maximum dollar amount allowed. If your practice does not wish to implement a maximum dollar amount for payment plans, this setting should remain 0 = Disabled.
- Payment Plan - Min. Payment Plan Dollar Amount: Determines the payment plan's minimum dollar amount allowed. If your practice does not wish to implement a minimum dollar amount for payment plans, this setting should remain 0 = Disabled.
- Payment Plan - Max. Installments Months: Determines the payment plan's maximum number of months for which installment payments can be configured. This setting will look at the payment plan installment Start and End Date to determine if it's allowed or not.
- Payment Plan - Min. Installments Months: Determines the payment plan's minimum number of months for which installment payments can be configured. This setting will look at the payment plan installment Start and End Date to determine if it's allowed or not.
- Payment Plan - Allow Recurring Payments: Determines if recurring payments are allowed for payment plans. When turned on, this company setting will allow recurring payments for payment plans.
- Payment Plan - Minimum last payment: Determines the minimum payment allowed as the last installment payment. If the amount for the last installment payment is less than this value, the amount will automatically be added to the first payment instead.
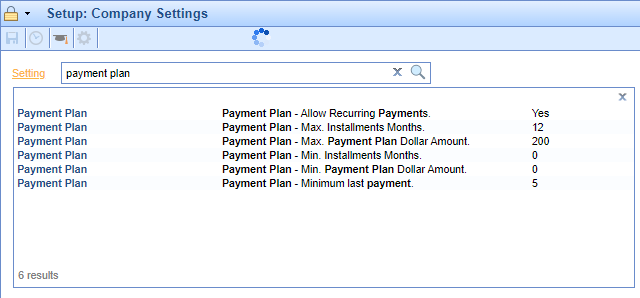
For more information on these settings, visit our Payment Plan Setup Setup document.
Navigating Your Payment Plan Screen is easy
The Payment Plan screen can be found in the Billing portal under the Payment Plan category on the navigation bar.

This screen by default will display all payment plans that currently exist in Past Due status. In addition, the screen allows you to perform a number of additional tasks including searching, reporting, making changes, and opening existing payment plans. Here are some of the payment plan screen fields.

- ID: The payment plan ID number.
- Status: The current status of the payment plan.
- Installment Total: The total number of installments of the payment plan.
- Plan Total: The adjusted plan total of the payment plan.
- Installments: The installment amount for each payment on the payment plan.
- Advanced Search: Used to open the payment plan advanced search window.
- The Advanced Search feature allows for the most complicated and specific types of searches. By clicking the Advanced Search button, a panel with search criteria will be displayed on the left-hand side of the screen. Select the pertinent criteria, then click the Search button on the panel.
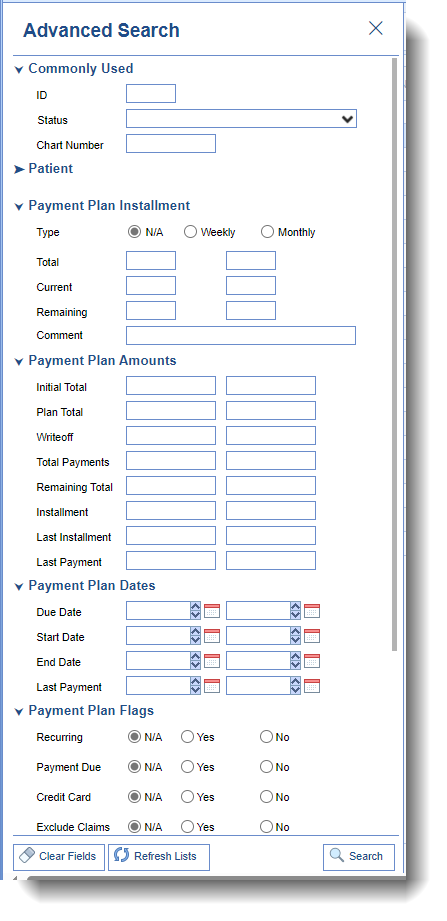
- The Advanced Search feature allows for the most complicated and specific types of searches. By clicking the Advanced Search button, a panel with search criteria will be displayed on the left-hand side of the screen. Select the pertinent criteria, then click the Search button on the panel.
For a complete list of fields or more information on the Payment Plan or Advanced Search windows, click here.
Creating Payment Plans
Creating a payment plan can be done by selecting the "New" button at the top of the payment plan screen. 
Once your patient is selected, the New Payment Plan window will be displayed. 
This window includes 4 sections:
Existing Payment Plans - This section allows users to view any current payment plans the patient already has in place.
- Patient Balance Claims - This section displays any outstanding patient claim balances and allows you to choose which claims or balances you wish to associate with the payment plan. It includes checkboxes to the left of the existing balances used to select the claims you want to include in your payment plan.
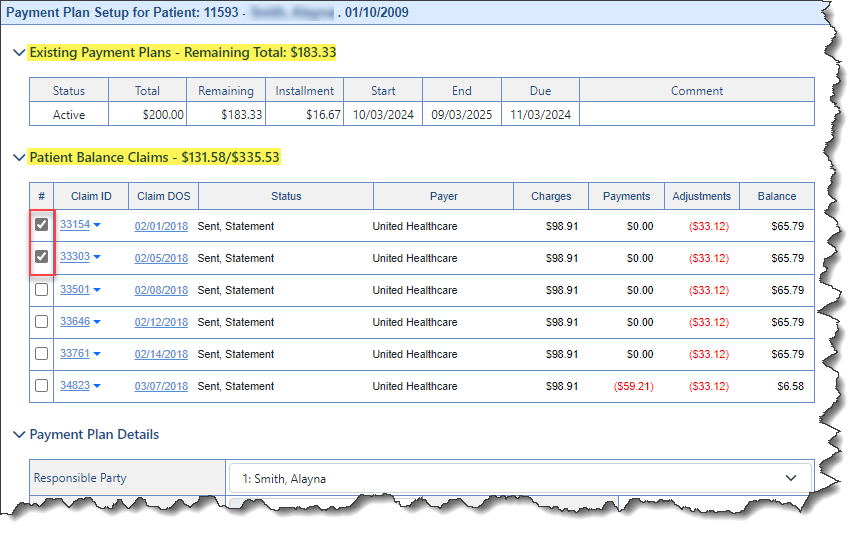
- Payment Plan Details - This section allows users to set up a new payment plan by entering their payment plan details (installment amounts, number of installments, dates, recurring payments, etc.).
- Payment Plan Installment Summary - This section will appear after the payment plan is created and displays the payment plan's installment number, due date, and payment amounts.
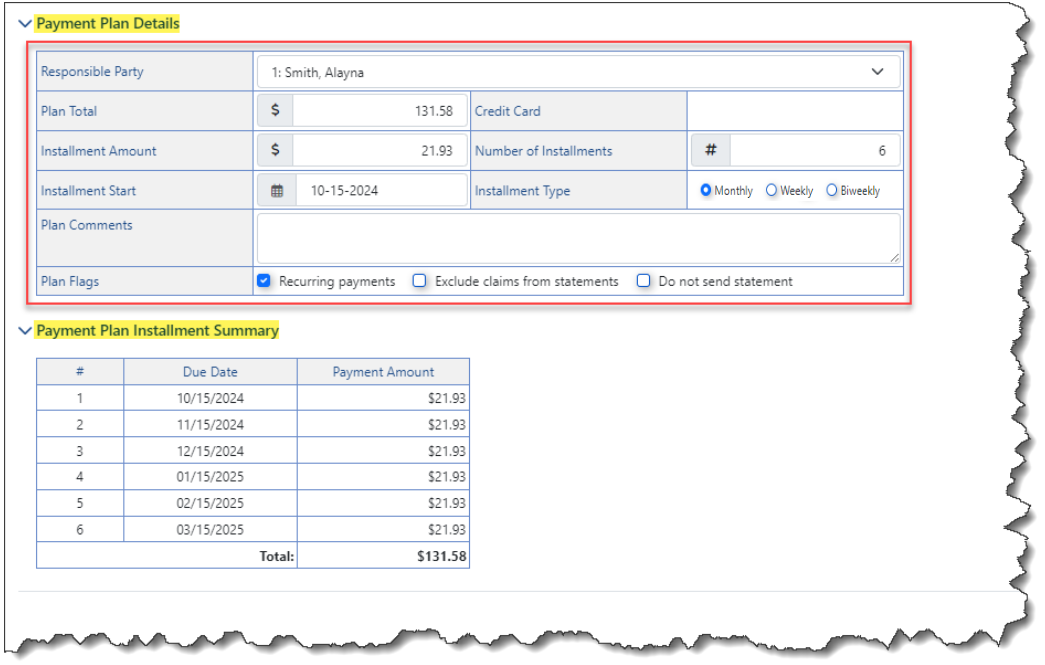
Once you've entered all your payment plan details, you can add a patient credit card on file by selecting the "Add Card" option at the bottom of the screen. This will link the card to the payment plan allowing it to be used for recurring or manual processing. Otherwise, you can click "Save" to save the payment plan. 
Additional Payment Plan Actions
Once you have set up a payment plan, you may find that some edits or updates need to be made to the existing plan. There are several actions you can take on the existing payment plans from the Payment Plan Details Screen.
To get to the Payment Plan Details Screen, highlight the desired payment plan from the list and select the "Open" button at the top of the payment plan screen. Alternatively, you can double-click the payment plan from the list to open it.
Once you select your payment plan, the Payment Plan Details window will appear, containing buttons under the Detail Actions section.
Within the Detail Actions section, you can choose the preferred action from the options provided.
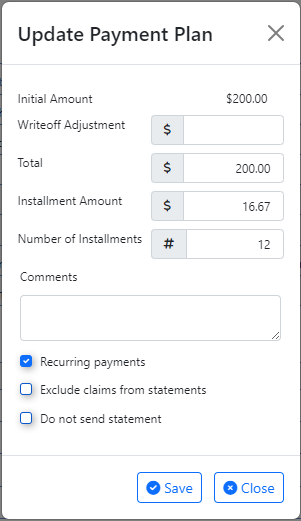
- Update Plan: The Update Payment Plan screen allows you to apply any desired edits or updates to the payment plan.
- Enter any applicable write-off or adjustment.
- Edit the total amount due.
- Edit the installment amount.
- Edit the number of installments.
- Enter any payment plan comments.
- Select any payment plan flag(s)
- Recurring Payment: This will flag the payment plan for the recurring payment process.
- Exclude claims from statements: This will exclude the selected claims from being included in the patient’s statement.
- Do not send statements: This will set the Do Not Send Patient Statement flag for the patient while the payment plan is in Active Status.
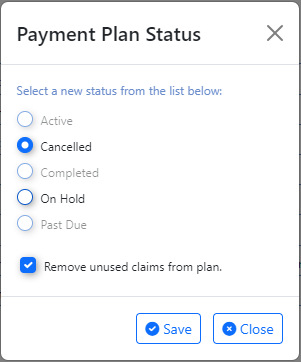
- Update Status: The Payment Plan Status screen allows you to update your payment plan's status from a list of options.
- Active: The Payment Plan is active with expected payment amounts and dates.
- Cancelled: The payment plan has been canceled.
- Completed: The entire payment plan balance was paid in full and no remaining balance exists.
- On Hold: The payment plan is in a hold state.
- Past Due: The payment plan has an installment that has been deemed past due.
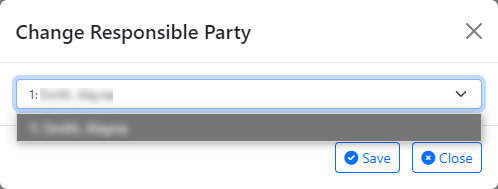
- Resp. Party: The Change Responsible Party screen allows you to update the responsible party from a list of options (if available).
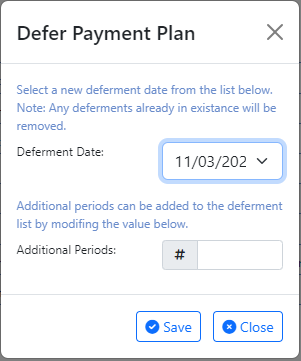
- Deferment: The Defer Payment Plan screen allows you to delay or "defer" a payment until a future date.
- Add Card: The Add Credit Card screen allows you to save a new or existing patient credit card and associate it with the payment plan for recurring and/or manual processing.

More Options
Choosing the "More" option at the top of the Payment Plan window presents the user with the following alternatives.
- Change Display Settings: The Change Display Settings option allows a user to determine exactly which data points are displayed in the Results Grid. You can also determine the Maximum number of rows that are returned for payment plans.

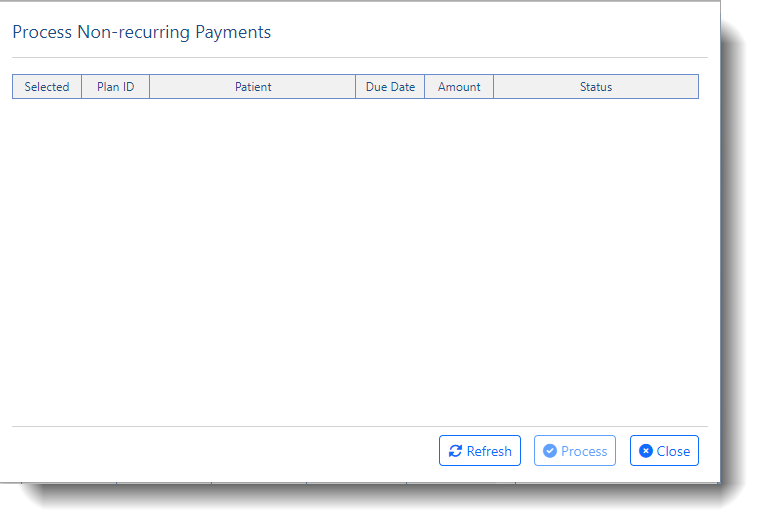
- Process Non-Recurring Payments: The Process Non-Recurring Payments option will open a window that lets a user process a payment for a balance that is not included as part of the payment plan.
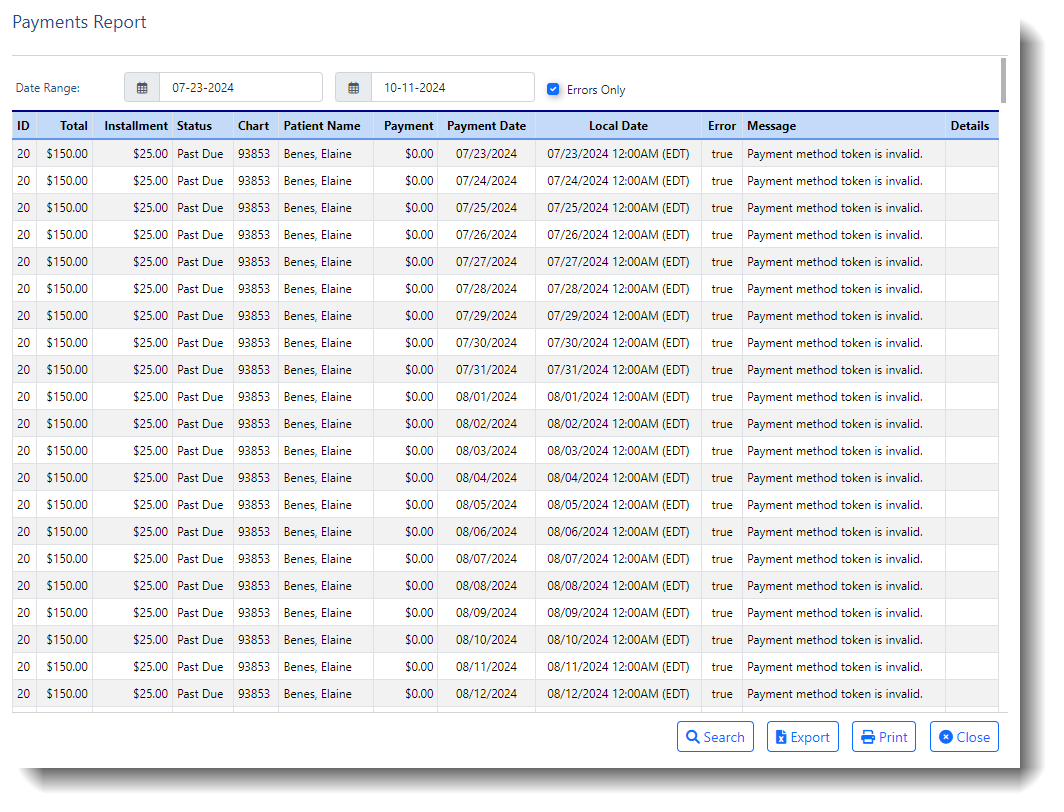
- Payment Plan Payments Report: The Payment Plan Payments Report option will allow the user to run a report on failed recurring payments for payment plans by a specific date range.
iScheduler
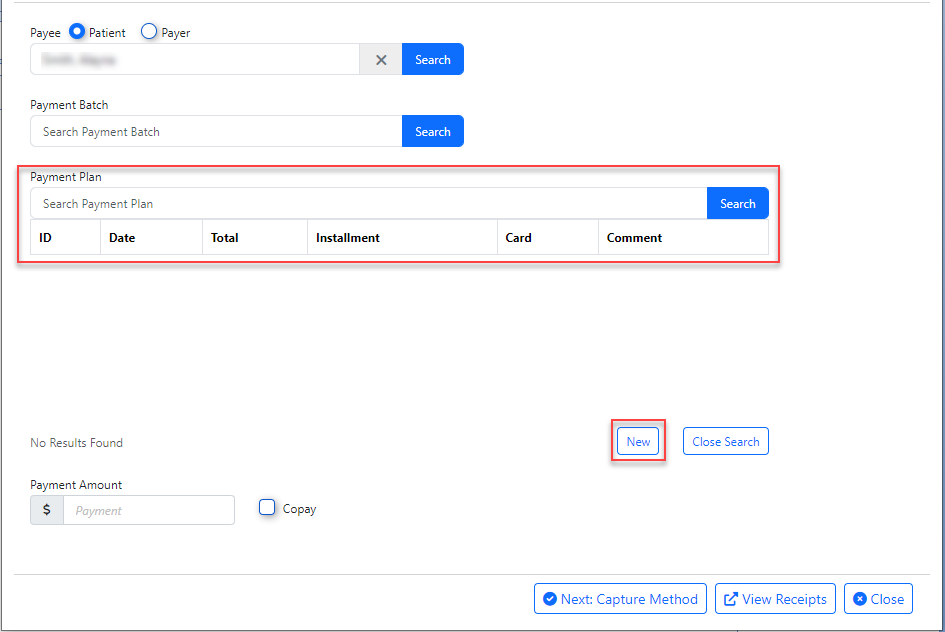
- U15600 - Payment Plans - Option Added to The Quick Pay Window: In the Quick Pay window, we've added a new option that allows users to either select an existing payment plan to link the payment to, or create a new payment plan.

Billing
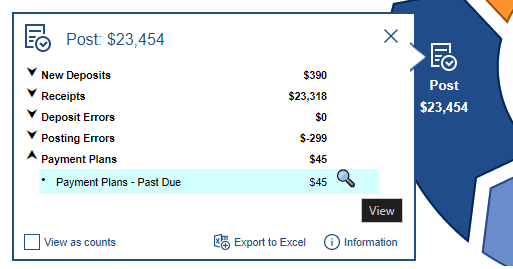
- U16371 - Add Past Due Payment Plans to the Revenue Cycle wheel: Updated the "Post" section of the revenue cycle wheel to include past due Payment Plans. This will display the total of Past Due Payment Plans, either as a dollar amount or payment plan count, depending on the user view selection. When the user clicks the drill-down option, it will link to the Payment Plan window, displaying the Past Due Payment Plans.
- U15601 - Payment Plans - Option Added to The Credit Card Payment Window: Within the Credit Card Payment window, we included a new option to select an existing payment plan or add a new one. This allows users to choose an existing payment plan or click "New" to create a new payment plan directly from the Credit Card Payment window.
 For more information on associating or adding a payment plan from the credit card window click here.
My Tasks
Eligibility
- U19041 - Updated The Dialysis Monthly Eligibility Logic For The Provider Being Utilized: Previously, the provider selection logic for monthly eligibility for dialysis patients used the patient's doctor if listed in the patient setup. If not, it would use the provider NPI set in the company setting "Dialysis Settings - Provider NPI used for Monthly Eligibility Check." However, if the practice did not configure this setting or if they set an invalid NPI (such as a group NPI), the eligibility check for these patients would fail due to the absence of a valid provider for eligibility verification. To help resolve this, we added logic to also consider the default batch eligibility provider if set, ensuring that all available options are utilized to set a provider for checking eligibility.
Reports
Export Data Request
- U18646 - New Process For Data Export Requests: We have modified the Data Export Requests Toast Message that displays in the bottom right corner of the screen and informs you that your request is being processed, to include a clickable link that allows you to open the Report Window.
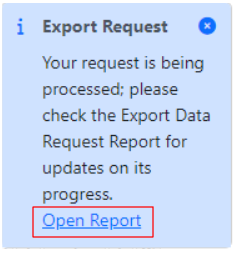
Performing your query and clicking the "Open Report" button opens the Export Data Request window.
EMR
Patient Charts
- U19021 - Limited Support For "Alt + T" For Text Control Fields within EMR templates: We added a time shortcut to text controls so that customers, such as those monitoring procedures, can document the time that vitals are recorded within a single template. This is often done multiple times throughout a procedure, so having this keyboard shortcut will help users save time during documentation. Using the keyboard shortcut 'Alt+T' while focused on a text input within a template will now populate the current time of the user in a HH:MM:SS AM/PM format. For clarity, the Alt+T shortcut is limited to:
- EMR > {Template Chart Tab} > Text Input/Control field:
- Alt+T on keyboard will add the current time as HH:MM:SS AM/PM
- Time is based on the user's timezone user setting
- If unset, use practice timezone (company profile zip)
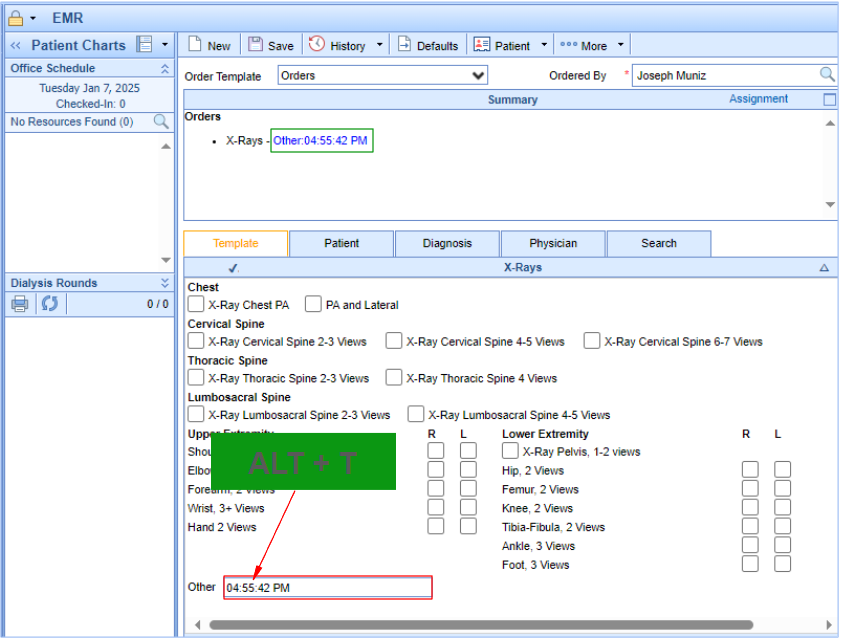
- Alt+T on keyboard will add the current time as HH:MM:SS AM/PM
- EMR > {Template Chart Tab} > Text Input/Control field:
Please note that the time displayed is based on the user's timezone setting or the practice's timezone if the user's timezone is not set.
Bug Fixes
My Tasks
Fax Updox
- B19001- Error When Resending a Fax: Resolved an issue where practices attempting to resend a fax over a day old received a "Failed to build the fax" error. This occurred because we purged the PDF data, so the location for retrieving the PDF data no longer existed. We have modified this process so that the data to resend the fax is now pulled from the sent PDF list, allowing the fax to be sent.
iScheduler
Appointments
- B18849 - Prior Auth Being Carried Forward from Previous Appointment: Corrected an issue where, when a user entered an appointment with a prior authorization number and then scheduled a new appointment for the same patient on a future date, the prior authorization number was incorrectly carried forward to the new appointment.
Billing
Batches
- B18238 - Statement Batch Failing to Download All Patients in The Batch: Corrected an issue that prevented large statement batches from downloading all their patient statements due to the time required to compile the download file based on the number of records. We updated this back-end process and added a completion flag that prevents the download from occurring until the download file has finished compiling.
Receipts
- B19026 - Unable to Edit Fully Reversed Receipt: If a receipt was not initially associated with a payment plan, it must be edited to associate it with the plan. The problem was that when a patient receipt was completed and reversed to apply to a payment plan, the receipt could no longer be edited. We addressed this by modifying the code, allowing reversed payments tied to a receipt to now be edited.
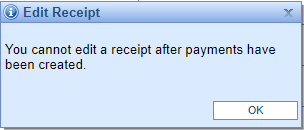
- B19038 - Claims Not Being Updated To Done Status After Receipt Posting: Corrected an issue that prevented claims from being updated to a "Done" status and "Complete" level after a receipt was posted, resulting in the claim having a $0.00 balance. This caused the claim to remain in a "Sent" status, even though the Receipt Company Setting to "Change Claim Status for Completed Procedures" was set to "Yes." We identified a "null" estimated balance value as the issue and corrected it so that if a claim balance is $0.00 after a receipt is applied, the claim's status will be set to complete.
Payment Import
- B19072 - Patient Payment Import Failing to Build Payments: Corrected an issue that caused the patient payment import to fail when importing payments from the attached file for a user. The loading wheel would appear for a few seconds, then time out without displaying an error, and no payments were created.


 For more information on associating or adding a payment plan from the credit card window click


