
The Receipts screen can be found in the Billing portal under the Payment Posting category on the navigation bar. This screen by default will display all receipts that are currently in an error status. In addition the screen allows you to perform a variety of other tasks including searching, reporting, making mass changes, and importing receipts.
Fields
- Checkbox: This box will be used to mark the statement(s) as part of the selection.
- Status: The current status of the receipt.
- Receipt Date: The date of the receipt.
- Chart Number: The chart number connected to the receipt.
- Patient Name: The patient name connected to the receipt.
- Patient Primary: The primary insurance name for the patient connected to the receipt.
- Patient Secondary: The secondary insurance name for the patient connected to the receipt.
- Patient Tertiary: The tertiary insurance name for the patient connected to the receipt.
- Appointment: The date and time of the appointment connected to the receipt.
- Resource: The resource name connected to the receipt.
- Appt. Location: The location name for the appointment connected to the receipt.
- Payer Name: The payer name for the receipt.
- Paid Amt: The total paid amount of the receipt.
- Applied Amt.: The amount of the paid amount that has been applied.
- Unapplied Amt.: The amount of the paid amount that has NOT been applied.
- Receipt ID: The id number of the receipt.
Advanced Search
The Advanced Search feature allows for the most complicated and specific type of searches. By clicking the Advanced Search button, a panel with search criteria will be displayed on the left-hand side of the screen. Select the criteria that is pertinent, then click the Search button on the panel.

Buttons at the top of screen
- New:
- The New button will allow you to create a new receipt for a patient manually.
- Click New and you will be prompted to search and select a patient.
- The Quick Pay receipt window will be opened and the necessary details can be entered.
- The receipt will be generated and the receipt reconciliation process will run.
- The New button will allow you to create a new receipt for a patient manually.
- Open button:
- The Open button will open the Receipt Details screen in a pop-up window for the receipt selected in the Results Grid.
- The Open button will open the Receipt Details screen in a pop-up window for the receipt selected in the Results Grid.
- More > Change Display Settings:
- The Change Display settings option allows a user to determine exactly which data points are displayed in the Results Grid. You can also determine the Maximum number of rows that are returned.

- The Change Display settings option allows a user to determine exactly which data points are displayed in the Results Grid. You can also determine the Maximum number of rows that are returned.
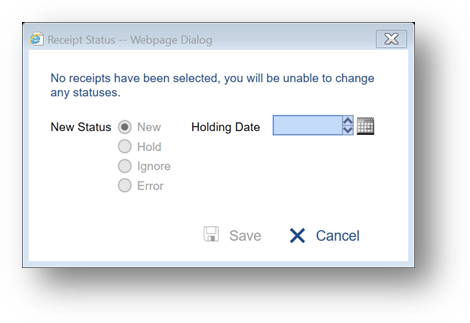
- More > Change Status:
- The Change Status option will open a window that lets a user update multiple receipts to a different status at once. The only statuses that can be changed are New, Hold, Ignore, or Error. Once selected, you can then choose the new status that the selected receipts will be changed to. You will also be able to determine a new Hold Date for all the selected receipts. If no Hold Date is selected, the hold date will remain as is on each of the receipts.
- The Change Status option will open a window that lets a user update multiple receipts to a different status at once. The only statuses that can be changed are New, Hold, Ignore, or Error. Once selected, you can then choose the new status that the selected receipts will be changed to. You will also be able to determine a new Hold Date for all the selected receipts. If no Hold Date is selected, the hold date will remain as is on each of the receipts.
- More > Receipt Reconciliation:
- The Receipt Reconciliation option will allow you to force the receipt reconciliation process to run against all the selected receipts.
- Please note, if a receipt is not in a status of either New or Hold, the receipt will automatically be skipped. This option may be helpful to use only if you want the process to run earlier than normal.
- More > Import Receipts:
- The Import Receipts option allows a user to upload a Microsoft Excel file containing patient payment information. The file must meet the iSalus Import specs which can be accessed on the import window.


Gear Icon
The ‘Gear’ icon found in the upper right-hand corner provides access to some basic settings and options like print/export.
- Security: This option will open the ‘Role Setup’ screen which is where you can determine who has access to the window.
- Screen: This option is not used here.
- Company: This option will provide access to Company Settings related to Receipts. This is helpful for setting up pertinent business rules related to the receipts process.
- User: This option will provide access to User Settings related to Receipts. Currently, there are none.
- Setup: This option is not used here.
- Print: This option will allow you to print the Results List or export the Results List to Microsoft Excel. You will be prompted to select the pertinent action.
- Audit: Receipt auditing is not currently supported from this window.
- Refresh: This option will refresh the window.
- Close: This option is not used here.
