
The Prepare category represents claims that the next step is to be sent to insurance or patient. The screen allows you to toggle the amount view from counts to dollar amount, Export the list to Excel, and to get more Information, such as when the counts being viewed were last updated. All of the claims in this category fall into 4 different sub-categories. If a sub-category is labeled with a down arrow then the user can click on the sub-category label to expand it to see more detailed information. The magnifying glass on the right of each line shows up as a hover option. Clicking this icon will open the selected group of claims in the Billing Query screen with the exception of Missing Claims which opens the Missing Superbills screen.
- Missing Claims - Appointments that have been checked in or checked out but do not yet have a claim created
- Missing Data - Claims that have been created but are missing a necessary piece of data that is required before the claim can be sent out
- Ready for Processing - Claims that are currently ready to be sent out
- Claim Issues - Claims that are failing some level of validation rules

Missing Claims are claims that the system believes should have been created from the EMR. They can be located on the Provider Counts/Missing Superbill screen. Highlighting the Missing Claims line and clicking the magnifying glass icon will take you to this screen with your superbills that are missing claims selected.

The Missing Superbills report consists of a graph displaying both Missing Superbills, represented in black, and Open Superbills that have not yet been closed, represented in blue.
Workflow
Double click one of the bar graph lines to get a detailed list of the encounters are missing claims.
Missing Superbills (Black Bar)

- Print your detailed list using the print button in the upper left hand corner to PDF or to paper.
- Check with the clinical staff to see if the visit has been completed yet.
- If yes - Make sure the encounter in the EHR is completed and then it will be automatically removed from the list.
- If no - Wait until the visit and the encounter is completed and then it will be automatically removed from the list.
- If the appointment was not kept or was rescheduled - Click the clipboard icon on the left of the row.
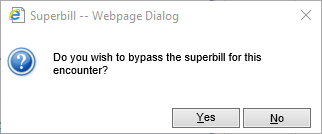
- Click Yes and Missing Superbill will be removed from the list.
Open Superbills (Blue Bar)

- Print your detailed list using the print button in the upper left hand corner to PDF or to paper.
- Check with clinical staff to see if the Encounter is ready to be closed.
- If yes - Close the encounter and the superbill will automatically be removed from the list.
- If no - Wait for the clinical staff to complete and close the encounter and it will be automatically removed from the list.

Missing data are claims which may be missing procedures, diagnoses, guarantors, insurance, rendering providers, service location, or signatures. Clicking the down arrow to the left of Missing Data displays the specific data missing for claims in your system. Clicking the magnifying glass to the right of Missing Data will open the Billing Query with all claims missing data selected. Clicking the magnifying glass next to one of the detail rows will open just the claims for that selected group.
Workflow
- Click the magnifying glass to open Billing Query.
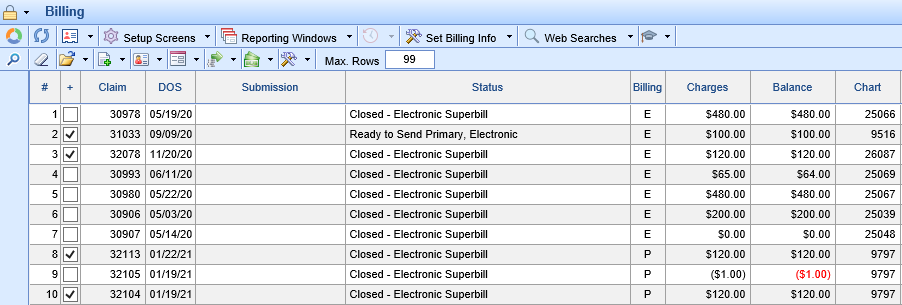
- Double click the claim to open the Edit Claim screen. The missing data will be identified by outlined red boxes, Red Xs in the validation section of Messages and Monitoring, and under Missing Data in Queue and Tasking.
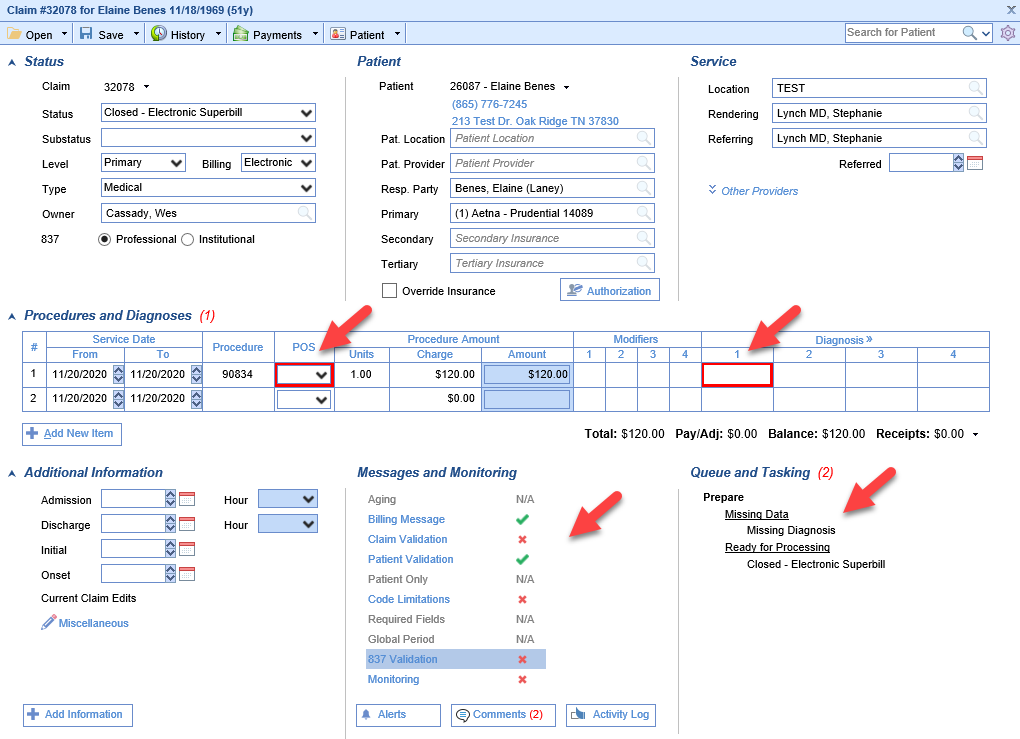
- Add the missing data to the claim per the instructions below.
- Click Save.
- Close the Edit Claim screen.
Adding Missing Data to the Claim
Missing Procedure - Hover over the group and click the magnifying glass to open the billing query screen. Double click on one of the claims. The Procedure box will be outlined in red. Right-click inside the Procedure box and select Search. Find your procedure code on the search screen and click to select it. Save the claim.
Missing Diagnosis - Hover over the group and click the magnifying glass to open the billing query screen. Double click on one of the claims. The Diagnosis 1 box will be outlined in red. Right-click inside the Diagnosis 1 box and select Search. Find your diagnosis code on the search screen and click to select it. Save the claim.
Missing Responsible Party - Hover over the group and click the magnifying glass to open the billing query screen. Double click on one of the claims. The Resp. Party box will be filled in pink. Click on the search button in the right side of the box. Select the responsible party. Save the claim. If no responsible party is listed, click Patient on the toolbar. Click the Responsible Party section on the left. Add a responsible party. Close the Patient Setup screen and repeat the previous steps.
Missing Primary Insurance - Hover over the group and click the magnifying glass to open the billing query screen. Double click on one of the claims. The box Primary Insurance box will be filled in pink. Click on the search button in the right side of the box. Select the primary insurance party. Save the claim. If no insurance plans are listed or if the primary insurance plan is missing, click Patient on the toolbar. Click the Insurance section on the left. Add a primary insurance. Close the Patient Setup screen and repeat the previous steps.
Missing Rendering Provider - Hover over the group and click the magnifying glass to open the billing query screen. Double click on one of the claims. The Rendering Provider box will be filled in pink. Either begin typing the provider's name or click on the search button in the right side of the box. Choose your provider from the search results and click to select it. Save the claim.
Missing Service Location - Hover over the group and click the magnifying glass to open the billing query screen. Double click on one of the claims. The Service Location box will be filled in pink. Either begin typing the location name or click on the search button in the right side of the box. Choose your location from the search results and click to select it. Save the claim.
Missing Signature - Hover over the group and click the magnifying glass to open the billing query screen. Double click on one of the claims. Click the Patient button on the toolbar to open the Patient record. Click on the Demographics tab on the left. Verify the patient has a signed consent form on file. Click the Signature check box and set the date accordingly. Click Save. Close the Patient record. Refresh the Claim.

Ready for Processing are claims that are currently in a status that designates they are ready to be submitted to a payer. These claims are ready to be billed to primary, secondary, tertiary insurance, or to the patient. Claims in a Closed status are claims that are ready to be assigned to either an insurance company or patient for billing.
Workflow
Claims
- Click the magnifying glass to open Billing Query. The claims with a balance without errors that are ready to be processed will be selected with a check mark in the '+' column. Please see the Missing Data article if you need help with resolving errors.

- On the toolbar at the top of the screen, click the Submission Options button and click Submit Claims or Submit Statements depending on claim status you have searched for.
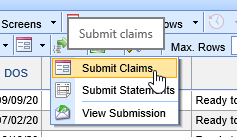
- Confirm the information on the Prepare batch screen and click OK.
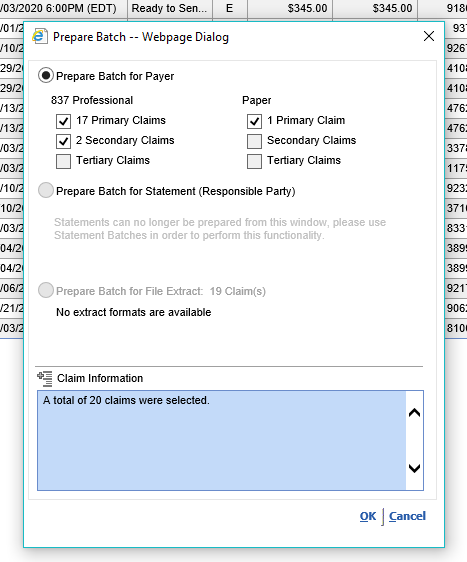
- You will get a message that your batch(es) have been created and you can continue by Reviewing and Sending your batches on the Claim Submission window. Click Ok.
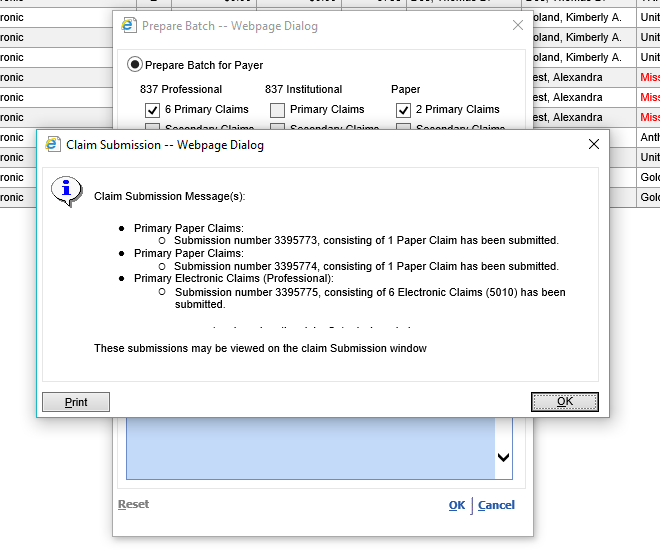
- When the Claim Submission processing has completed the submission batch will populate into the Submit section of the Revenue Cycle Wheel.
Statements
Click the magnifying glass next to Ready to Send Statement to open the Ready to Send Screen
From here you can Manually Batch and Submit Statements if that is your process.
Claim issues are claims that have been identified as having procedure codes with potential NDC errors or procedure codes that fall into a Global Period. It is recommended that these claims be reviewed prior to submitting them to insurance.

Workflow
- Hover over the group and click the magnifying glass to open the billing query screen.

- Double click on one of the claims.
- The issue will be identified in the Queue and Tasking section in the bottom right of the screen.
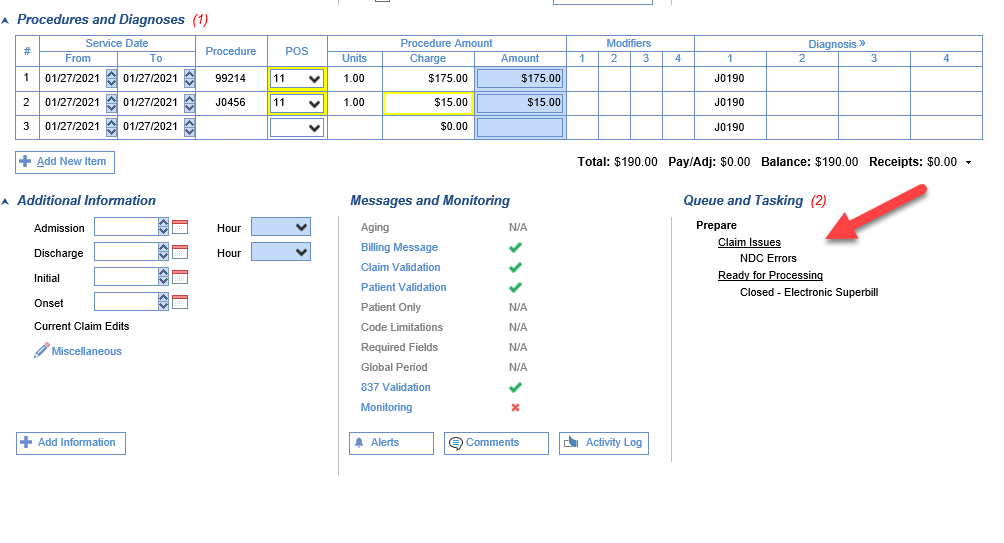
- Review and, if necessary, correct the claim per the instructions below.
- Click Save.
- Close the Edit Claim screen.
Correcting Claim Issues
NDC Errors - Hover over the group and click the magnifying glass to open the billing query screen. Double click on one of the claims. There will be a red X next to Monitoring under Messages and Monitoring and NDC Errors will be listed under Claim Issues under Queue and Tasking. Right click on the procedure code and choose NDC. From this screen you can quickly move between procedure lines to enter the correct values for NDC Value, Price, Quantity, and Unit. These fields are often required for NDC codes. Click Save. Monitoring should now have a green check mark and the Claim Issues are now gone. Close the Edit Claim screen. (Note: The NDC error may persist if the documented price and quantity do match the charge on the claim)
Global Period - These claims should not be billed to insurance in most cases. Users have two options. To change the charge amount to $0.00 - Hover over the group and click the magnifying glass to open the billing query screen. Double click on one of the claims. Click the X to clear the amount from the Charge field. Save the claim. To adjust the claim balance to $0.00 - Hover over the group and click the magnifying glass to open the billing query screen. Click once to select one of the claims. Click the Billing Options icon on the toolbar and select Payment. Add the Paid By, Adjustment Amount, and Adjustment Type. Click Post. Click Close.


