This document will help define the buttons available within the new scanning screen available when using Google Chrome. Additional information about each button can be found below or via embedded links within the descriptions.

1. Custom Scan
Source


This drop-down menu will allow you to select the scanner you wish to use.
Show Scanner UI


If you would like to use any scanning profiles you may have created in the past or apply additional settings to your document before scanning it into the system you will want to check this option. After selecting Scan another window will display the comes from your scanner. You will need to follow the steps on this screen to scan the documents.
Use ADF


If your scanner allows for an Automated Document Feeder (ADF) you may select this option to use this feature. Otherwise uncheck the box and scan pages individually. This option should not be selected if you are using a flat-bed scanner.
Auto Remove Blank Page


This selection will allow a user to remove any blank pages when scanning in multiple pages so they do not have to be removed manually.
2-sided Scan


Selecting 2-sided scan can be used to coalesce a page that has information on both the front and back to 1 page. If you wish for the front and back sides of a document to be their own pages you will need you either flip the page over and scan again or Use Scanner UI.
Pixel Type


The pixel type is used for deciding what color options should be used for the pages being scanned in. There are three available options for this:
- B&W - Scanned page(s) will display in black and white
- Gray - Scanned page(s) will use grayscale for the document. This option is what was used for all images scanned using Internet Explorer
- Color - Scanned page(s) will display in full color. Scanning in pages using color will cause the image to have a larger file size.
Resolution


Resolution is equivalent to size and clarity. The larger the resolution, the larger the image and file size. The recommended setting for this is between 100-250.
Scan


Once all appropriate settings are configured, select Scan. This will initialize the scanner and process the pages. If you have Use Scanner UI on, then you will need to use this screen to initiate and complete the scan. After processing, you will have the ability to rearrange, filter, name, and assign the document to other users before uploading them into folders.
Message Center 

The message center is used as a self-contained audit for the scanning session you have open. It can be used to backtrack if you have uploaded a document into the wrong chart for example. In this case, you could check the message center for the recent uploads and navigate to the chart within eDocuments and move it to the appropriate chart.
Note: This only audits your current session, not previously opened windows.
2. Save Documents / Upload
Filename


Filename to be displayed within the folder and on the timeline in the EMR.
Document Format Dropdown
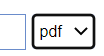

Previously, the only option for scanning into the system was a Tiff file. Now you will default to the PDF option but also have selections for TIFF and JPEG.
Received Date


A received date can be set to show a difference between the day the file was scanned into the chart versus when the file was received by the office.
Type (Document Type)


The options available will depend on what has been set up for your practice during the implementation phase. This field is used to further categorize documents with pre-defined document types.
Comment


Use the comment field to add context to the file you are about to upload. This comment is visible within the columns when viewing documents in the My Task List or eDocuments Portal/Chart Tab.
Menu


The menu items are based on what is seen in eDocuments Portal. Making a selection other than Practice will allow for the specific entity to be searched for below. Ex. If set to Patient, a patient search field is available below the folder selection.
Folder


The folder drop-down list is the equivalent of the folder structure seen on the left-hand side of the eDocuments portal. From here you will determine the Cabinet>Drawer>Folder you are about to upload the file to.
Menu Specific Item (Patient / Resource / Payer / Company)


As discussed in the Menu section, depending on what is selected, different searches will be available to you. If you are in a situation where you need to upload documents to different charts. This section can be used to search for the next patient you need the files uploaded for. In the event you selected Resource or Payer, the searches will be specific to those categories.
Assign to User/User Group to Review
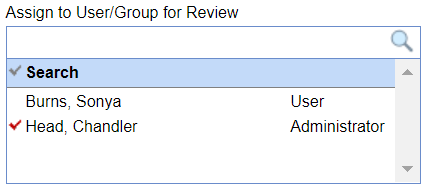

This existing concept in the system was added to ease the disperse and review process. Different from the ability for scanning in IE, the Chrome window will allow for a user to assign specific files to a user or user group to review in the My Tasks - eDocuments section.
Review Comment
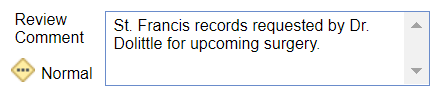

Only used in conjunction with the above, when assigning a document for review, you may want to add a comment. It may be helpful to add task-specific context to the document you are marking for review.
Priority


Similar to Review Comment, a Priority can be set to help prioritize the list of documents for review. By default, this will be set to Normal.
Clear Settings After Upload


After all Save Document settings are configured you may decide you'd like to keep these settings for the next file you upload. In that case, uncheck this option. If you have a whole new patient and folder to upload to, you may want to clear these settings after you upload the first file.
Upload


This button will use the above determinations to upload the displayed files on the left-hand side. If uploading different files, ensure you are only displaying the active files you'd like uploaded.
3. Toolbar & Display
Delete Single Page


After selecting one of the scanned pages, you may decide you need to delete this one page. This icon will allow for this ability.
Clear All Pages


If you have uploaded all documents or scanned the wrong pages altogether you may want to
Page Forward & Back


Will flip through each page and display the selection in the viewing pane.
Filter


The filter is a new concept within the system. This will allow for a user to scan multiple pages and then divide them into separate files/sections. These files can then be uploaded into various folders and charts if need be. It may also be used to filter what pages are displayed to you. A step-by-step guide can be found here.
Page Number


The page number is displayed in the bottom-right corner of each thumbnail in the display pane. You can drag and drop the thumbnails to rearrange the pages prior to selecting upload. This will be the order of the pages when the file is opened in the patient's chart.
Rotate
You have the ability to rotate a document within the document previewer. Select the icon to rotate the image 90 degrees counter-clockwise.
Aspect Ratio
 /
/ 
 /
/ 
Depending on the specific document or page you are viewing, you may want to change the aspect ratio to better view the image prior to upload. Use the icon to swap from a 1:1 (actual size) ratio to a fit-to-screen ratio.
Zoom


Use the + or - icon to zoom in or out on the selected page.
