CMS updated the format of certification numbers beginning in 2026. The OfficeEMR 2025 CMS Certification ID is 2025C16KJR0PA58 (the MIPS Dashboard under Reports > MIPS Dashboard was updated to reflect this change).
Medicare is requiring a minimum of 75 MIPS Performance points for the 2025 Performance Period to avoid a negative payment penalty in 2027.
OfficeEMR MIPS Assist 2025 Program
It is becoming increasingly harder to avoid a negative payment penalty for the eligible clinicians required to participate in the Merit Based Incentive Program. MIPS Assist was such a success in 2023 and 2024, we will continue to offer OfficeEMR MIPS Assist 2025. Let our MIPS Consultants work one-on-one with your team to ensure you meet your MIPS score goal for the 2025 reporting period.
Our comprehensive, user-friendly products and knowledgeable MIPS consultants will guide you to quality reporting success. We will help you:
- Create a plan to avoid a payment penalty in 2027.
- Optimize incentive and potential bonuses.
- Select the right measures and configure OfficeEMR for maximum reporting efficacy.
- Analyze and improve performance.
- Successfully submit data to Medicare.
What's Included
- Guidance on MINGLE Registry Signup
- MIPS 1 hour Kick Off Meeting to review measures and train on how to collect, view, and report MIPS data
- Promoting Interoperability-Provide Patient Access activation/setup
- 4 hours of MIPS template configuration and/or consultation time
- Quarterly check-ins with your iSalus MIPS Consultant
- Assistance with final submission of your MIPS Reports using MINGLE Health
Our goal is to help take the guess work out of MIPS reporting for your practice. Through our MIPS Assist program, we will assist your practice in maximizing the amount of points a provider or group practice can earn during the reporting period.
Am I Eligible for MIPS in 2025?
You can check your eligibility by going to the QPP website and entering your NPI in the Check Your Participation Status section of the screen.
How Much Does It Cost?
The MIPS Assist base package is $2000.00 This includes MIPS consultation services for up to 3 NPI's. Each additional NPI (above 3) is $200.00 per provider. Only reporting clinicians should be included in this package.
How Do I Sign-up?
If you are interested in the MIPS Assist Program, you can sign-up by clicking on this link: MIPS Assist 2025 Sign up
Follow these Steps to Verify Your Eligible Clinician Participation Status:
If your practice is planning on group reporting, be sure to check and take note of clinicians who are only eligible for group reporting (PA, NP, etc). They will often be required to report if you report as a group.
- Navigate to the Setup Portal.

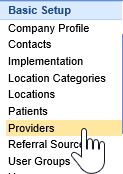
- Select Providers under Basic Setup.
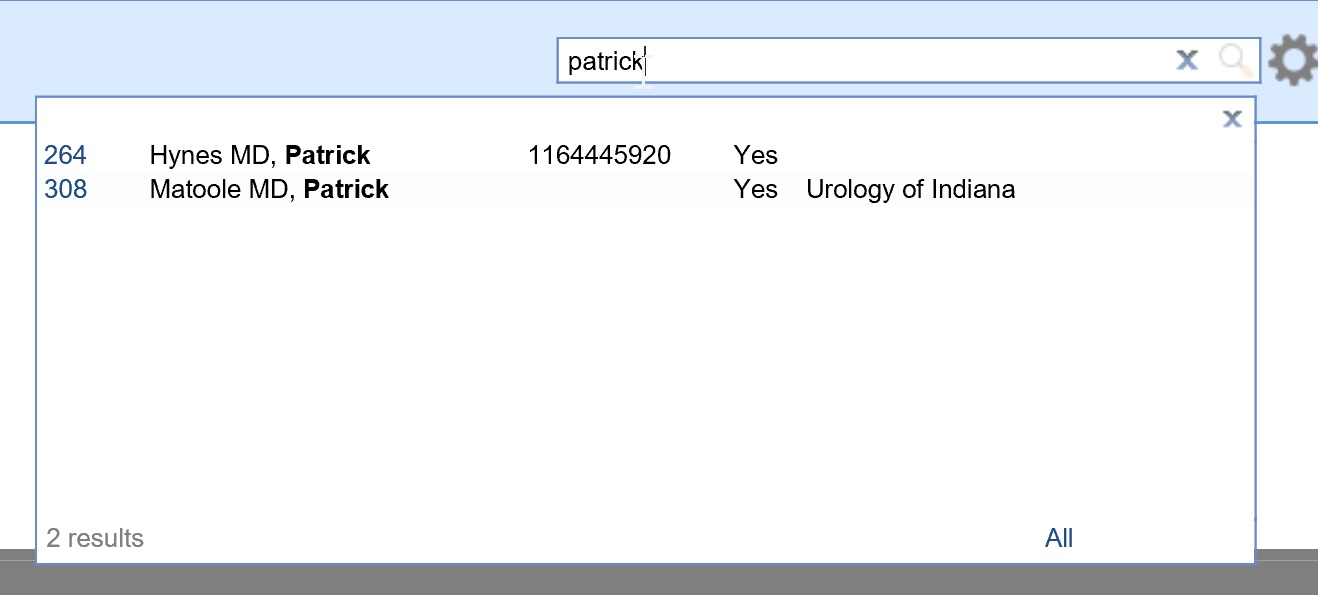
- Search for each billing NPI at the Practice under the Provider Search.
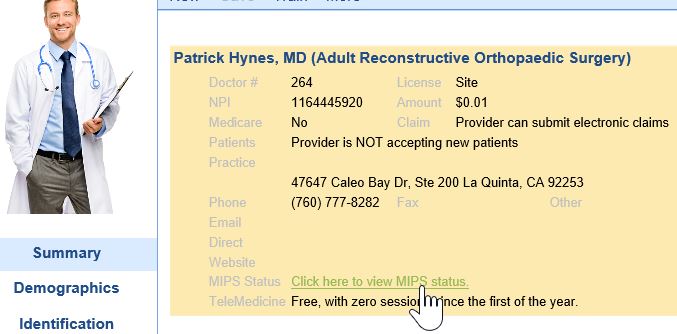
- Select the Click here to view MIPS status link.
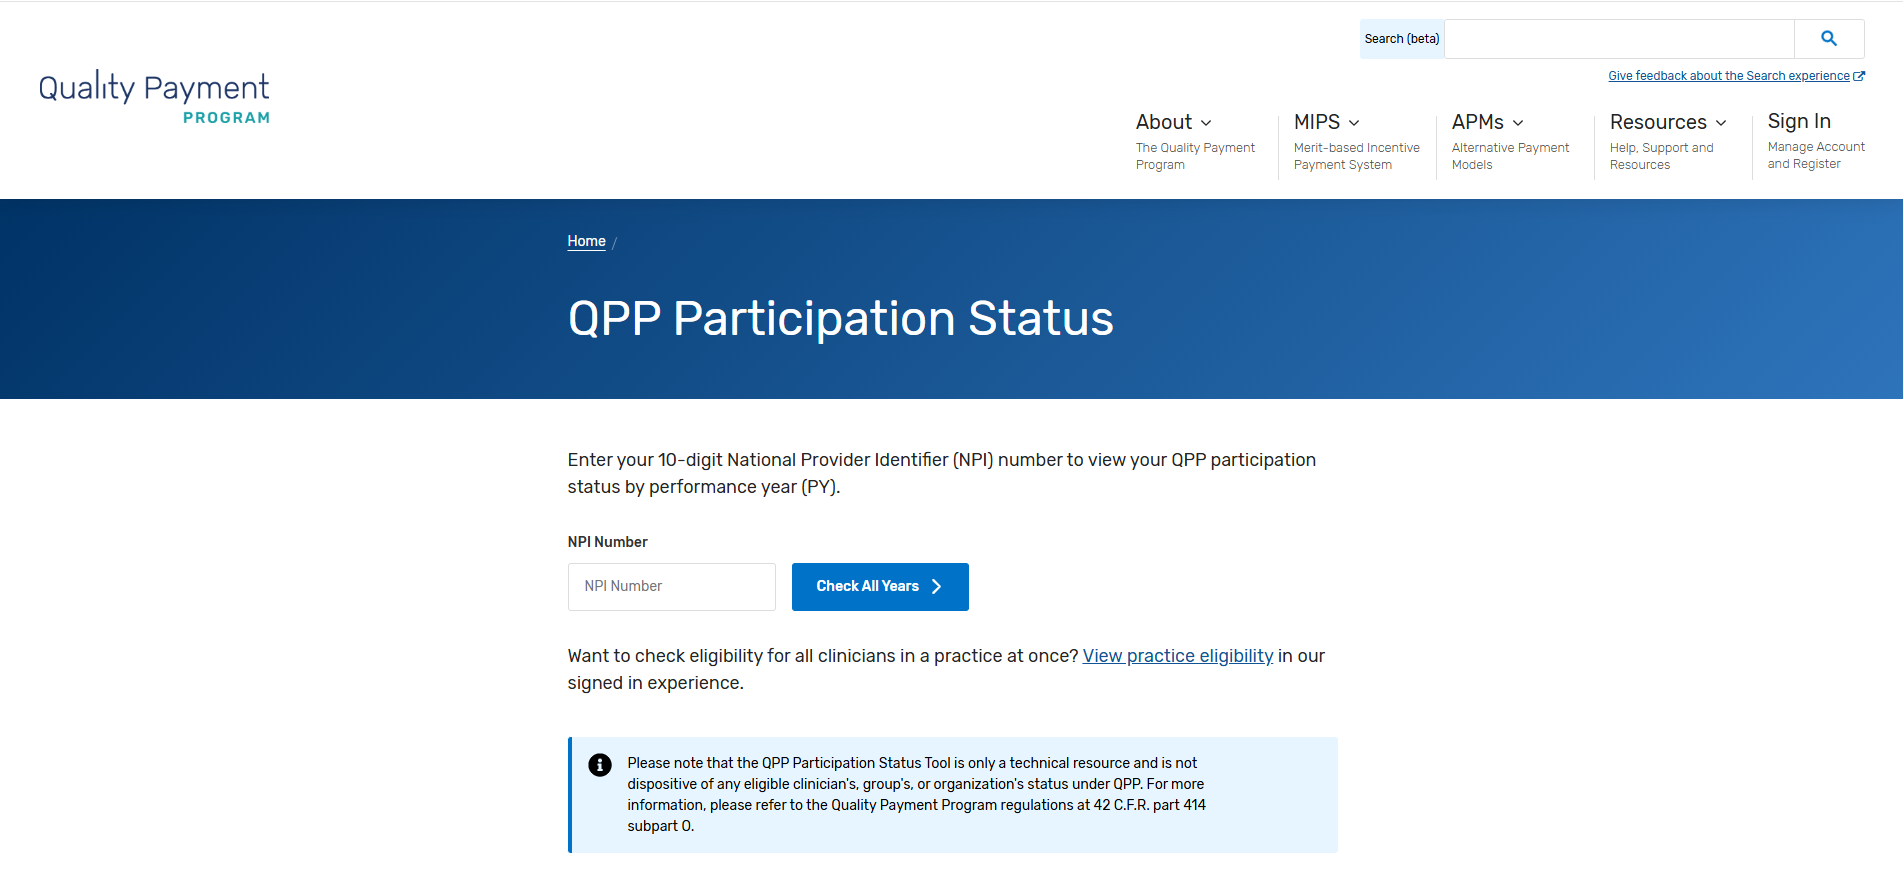
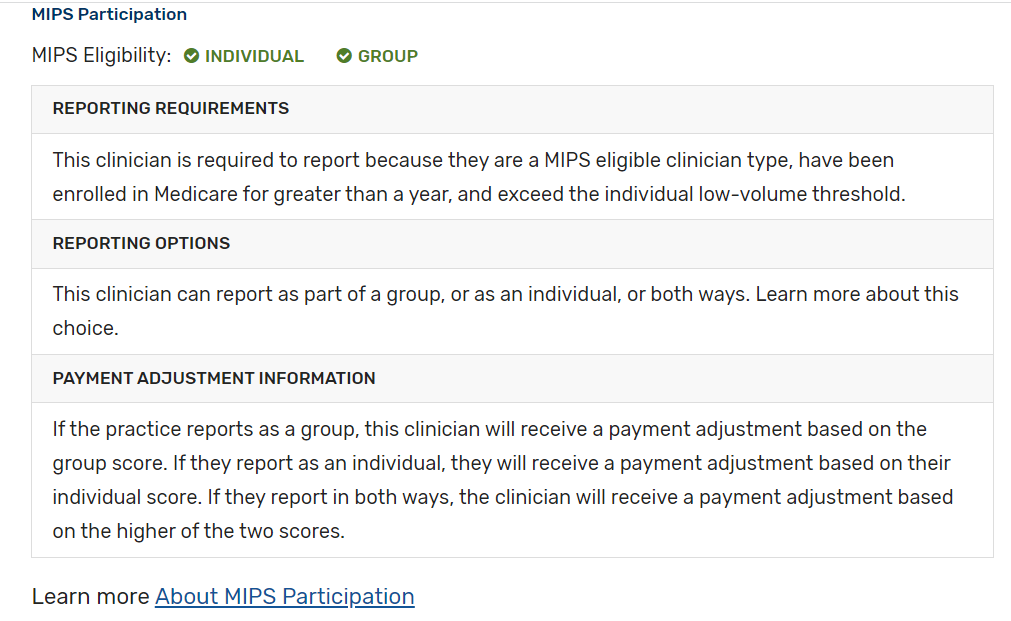
- This will open the CMS QPP Participation Status for the Selected Clinician. Make sure the appropriate Fiscal Year tab is selected.
- Scroll Down until you see the Clinicians name and Practice Name. Click on the Expand button to view the clinician's full eligibility information.

- Document whether the clinician is eligible as an individual and/or group provider.
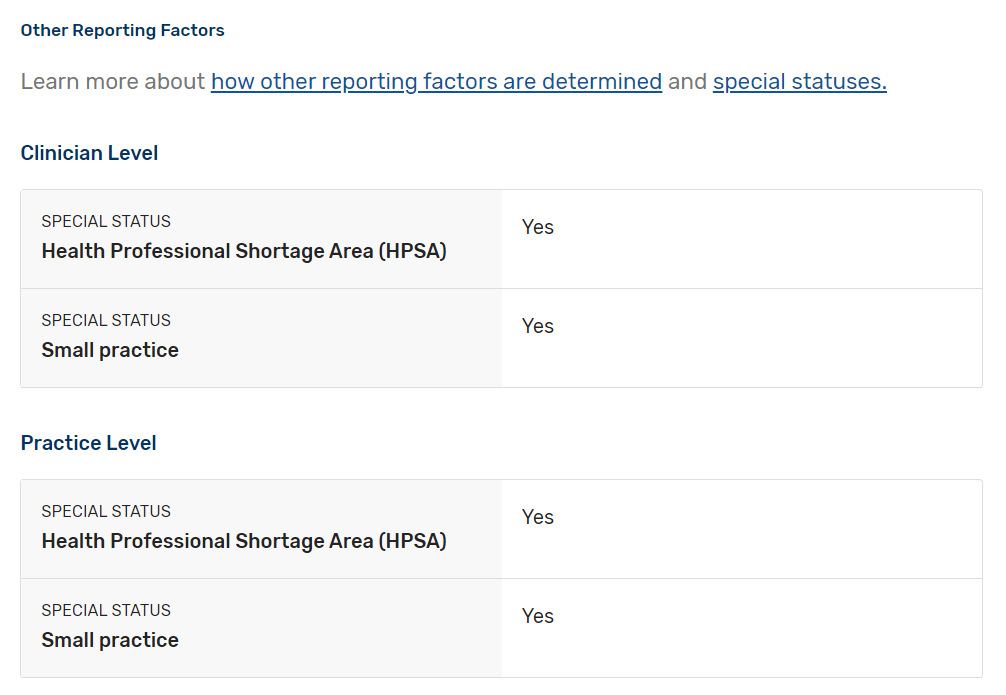
- Scroll down to check for any special statuses. Click here to learn more about special statuses.
- Go back to step 3 and repeat for all clinicians at the practice.
Check out qpp.cms.gov for more information about how MIPS eligibility is determined.
Practices with more than 1 eligible clinician will need to determine whether they wish to report as individuals or as a group.
- An individual clinician submits measures and activities for the practice(s) (identified by TIN) in which the clinician is MIPS eligible.
- A group is defined as a TIN with 2 or more eligible clinicians, including at least 1 MIPS eligible clinician, as identified by their NPIs who have reassigned their Medicare billing rights to the TIN.
- Most practices with 2 or more eligible clinicians will report as a group in order to earn incentives for and to protect the TIN against negative payment adjustments.
- Learn more about the Quality Payment Program in CMS’s Individual or Group Participation
CMS has defined and automatically assigns special statuses to MIPS eligible clinicians, practices, virtual groups, and APM entities who meet certain criteria. These special statuses are as follows:
- Ambulatory Surgery Center (ASC)-based;
- Hospital-based;
- Facility-based;
- Non-patient Facing;
- Small Practice;
- Health Professional Shortage Area; and
- Rural
These statuses may impact your MIPS reporting requirements, such as applying 2x the points for each improvement activity submitted during traditional MIPS reporting, automatic reweighting of the Promoting Interoperability performance category to 0% and more. To determine if your clinicians and practice have been assigned one or more of these special statuses and how they impact your MIPS reporting for 2024:
- Check Participation Status QPP Participation Status
- Special Statuses Review the 2024 Special Statuses
CMS has extended the Extreme and Uncontrollable Circumstances (EUC) exception application and MIPS Promoting Interoperability Performance category hardship Exception application to allow clinicians, groups, virtual groups and APM Entities to submit an application requesting MIPS performance category reweighting due to the current COVID-19 public health emergency. Click here to learn more about this and other QPP exception applications.
The MIPS Promoting Interoperability Performance Category Hardship Exception application deadline is 8PM ET on January 2nd, 2024.
Follow these steps to apply for the COVID-19 related extreme and uncontrollable circumstances exception for a group, virtual group or APM Entity:
- Log in to qpp.cms.gov.
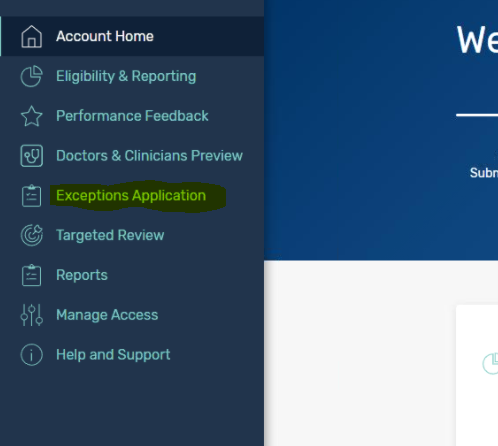
- Click on the Exceptions Application menu option.
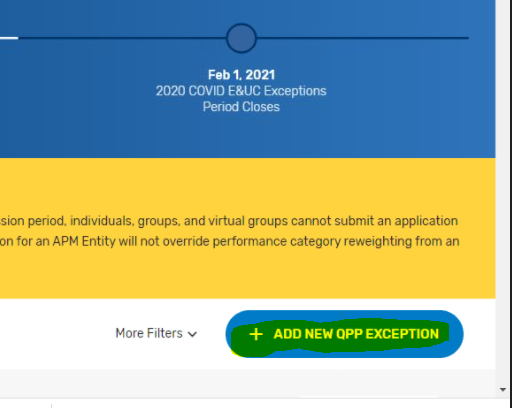
- Select Add New QPP Exception.
- Pick the Extreme and Uncontrollable Circumstances Exception option.
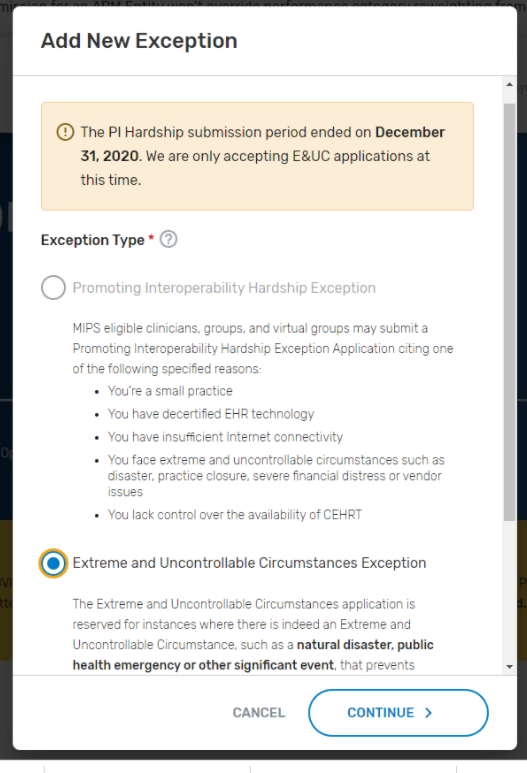
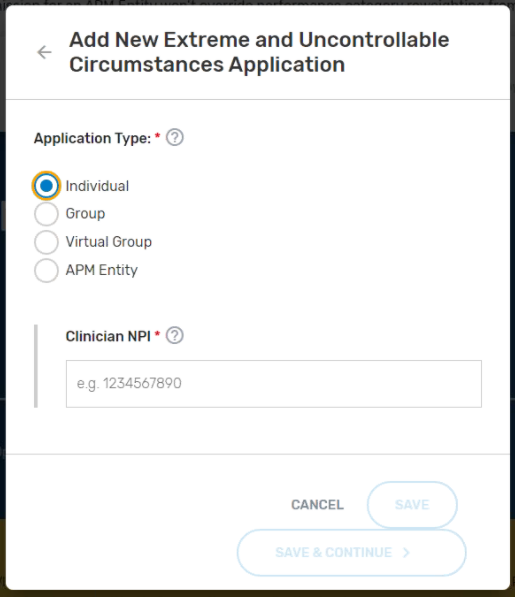
- Set the Application Type to the appropriate option for your practice.
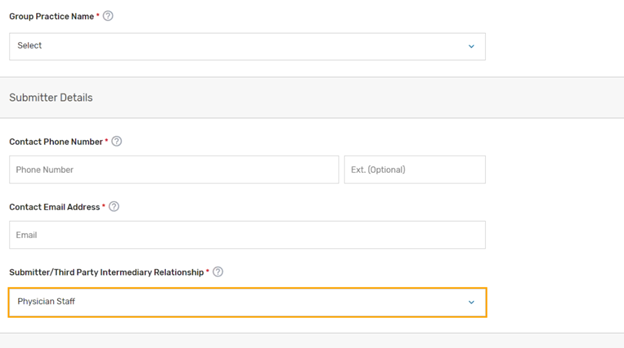
- Complete the Practice Information. For the Submitter/Third Party Intermediary Relationship - click what applies. Most of the time this is set to Physician Staff.
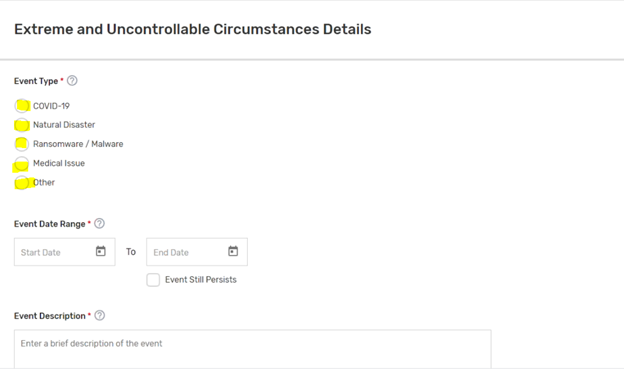
- Select the appropriate Uncontrollable Circumstances Event Type (COVID-19) and set your Event Date Range.
- Choose the Performance Category Affected options you wish to apply for an exception for. If you want the hardship to apply to the entire MIPS program, you will select all categories.
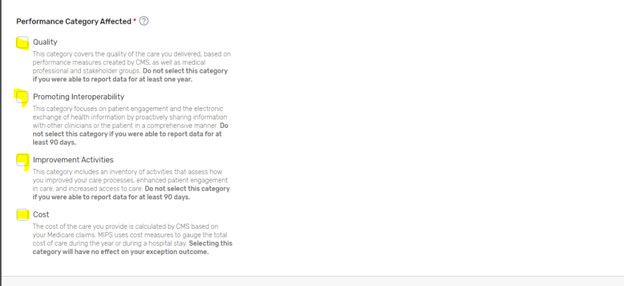
- Submit your application. Make sure to print a copy of the application showing that it was accepted for your records.
References:
For the 2024 MIPS reporting period, the Promoting Interoperability performance category is worth 25% of the Clinician's/Group's final score. Participants will submit a single set of Promoting Interoperability Objectives and Measures to align with 2015 Edition CEHRT.
You're required to use an Electronic Health Record (EHR) that meets the 2015 Edition certification criteria, 2015 Edition Cures Update certification criteria, or a combination of both for participation in this category.
You must provide your EHR's CMS Identification code (iSalus' ID is 0015CLW1C173HRM ) along with a "yes" to:
- The Actions to Limit or Restrict Compatibility or Interoperability of CEHRT (previously named the Prevention of Information Blocking) Attestation.
- The Office of the National Coordinator for Health Information Technology (ONC) Direct Review Attestation.
- The Security Risk Analysis Measure.
- The Safety Assurance Factors for EHR Resilience (SAFER) Guides Measure (a "no" will also satisfy this measure).
Participants must submit collected data for certain measures for 180 continuous days or more during 2024. Promoting Interoperability reporting periods for 2024 in the MIPS Dashboard can start as soon as 01/01/2024. The following measures and activities for 2024:
- Actions to limit or Restrict the Capability of CEHRT: Attestation Statement: I attest to CMS that I did not knowingly and willfully take action (such as to disable functionality) to limit or restrict the compatibility or interoperability of certified EHR technology.
- Measure Score: Required to earn a Promoting Interoperability score > 0
- Clinicians must attest YES to this statement.
- Security Risk Analysis: Conduct or review a security risk analysis in accordance with the requirements in 45 CFR 164.308(a)(1), including addressing the security (to include encryption) of ePHI data created or maintained by CEHRT in accordance with requirements in 45 CFR 164.312(a)(2)(iv) and 164.306(d)(3), implement security updates as necessary, and correct identified security deficiencies as part of the MIPS eligible clinician's risk management process.
- Measure Score: Required to earn a Promoting Interoperability score > 0
- Clinicians must attest YES to completing this measure
- SAFER Guides: Conduct an annual self-assessment using the High Priority Practices Guide at any point during the calendar year in which the performance period occurs.
- Measure Score: Required to earn a Promoting Interoperability score > 0
- Clinicians/Groups must attest YES to this measure
- e-Prescribing: At least one permissible prescription written by the MIPS eligible clinician is queried for a drug formulary and transmitted electronically using CEHRT.
- Measure Score: Up to 10 points.
- Clinicians/Groups must provide numerator/denominator scores for this measure or attest YES to one of the e-Prescribing exclusions
- Query of the Prescription Drug Monitoring Program (PDMP): For at least one Schedule II opioid electronically prescribed using CEHRT during the performance period, the MIPS eligible clinician uses data from CEHRT to conduct a query of a Prescription Drug Monitoring Program (PDMP) for prescription drug history, except where prohibited and in accordance with applicable law.
- Measure Score: 10 points.
- Provide Patients Electronic Access to their Health Information: For at least one unique patient seen by the MIPS eligible clinician: (1) The patient (or the patient-authorized representative) is provided timely access to view online, download, and transmit his or her health information; and (2) The MIPS eligible clinician ensures the patient's health information is available for the patient (or patient-authorized representative) to access using any application of their choice that is configured to meet the technical specifications of the Application Programming Interface (API) in the MIPS eligible clinician's certified electronic health record technology (CEHRT).
- Measure Score: Up to 25 points.
- Clinicians/Groups must provide numerator score > 0 for this measure. No Exclusions apply.
- Support Electronic Referral Loops by Sending Health Information: For at least one transition of care or referral, the MIPS eligible clinician that transitions or refers their patient to another setting of care or health care provider — (1) creates a summary of care record using certified electronic health record technology (CEHRT); and (2) electronically exchanges the summary of care record.
- Measure Score: up to 15 points.
- Clinicians/Groups must provide numerator scores >0 for this measure; attest YES to one of the measure exclusions; OR attest YES to the Health Information (HIE) Bi-Directional Exchange measure
- Support Electronic Referral Loops by Receiving and Reconciling Health Information: For at least one electronic summary of care record received for patient encounters during the performance period for which a MIPS eligible clinician was the receiving party of a transition of care or referral, or for patient encounters during the performance period in which the MIPS eligible clinician has never before encountered the patient, the MIPS eligible clinician conducts clinical information reconciliation for medication, medication allergy, and current problem list.
- Measure Score: 15 points.
- Clinicians/Groups must provide numerator scores >0 for this measure; attest YES to one of the measure exclusions; OR attest YES to the Health Information (HIE) Bi-Directional Exchange measure
- Health Information Exchange (HIE) Bi-Directional Exchange: The MIPS eligible clinician or group must establish the technical capacity and workflows to engage in bi-directional exchange via an HIE for all patients seen by the eligible clinician and for any patient record stored or maintained in their EHR.
- Measure Score: 30 points
- Clinicians/Groups can report YES or TRUE to this measure in place of the Support Electronic Referral Loops by Sending Health Information and Support Electronic Referral Loops by Receiving and Incorporating Health Information measures.
- Enabling Exchange Under the Trusted Exchange Framework and Common Agreement (TEFCA): The MIPS eligible clinician or group must attest to the following:
- Participating as a signatory to a Framework Agreement (as that term is defined by the Common Agreement for Nationwide Health Information Interoperability as published in the Federal Register and on ONC’s website) in good standing (that is, not suspended) and enabling secure, bi-directional exchange of information to occur, in production, for every patient encounter, transition or referral, and record stored or maintained in the EHR during the performance period, in accordance with applicable law and policy.
- Using the functions of CEHRT to support bi-directional exchange of patient information, in production, under this Framework Agreement.
- Immunization Registry Reporting: The MIPS eligible clinician is in active engagement with a public health agency to submit immunization data and receive immunization forecasts and histories from the public health immunization registry/immunization information system (IIS).
- Measure Score: 25 points
- Clinicians/Groups must report YES or TRUE to this measure or attest YES to one of the measure exclusions
- Electronic Case Reporting: Required in 2023 unless an exclusion can be claimed. The MIPS eligible clinician is in active engagement with a public health agency to electronically submit case reporting of reportable conditions.
- Measure Score: 25 points.
- Clinicians/Groups must report YES or TRUE to this measure or attest YES to one of the measure exclusions.
Providers are Eligible for up to 5 Bonus Points in 2024 by submitting one of the following public health reporting measures:
- Syndromic Surveillance Reporting: The MIPS eligible clinician is in active engagement with a public health agency to submit syndromic surveillance data from an urgent care setting.
- Measure Score: 5 bonus points.
- Public Health Registry Reporting: The MIPS eligible clinician is in active engagement with a public health agency to submit data to public health registries.
- Measure Score: 5 bonus points.
- Clinical Data Registry Reporting: The MIPS eligible clinician is in active engagement to submit data to a clinical data registry.
- Measure Score: 5 bonus points.
Learn more about the Promoting Interoperability performance category at Promoting Interoperability
For the 2024 MIPS reporting period, the Quality performance category stayed the same as last year at 30% of the Clinician's/Group's final score. This percentage can change due to Exception Applications or Alternative Payment Model (APM) Entity participation. Participants are required to collect quality measure data for the 12-month performance period (January 1-December 31, 2024).
General reporting requirements:
- You'll typically need to submit collected data for at least 6 measures (including 1 outcome measure or high-priority measure in the absence of an applicable outcome measure), or a complete specialty measure set.
- New for 2024: Beginning with the 2024 performance period, you’ll need to report performance data for at least 75% of the denominator eligible cases for each quality measure (data completeness), which is an increase from the previous data completeness threshold of 70%.
- You can submit measures from different collection types (except CMS Web Interface measures) to fulfill the requirement to report a minimum of 6 quality measures.
iSalus Healthcare has partnered with with 2 companies for MIPS Quality Reporting in 2024. Those partners are Mingle Health and Dynamic Health IT.
- Mingle Health is an industry-leading Medicare Qualified Clinical Data Registry. They offer robust quality reporting options for our practices and complete MIPS (Promoting Interoperability, Improvement Activity and Quality) reporting to CMS. Click here to get started with Mingle Health.
- iSalus has also integrated with Dynamic Health IT's CQMsolution as our Electronic Clinical Quality Measure (eCQMs) quality reporting tool. We currently support the following eCQMs through our integration with CQMsolution:
- CMS22v10 / MIPS Quality ID 317 - Preventive Care and Screening: Screening for High Blood Pressure and Follow-up Documented
- CMS68v11 / MIPS Quality ID 130 - Documentation of Current Medications in the Medical Record
- CMS69v10 / MIPS Quality ID 128 - Preventive Care and Screening: Body Mass Index (BMI) Screening and Follow-up Plan
- CMS122v10 / MIPS Quality ID 1 - Diabetes: Hemoglobin A1c (HbA1c) Poor Control (> 9%)
- CMS138v10 / MIPS Quality ID 226 - Preventive Care and Screening: Tobacco Use Screening and Cessation Intervention
- CMS156v10 / MIPS Quality ID 238 - Use of High-Risk Medications in the Elderly
- CMS165v10 / MIPS Quality ID 236 - Controlling High Blood Pressure
Most eligible MIPS clinicians will partner with Mingle Health or another registry as registries have access to hundreds of quality measures for practices to report on vs. the 9 available eCQMs currently supported by iSalus. To sign-up for Mingle Health, purchase a MIPS Solutions package for each reporting clinician here. Be sure to utilize the ISALUS24 coupon code to receive our discounted rate of $588/Clinician.
For more information on reporting your 2024 Quality data using our CQMsolution eCQMs, contact our support staff at support@isalushealthcare.com. Learn more about the Quality Performance Category on the qpp.cms.gov website.
For the 2024 MIPS reporting period, the Improvement Activities performance category is worth 15% of the Clinician's/Group's final score. To earn full credit in this performance category, you must generally submit one of the following combinations of activities:
- 2 high-weighted activities,
- 1 high-weighted activity and 2 medium-weighted activities, or
- 4 medium-weighted activities
High-weighted activities receive 20 points and medium-weighted activities receive 10 points. You'll receive double points for each high- or medium-weighted activity you submit if you're an individual clinician, group, virtual group, or APM Entity who holds a qualifying special status. You can check for any special status by singing in to qpp.cms.gov. Small status designation for APM Entities will be displaying in mid-2024.
Improvement activities have a continuous 90-day performance period (during CY 2023) unless otherwise stated in the activity description.
Group and APM Entity Reporting Update: At least 50% of the clinicians in the group, virtual group, or APM Entity perform the same activity during any continuous 90-day period (or as specified in the activity description) in the same performance year.
Clinicians can review the list of possible improvement activities within the Improvement Activities section of the MIPS Dashboard.

You can also click here to learn more regarding the 2024 Improvement Activities.
Starting with the MIPS 2023 reporting period, there are a few new company settings and new ONC Cures Edition FHIR API's that must be enabled for your practice to fully participate in the MIPS Promoting Interoperability performance category. Follow these steps to fully enable the MIPS Dashboard for MIPS PI reporting prior to starting your reporting period:
Setup the ONC Cures Edition FHIR API's
1. Submit a FHIR API Integration Request
Starting in 2023, in order to meet the Provide Patient Access Promoting Interoperability measure, your practice must implement our new ONC Cures Edition FHIR API's. To get started, submit a FHIR API Integration Request. Make sure to select that you select that you are looking to "Setup my Practice's FHIR API's for MIPS" when completing the request form.
The FHIR API's must be configured and setup prior to starting your Promoting Interoperability reporting period to earn the maximum number of points towards the Provide Patient Access measure. If your practice already configured the FHIR API's for 2023 reporting, no additional setup is required to support 2024 and beyond MIPS PI reporting.
2. Enable the FHIR API Company Settings
Follow these steps to enable the new FHIR API Company Settings to fully enable the Provide Patient Access measure API invitations:
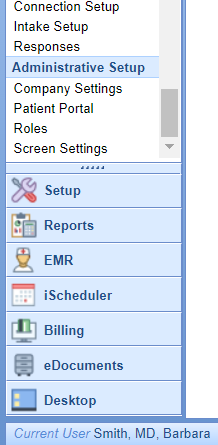
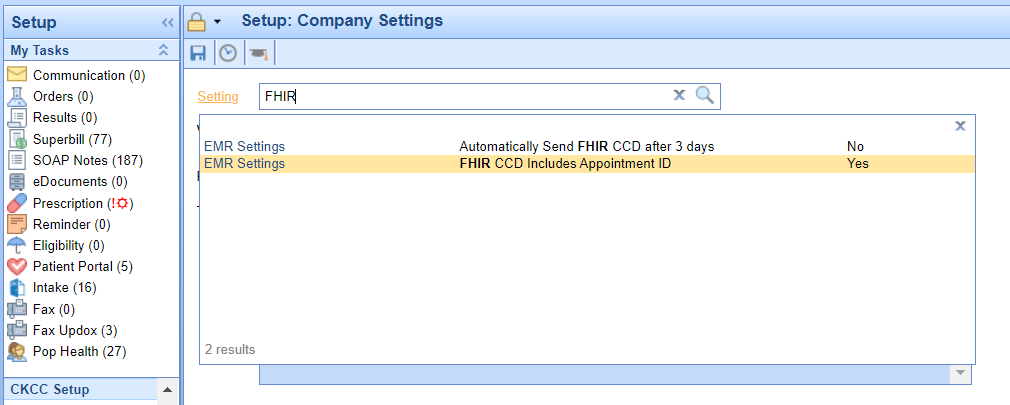
- Click on the Setup Portal > Company Settings.
- Search for "FHIR" and select the "FHIR CCD Includes Appointment ID" setting.
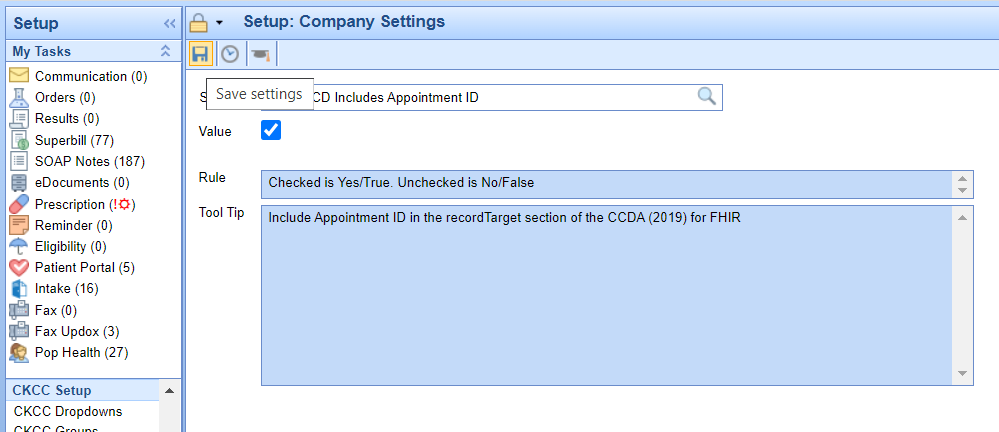
- Select the Value checkbox to enabled for this setting and press the Save button.
3. Enable the CCDA v 2.1 Setting
The latest version of the CCDA file v2.1 is required in order to support the 2023 Provide Patient Access Promoting Interoperability measure. CCDAs are sent to the patient's MyMedicalLocker account as well as to the new FHIR API's once a progress note is signed for checked-out appointments. Follow these steps to enable the latest version of the CCDA v 2.1 file:
- Click on the Setup Portal > Company Settings.

- Search for "CCD" and select the "CCD Version" company setting.
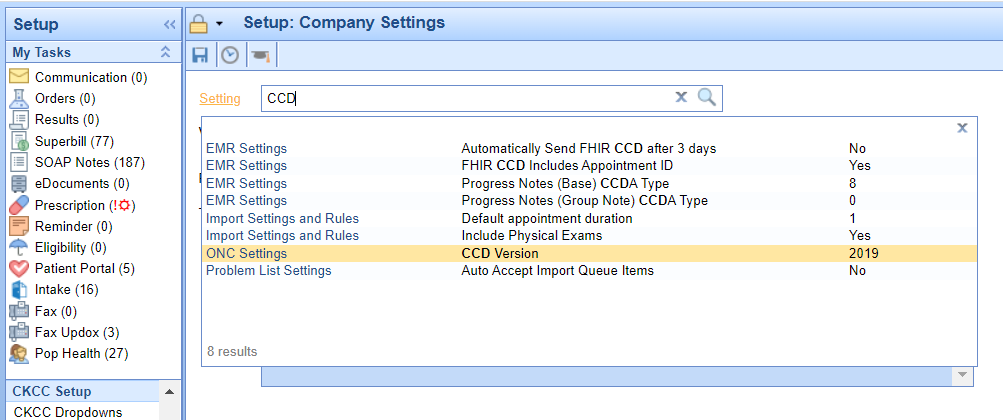
- Set the Value to 2019 and press the Save button.
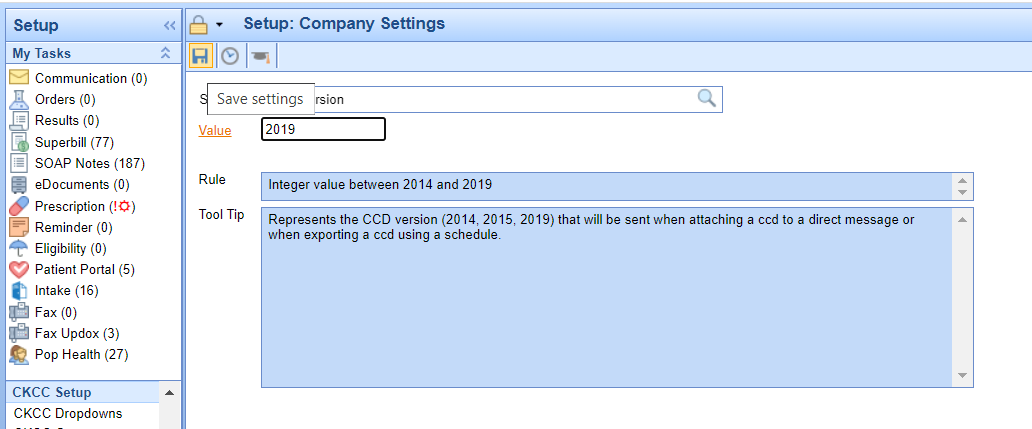
If your practice is actively generating CCDA files to supply to a third-party vendor, you will want to verify with the vendor that they can accept the CCDA v2.1.
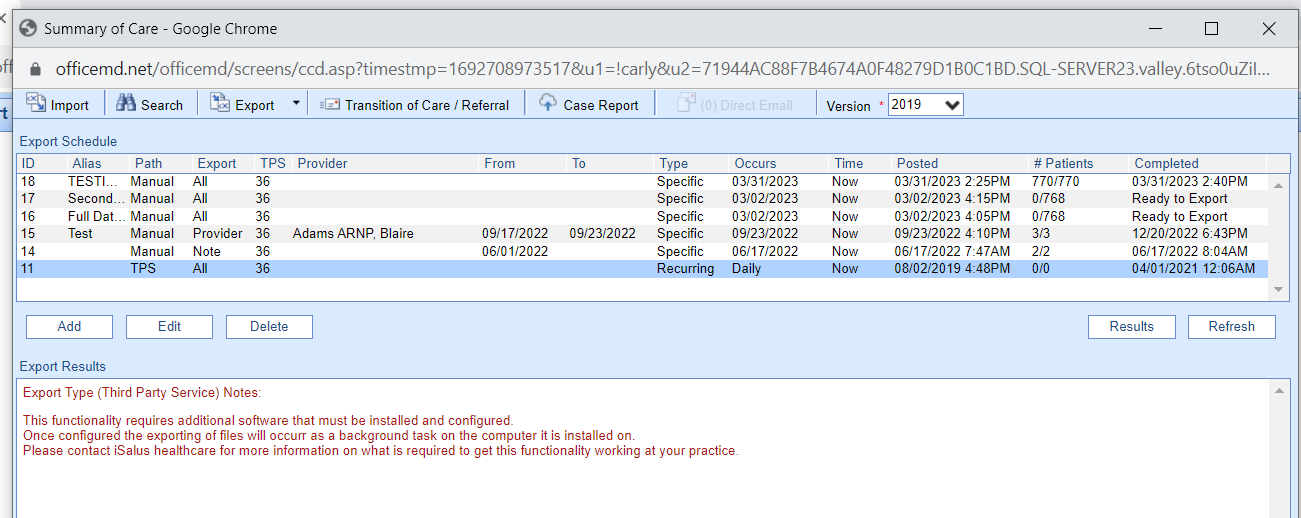
You can check for these scheduled CCDA files by following these steps:
- Click on Reports > Summary of Care.
- Select the Export menu > Schedule.
- If you see any active recurring CCDA Exports, you will need to verify the recipient/user of these files can accept the updated file before switching your CCD Version company setting.
Review and send this knowledge article to any vendors that consume your CCDA files to learn more about the CCDA version 2.1 and access a sample file.
Review the Updates to the Provide Patient Access Measure
There are some new requirements for practices to consider in order to meet the Provide Patient Access Promoting Interoperability measure. Review the updated knowledge article on this measure to learn more.
In order to calculate and extract MIPS Quality and Promoting Interoperability data, practices need to setup each MIPS eligible clinician on the MIPS dashboard following these steps:
- Navigate to the Reports Portal.
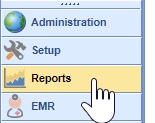
- Select MIPS Dashboard under the Meaningful Use section.

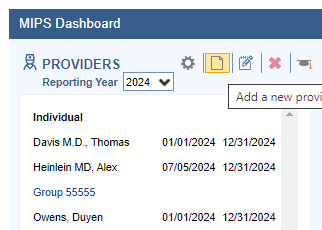
- Click on the New button to add a new provider.
- Optional: You can quickly copy a Group or Provider for the new reporting year by selecting it from the previous reporting year (2023) and clicking the new Copy Button within the toolbar to copy and edit the group or provider into the new reporting year.

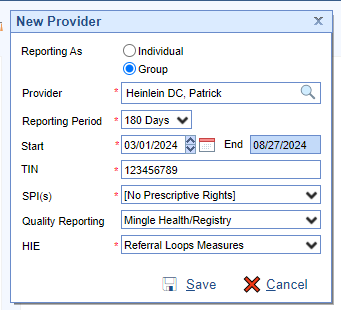
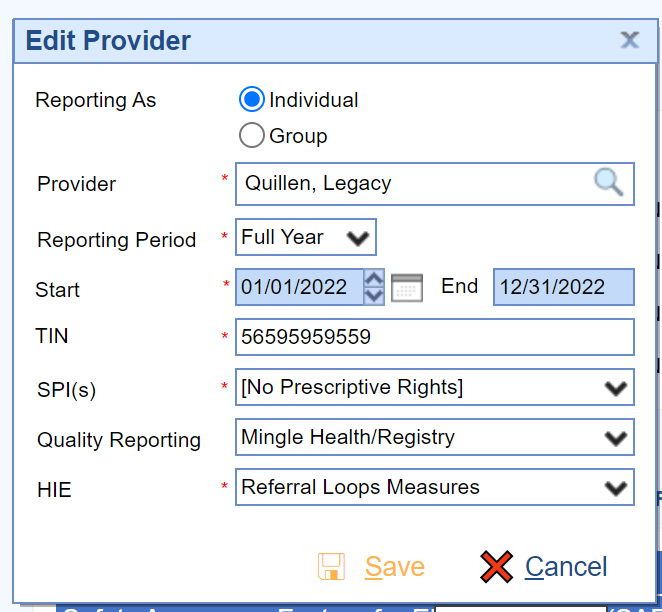
- Set up the provider reporting period using the Edit Provider screen.
- Press the Save button.
- Repeat the process for all MIPS Eligible Clinicians.
- Also, the practice must ensure to enable the OfficeEMR FHIR API's prior to starting their PI reporting period. See How to Enable the FHIR API's for MIPS Reporting for instructions on enabling this feature.
For the 2024 reporting period, the Promoting Interoperability performance category is a minimum of 180 continuous days.
When setting up providers, the TIN must be entered without a - in the middle.
SPI is the Surescripts Provider ID which is used for electronic prescribing. Most providers will only have 1 SPI value. If your practice has only 1 TIN and the provider has multiple SPI numbers, select all SPI numbers. If your provider does not have prescriptive rights, select the [No Prescriptive Rights] option.
There are two Quality Reporting options. Select Mingle Health/Registry if you are working with Mingle Health or another Registry for your quality reporting needs. Select DHIT eCQM if your practice is using CQMsolutions for quality reporting.
HIE Clinicians and groups have three options for Health Information Exchange reporting. Clinicians can attest to the bi-directional HIE exchange or Enabling Exchange Under TEFCA measure or continue to report the individual referral loops measures. Clinicians/Groups should select the "Bi-Directional Exchange Measure" to attest to bi-directional exchange with an HIE to support transitions of care as their HIE measure. Select the "Enabling Exchange under TEFCA Measure" to attest to enabling exchange under TEFCA as their HIE measures. Select the "Referral Loops measures" to track and report the Referral Loops - Send Health Information and Referral Loops - Receive and Incorporate measures as their HIE measures.
Follow these steps to edit a provider or group setup on the MIPS Dashboard:
- Select the Clinician in the list of Providers on the left.
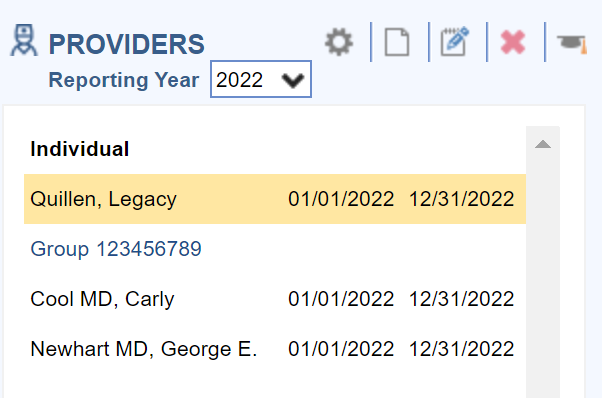
- Click on the Edit button.
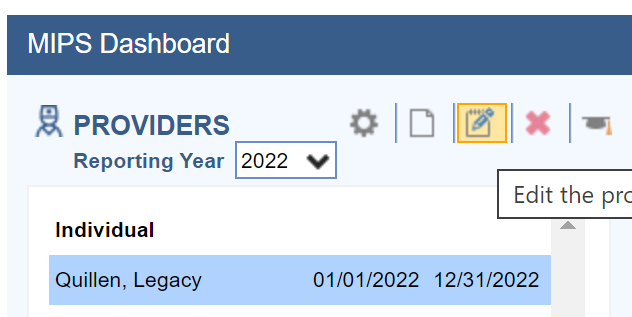
- Edit the Clinician or Group as necessary and press the Save button.
Follow these steps to remove a clinician from the MIPS Dashboard:
- Select the Clinician in the list of Providers on the left.
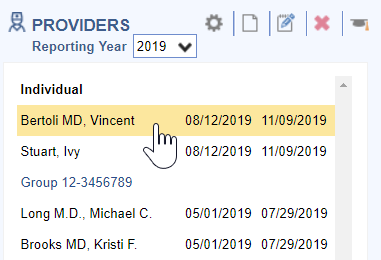
- Click on the X icon to delete the Clinician.

iSalus Healthcare offers 4 different quality data extract files which are exported and uploaded into the Mingle Health site to calculate practice MIPS Quality reports. They are as follows:
MIPS Quality PM File Contents
All practices must extract and provide this file to Mingle Health for quality measure calculation. It includes:
- Claim information for patients seen for the NPI and TIN during 01/01/Reporting Year – 12/31/Reporting Year
MIPS Quality Interventions File Contents
Practices tracking quality data with clinical data will need to extract this file if their quality measures include the following clinical data:
- Immunizations setup with a CVX Code
- Patient Education Materials selected in the Patient Education chart tab
- Procedure type Orders
- Referral type Orders
- Lab, Radiology and Pathology type Orders
- Template items setup as CCDA Care Plan Goals or Care Plan Instructions
MIPS Quality Medications File Contents
Practices tracking quality data with clinical data will need to extract this file if their quality measures include the following clinical data:
- Medications for patients seen during the reporting period
- Medications Documented Indicator (Medications Marked as Reviewed on the Patient Timeline Summary)
MIPS Quality Observations File Contents
Practices tracking quality data with clinical data will need to extract this file if their quality measures include the following clinical data:
- Vitals including BMI, Diastolic BP, Systolic BP, Height, Weight, Pain Scale, Heart Rate
- Order Results
- Problems where the status is not Removed
- Allergies
- Smoking Status – Pulls a Specific Global Entity from the Patient History template
Practices who have engaged with our Clinical Data Registry Mingle Health for their quality reporting will need to properly setup and extract data files from the MIPS Dashboard to upload into the Mingle Health portal. The MIPS Dashboard has 4 file extracts that are used for quality reporting depending upon how a practice is tracking their quality measures. Click here to learn more about the specific contents of the Quality Data Extract files.
Follow these steps to setup the Practice's Mingle Client ID and the time frame in which to pull the MIPS quality data extract files:
- Click on the Gear button.

- Enter the practice Mingle Client ID and setup the appropriate time frame to pull clinical data for the clinical Interventions, Medications and Observations.
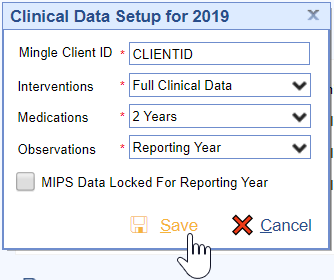
- Press the Save button to save the settings.
The dashboard quality data is calculated nightly by iSalus. If your practice needs this data manually refreshed, contact the iSalus Support team.
When practices are ready to obtain an updated quality report from Mingle Health, they will need to extract the quality data files to upload in the Mingle Health portal.
Follow these steps to extract the MIPS Quality Data files:
- Click on the Individual Clinician or Group to extract files for.

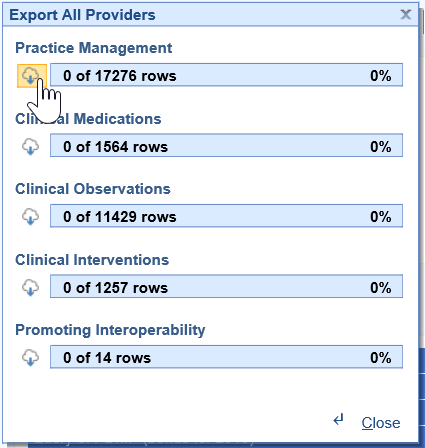
- Click on the Quality download menu.

- Select All Providers.
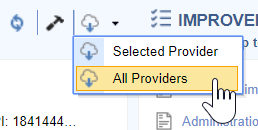
- Click on the Download Cloud button for all of the files necessary to calculate your practice’s quality measures.These will download to your C drive – iSalusExport folder on your computer’s hard drive.
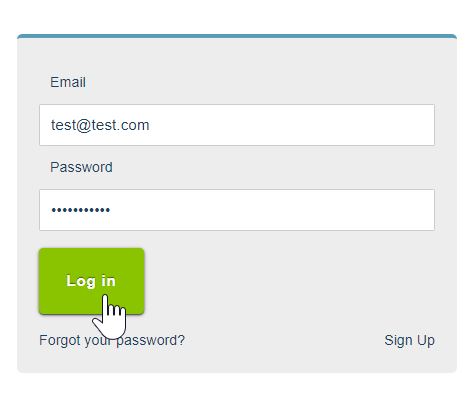
- Login to the Mingle Health Portal.
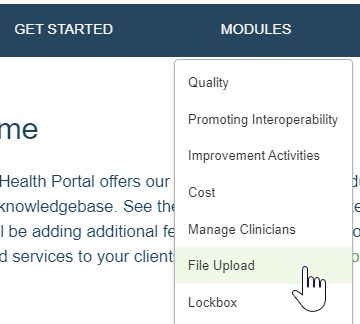
- Select the Modules menu.

- Click on the File Upload menu option.
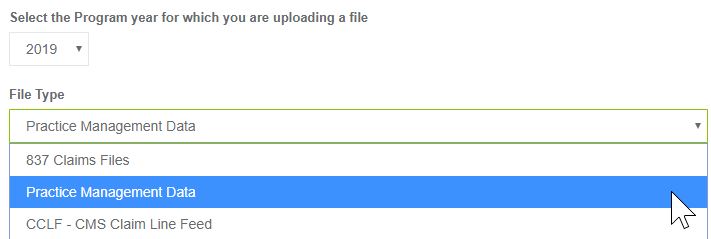
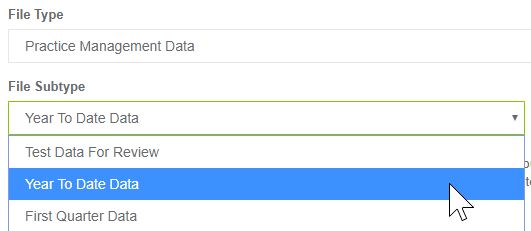
- Set the File Type to Practice Management Data (for the PM file) or Clinical Data Extract (for the Medications, Observations and Interventions files).
- Set the File Subtype to Year to Date Data.
- Select the or click here button to upload your file. It will be in the C:iSalus Export folder.

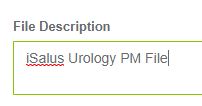
- Enter the File Description as "Practice Name PM/Medication/Observations/Interventions File".
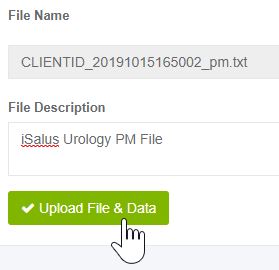
- Press the Upload File & Data button. Repeat until all files have been uploaded to Mingle Health.
Follow these steps to view a clinician or group's MIPS Promoting Interoperability score:
- Select either the Group or Individual Clinician to see the Promoting Interoperability scores for.
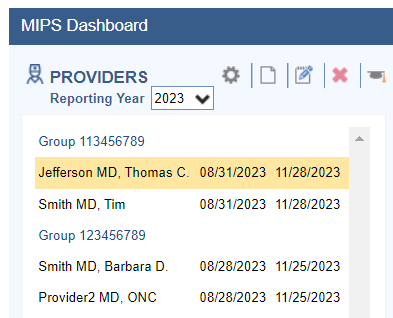
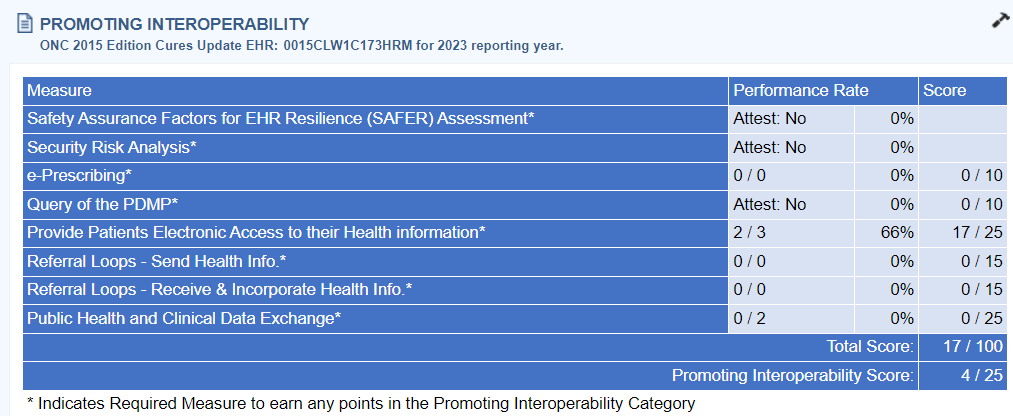
- Click on the Hammer button under the Promoting Interoperability section of the Dashboard to calculate/refresh the Promoting Interoperability score for the Group/Individual Clinician.

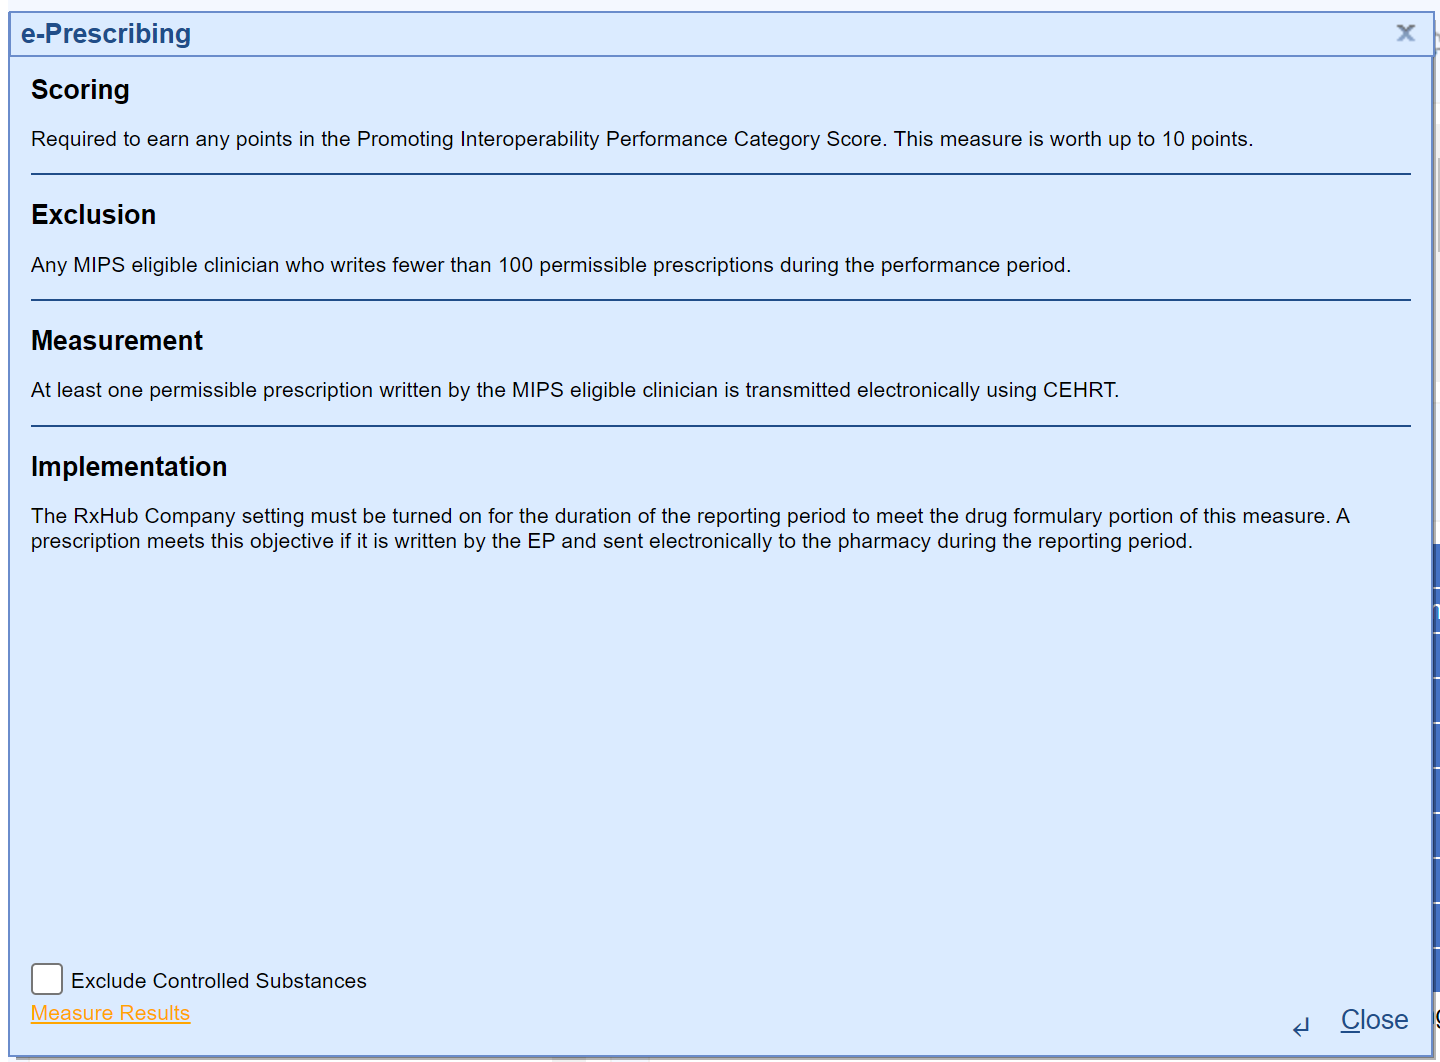
- Click on the Measure name for more information about the measure.
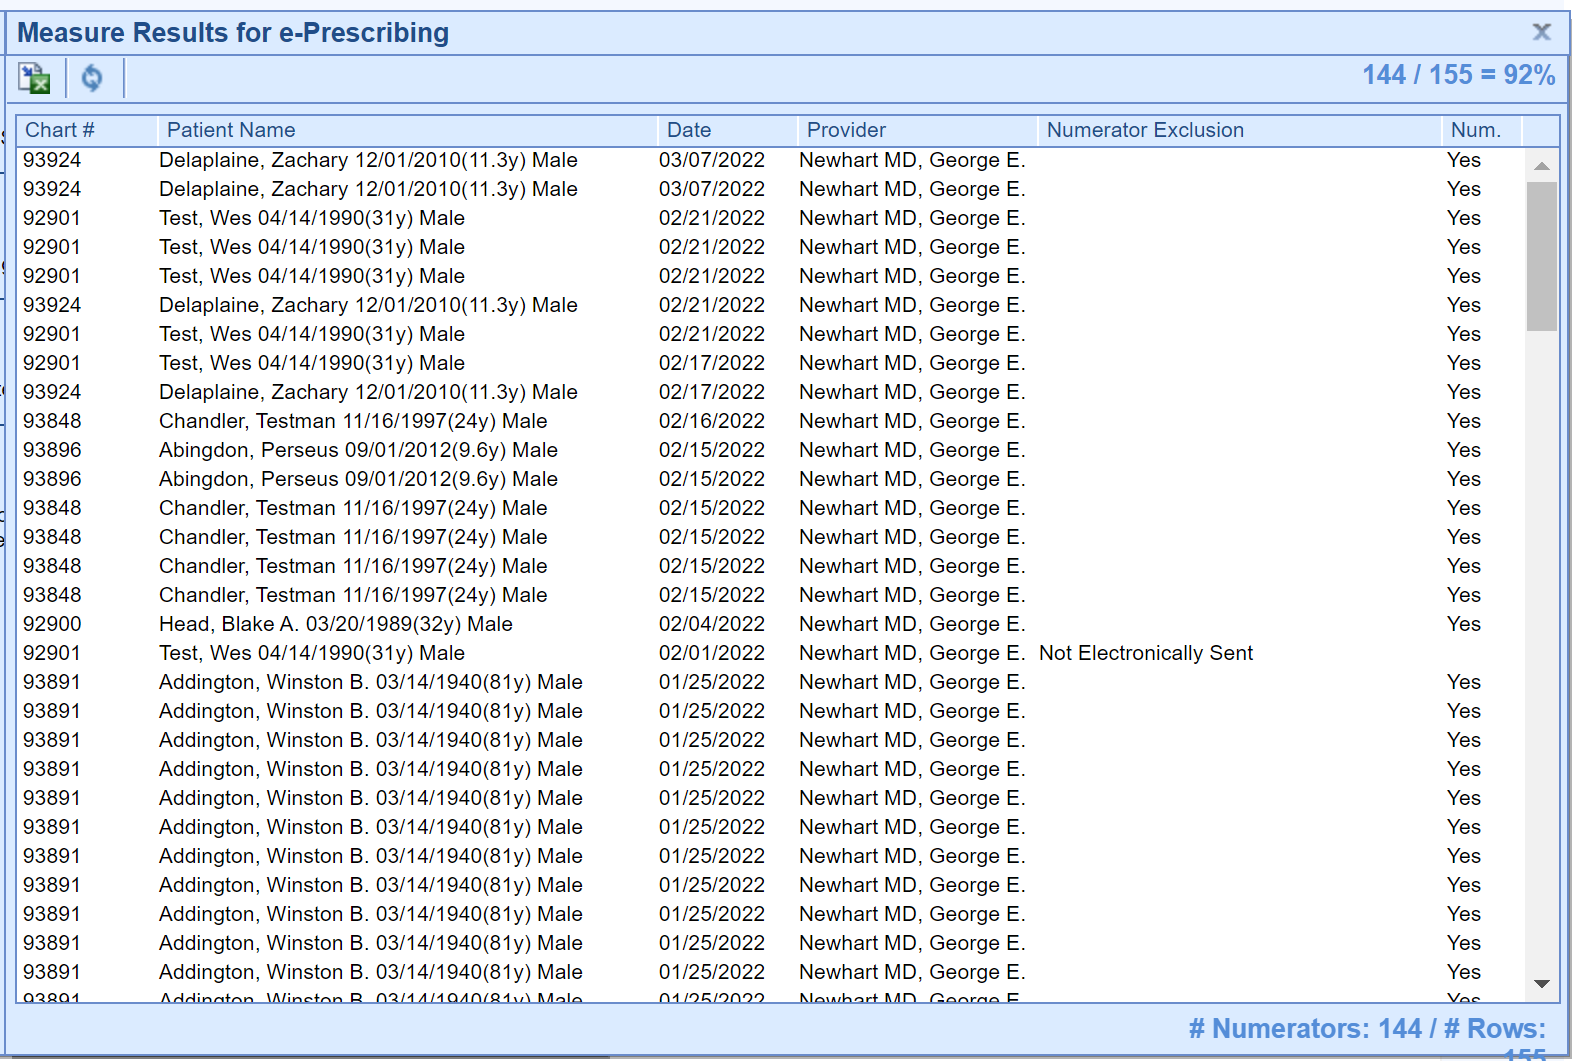
- Click Measure Results link to see patient level Measure Results.
- View the Patient Measure Results.
The goal is for the Group/Eligible Clinician’s Promoting Interoperability score to be as close to 25 / 25 as possible.
Measures with a * after them are required to have a score > 0 for the promoting interoperability performance category. These measures include:
- Safety Assurance Factors for EHR Resilience (SAFER) Assessment
- Security Risk Analysis
- e-Prescribing
- Query of PDMP
- Provide Electronic Access
- Referral Loops – Send Health Information AND Referral Loops – Receive & Incorporate Health Information OR HIE Bi-Directional Exchange
- Public Health and Clinical Data Exchange - Electronic Case Reporting and Immunization Reporting
The following measure is available as a bonus measure for Eligible Clinician's to add additional points to their Promoting Interoperability score:
- Public Health and Clinical Data Exchange - Syndromic Surveillance Reporting - 5 Points

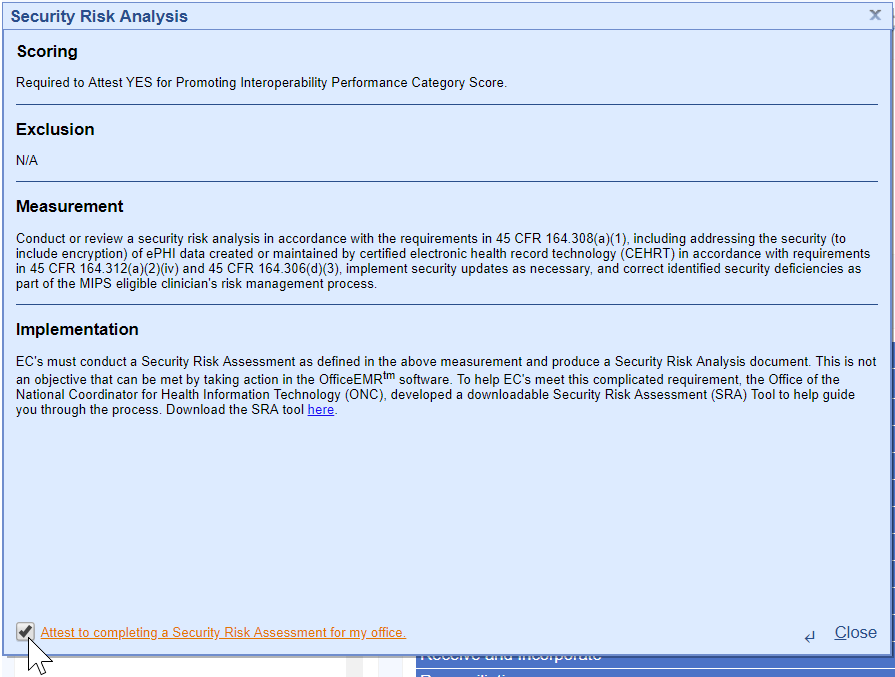
MIPS Eligible Clinicians must attest YES to conducting or reviewing a security risk analysis and implementing security updates as necessary and correcting identified security deficiencies.
- Analysis must be conducted when 2015 Edition CEHRT is implemented and during the reporting period year 01/01/2023-12/31/2023.
- The Office of the National Coordinator for Health Information Technology (ONC) has developed a downloadable Security Risk Assessment (SRA) tool to help guide practices through the process. Access the SRA tool here.
- Select the Attest to completing a Security Risk Assessment for my Office checkbox upon completion for each Clinician.
- At least 1 permissible prescription written by the MIPS eligible clinician is queried for a drug formulary and transmitted electronically using CEHRT.
- This measure is worth up to 10 points towards the clinician’s/group’s Promoting Interoperability score
- All printed/electronic prescriptions are in the denominator for the clinician.
- Electronic prescriptions written by the clinician make up the numerator, and it will include Electronic Prescriptions for Controlled Substances.
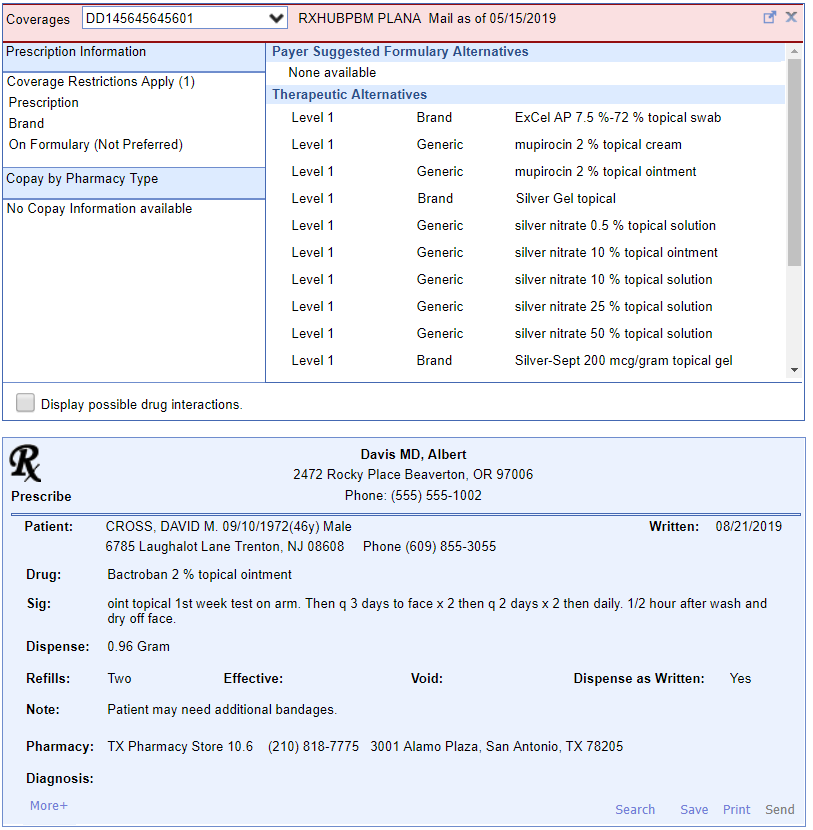
- To exclude Controlled Substances from the provider's Numerator and Denominator follow these steps:
- Open the Reports > MIPS Dashboard.
- Select the Provider you wish to exclude Controlled Substances for.
- Click on the e-Prescribing Measure name.
- Select the Exclude Controlled Substances Checkbox.
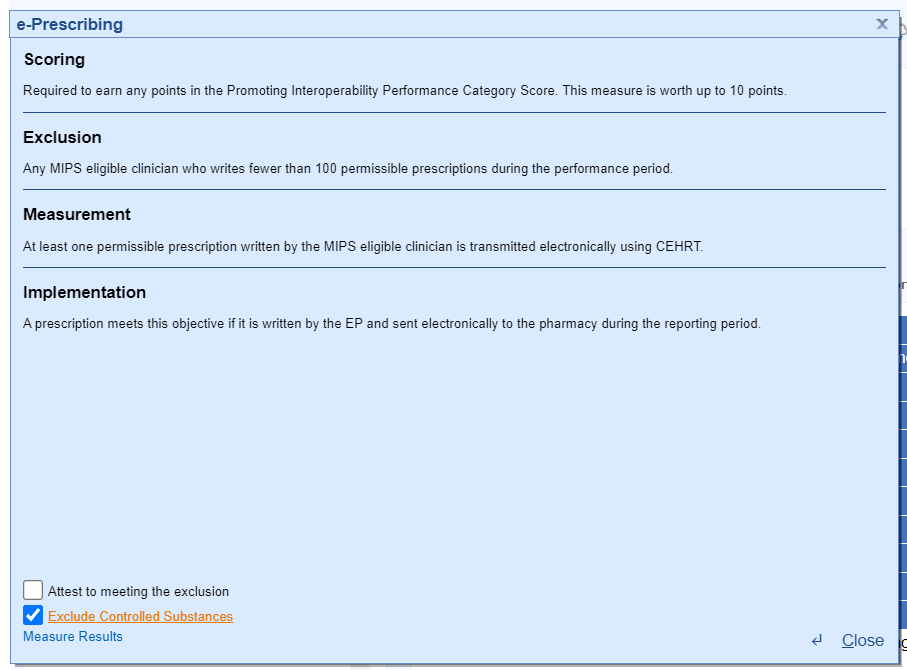
- Press the Close button.
- To Attest to meeting the exclusion for e-Prescribing, follow these steps:
- Open the Reports > MIPS Dashboard.
- Select the Provider you wish to attest to meeting the e-Prescribing exclusion for.
- Click on the e-Prescribing Measure name.
- Select the Attest to meeting the exclusion checkbox.
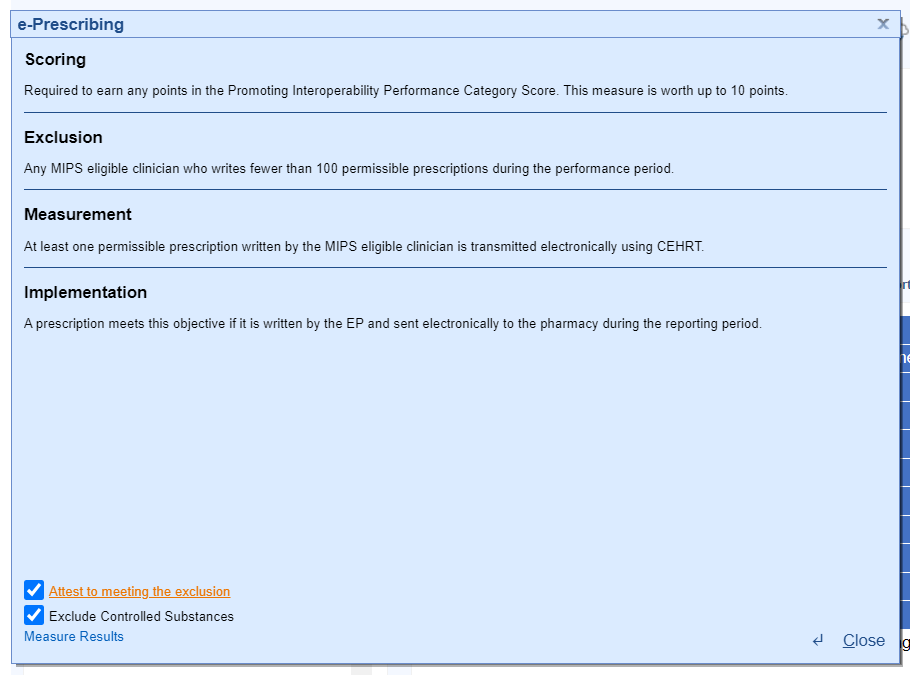
- Press the Close button.
- For at least one Schedule II opioid electronically prescribed using CEHRT during the performance period, the MIPS eligible clinician uses data from CEHRT to conduct a query of a PDMP for prescription drug history, except where prohibited and in accordance with applicable law.
- Eligible clinicians will Attest Yes or Attest No to meeting this measure.
- This measure is worth up to 5 bonus points towards the clinician’s/group’s Promoting Interoperability score.
iSalus has integrated with the Appriss Health PDMP Interface; to see if the interface is available in your state and to obtain a user name and password, fill out the following form from Appriss Health here.
- For at least one unique patient seen by the MIPS-eligible clinician:
- The patient (or the patient-authorized representative) is provided timely access (within 4 business days of their appointment start time) to view, download, and transmit their health information.
- The MIPS-eligible clinician ensures the patient's health information is accessible to the patient (or a patient-authorized representative) through any application of their choice, provided it meets the technical specifications of the Application Programming Interface (API) in the MIPS-eligible clinician's Certified Electronic Health Record Technology (CEHRT).
- This measure is worth up to 40 points toward the clinician’s/group’s Promoting Interoperability score.
Part 1: Access Provided to MyMedicalLocker Account
There are 3 options for this part of the measure:
Option 1: Connect Patient with a MyMedicalLocker Account
This is the recommended workflow for both the practice and the patient. Connecting the patient allows access to their medical records and meets the requirements for the practice.
- From the iScheduler, open the patient or select the Patient's Appointment from the schedule.

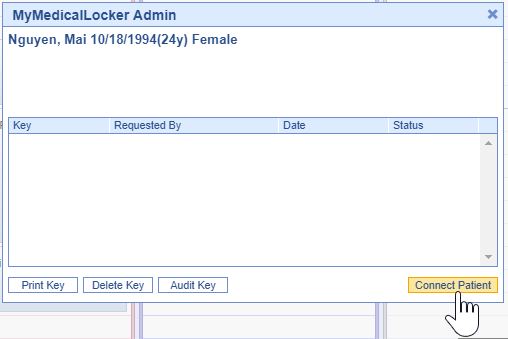
- Click the Patient Index Card Menu and select the MyMedicalLocker Admin option.
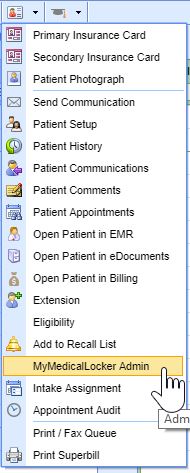
- Click the Connect Patient button.
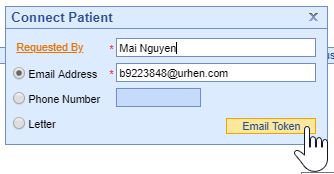
- Enter the "Requested By" (the patient or an authorized representative), along with either their email address or phone number, and click the "Email Token" button. The patient will then receive a token via email or text.
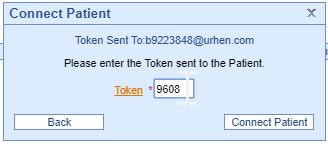
- Ask the patient or representative for the token that was emailed or texted to them and enter it on the Connect Patient screen.
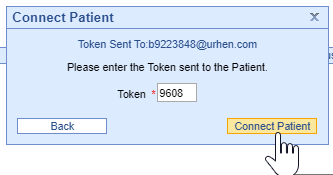
- Click the Connect Patient button.
- Click the Patient Index Card Menu and select the MyMedicalLocker Admin option.
The patient is now set up with a MyMedicalLocker patient portal account connected to your practice. The patient can log in to https://www.mymedicallocker.com using their email/phone number and the token sent to them as their temporary password.
Option 2: Print a Welcome to MyMedicalLocker Letter at Patient Check-out
This must be done within 4 business days from the patient’s appointment. This must occur for the first visit in the reporting period and all subsequent visits if the patient is not connected with an account.
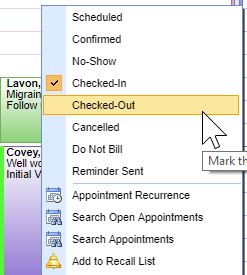
- From the iScheduler, right-click on the patient's appointment and change the appointment status to "Check-Out.".
- Click the Print Queue tab within the Quick Pay screen. If the patient does not already have a MyMedicalLocker connection, a MyMedicalLocker Welcome Letter will display in the print queue.

- Click the Print button and provide the MyMedicalLocker Welcome Letter to the patient.

- Click the Print Queue tab within the Quick Pay screen. If the patient does not already have a MyMedicalLocker connection, a MyMedicalLocker Welcome Letter will display in the print queue.
Option 3: Opt-Out of MyMedicalLocker via Printed Letter
MIPS eligible clinicians have the option to opt-out a patient from MyMedicalLocker via a printed letter. This is the recommended workflow for patients who choose not to connect with MML, reducing the need for clinicians to ask the patient about access at subsequent visits. By following this workflow, clinicians can still meet the numerator requirements for the MIPS Provide Patient Access measure. For details on printing a MyMedicalLocker letter, refer to the steps in Option 2.
- From the Quick Pay screen, click the Print Queue tab

- Click the dropdown menu on the Print button, and select "Print & Opt-Out of MyMedicalLocker".

Checking a Patient's MyMedicalLocker Status
Clinicians can easily check a patient's MyMedicalLocker status in the patient header to determine if the patient is Enabled, Not Enabled, or Opted out.
Navigate to the patient's header, where you'll see a MyMedicalLocker icon. When you hover over this icon, you'll see the MML status. This status is a hyperlink; clicking it will open a pop-up box for the MML admin screen.
Here are the MyMedicalLocker icon options:
- A green icon with a checkmark displays an MML status of "Enabled"
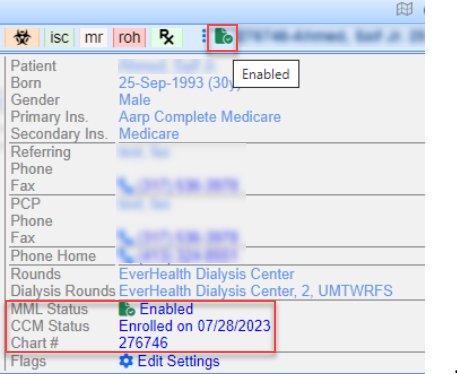
- A blue icon with a + symbol displays an MML status of "Not Enabled - Invite"

- A red icon with an X displays an MML status of "Opted-Out"

Part 2: Access Provided for FHIR API
Your practice's FHIR APIs must be configured and set up before starting your Promoting Interoperability reporting period to earn the maximum number of points towards the Provide Patient Access measure. To get started, submit an FHIR API Integration Request.
An FHIR API Welcome Email will be sent to a patient with:
- A valid, accessible patient email should be added to the Patient Setup screen (do not add dummy emails to this screen).
- Progress Notes must be signed by a clinician within four business days to ensure the information is available for the patient and that the patient receives a FHIR API welcome email.
"Incident To" Billing Workflows
For any of our MIPS reporting practices that support "Incident To" billing workflows where the patient has a scheduled appointment and a completed note with a mid-level clinician but the claim for the appointment is under an MD clinician, the practice must be sure to set up the mid-level providers on the MIPS dashboard so that OfficeEMR will pull the FHIR measure results via API call for the mid-level provider.
Once FHIR is Enabled Practices Can Track FHIR CCDA Sends via FHIR Summary Report:
The FHIR Summary Report provides send details based on the specified date range including chart details, status, and the encounter date with process dates and times. To view this report:
- Go to Reports portal
- Locate and access FHIR Summary in the General Section (or search 'FHIR')
- The report will auto-load for the current date
Note: Date range limitations may apply where data volume is high

- For at least one transition of care or referral, the MIPS eligible clinician that transitions or refers their patient to another setting of care or health care provider:
- Creates a summary of care record using certified electronic health record technology (CEHRT); and
- Electronically exchanges the summary of care record.
- This measure is worth up to 20 points towards the clinician’s/group’s Promoting Interoperability score
- The denominator for this measure is made up of Referral Type Orders placed for the eligible clinician during the reporting period.
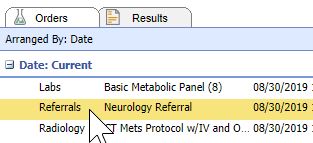
- The numerator is made up of the patient orders from the denominator where a CCDA Referral Note was sent using DIRECT email to the physician receiving the referral.
To send a referral note using DIRECT follow these steps:
- Ensure the user sending the DIRECT message has his/her User Provider Connection setup for the Provider the Referral Summary is being sent for. This needs set prior to opening the Task Communication screen. Reset the Task Communication screen if necessary.
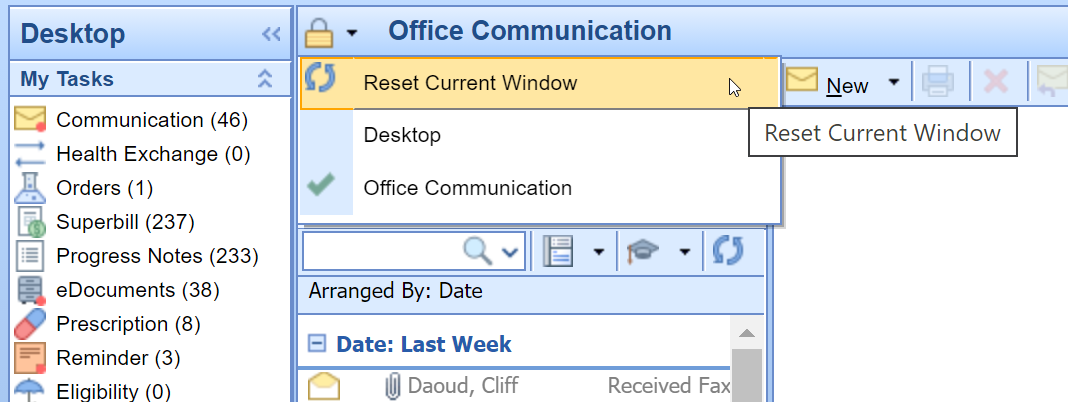
- Open Task Communication.

- Click on the New menu.

- Select DIRECT Message.

- Select the user to send the message to, enter a subject and message.
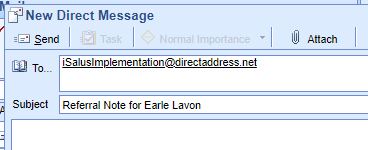
- Click on the Attach button.

- Search for the patient.

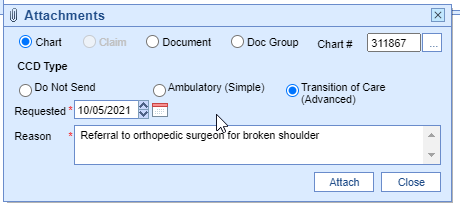
- Select the Transition of Care option. Set the Requested date to the Referral Order Date. Enter a Reason for the Referral.
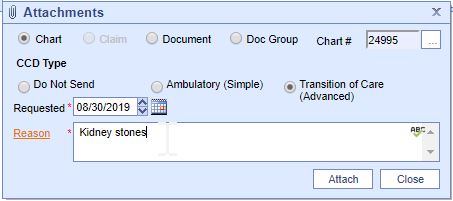
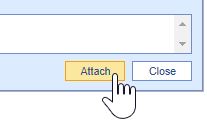
- Press the Attach button.
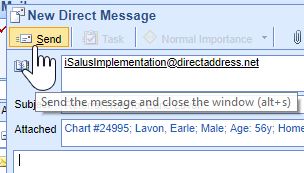
- Press the Send button
DIRECT emails are managed under the Setup Portal – Contacts. Beginning in 2019, receipt of DIRECT messages by the receiving party must be confirmed in order for the message to count towards the numerator.
To check receipt of a DIRECT message, follow these steps:
- Open My Task Communication.

- Click on the Sent Items queue.
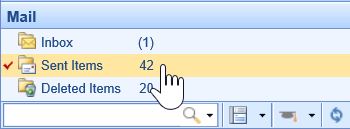
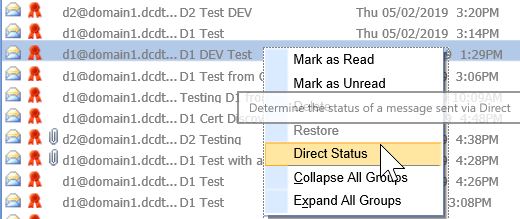
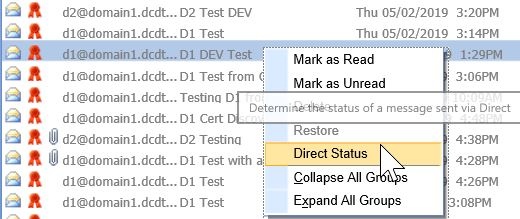
- Find your DIRECT message in the Sent Items Queue. Right-click over the message and select DIRECT Status.
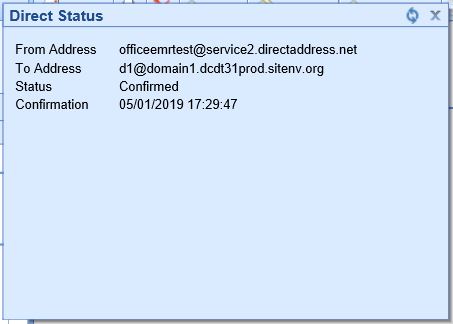
- The status must be either 'Accepted' or 'Confirmed' to count towards the numerator of the Referral Loops - Send Health Information MIPS measure.
- For at least one electronic summary of care record received for patient encounters during the performance period for which a MIPS eligible clinician was the receiving party of a transition of care or referral, or for patient encounters during the performance period in which the MIPS eligible clinician has never before encountered the patient, the MIPS eligible clinician conducts clinical information reconciliation for medication, medication allergy, and current problem list.
- The denominator for this measure is made up of new patient encounters during the performance period where a CCDA was attached to the patient's record for the encounter.
- The numerator is made up of the patient encounters in the denominator where problem list, medication and allergy reconciliation was performed for the encounter during the reporting period.
- This measure is worth up to 20 points towards the clinician’s/group’s Promoting Interoperability score
- Exclusions:
- Any MIPS eligible clinician who is unable to implement the measure for a MIPS performance period in 2019 would be excluded from having to report this measure. Or
- Any MIPS eligible clinician who receives fewer than 100 transitions of care or referrals or has fewer than 100 encounters with patients never before encountered during the performance period.
- If an exclusion is claimed for this measure, the 20 points will be redistributed to the other measure within this objective, the Support Electronic Referral Loops by Sending Health Information measure.
Option 1: Import and Attach CCDA Received from Outside Sources
- Click on the Reports portal.

- Click on the Summary of Care option under the EHR section.

- Click on the Import button.
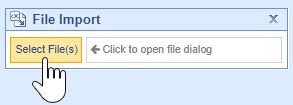
- Navigate to the location of the Summary of Care XML file on your computer, select it and press the Open button.
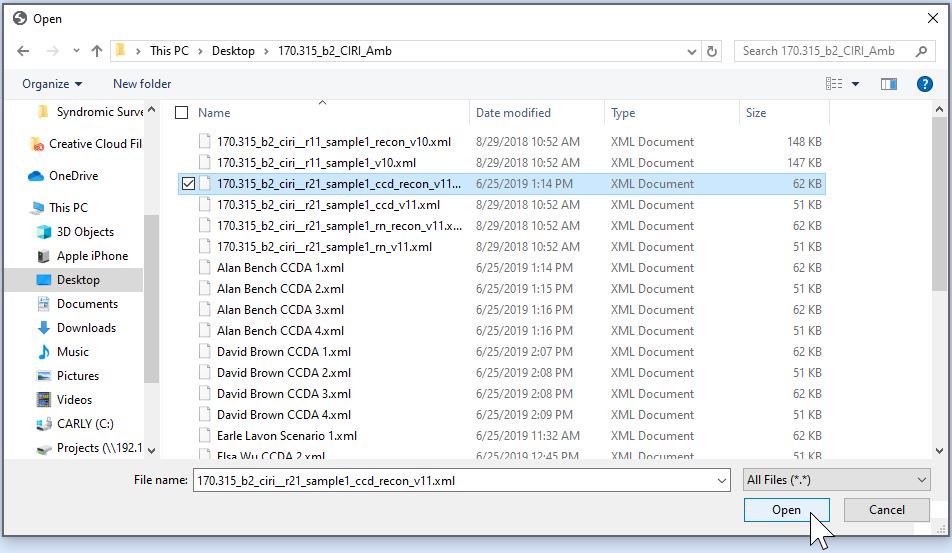
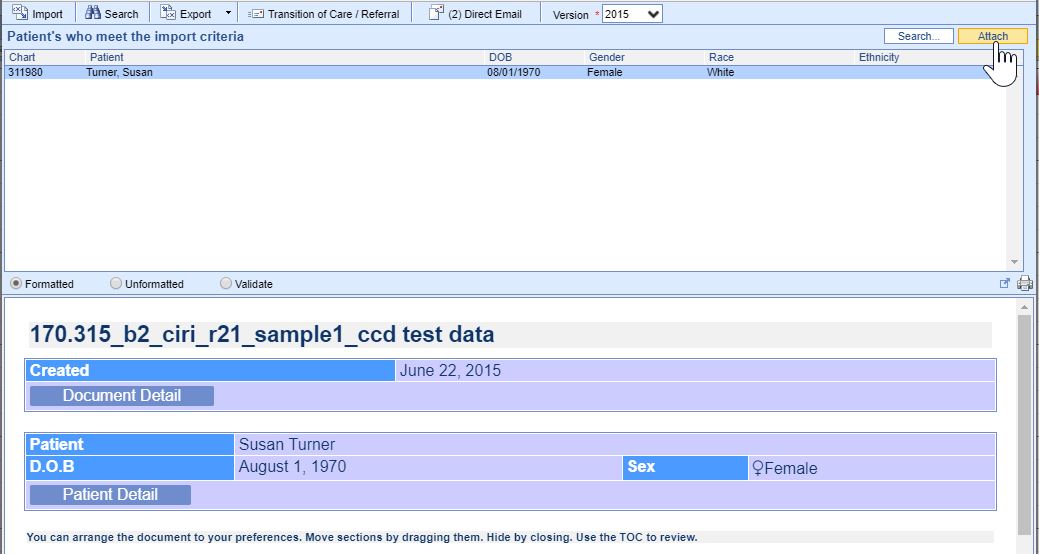
- The summary of Care displays. The report will display patients whose demographic data match the data within the CCDA. If the correct patient does not display, click on the Search button to either search for or create a new patient. Click on the correct patient’s name and then on the Attach button to incorporate the summary into the patient’s chart.
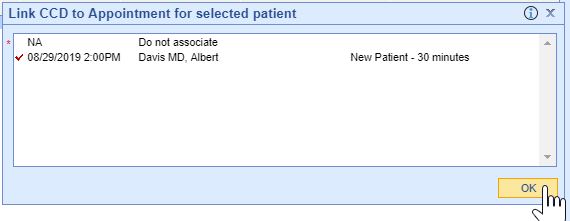
- Summaries must be associated with the patient's new patient encounter to count towards the measure, select the appropriate patient Appointment to link the referral summary to.
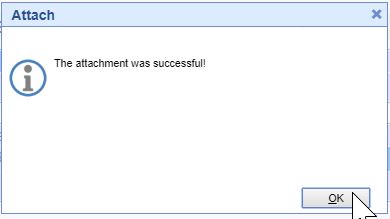
- If the incorporation is successful, you will receive an alert the attachment was successful.
- The summary is now ready for clinical reconciliation. Incorporated summaries will display in the EHR on the Timeline Summary Screen under the Health Exchange section.
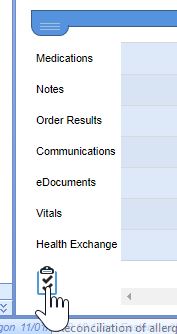
- Click on the clinical marker to view the summary.

Option 2: Receive and Incorporate CCDA Received via DIRECT Message
- Open My Task Communication

- Incoming DIRECT messages display in the user’s Inbox, click on the Message to open it.
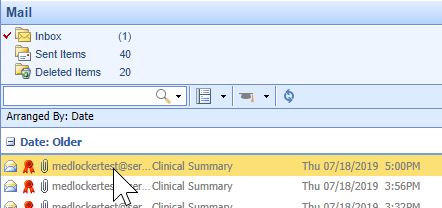
- CCDA documents will display as an XML attachment. Click on the .xml Attachment to view the summary.
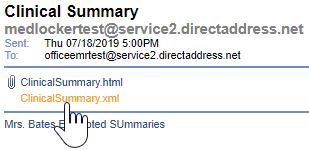
- The Report will display patient’s whose demographic data meet the data within the CCDA. If the correct patient does not display, click on the Search button to either search for or create a new patient. Click on the correct patient’s name and then on the Attach button to incorporate the summary into the patient’s chart.

- Summaries need associated with a patient encounter to count towards the EP’s MU measure, select the appropriate patient Appointment to link the referral summary to.
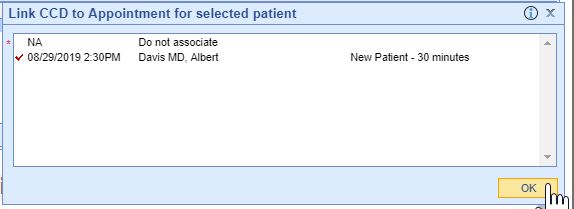
- If the incorporation is successful, you will receive an alert the attachment was successful.

- Incorporated summaries will display in the EHR on the Timeline Summary Screen under the Health Exchange section.
- The Clinician must attest Yes or Claim an Exclusion to 2 of the 5 Public Health and Clinical Data Exchange reporting options to qualify for this measure.
- This measure is worth up to 10 points towards the clinician’s/group’s Promoting Interoperability score
- The following public health and clinical data exchange options exist:
- The MIPS eligible clinician is in active engagement with a public health agency to submit immunization data and receive immunization forecasts and histories from the public health immunization registry/immunization information system (IIS). See Immunization Reporting
- The MIPS eligible clinician is in active engagement with a public health agency to submit syndromic surveillance data from a non-urgent care setting. See Syndromic Surveillance Reporting
- The MIPS eligible clinician is in active engagement to submit data to a clinical data registry.
- The MIPS eligible clinician is in active engagement with a public health agency to electronically submit case reporting of reportable conditions.
- The MIPS eligible clinician is in active engagement with a public health agency to submit data to public health registries.
The product's CMS EHR Certification ID for 2025 reporting is 0015CZR826A3XBH. This ID is required for attesting Promoting Interoperability scores to CMS and Medicaid.
Developer: iSALUS Healthcare
Product Name: OfficeEMR
Version: 2021
You can always access this ID from within the product following these steps:
- Click on the Reports portal.

- Select MIPS Dashboard.
- Select a Group or Clinician to view their MIPS Dashboard.
- The Certification ID displays in the Promoting Interoperability section.
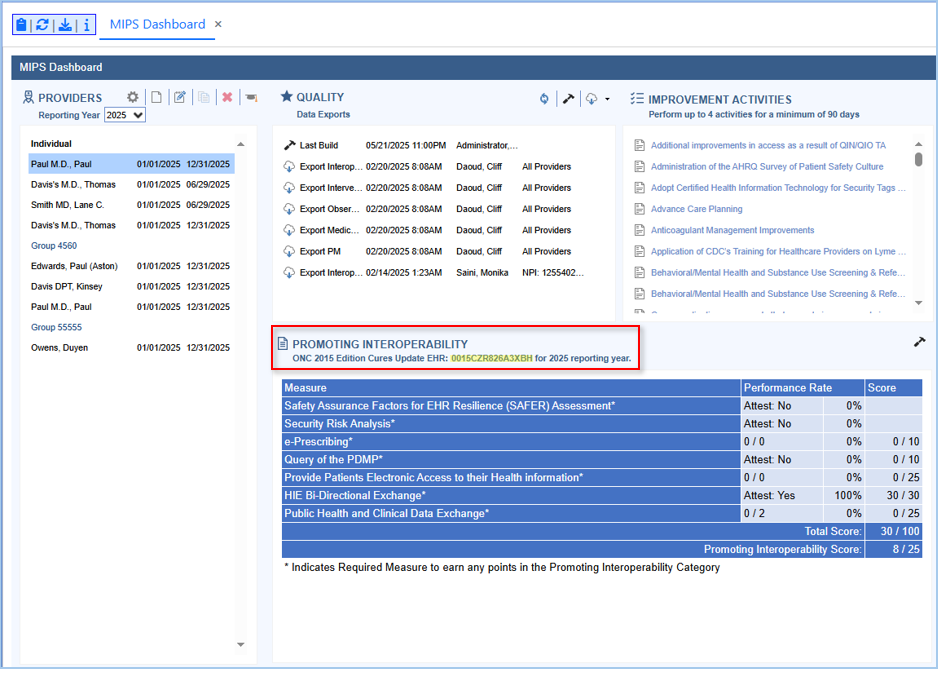
Follow these instructions to print out the practice's promoting interoperability numerators and denominators used for attestation to the MIPS programs:
- Click on the Reports portal.

- Select the MIPS Dashboard report.

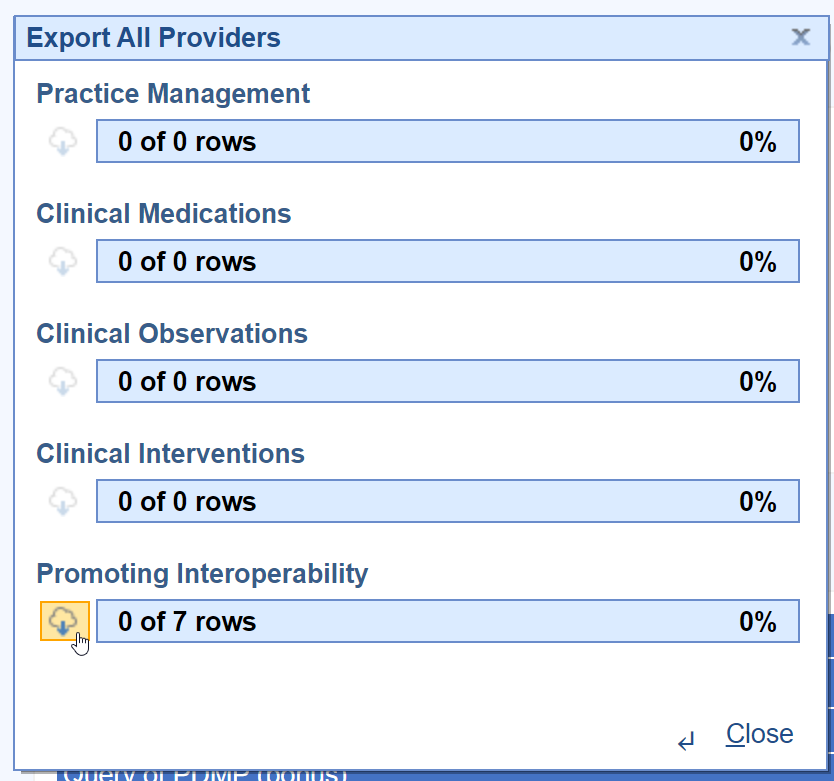
- Click on the Quality Report button.

- Pick the All Providers option.

- Select the Download button under the Promoting Interoperability section.
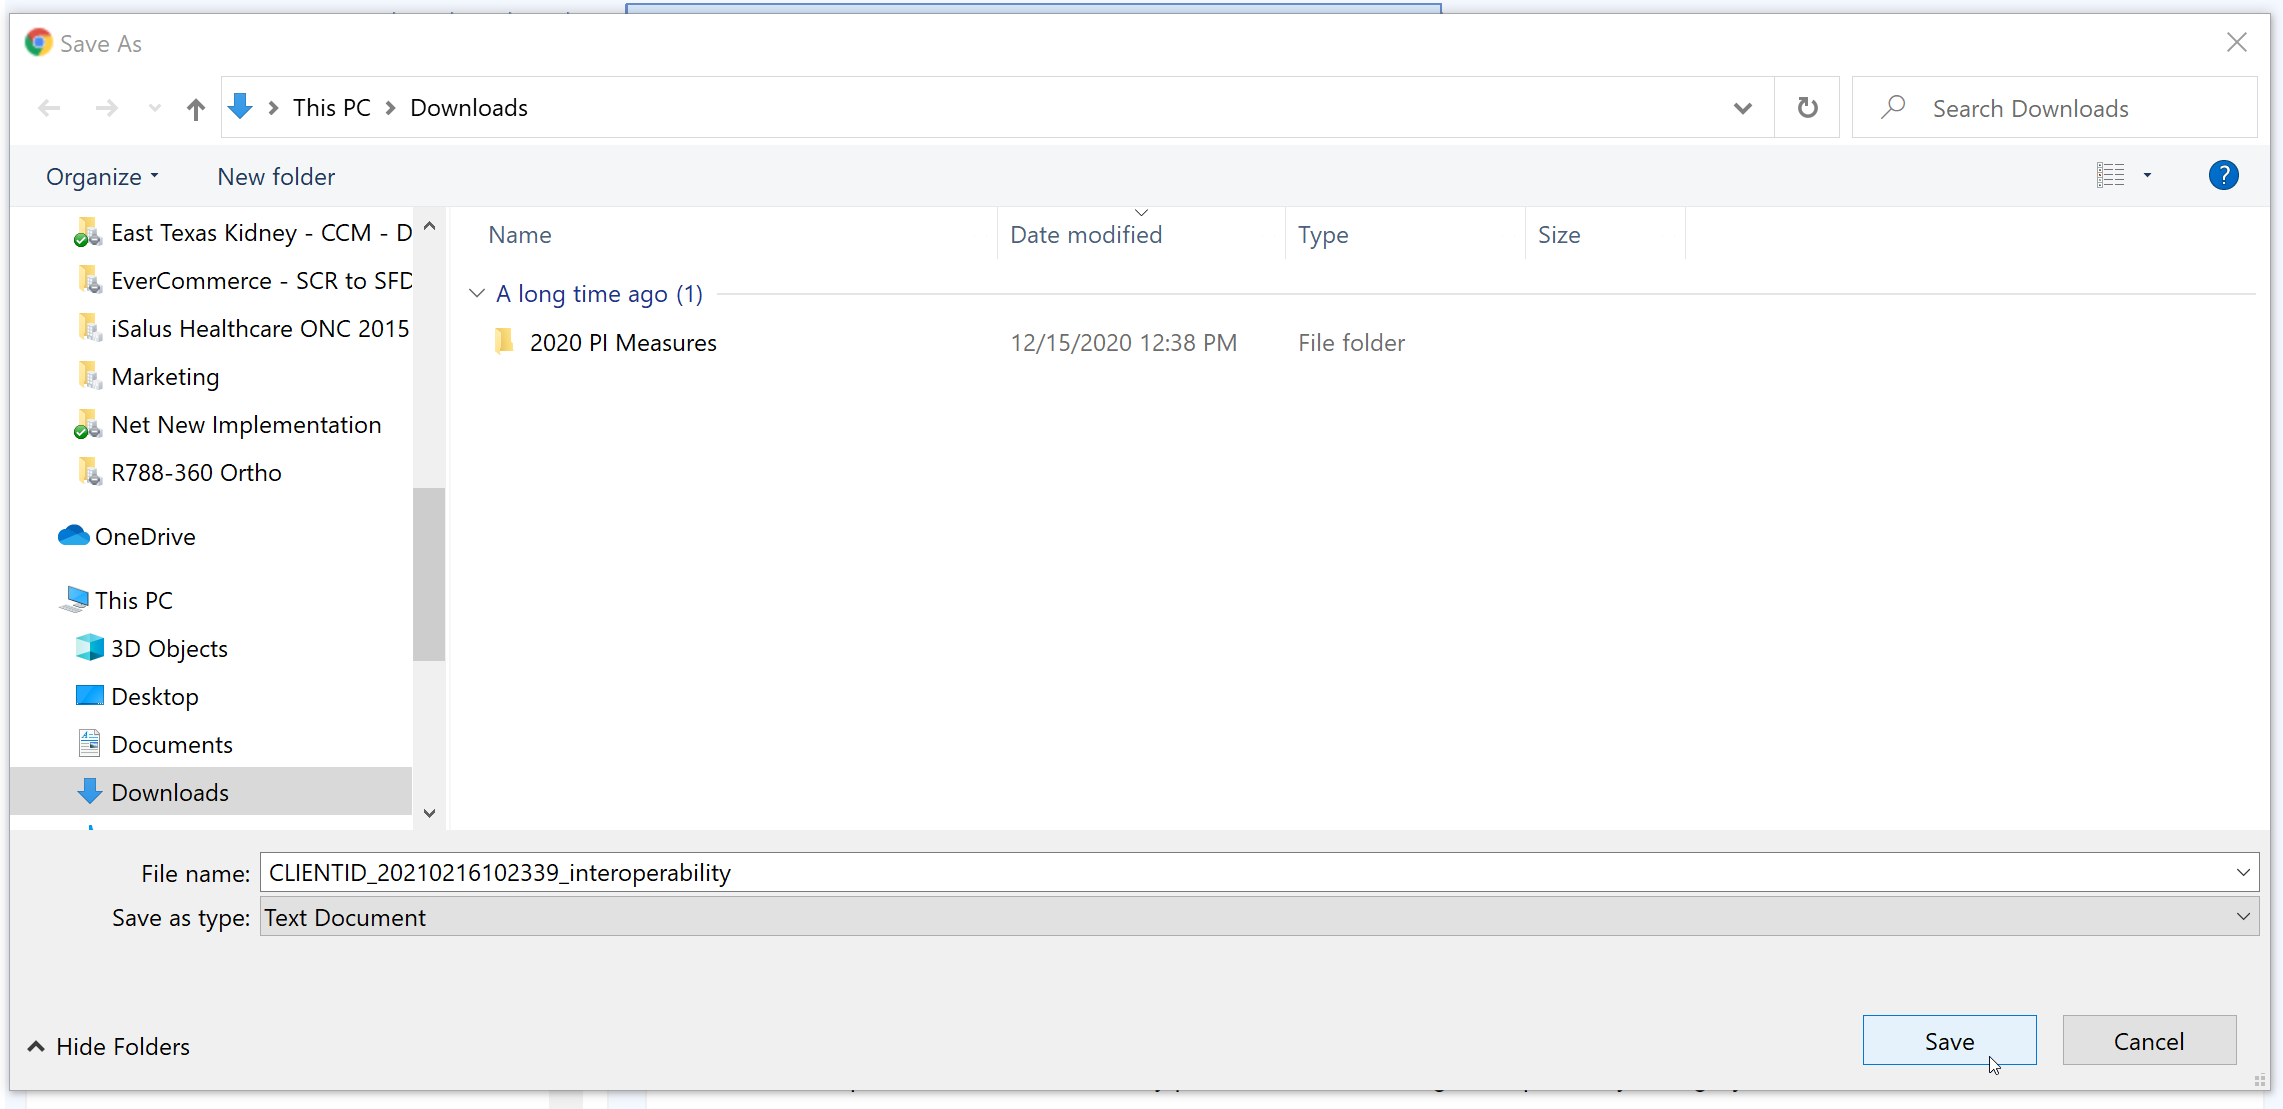
- Choose the directory/location on your computer and press the Save button.
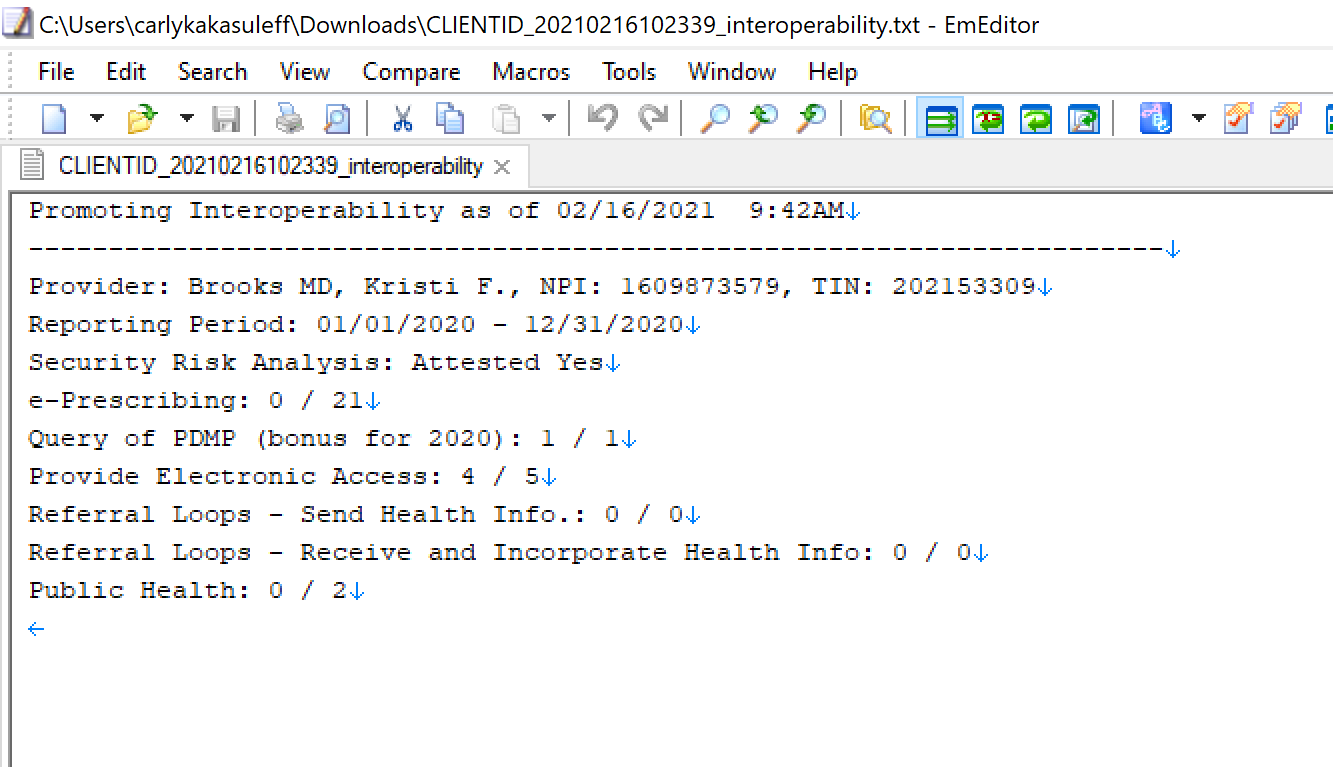
- The Promoting Interoperability report is now downloaded.
Subject: Welcome to the <<Practice Name>> FHIR APIs
Email Body:
Hello,
This email is your invitation to access your personal health data using our practice's FHIR APIs. Accessing your data this way is optional and no additional steps are necessary on your part.
Our FHIR API's are a modern way to securely interact with and retrieve your health information from our practice. These API's are one of two options you have to access your health information. For most patients, using MyMedicalLocker.com to access their personal health information is the easiest and best choice. Reach out to your practice if you have not already setup a MyMedicalLocker.com personal health record account.
Your API Account Activation Information:
Steps to Complete
- To activate your account, please access the site by clicking here.
- Select Login
- An option for Click Here to Activate will be shown below the username and password fields
- Once selected, you will need to provide your First Name, Last Name, Date of Birth, and Activation Key (myN/MymSf6fxFLT/a)
- Create a Username and Password. Keep these credentials as you will need them to access your account.
Once activated, keep these details safe:
- Your API ID: 101358
- Your Activation Key: myN/MymSf6fxFLT/a
Why am I receiving this?
The Fast Healthcare Interoperability Resources (FHIR) is a standard for exchanging healthcare information electronically. It is designed to facilitate the exchange of electronic health records (EHRs) and other healthcare data between different systems. The Interoperability and Patient Access final rule requires the use of FHIR by a variety of CMS-regulated payers, including Medicare Advantage organizations, state Medicaid programs, and qualified health plans in the Federally Facilitated Marketplace by 2021. Specifically, the rule requires FHIR APIs for Patient Access, Provider Directory and Payer-to-Payer exchange. The primary goal of the rule is to put patients first by giving them access to their health information when they need it most and in a way they can best use it. Patients and their healthcare providers will have the opportunity to be more informed, which can lead to better care and improved patient outcomes, while at the same time reducing burden.
Warm regards,
The <<Your Practice Name Here>> Team
Q: I am sending my referral summaries via DIRECT. Why are they missing from my numerator?
A: In order for your referral summaries to count for the Referral Loops: Send Health Information measure, please ensure you're following these steps and verify the settings/steps below:
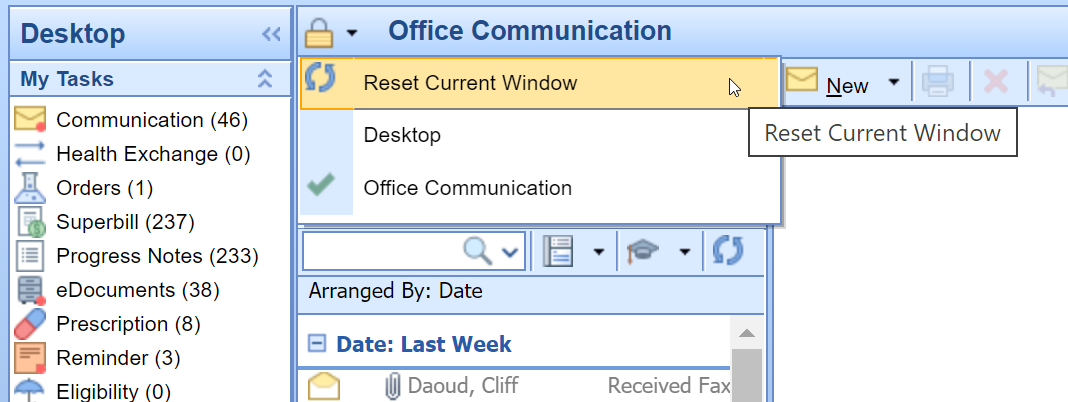
- Ensure the user sending the DIRECT message has his/her User Provider Connection setup for the Provider the Referral Summary is being sent for. This needs set prior to opening the Task Communication screen. Reset the Task Communication screen if necessary. If this setting was not setup before sending the referral summary via DIRECT, you must send a new summary of care.
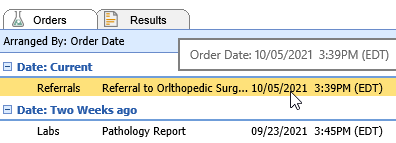
- Did you set the Transition of Care summary Requested Date to the Referral Order Date? These two dates must match. If the dates did not match, you will need to send a new summary of care via DIRECT.
- Find your DIRECT message in the Task Communications > Sent Items Queue. Right-click over the message and select DIRECT Status. The status must be either 'Accepted' or 'Confirmed' to count towards the numerator of the Referral Loops - Send Health Information MIPS measure.
- Open the Reports > MIPS Dashboard. Select the provider/group you are looking at. Press the Hammer icon under the Promoting Interoperability section to re-calculate the MIPS PI scores.

Q: Why is my Provider/Group's Referral Loops: Receive and Incorporate denominator zero?
A: In order for a new patient visit (a claim with a new patient CPT code present on it during the reporting period) to count towards the Referral Loops: Receive & Incorporate denominator, a CCDA document must be received via DIRECT/imported via the Reports > Summary of Care screen and linked to the patient's new patient appointment when linking the CCD to the patient's chart. Click here for the full instructions on receiving and incorporating CCDA documents into patient charts.
Q: My patient is setup with an email, MyMedicalLocker access was provided within 4 business days/the patient has a connected MML account, FHIR is enabled for our practice and my provider signed the patient's note within 4 business days - why is my patient not counting towards my Provide Patient Access numerator?
A: In this event, you will want to check the following two items which may be impacting the patient counting towards the provide patient access measure:
- Was the patient seen for an "Incident to" billing scenario where the patient's appointment was with a mid-level clinician, but his/her claim is under the MD clinician? If so, make sure you have the mid-level clinician setup as a provider on the MIPS dashboard for your group.
- Is the patient's claim tied to the appointment - you can figure this out by right-clicking over the appointment > Select Quick Pay > Click on the Superbill tab? If not, we will not be able to properly calculate whether the appropriate access was provided to the patient. It is important to submit patient's claims that are tied to their appointment by populating them off the Appointment > Quick Pay or via the patient's appointment in the EHR > Superbill tab.
Please be sure to familiarize yourself with the following resources for complete information on the QPP MIPS Payment Program:


