The team at iSalus has evaluated the payment posting settings to be sure that the defaults are accurate and conservative, but we’d encourage you to review them to be sure they’re set to best meet the needs of your practice. You can find an overview video on recent changes here that discusses customization options from a manager's perspective.
At the upper right corner of the new Deposits screen, you’ll see the words “Deposit Search,” with a gear icon next to it. You can find all the settings for payment posting by clicking this gear.

Company Settings
- Auto-Post ERA Delay
- Default Setting: -1 (Off)
- Function: When an ERA is loaded into the system, it will auto-post any claim that does not have errors, without waiting for a user to manually choose to send that check to posting, or it will wait to post until the delay time has been met.
- Reason for Default: The default setting 'off' more closely represents the current function of deposit posting, and it allows users to hold checks and post to the bank if desired.
- Reason to Change Setting: If you’re not posting to the bank, there’s little reason to hold ERA’s back from posting once they come in. Changing the setting to '0' (on) will enable a more automated workflow to minimize the need for staff intervention.
- Create Deposit Credit Error
- Default Setting: 3
- Function: When the posting process runs to actually create payments on a given claim, it will afterwards check to see if a credit balance has been created. If it finds that there is a credit balance now on the claim, this setting will determine what the system does as a result.
- Possible Settings:
Value Credit Auto-Created on Claim Error Created on Claim Claim Status Changed 1 Insurance Yes Yes 2 Insurance No Yes 3 None No No 4 Patient Yes Yes 5 Patient No Yes 6 None No Yes - Reason to Change Setting: If you'd like to customize how the system handles refunds, you may want to change this setting. If you don't want to decide how to handle refunds in the middle of the posting process, you may want to choose one of the options that doesn't create a claim error. If you'd like the system to auto-create patient credits with the assumption that most refunds will go to the patient, you may want to select an option with Credit Auto-Created on Claim: Patient. If you want the system to change the status of the claim to Refund but otherwise just let the credit balance fall on the Missing Refund Report, you likely want to choose option #6.
ERA Claim Adjustment Reasons
Purpose
The ERA Adjustment Reasons setup window is used in the Automated Payment Posting process. Once a claim has been ran through the Automated Payment Posting logic, the system will identify all Adjustment Reason Codes that are provided in the ERA/EOB. Each Adjustment Reason code will create a Payment/Adjustment record for the procedure line that the adjustment reason code is associated with. In some scenarios, the Adjustment Reason code provided may indicate that the claim was not posted cleanly and needs to be reviewed by a member of the billing team. If this is the case, a practice may choose to set a Claim Status or Claim Level override. A practice can customize these rules to meet the unique needs of the business.
Screen Layout and Definitions
Adjustment Reason Code List
The screen allows a user to change the workflow for each Adjustment Reason Code received. In the ERA, the Adjustment Reason Codes are provided in the 835 EDI FIle (Loop: 2110, Segment: CAS) by the payer. In the EOB, the Adjustment Reason Codes are usually listed procedure information.
In both the ERA and EOB, the Adjustment Reason Code is often paired with the Adjustment Group (CO, OA, PR, PI). You will notice that the system does allow for the Group to be specified. However, this is only necessary to configure if the code is treated differently because the group is included. For example, if a PR-22 and a PI-22 do the same thing, then you only need to setup the rules for a '22'.
Adjustment Reason Code Values
For each Adjustment Reason Code, the following can be specified:
- Group: An Adjustment Group can be added to an Adjustment Reason Code if it is necessary to treat the code differently because of the group.
- Denial Indicator: This flag indicates that this code/group combination is considered a denial reason. This will be utilized for reporting purposes.
- EOB Indicator: This flag indicates that this code will create an EOB record to send to the secondary insurance.
- Description: The description displayed can not be changed, but represents the description of the code as defined by the 835 standards.
Once the standard code details are configured, the Claim Status, Claim Level, and Payment types can also be configured. You will notice that you have the ability to modify these values for various Processing Levels.
- ERA Status: This is the Processing Level receiving on the ERA/EOB. In the ERA, the Processing Level is provided in the 835 EDI FIle (Loop: 2100, Segment: CLP02) by the payer. In the EOB, the Processing Level is usually listed with the information at the claim level.
- Claim Status: This value dictates that if the selected Adjustment Reason Code is received, the Claim Status will be overwritten and set to the value provided. If the 'Primary Claims' value is set, this will be treated as the Default for the other levels. If no value is set, the Claim Status will not be overwritten.
- Claim Level: This value dictates that if the selected Adjustment Reason Code is received, the Claim Level will be overwritten and set to the value provided. If the 'Primary Claims' value is set, this will be treated as the Default for the other levels. If no value is set, the Claim Level will not be overwritten.
- Payment Type: This value dictates which Payment Type is used for the corresponding Adjustment Amount provided with the Adjustment Reason Code. The 'Primary Claims' value must be set. This will be treated as the Default for all other other levels unless those levels are explicitly set. The Payment Type setup window will determine how that record affects the overall balance of the claim. Learn more here: Payment Type.

ERA Claim Status
Purpose
The ERA Claim Status setup window is used in the Automated Payment Posting process. Once a claim has been ran through the Automated Payment Posting logic, the system will attempt to set the correct Claim Status and Claim Level so that it can be worked through the remainder of the revenue cycle. In the event that the ERA/EOB is posted cleanly (meaning no Adjustment Reasons caused the claim status/level to be set), then the rules on this screen will come into effect. A practice can customize these rules to meet the unique needs of their practice.
Screen Layout and Definitions
Claim Status List
The screen allows a user to change the workflow based on the Processing Level of the ERA/EOB. In the ERA, the Processing Level is provided in the 835 EDI FIle (Loop: 2100, Segment: CLP02) by the payer. In the EOB, the Processing Level is usually listed with the information at the claim level.
Claim Status Values
For each Processing Level, you will be able to set the Claim Status and the Claim Level for 3 specific circumstances:
- Zero Balance: If the entire claim balance becomes 0 after all payments are applied.
- Next Insurance: If a balance remains on the claim and the patient has a subsequent insurance. For example, if processed as Primary and the patient has a Secondary insurance on file.
- No Insurance: If a balance remains on the claim and the patient does not have a subsequent insurance.
Window Display

NOTE: Some Processing Level options may not allow you to utilize the Next Insurance values. This occurs because we do not have a way of knowing which insurance level was responding, so we can not know what 'Next Insurance' to look for.
ERA Payments
Purpose
The ERA Payments setup window is used in the Automated Payment Posting process. When an ERA is received, a Payment Method Code is supplied in BPR 04. The Payment Method code will map to both a payment type and payment method in the application.
Screen Layout and Definitions
Payment Method Code List
In the ERA, the Payment Method Code is provided in the 835 EDI FIle (Segment: BPR02) by the payer. The guidelines allow the following values.
| Code | Definition |
|---|---|
| ACH | Automated Clearinghouse |
| BOP | Financial Institution Option |
| CHK | Check |
| FWT | Federal Reserve Funds/Wire Transfer |
| NON | Non Payment Data |
Payment Method Code Values
For each Payment Method Code, you will be able to set the deposits Payment Method and Payment Type.
- Payment Method: Sets the payment method on the deposit when the selected code is supplied.
- Payment Type: Sets the payment type on the deposit when the selected code is supplied.
Window Display

ERA PLB Amounts
Purpose
The ERA PLB Amounts setup window is used in the Automated Payment Posting process. When an ERA is received, it is possible that a Provider Level Adjustment (PLB) segment is provided. This often includes information related to accelerated payments, cost reports settlements, and timeliness report penalties unrelated to a specific claim or service.
The ERA PLB Amounts setup window will allow you to decide exactly how to handle each type of transaction supplied. Some scenarios may require that the money is posted to one to many claims. Other times, you may just want to ignore it.
Customizing PLB Segments per Payer
The ERA PLB Amounts setup window serves as the Company Default for how these values are handled in the Payment Posting process. However, users can customize this at a payer level. This is helpful when different payers treat these standardized values different than the rest of the industry. Payer level settings will take precedence over the company level setting. This can be done by navigate to Setup > Payers > More > Payer ERA Overrides > PLB.

Screen Layout and Definitions
PLB Adjustment Reason Code List
In the ERA, the PLB Adjustment Reason Code is provided in the 835 EDI FIle (Segment: PLB 03) by the payer. The guidelines allow the following values:
| Code | Definition |
|---|---|
| 50 | Late Charge |
| 51 | Interest Penalty Charge |
| 72 | Authorized Return |
| 90 | Early Payment Allowance |
| AH | Origination Fee |
| AM | Applied to Borrower's Account |
| AP | Acceleration of Benefits |
| B2 | Rebate |
| B3 | Recovery Allowance |
| BD | Bad Debt Adjustment |
| BN | Bonus |
| C5 | Temporary Allowance |
| CR | Capitation Interest |
| CS | Adjustment |
| CT | Capitation Payment |
| CV | Capital Passthru |
| CW | Certified Registered Nurse Anesthetist Passthru |
| DM | Direct Medical Education Passthru |
| E3 | Withholding |
| FB | Forwarding Balance |
| FC | Fund Allocation |
| GO | Graduate Medical Education Passthru |
| HM | Hemophilia Clotting Factor Supplement |
| IP | Incentive Premium Payment |
| IR | Internal Revenue Service Withholding |
| IS | Interim Settlement |
| J1 | Nonreimbursable |
| L3 | Penalty |
| L6 | Interest Owed |
| LE | Levy |
| LS | Lump Sum |
| OA | Organ Acquisition Passthru |
| OB | Offset for Affiliated Providers |
| PI | Periodic Interim Payment |
| PL | Payment Final |
| RA | Retro-activity Adjustment |
| RE | Return on Equity |
| SL | Student Loan Repayment |
| TL | Third Party Liability |
| WO | Overpayment Recovery |
| WU | Unspecified Recovery |
| ZZ | Mutually Defined |
Payment Method Code Values
Because PLB Adjustment Reason Codes do not specific where to post the money or even if you should post the money, the application can not do this automatically. Therefore, users will be required to decide how to allocate the amount supplied in this segment. So, by default, every PLB line is considered a Deposit Error. Users can control what happens with those errors by setting the following options.
- PLB Type: Decides how to handle each PLB Code should be handled.
- Apply Amount to Claims: If this option is set, PLB amounts will be classified as an error. The user will have to ‘Resolve’ this error by applying the money to existing claims.
- Report Amount: If this option is set, the amounts will be flagged so that we can report on the amounts. The error will be ignored. The user does not have to do anything – money does not get posted anywhere.
- Ignore/Resolve: If this option is set, the PLB error will be automatically set to ignore. The user does not have to do anything – money does not get posted anywhere.
- Claim Information: If the user chooses the 'Apply Amount to Claims' option, these values will be used to determine what happens with the claim that the money is posted to.
- Claim Status: Users can determine if the claim status that the money is being posted to should change. If it should remain as is, leave this field blank.
- Claim Level: Users can determine if the claim level that the money is being posted to should change. If it should remain as is, leave this field blank.
- Payment: Users can determine which payment type is associated with the amount when posted. If it is blank, the user will be required to pick the payment type during the posting process.
Window Display

Below is the recommended workflow for posting payments in the application. It assumes that you have already customized your posting rules to meet the needs of your practice. This general workflow should be able to be applied to the payment posting process as a whole, but please see other sections to review specific workflows for ERAs, EOBs, and Statement Checks in the system.

ERA Workflow Video
ERA Workflow Steps
- If your practice doesn't post to the bank, ERAs received should be sent to posting automatically using the Auto Post ERA Delay company setting.
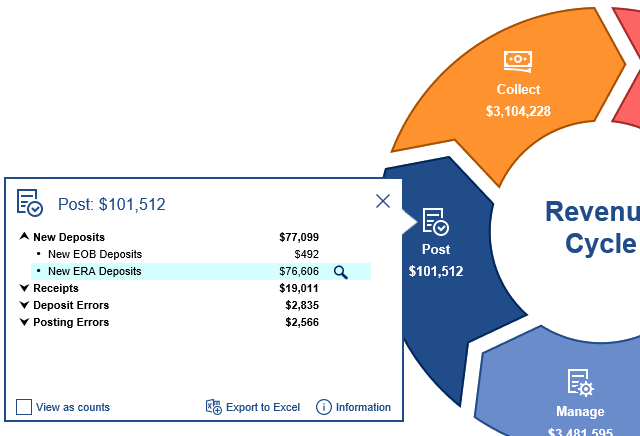
- If not auto-posting ERAs, you will need to use the RCM Wheel to go to New ERA Deposits. Open each to click "Send to Posting." This is the step that is automated if #1 is properly set.
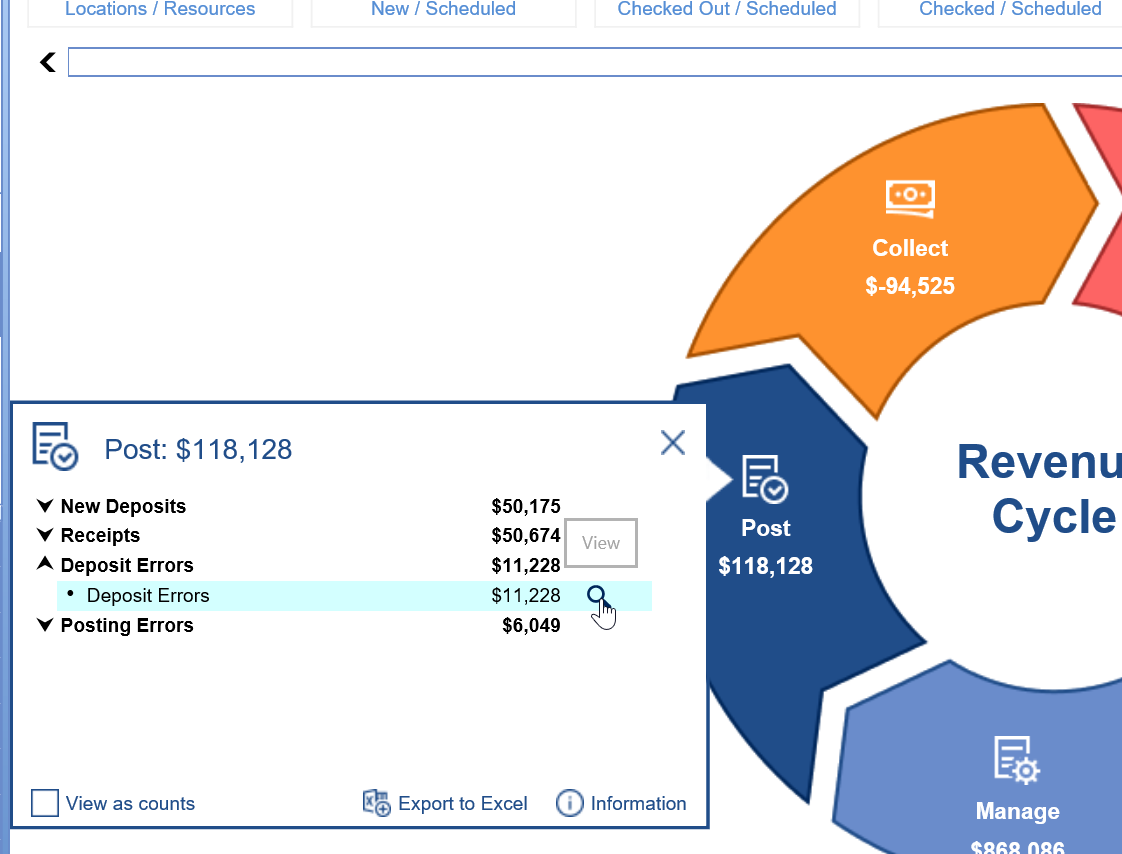
- If a deposit has a critical error, the deposit will be stopped even if auto-posting is turned on, giving you a chance to resolve errors before it moves to the auto-posting process. You can the RCM Wheel to navigate to deposits with outstanding Deposit Errors and resolve them.
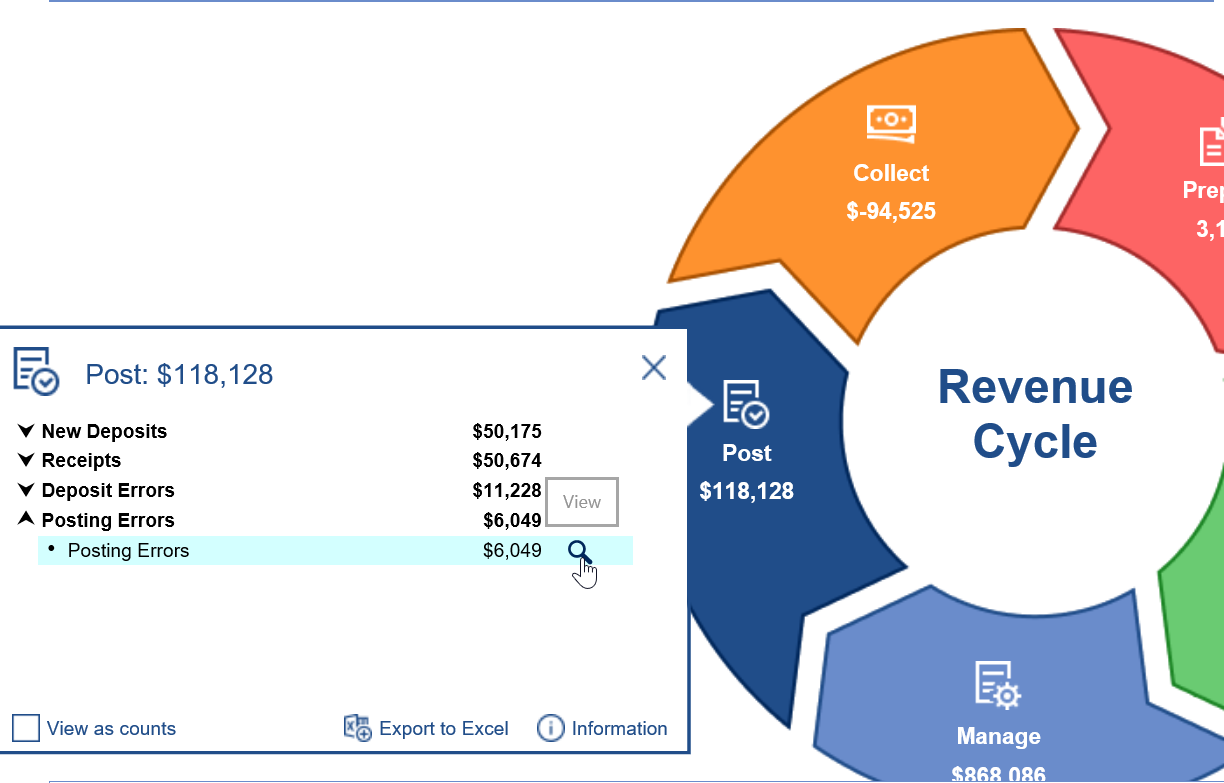
- If the auto-posting process encounters claim or procedure errors that (according to how the system has been customized) prevent posting, any impacted deposit claims will not be posted. You can use the RCM Wheel to navigate to deposit claims with Posting Errors and resolve them.
EOB Workflow Video
EOB Workflow Steps
- EOBs should be created as a new Payer Deposit in the Deposits window.
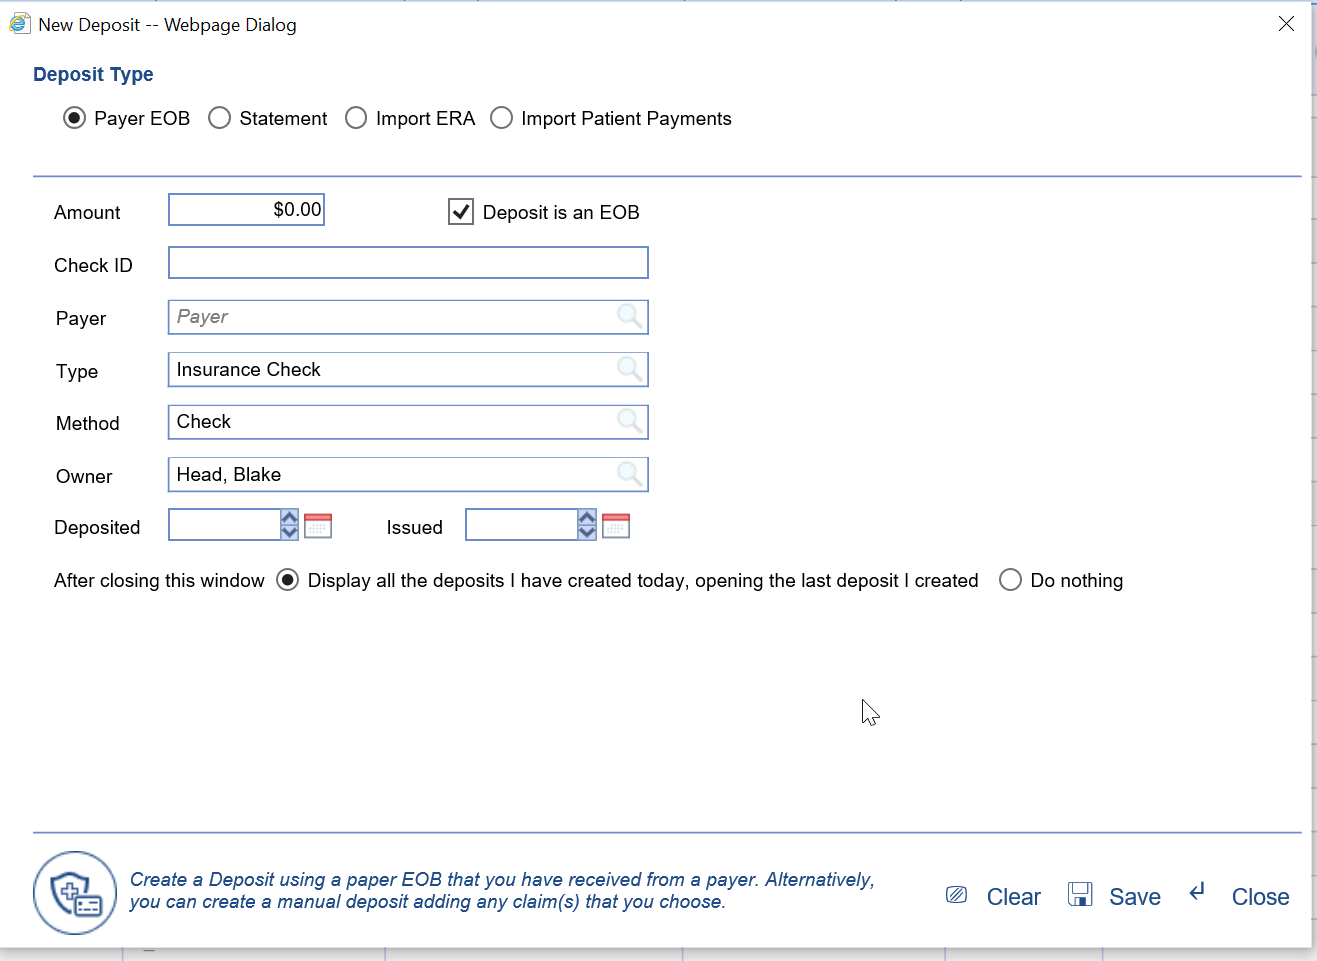
- Link your paper EOB to your deposit so that it can be easily accessed and referenced.
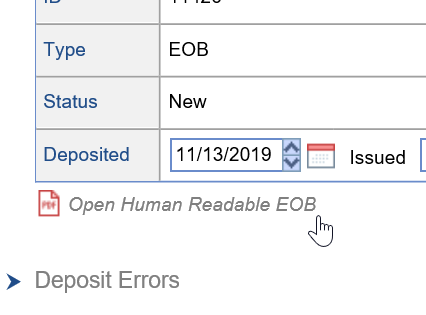
- Add all the necessary claims to the deposit, and add procedure information on the Deposit Claim Details window for each deposit claim - enter the data as you see it on the EOB.
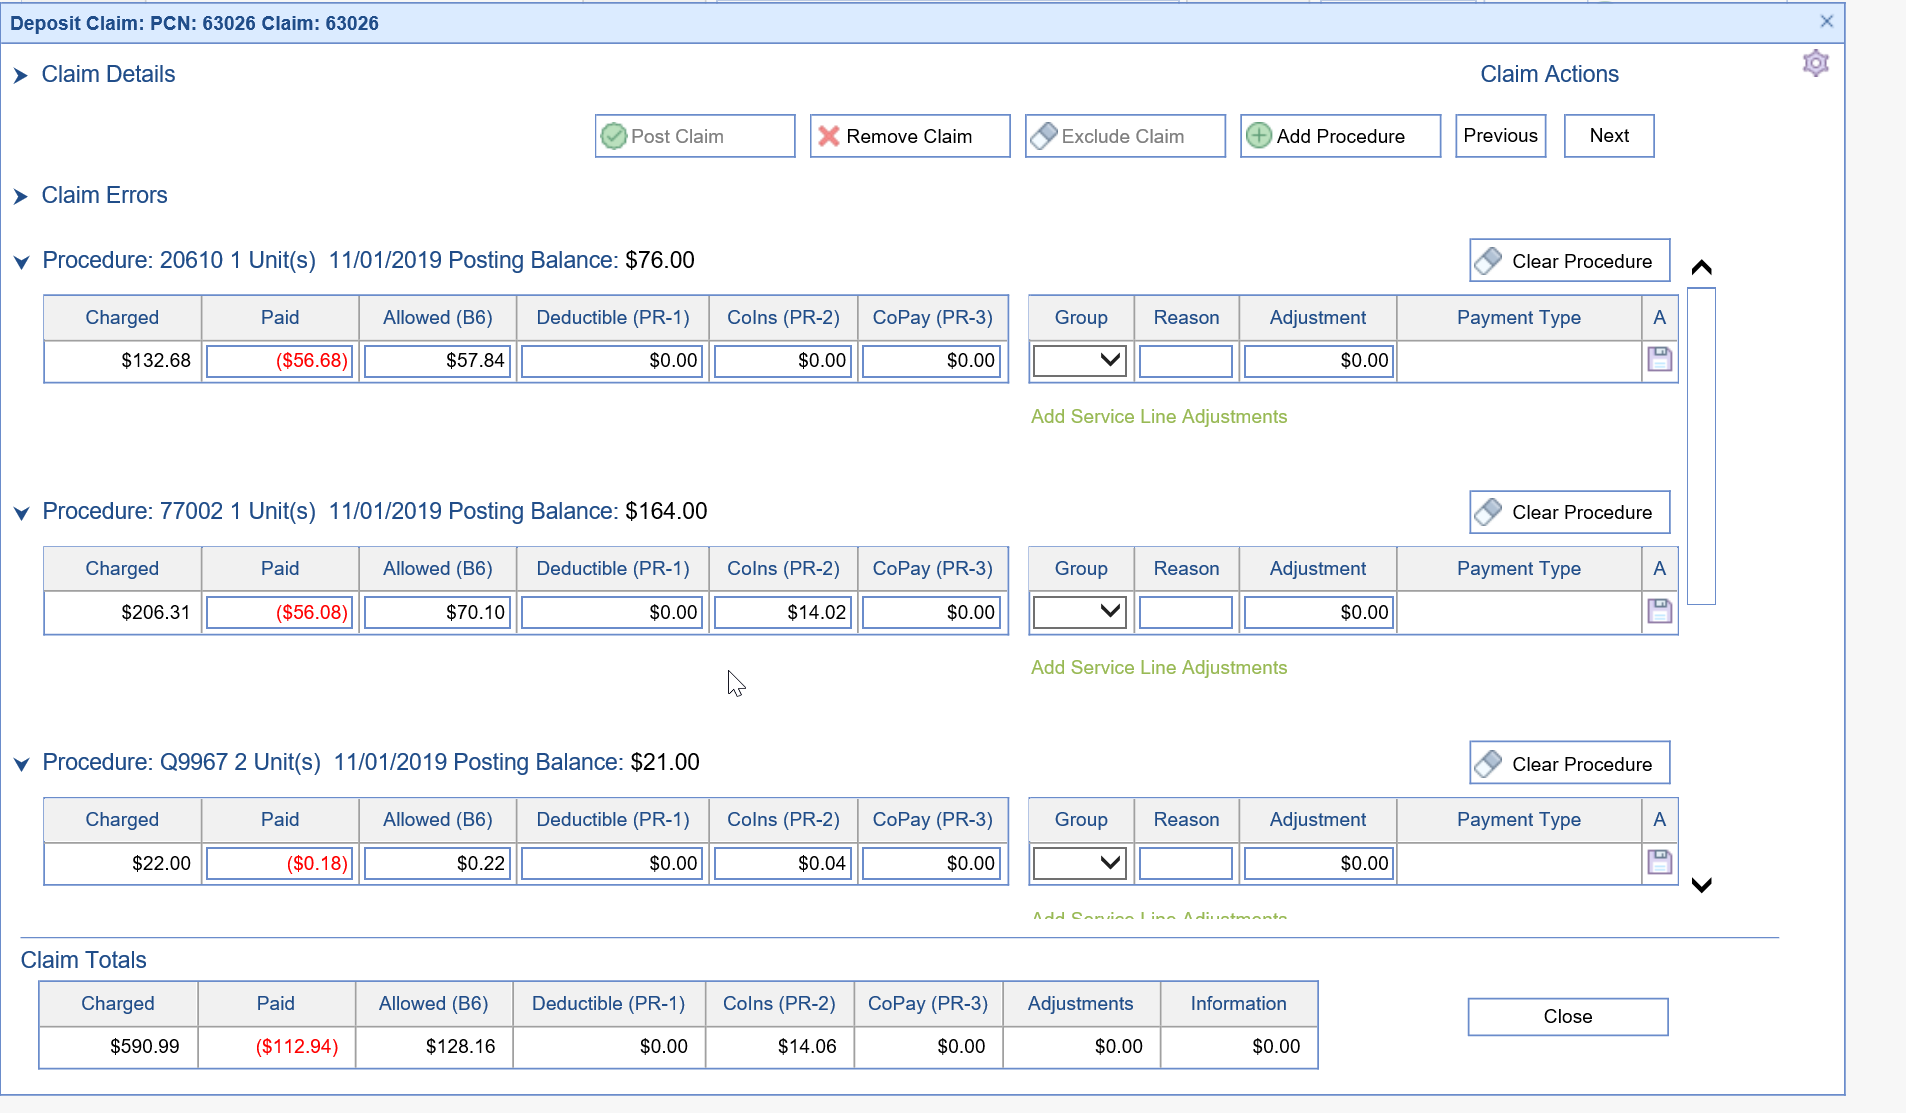
- Once you have created the entire EOB, send it to posting.
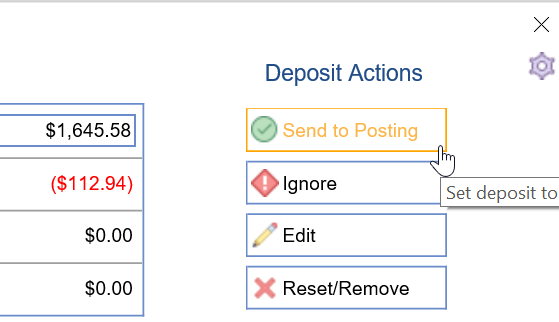
- Use the RCM Wheel to identify New EOB Deposits that are still being worked that have not been sent to posting.
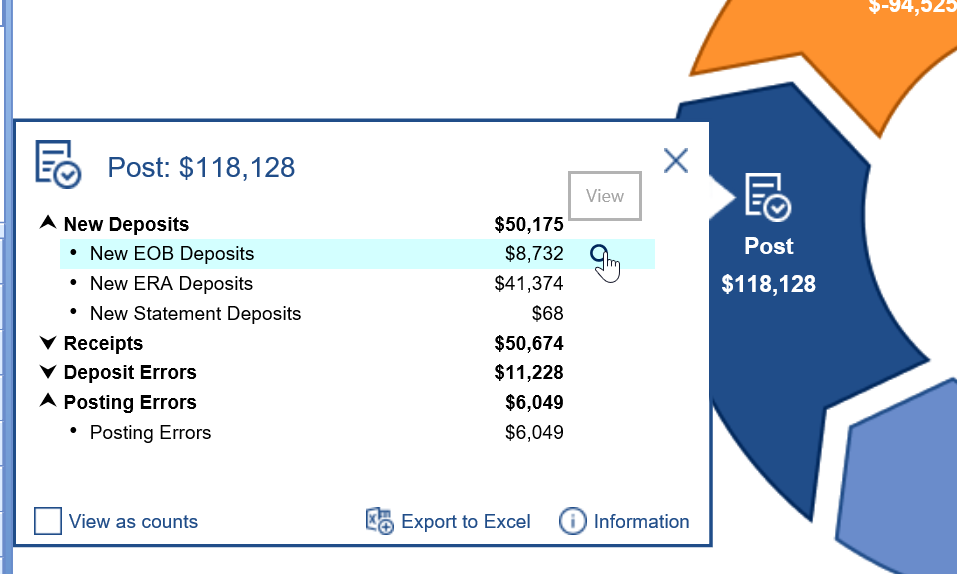
- Use the RCM Wheel to identify Posting Errors and resolve them.

Statement Posting Workflow Video
Statement Posting Steps
- Statements should be created as a new Statement Deposits in the Deposits window.
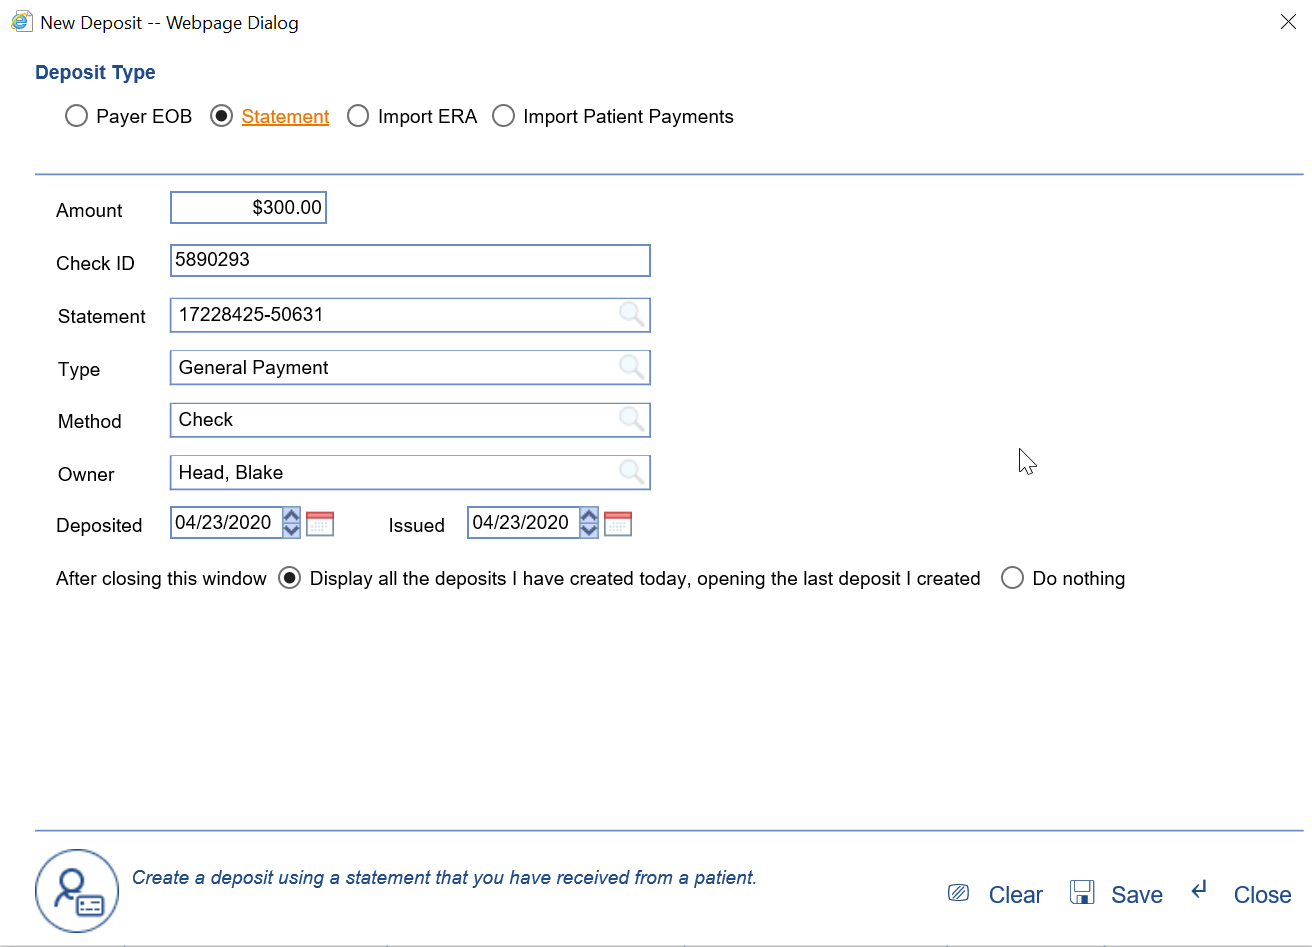
- All claims associated with the statement will be automatically added, and the check amounts will be auto-disbursed across procedures with remaining balances. They will be applied from the oldest procedure to the newest.

- Once you are satisfied with how the money has been allocated in the deposit, you can send it to posting.

- Based on the results of posting process, the following will happen with the claim:
- Remaining Balance on claim:
- Claim Status = Will stay as is.
- Claim Level = Will stay as is.
- No remaining balance on claim:
- Claim Status = Done
- Claim Level = Completed.
- Credit on claim:
- Claim Status = Company Setting,
- Claim Level = Will remain unchanged.
- Remaining Balance on claim:
Posting Interest payments has been designed to make this process:
- Better- Interest payments will be easily accessible to users through the Deposit Reporting option located under the More button.
- Faster - Interest can be posted with a single transaction and is often auto-posted for the user.
- Cleaner - Interest transactions are not displayed in the patient history or on statements. Interest is a payment to the practice from the insurance company typically because of a delayed payment. This additional money has no effect on the claim balance and therefore should not be displayed in the patient record.
Workflow
An ERA deposit is received and in the Deposit Errors section you find a Provider-Level Adjustment for an Interest Owed amount and the Deposit amount does not match the amount of Payments.

- Click Resolve

- If the claim is not pre-populated for you, search for and select the claim that you would like to post this money to.
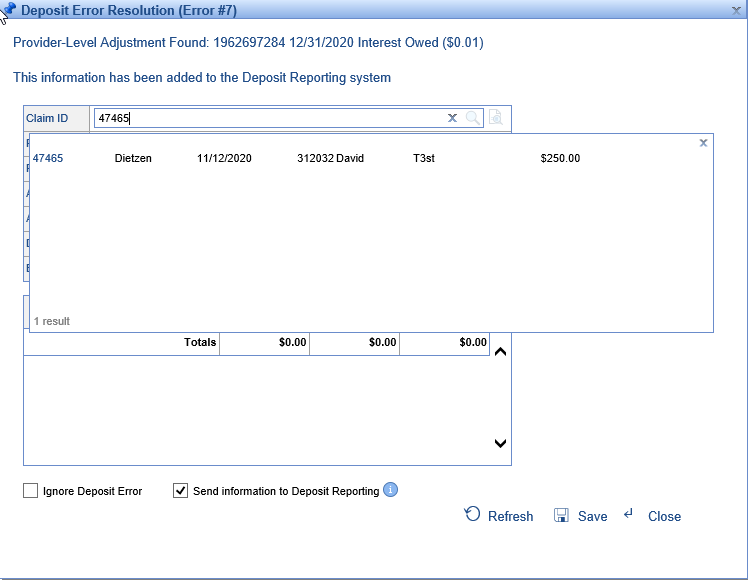
- Once the claim is selected, the remaining fields will be populated. Also, the procedure lines from the claim will be displayed.
- The application will apply the interest amount to the first procedure line and the Send information to Deposit Reporting will be checked.
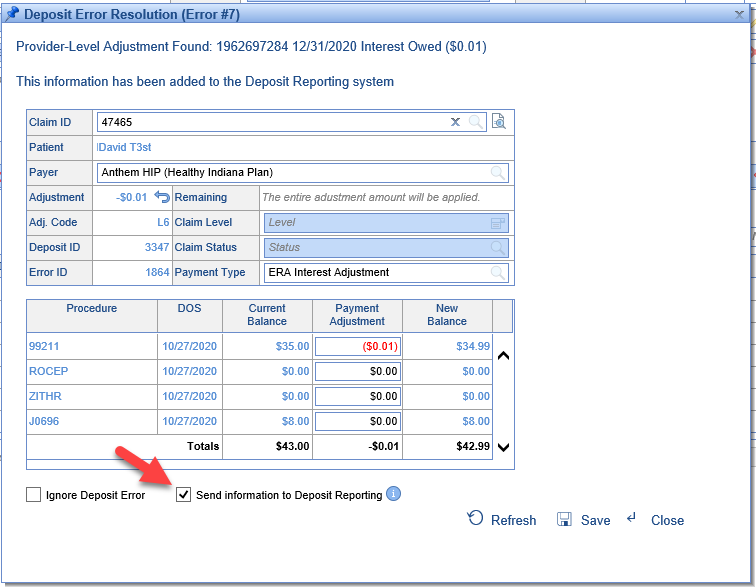
- Click Save.
You will now notice that your error is resolved and your deposit amount and your amount of payments balance.

Reporting
Interest payments can now be reported on using the Deposit Reporting option found in the Deposits screen under the More button.

Set your Reporting Period, Reporting Type, and click Search to view the results.

Results can be printed or exported to Excel as needed.
Additional Information
Some payers will report the interest amount at the Deposit AND the Claim level.
- In these cases we recommend you post the interest at the Deposit level and ignore the interest at the claim level. To ignore the claim error you will open the claim, click the resolve button for the error, click the Ignore Claim Error box at the bottom of the screen, and then Save the error.
Setup for auto posting interest payments
- Click the gear icon in the Deposit screen, then Setup, and then ERA Amounts
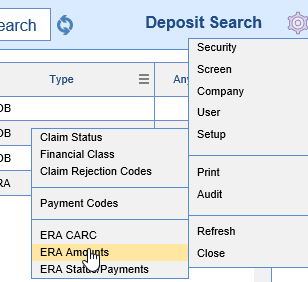
- Click on the PLB tab and the select L6 Interest Owed in the left pane
- Set the PLB Type to Report Amount
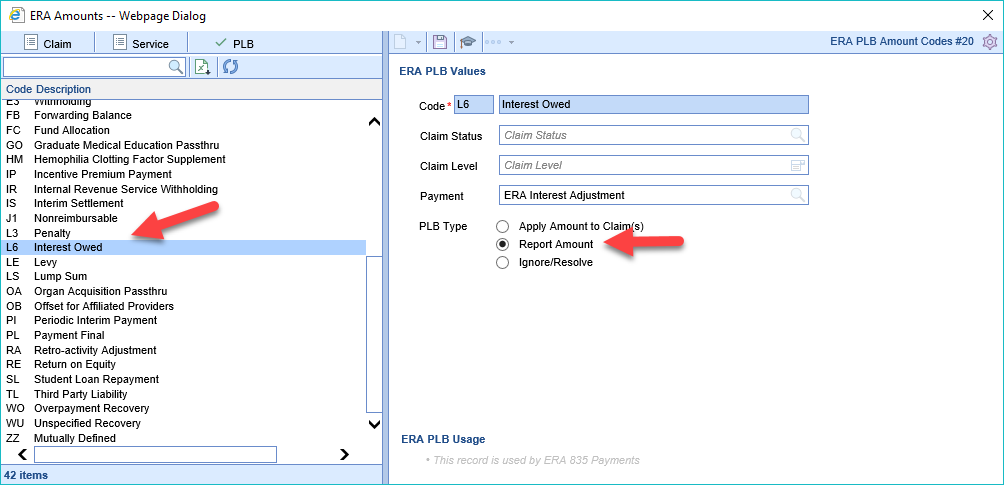
- Click Save
- Click the gear icon in the Deposit screen, then Setup, and then ERA Amounts
Payer Override to auto-ignore claim level interest
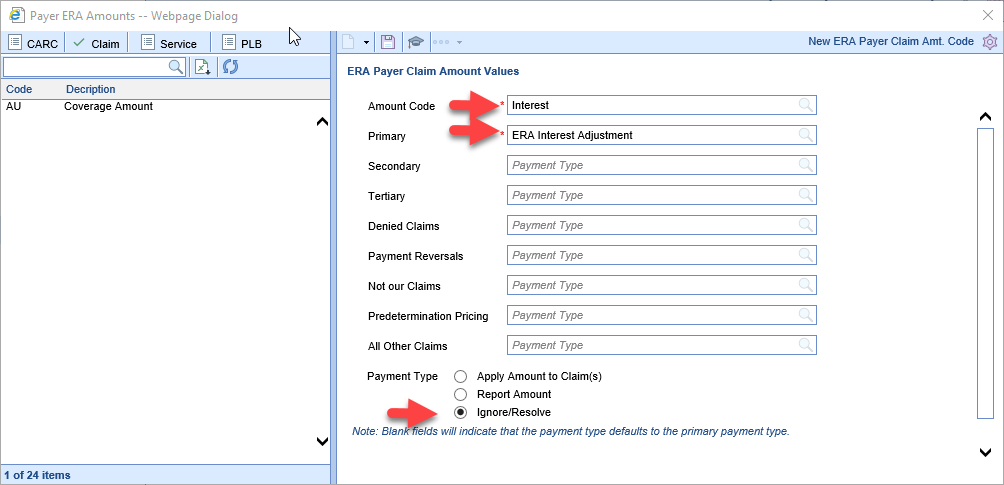
If you have a payer that ALWAYS reports interest at the deposit and claim level we recommend that you set the deposit level to auto-report as above and you set the claim level to auto-ignore.
- Go to the Payer Setup screen and open the insurance payer
- Click the More button and select Payer ERA Overrides
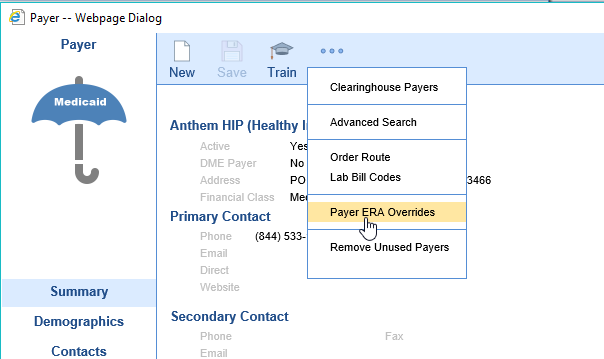
- Click the Claim tab
- In the Amount Code field put in: Interest
- In the Primary field put in: ERA Interest Adjustment
- For Payment Type select: Ignore/Resolve
- Click Save
