Introduction
We are excited to introduce the Enhanced Patient Flag Module, designed to augment the functionality of OfficeEMR. This module empowers practices with the capability to create custom flags for patient charts, enhancing chart management and accessibility. These practice defined and customizable flags are prominently displayed in the updated Patient Header, accessible across the entire OfficeEMR suite, including EMR, iScheduler, Billing, and eDocuments.
While these patient flags are configured to be visible across all four portals by default, there is flexibility to limit their display to specific portals as per practice requirements. At a glance patient flags benefits include helping staff to quickly identify patients based on physical needs while at the practice (e.g., accessibility), identifying patient risks (e.g., fall risk), medication risks (e.g., blood thinners), and so much more.
Important Note on Usage: We urge practices to exercise discretion when creating patient flags to avoid an excessive number of flags, which could diminish their benefit. Practices using too many flags will not be able to all display (fit) on the dynamically adjusting patient header and will require users to drill into the Patient Flag Assign screen to see all flags assigned to a patient.
 To access Patient Flags within iScheduler, the latest version, iScheduler v2, is required. Currently, iScheduler v2 is in Beta Testing and is limited to clients with the iScheduler v2 feature flag enabled. iScheduler v2 is scheduled to be included in the release on 1/25/2024 following resolution of a bug that prevents launching of Telehealth sessions from the schedule. Until this release, only Beta Testing clients will have the capability to see and use Patient Flags in the iScheduler section of iSalus. Clients eager to utilize Patient Flags in iScheduler before the next release should contact support for activation. Post-release 1/25/2024, this functionality will be accessible to all clients.
Setting up patient flags requires role assignment to manage which users will have the ability to create practice flags and assign practice flags. Additionally, practices will need to create the flags they want to make available for staff to assign to patient charts (keeping in mind that practices want to avoid an excessive number of flags, which can diminish the practical utility and benefit of flags in the system).
Setting up Roles for Patient Flags:
There are 2 roles to set up under Setup > Administrative Setup > Roles for Patient Flags:
- Create practice Flags (Role: Patient Flag Setup) – defaults to Admin users only
- Add/Remove Flags for individual patient charts (Role: Patient Flag Assign)
If you need a refresher on how to set up Roles, go to Assign a Screen to Role, Assign a Role to a User, or access additional information on Roles here.
For users that do not have a role that allows them to assign Patient Flags, patient flags will be visible in the patient headers throughout OfficeEMR and provide tool-tip information to the user. However, in such a case, the user is limited to read only access (and flags will display based on flag setup parameters in Setup > Basic Setup > Patient Flags).
Create practice Flags (Role: Patient Flag Setup) – defaults to Admin users only
Setup > Administrative Setup > Roles for Patient Flags:

Add/Remove Flags for individual patient charts (Role: Patient Flag Assign)
Setup > Administrative Setup > Roles for Patient Flags:

Practices will need to create the flags they want to make available for staff to assign to patient charts (keeping in mind that practices want to avoid an excessive number of flags, which can diminish the practical utility and benefit of flags in the system).
Creating Patient Flags for your practice:
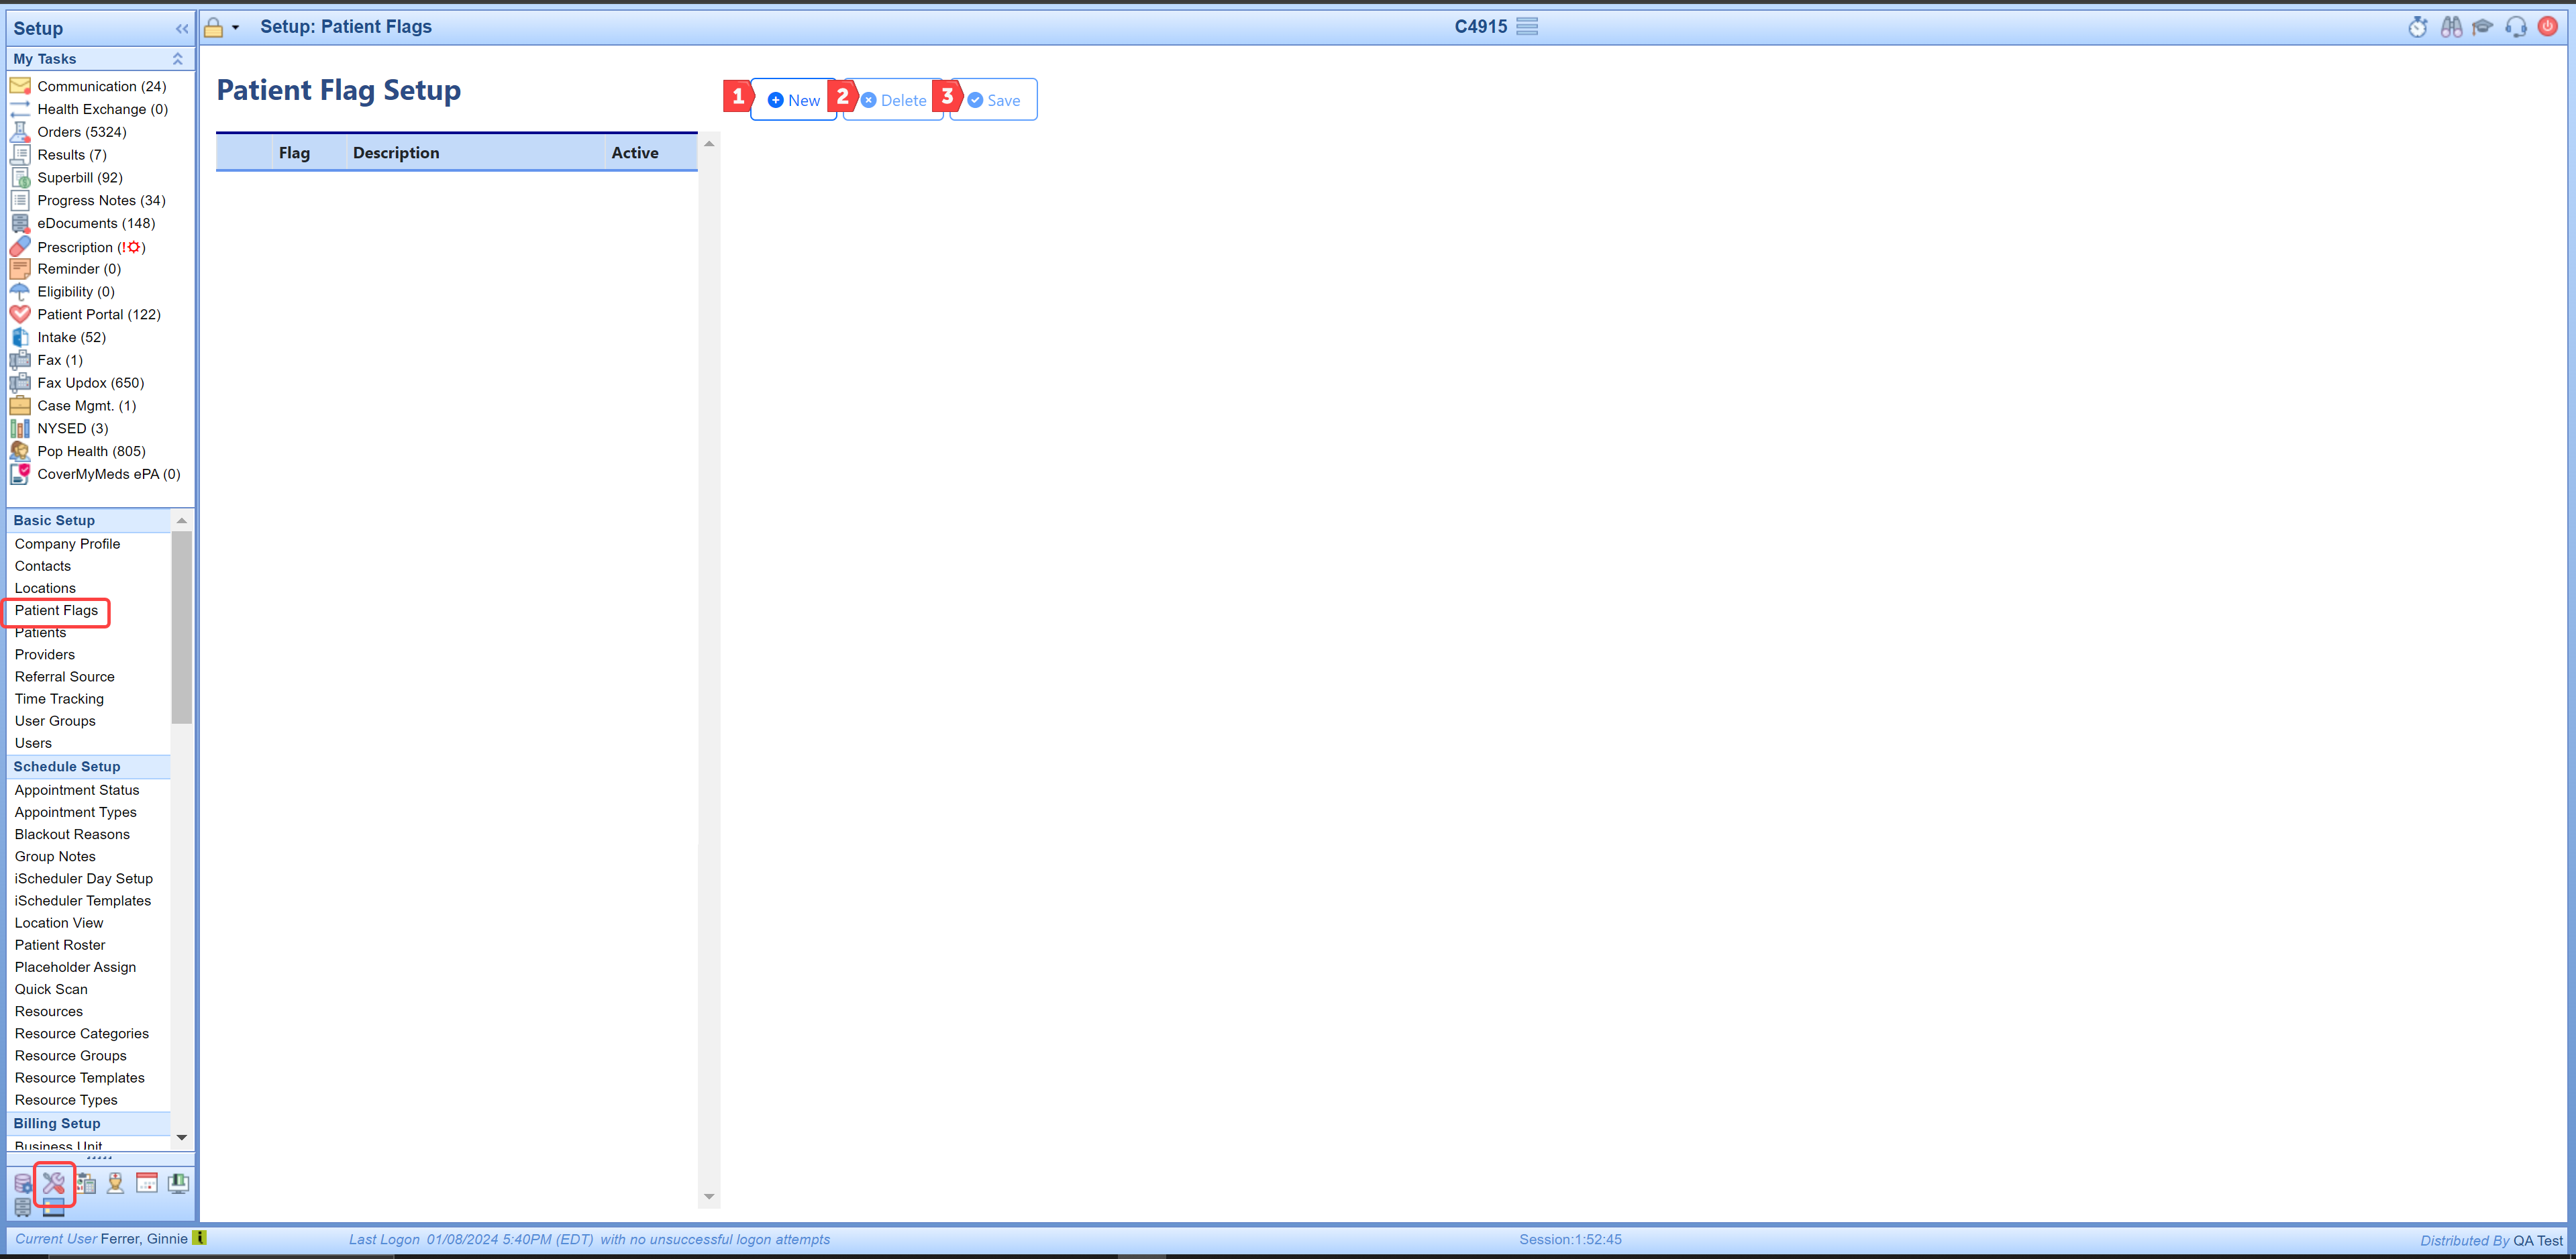
Go to Setup > Basic Setup > Patient Flags to view existing flags, both active and inactive. For practices that have never used patient flags before, you will see the Patient Flag Setup screen has no existing Patient Flags. You will see 3 buttons:
- New button: this button allows you to create a new Patient Flag.
- Delete button: this button allows you to delete a Patient Flag (but delete is limited to Patient Flags that are not assigned to any patients). Note: In the case where a flag is assigned but no longer needed, you would see step 6 below to inactivate the flag.
- Save button: this button saves new entries and any changes made to existing patient flags.
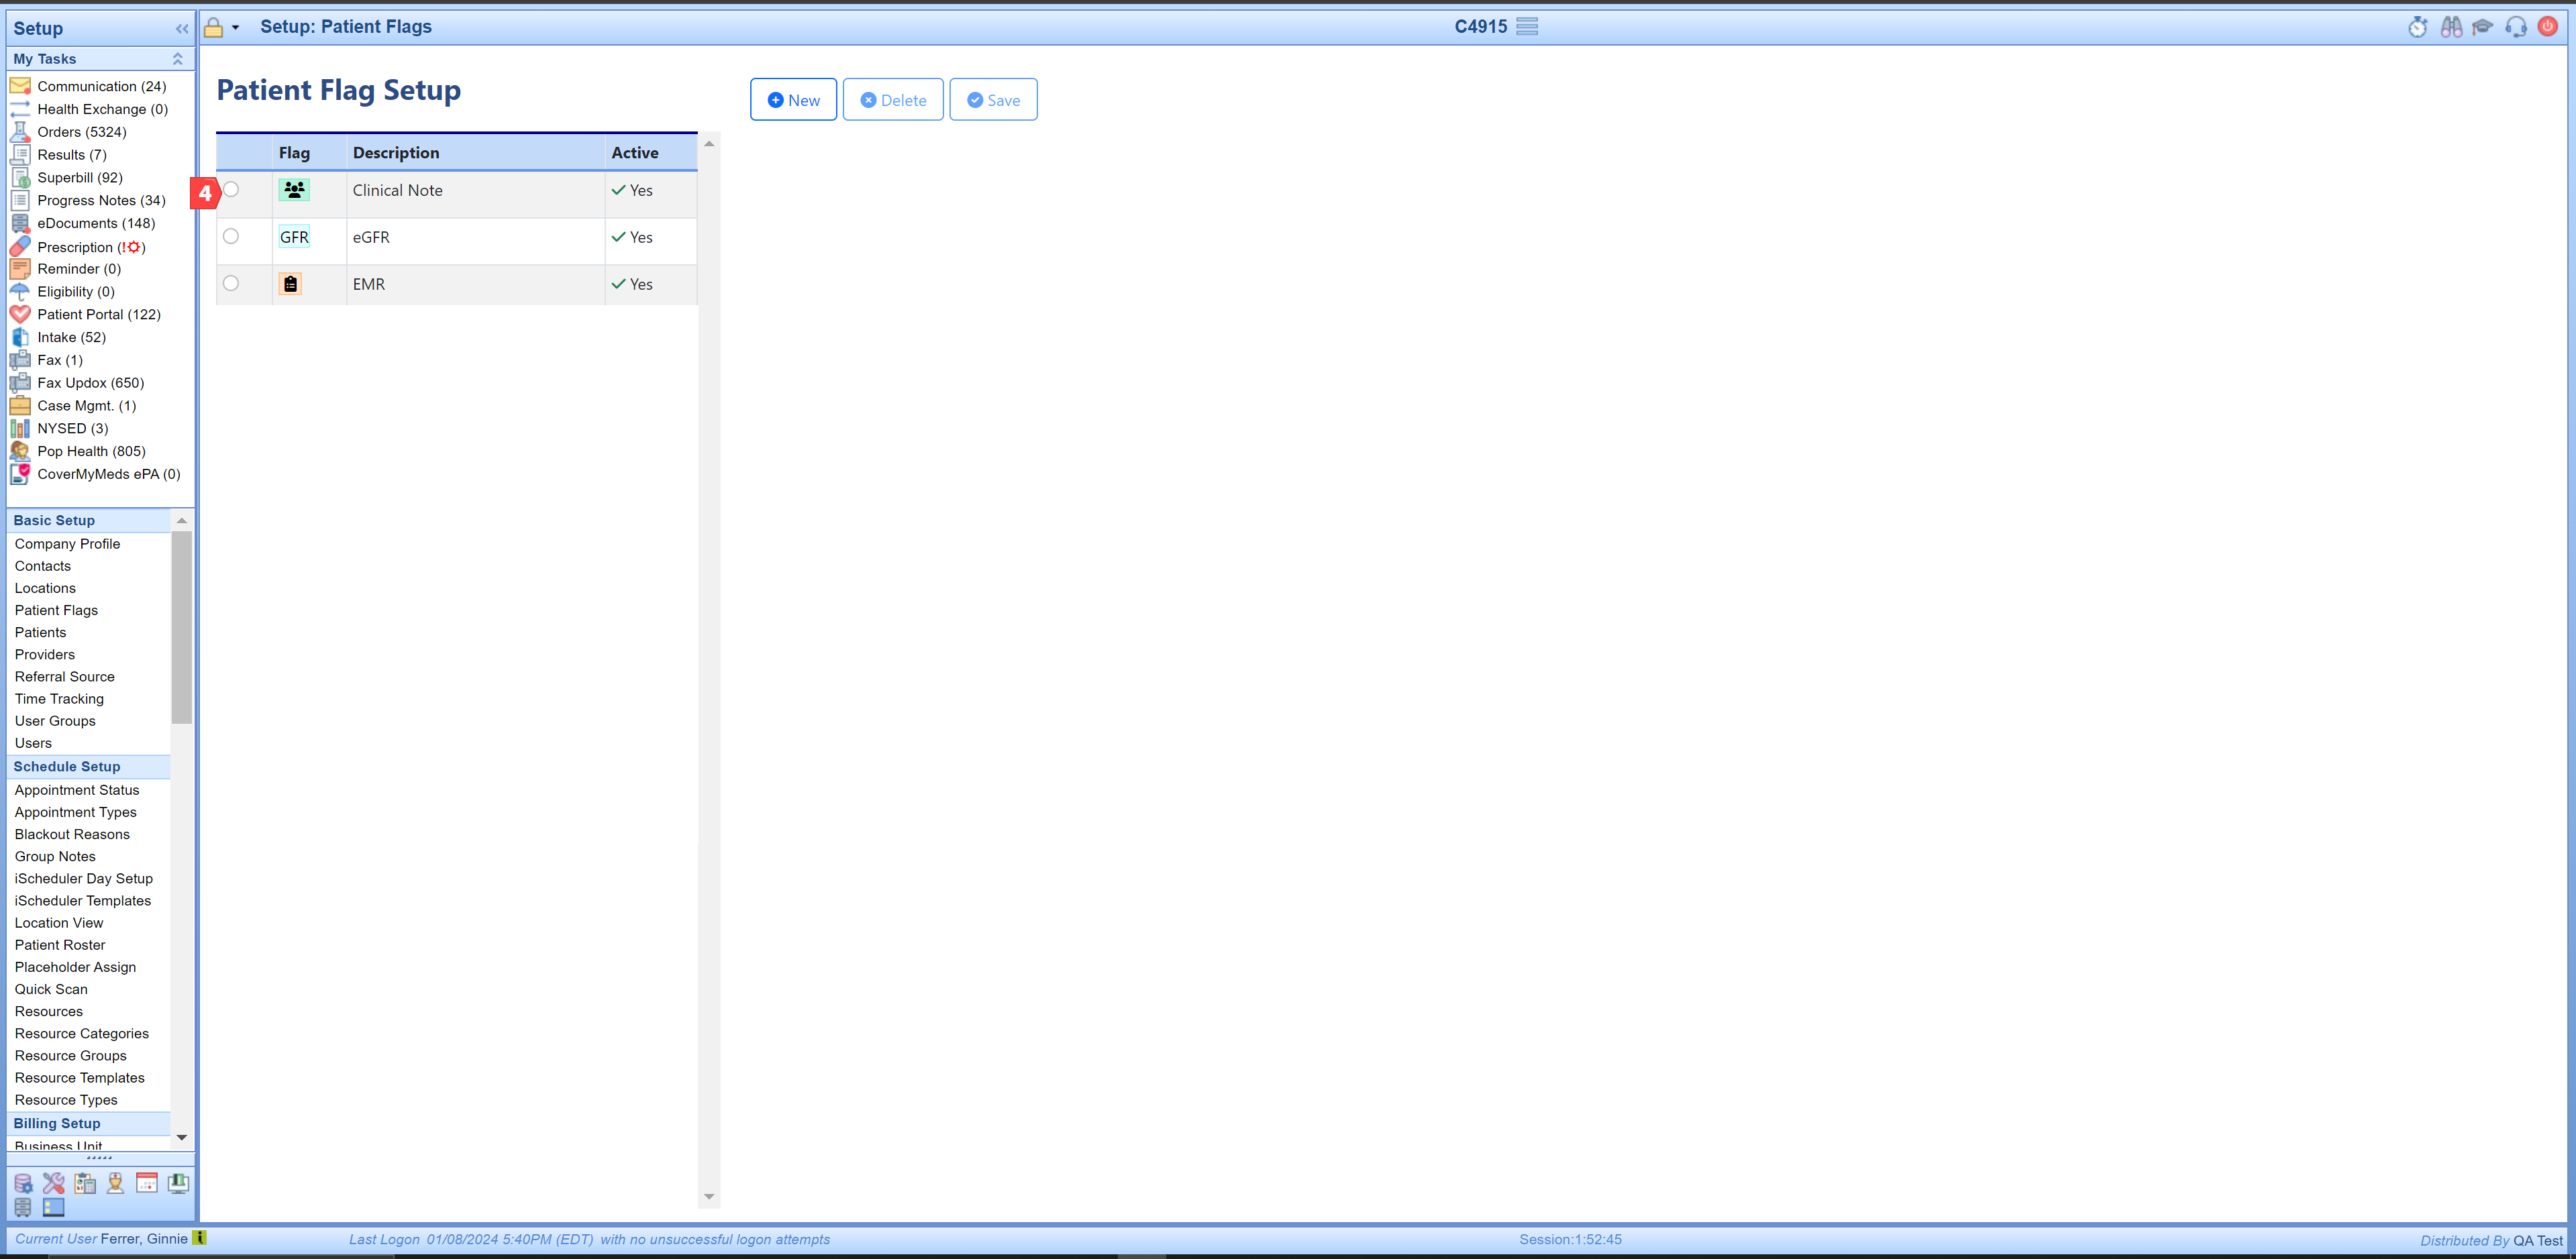
- Existing Patient Flag List: This is your list of existing Patient Flags. Note: To edit an existing Patient Flag, you would just select the flag you want to edit in this list of flags and go to Flag Setup Section to make edits.
- Flag Setup Section: You will see the flag parameters that are currently set up load in the Flag Setup Section. To update/edit an existing flag just make desired changes and then click on your Save button at the top of the screen. The changes made are automatically displayed across all patients where the flag is currently assigned.
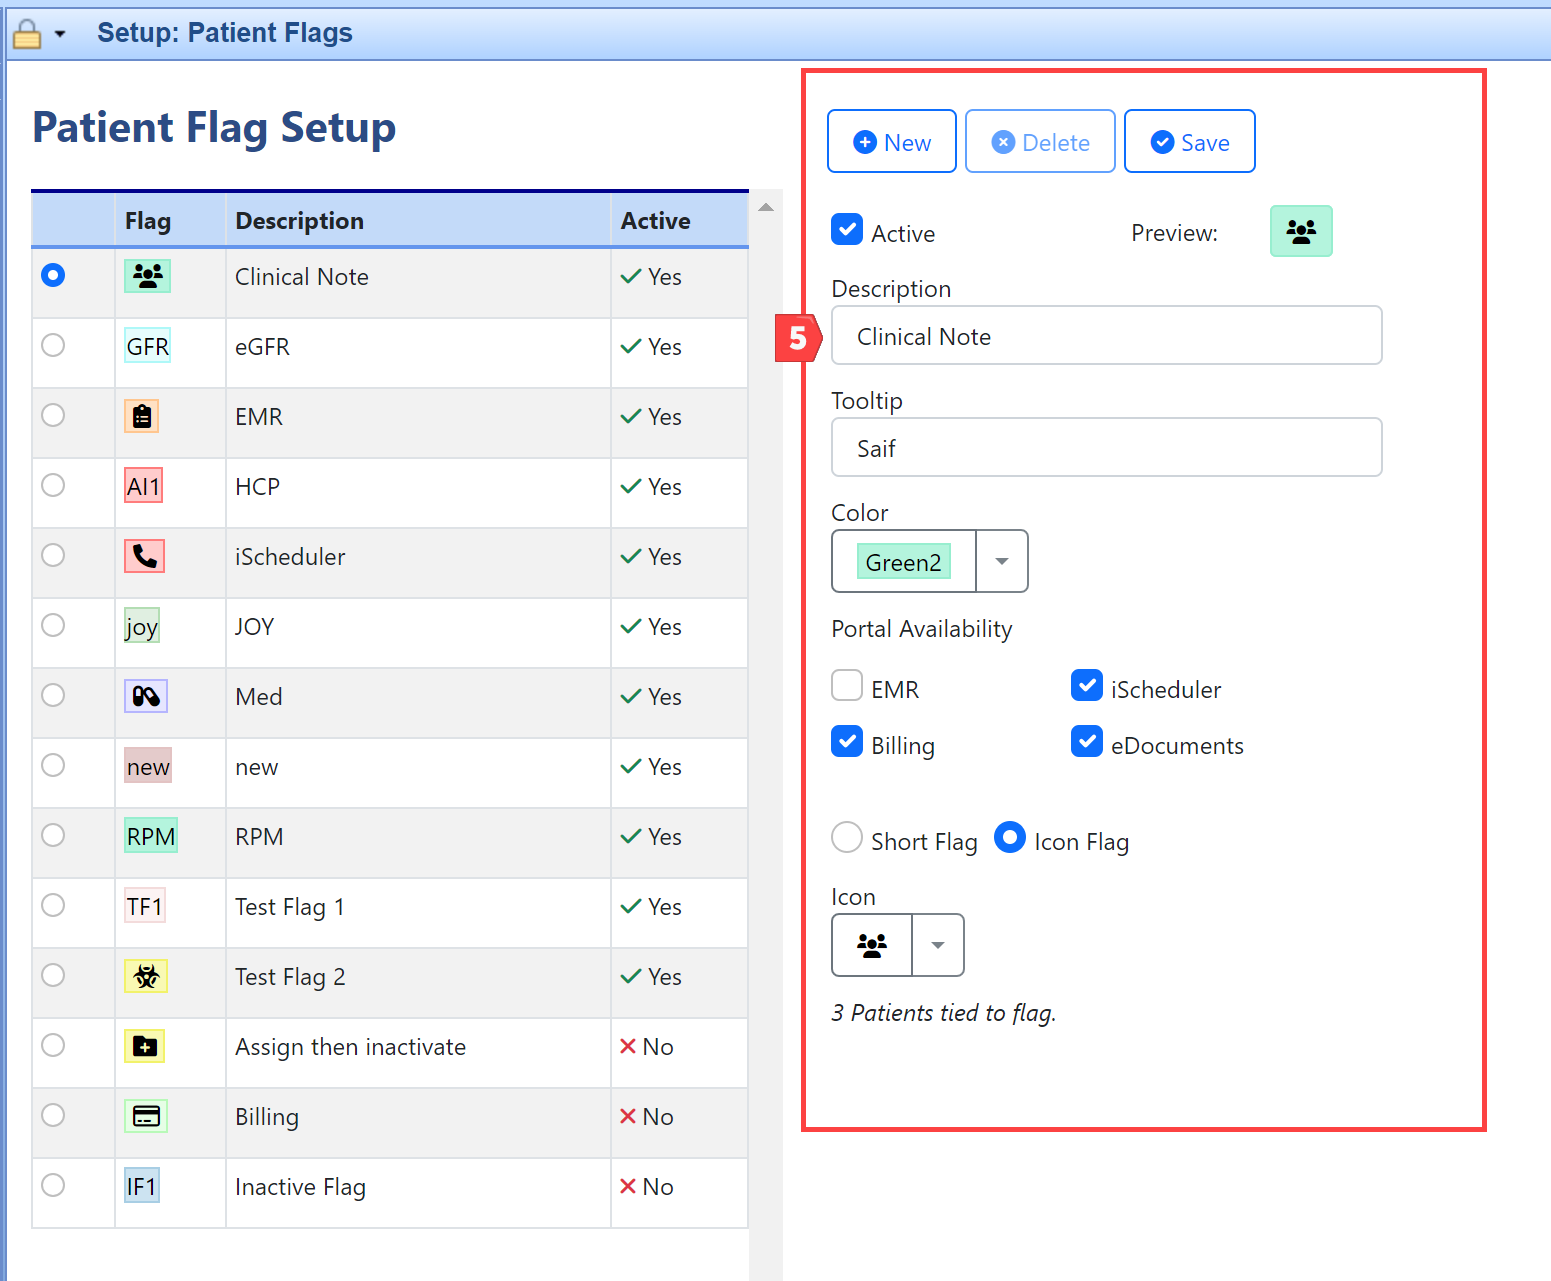
Setup Fields Defined:
- Active Checkbox: By default, all new flags created will automatically be set to Active. When a flag is check marked as ‘Active’ it will display in the patient header. When Active is not check marked then the flag is considered Inactive, and it will not display in the patient header.
- Description: The practice can input the desired Description for any flag created. By default, Patient Flags are displayed in the patient header in alphabetical order based on this description. Note: Users can override this Patient Flag order as outlined in User Ability to Set Custom Order for Patient Flag Display.
- Tooltip: The tooltip is displayed when hovering over the flags displayed in the patient header, providing the practice with a way to share brief notes about the flag (e.g., RPM flag tooltip: Active RPM Patient, or an alternate XRP flag tooltip: Canceled or Not Eligible for RPM)
- Color: The practice can choose a color for their new Patient Flag from the list of available flag colors
- Portal Availability: When creating a new patient flag, the default display is across OfficeEMR (all portals). However, practice can opt to set up flags to display in one or more portals to improve the usefulness of flags displayed in any given area.
- Flag Type: For maximum flexibility, practice can choose between creating a new Icon Flag or a Short-name Flag.
a) When choosing the Icon Flag, the practice user would select the Icon Flag radio button, and then use the drop-down menu to choose from the list of available icons to use for their new icon flag.
b) When choosing the Short-name Flag, the practice user would select the Short Flag radio button, and then populate the desired 3-letter-acronym to use for their new icon flag (e.g., RPM or CCM).
Important note: When designing new flags, ensure that either the Icon Flag + Selected Color combination or the Short Flag Description + Selected Color combination is distinct and hasn't been used previously. A preview of existing flags is available on the Patient Flag Setup screen to assist in this process. For example, having two flags with 'RPM' as the Short Flag Description and both in Green2 color is not considered distinct. However, if you create two 'RPM' flags, one in green and the other in red, this results in unique combinations. The specific use case for each can be detailed in the tool-tip. For example, the tool-tip for the Green RPM flag could read "Active RPM Patient," while the Red RPM flag's tool-tip might state "Not Eligible or Patient Declined RPM."

Once a practice has established user roles for Patient Flags and generated flags for patient use, users authorized to assign flags (Patient Flag Assign) can start modifying patient records in OfficeEMR. This ensures that patient charts show relevant and active flags. As flags are allocated to specific patient charts, all users of the system will have visibility of these active flags where they are attached to patient headers. It is worth noting that inactive flags can be assigned to a patient but will not display in the Patient Header until set to an Active status in the Patient Flag setup screen.
Patient Header Examples
Patient Header with Patient Flags Assigned
When a patient has flags assigned to them the flags will display in the various patient headers based on the flag setup, as shown in the example below:

Patient Header with No Patient Flags Assigned
When opening a patient chart that has no assigned Patient Flags, the patient header will display a vertical ellipsis with no flags displayed to the left of the vertical ellipsis (as shown below).

Accessing the Patient Flag Assign Screen
The vertical ellipsis in the patient header is used to access the Patient Flag Assign screen:

Users without the proper security will encounter a screen indicating “You do not have rights to view this screen”. Users needing access will need to get with their practice administrator as it is up to the practice to grant this level of permission. A user without permissions to add/remove flags from patient charts would encounter this screen when clicking on the vertical ellipsis in the patient header:

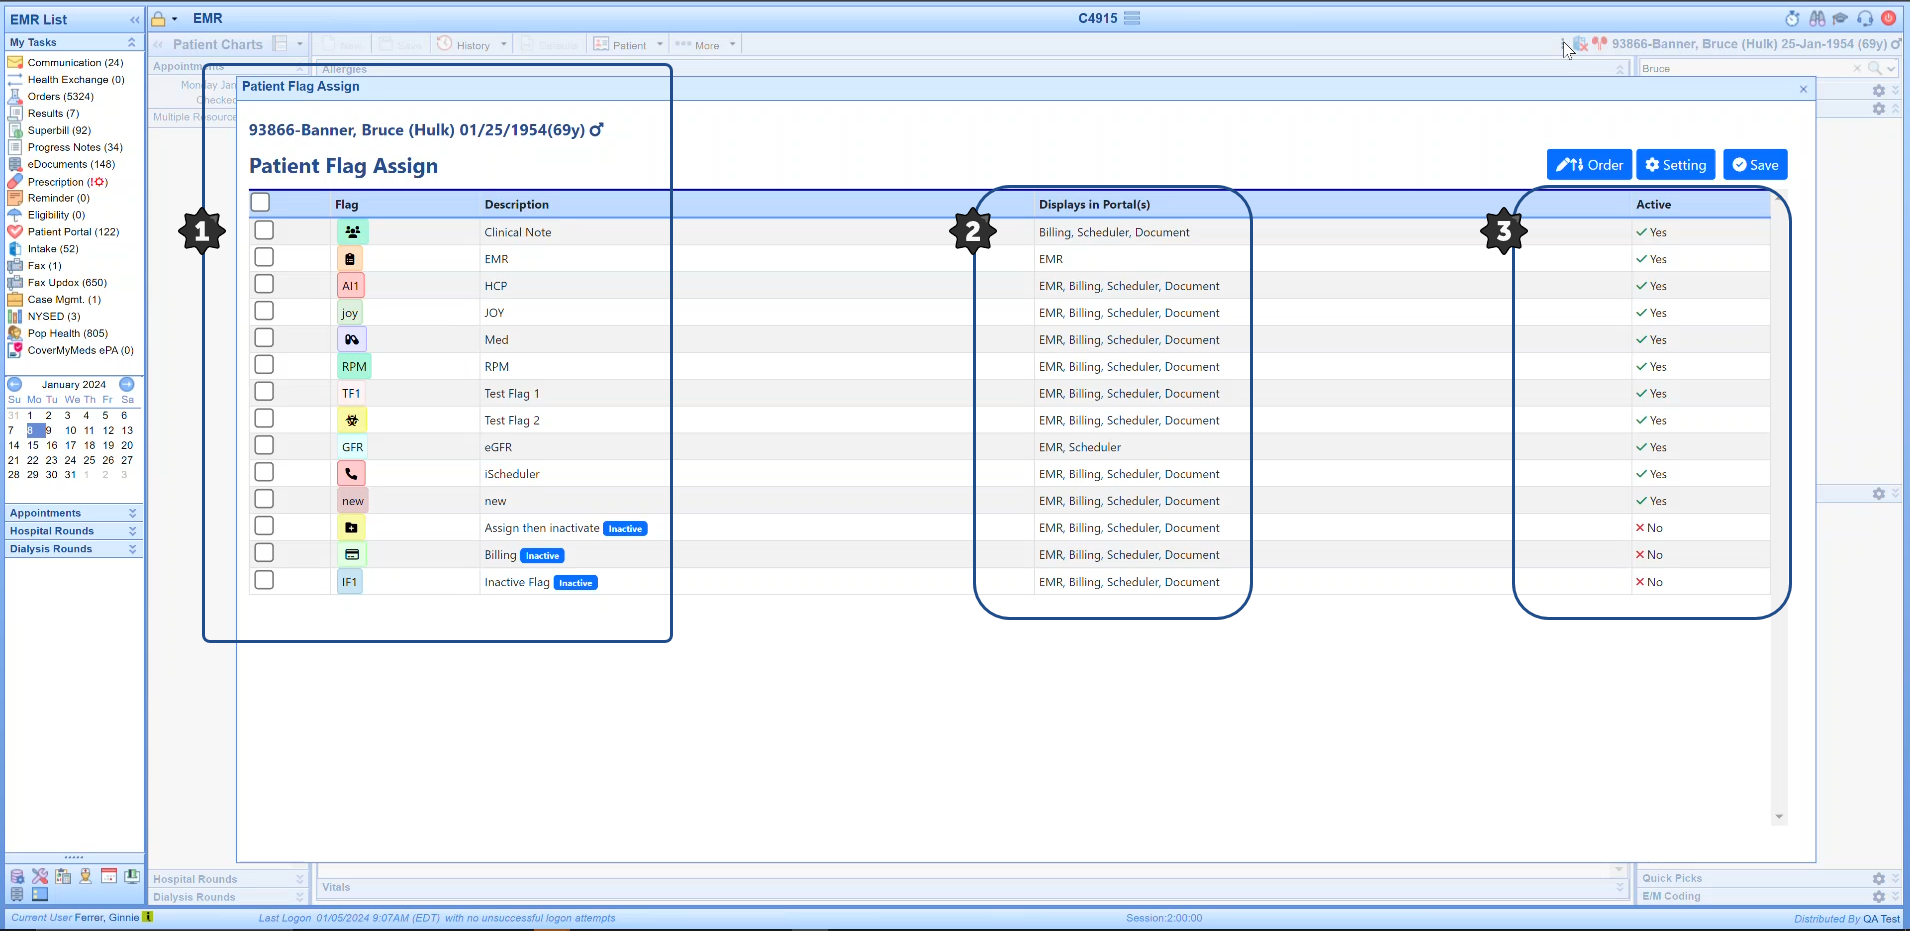
Users with security rights (roles) can perform various actions based on their user login permissions (roles) to assign/display active patient flags or to remove flags from displaying for the patient chart. Adding and removing flags from a patient chart can be audited as noted here. For users that do have access, the Patient Flag Assign Screen view will be similar to this:
- The practice patient flags created (both active and inactive)
- The details on what OfficeEMR portals the flag will display. This is set by the practice user that creates the flag and can be modified by a user with the Role: Patient Flag Setup (using the Setting button shown in the image below OR by going to Setup > Basic Setup header > Patient Flags and following setup process defined here.
- The current status of the specific flag as defined in the Patient Flag setup screen
Patient Flag Assign Screen Action Buttons
There are 3 buttons in the Patient Flag Assign screen including:
- Order button - this button allows a user to override the system default to display Patient Flags in alphabetical order according to the Description field. Users accessing Order can use the up/down arrows to move the Flag position one row at a time. Before changing the order, users should be aware that once you override the default alphabetical order display, all 'new' flags will appear at the bottom of your flag listing in this screen. Once a user decides to override the display order for flags, that user will have to maintain their flag order manually using this button. When manually controlling the Flag order display, flags at the top of your list will display as the 'leftmost' flag on the patient header. Practices using too many flags will not be able to all display (fit) on the dynamically adjusting patient header and will require users to drill into the Patient Flag Assign screen to see all flags assigned to a patient.
- Setting button - this button is limited (by default) to admin user roles and provides access to the Setup: Patient Flags screen where users can add and modify patient flags as defined here.
- Save button - this action saves any flag changes made to the individual patient chart that you are working in (as noted in the header).

Various Patient Screens that Display Patient Flags in the Header
The main system patient headers will now display the new Patient Flags header. We have also updated the Billing Claim Query screen and Case Management screens to display this new Patient Flag Header as shown in the examples below:
- EMR Patient Header

- eDocuments Patient Header

- iScheduler Patient Header (for OfficeEMR clients using iScheduler v2*)

- Billing Claim Query Patient Header

- Patient Setup screen Summary tab display

- Case Management Patient Header
The Patient Flag Header was added to display in both the Case Management tab of the Patient Setup screen and in the My Tasks > Case Management screen as shown below: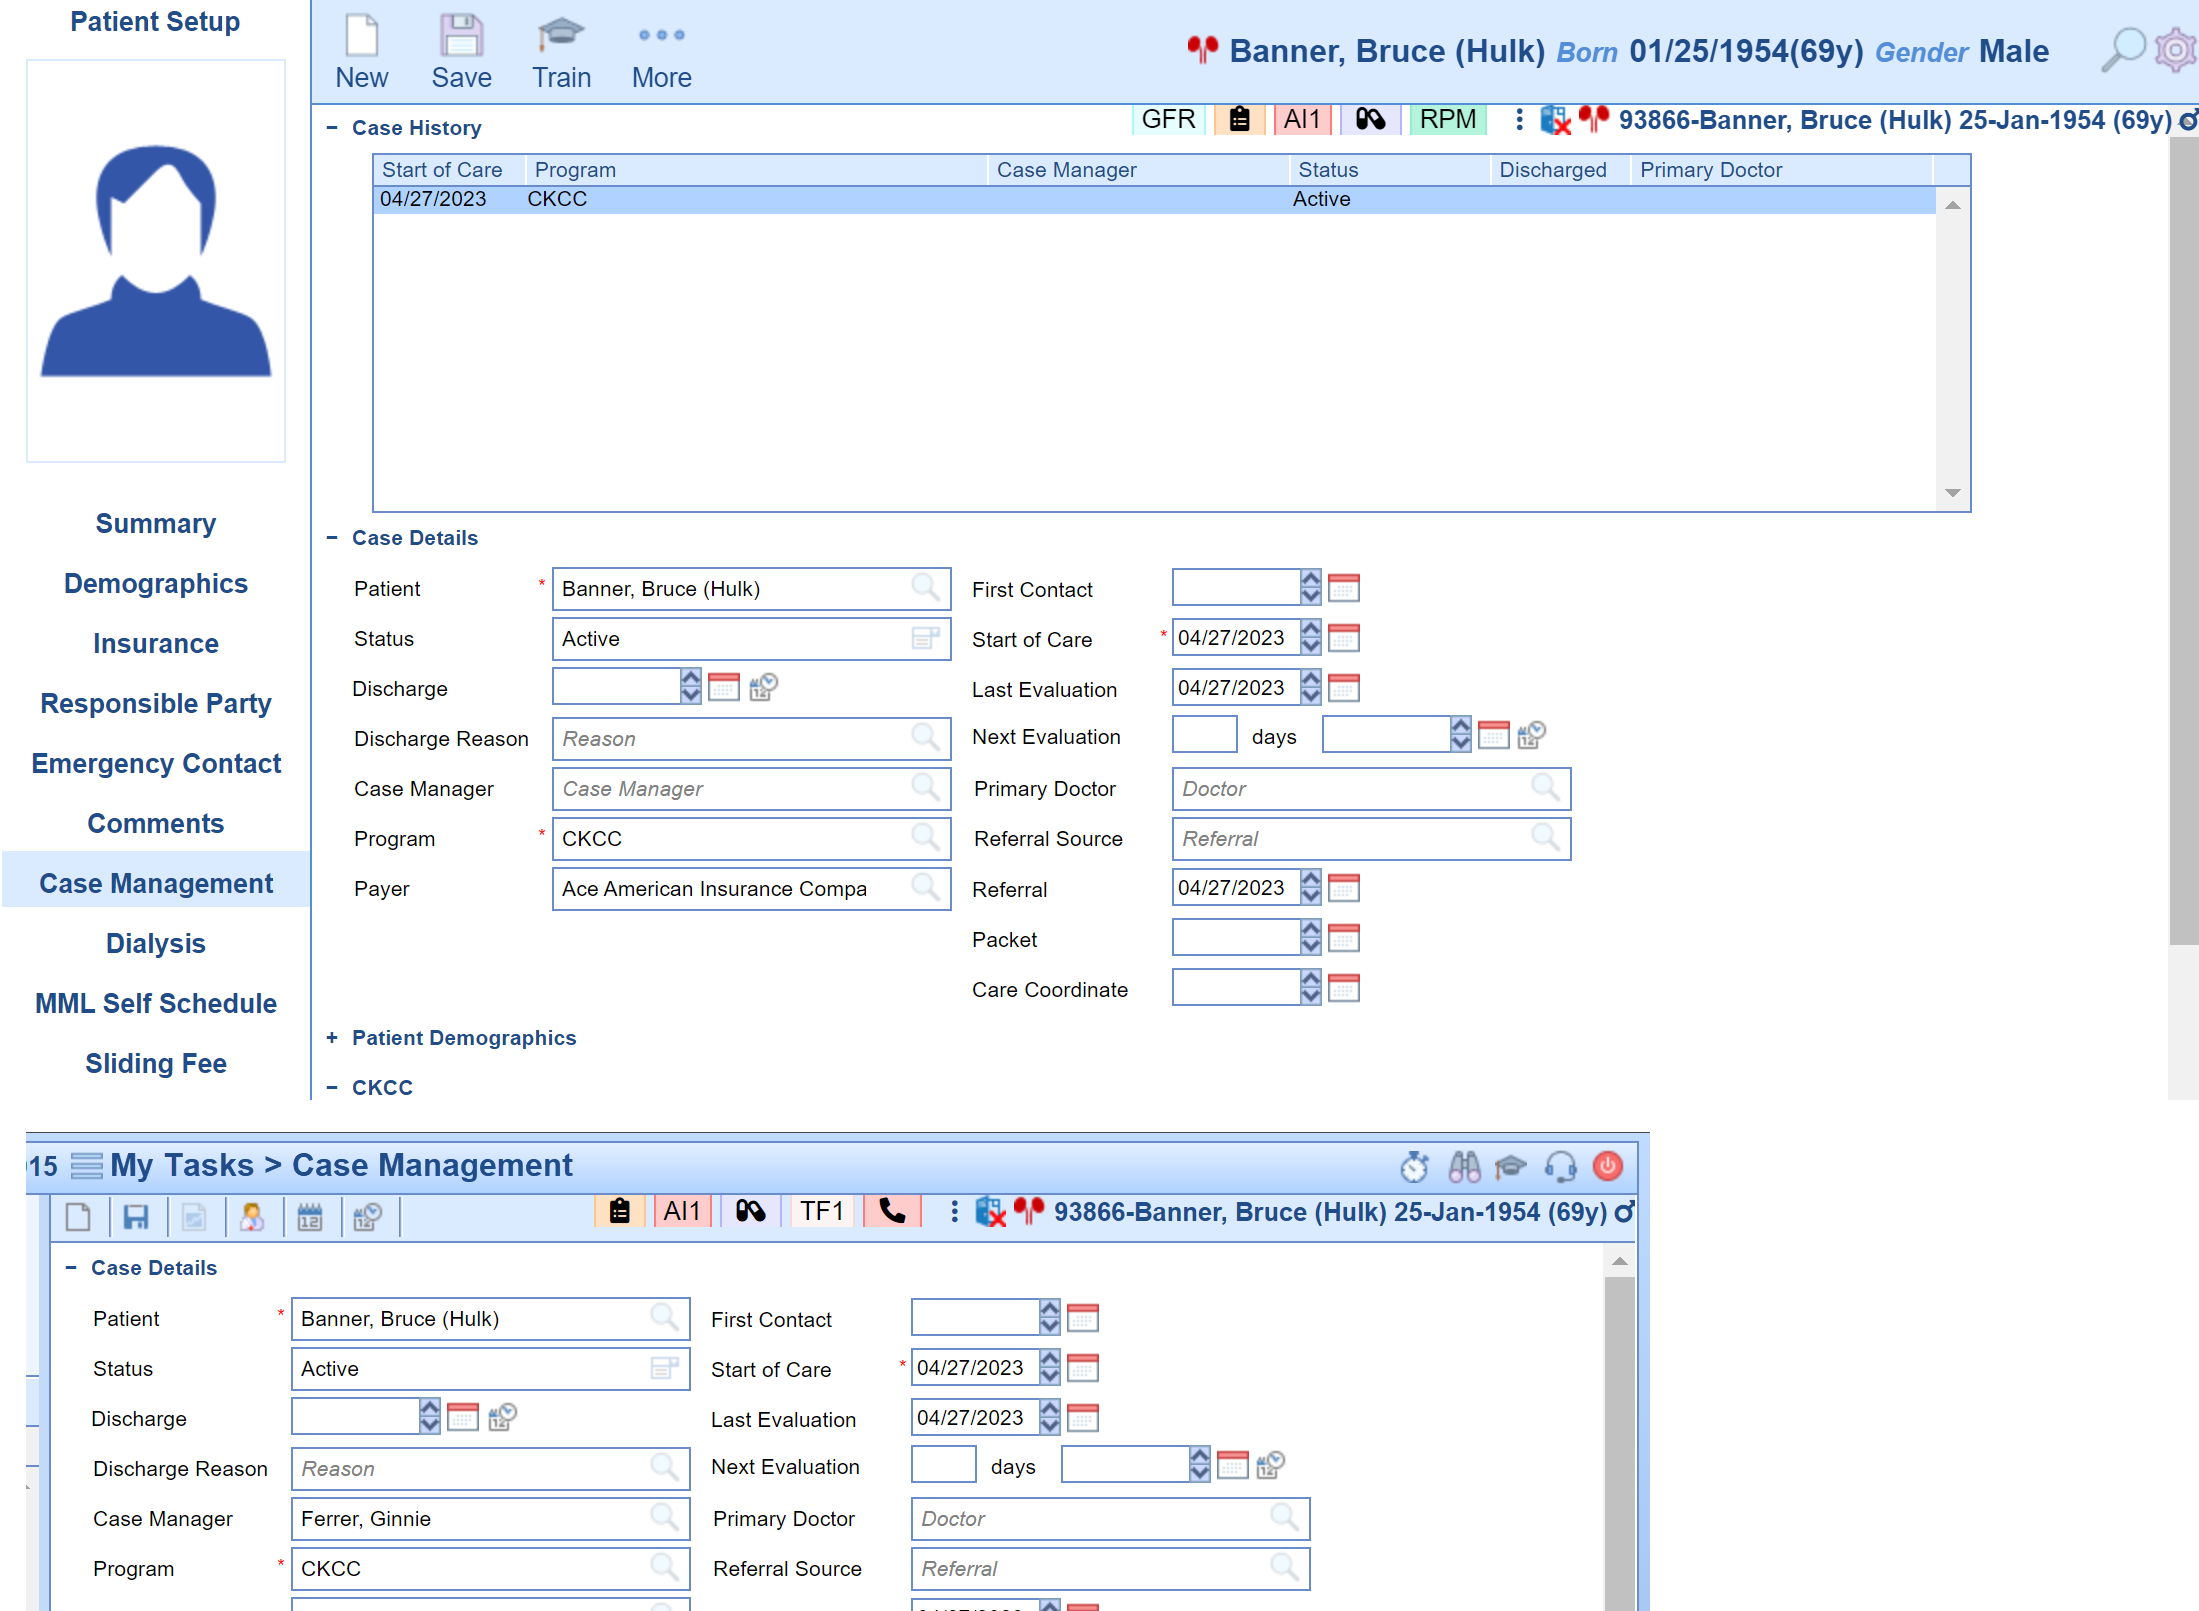
Reporting and Patient Flags:
Currently we provide two ways to pull a list of patients based on the selected patient flag:
Billing portal:
Access the Billing Portal and then:
- Choose Claim Query under Insurance header
- Access Advanced Search
- Notice that under the Patient filter section you can access and filter on Patient Flag (this field allows multi-select
- You can use the existing tools/processes for exporting/printing the data by clicking on the Window Settings icon in the top right of your screen

Reports Portal
Access the Reports Portal and then:
- Choose Appointment under General header
- Access Advanced Search
- Notice that under the Patient Demographics filter section you can access and filter on Patient Flag (this field allows multi-select
- You can use the existing tools/processes for exporting/printing the data by clicking on the Window Settings icon in the top right of your screen

Practices users with access to the Reports Portal > Security Report under the Audit header can audit Patient Flag Assign activities as shown below. If you need additional details you can find them under Security Audit.

In its current state, Patient Flags can only be associated to a patient manually via the Patient Flag Assign window. Coming soon, an enhancement to add a new Template Action Type of “Patient Flag” will allow some level of automation of assignment based upon template inputs being completed throughout the encounter.
Use Case Example
A provider places an "RPM Enrollment" order, this is associated to an 'RPM' patient flag via template action. This reduces the manual work to set the patient flag and ensures visibility upon follow-up.


