- Go to the Reports section, then under EMR select Connect.
- Click the icon with a plus sign in the toolbar to create a new Connect report entry.

- When asked to select the Report, scroll under the Patient header and find Patient Letters. Then fill out the parameter list as follows:
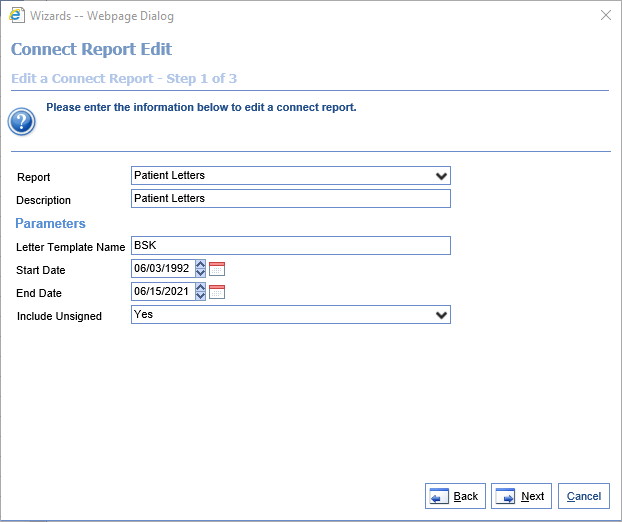
- Letter Template Name: Enter a part of the letter template's name that you're hoping to search. Please note that this report will only return letters whose templates contain the exact entered string -- if you type "BSK," it will find both "BSK Letters" and "BSK Info Letter" but if you type "BSK Letters" it would find "BSK Letters" but not "BSK Info Letter".
- Start Date: The Start Date of the letter's last revision.
- End Date: The End Date of the letter's last revision.
- Include Unsigned: If 'Yes,' patients with letters whose last revision were not signed by the patient will be included in the results. If 'No,' only patients with signed letters will be included.
- Select the desired fields for the report to show, or simply select 'All.' Then hit 'Finish,' then 'Close,' to complete adding the report. The available fields are as follows:
- Last Revision: The date of the last revision of any qualifying letter from the specified letter template on the patient's account.
- ICD Codes: The active diagnosis codes on the patient's chart.
- Letter Template: The qualifying letter template that was found in the patient's chart.
- First Name: The first name of the patient.
- Chart: The chart number of the patient.
- Last Name: The last name of the patient.
- Primary Ins: The primary insurance on the patient's account.
- Secondary Ins: The secondary insurance on the patient's account.
-
-
-
-
-
-
- Entering a New Claim from the Billing Portal
- Copy an Existing Claim
- Modifying Multiple Claims
- Add a Note to a Claim
- Add a Medicare ICN to a Secondary Claim
- Add an NDC Number to a Claim
- Fixing an Inactive Procedure Validation Error
- Procedure Code - Billing Setting
- Missing Procedure
- Missing Diagnosis
- Missing Responsible Party
- Missing Primary Insurance
- Missing Rendering Provider
- Missing Service Location
- Missing Signature
- NDC Errors
- Claim Issues - Global Period
- Introduction to Claim Comments
- Creating a Claim Comment
- Accessing Claim Comments from the Transaction History
- Insurance Profiles
-
-
-
-
- Deposits - Poster - Day to Day Process
- Deposits - Manager Priorities
-
-
- Carrier Payment Mismatch
- Claim Not Found
- Claim-Level Adjustment Found
- Claim Supplemental Amount Found
- ERA Missing Procedures
- Invalid Recoup
- Missing Payer
- Missing Payment Information
- Patient Import Error
- Payer Level Mismatch Error
- Procedure Status Conflict
- Procedure Level Conflict
- Patient Responsibility Inconsistent
- Deposit Claim Error - Missing Procedures
- Creating a New Deposit
- Importing Patient Payments
- Add a Claim to a Deposit
- Edit Claim Details in a Deposit
- Deposit Actions
- Link a paper EOB to a Deposit
- Finding Deleted Deposits
-
-
- Initial Setup of Scanning Solution
- Open Patient in eDocuments
- Navigate the Folders
- Import a Document
- Send a Document for Review
- Move, Copy, Delete and Export a Document
- Printing an eDocument
- Fax a Document
- Add Patient Education
- Save as Faxable
- Chrome Scanning Screen Definitions
- Using the Filter to Create Multiple Files to Upload When Scanning
- Chrome Scanning Quick Use Guide
- Sharing eDocuments to Patients via MML
-
-
-
-
-
- Access the Prescriptions Chart Tab
- Document a Patient Reported Medication
- Pull a Patient Medication History Report
- Add Medications from the RxHub Medication History
- Print a Patient's Medication List
- Send an Electronic Prescription from a Drug Search
- Send an Electronic Prescription from Rx Favorites List
- Send an Electronic Prescription Using Mobile EPCS
- Send an Electronic Prescription Using USB Token EPCS
- New Prescription EPCS Rules
- Print a Prescription from a Drug Search
- Print a Prescription from Rx Favorites List
- Cancel Future Prescription Fills
- Copy a Prescription
- Refill a Medication
- Run a PDMP Report
- Search for a Drug
- Search for a Pharmacy
- Stop/Discontinue a Medication
- Stop/Discontinue Multiple Medications at Once
- View a Patient's Active Medication List
- View Medication Fill Status
- View Medication Refill History
- View Stopped/Discontinued Medications
- Prescription Details
- How to Override the NADEAN Requirement When Prescribing Buprenorphine for Pain
- Electronic Prescriptions SCRIPT 2017071 Release Checklist
-
-
- Overview of Telehealth
- Setup Telehealth
- Schedule a Telehealth Visit (Optional)
- Initiate the Telehealth Session
- Conduct the Telehealth Visit
- Complete the Telehealth Visit
- Telehealth Visit (Patient Perspective - iOS/Android Required)
- Telehealth Billing FAQ
- Telehealth Billing Decision Trees
- Create a Bluebar in a Superbill for Telehealth
- Create a Telehealth Service Location
- Create a Telehealth Procedure Code (Fee Grouping)
- Create a Telehealth Procedure Code (Custom Code)
- Bill a Telehealth Visit from the EMR Superbill
- Telehealth Preferred Contact
-
-
-
- Automatically Assign an Intelligent Intake via Appointment Type
- Manual Intake Assignment Locations
- Assign an Intake Using the Intake Schedule
- Assign an Intake Using the Quick Pay Window
- Assign an Intake from iScheduler Using Intake Assignment
- Assign an Intake from the EMR Using Intake Assignment
- Initiate the Intake on the iPad Using the Intake Schedule or Quick Pay window
- Initiate the Intake on the iPad Using the Intake Assignment Window
- Manually Send An Intake Link to a Patient via Intake Assignment
-
- Complete Intake Forms Using a Link (Mobile Device)
- Complete Intake Forms at Home (Desktop)
- Complete Forms in the Office (Practice iPad)
- Complete Intake Forms by Logging Into MyMedicalLocker (Mobile Device)
- Intake Form | Patient View - Demographics
- Intake Form | Patient View - Responsible Party
- Intake Form | Patient View - Emergency Contact
- Intake Form | Patient View - Appointment Reminders
- Intake Form | Patient View - Photo (Photo ID)
- Intake Form | Patient View - Insurance Cards
- Intake Form | Patient View - Allergies
- Intake Form | Patient View - Medications
- Intake Form | Patient View - Templates (History, ROS, HPI, etc.)
- Intake Form | Patient View - Letters (Consents, Releases, Signature Forms)
- Intake Form | Patient View - Copay Collection
- Intake Form | Patient View - Outstanding Balance Collection
- Intake Form | Patient View - Preferred Pharmacies
-
- Merge Practice Management Information from an Intake via Intake Schedule or Quick Pay Window
- Merge Practice Management Information from an Intake using the My Task - Patient Portal
- Merge the Clinical Information from an Intake Using Reconciliation Window (Allergies & Medications)
- Merge the Clinical Information from an Intake (Templates)
- View the Completed Signature Forms in iScheduler
- View Completed Signature Forms in EMR
-
-
- Check In-Out Dashboard Summary
- Getting Started - Practice & Role Required Settings
- Getting Started - A Quick Reference for Users to Get Started
- User Settings Written Tutorials
- User Settings Video Tutorials
- Check In/Out Dashboard Overview Summary
- Check In-Out Dashboard Overview Video Detailed
- Check In/Out Dashboard Overview Written Detailed
- User Setting to Auto Copy Patient ID to Patient Photo
- User Setup for Single Monitor Dashboard Viewing
- Dashboard Features and Updates
- Beta Client Feedback Enhancements Completed
-
-
- My Tasks - Orders | Overview
- Select an Order in the My Task List
- Print a Requisition from My Task Orders
- Open Patient in the EMR from My Task Orders
- Complete an Advanced Search for Orders
- Complete Order Fulfillment Details via My Task - Orders
- Setting Appointment with Service Facility in Order Appointment Screen
- Change the Processor on an order via My Task - Orders
- Change the Status of an Order via My Task - Orders
-
-
-
-
-
- Overview of My Tasks - Prescriptions - Refills
- Configure Refill Queues (Assignment Setup)
- Manage the Prescription Refills Task Queues
- Link an unsolicited refill request to a patient
- Change the owner of a prescription refill request
- Respond to a prescription refill request - Approve/Replace/Deny/Reassign
- Delete a Prescription Refill Request
- Reassign several refill requests at once
-
- Overview of My Tasks - Prescriptions - Changes
- Configure Changes Queue (Assignment Setup)
- Manage Prescription Change Task Queue
- Link an Unsolicited Change Request to a Patient
- Change the Owner of a Prescription Change Request
- Respond to a Prescription Change Request - Approve/Replace/Deny/Reassign
- Delete a Prescription Change Request
- Reassign Several Change Requests at Once
-
-
-
-
-
-
- Overview of Choice Analytics
-
- Overview of New Billing Analytics
- Building a New Report with New Billing Analytics
- Connecting an Existing New Analytics Report to a Local Connection File
- Adding a Worksheet and PivotTable in Billing Analytics
- Adding a Chart to Billing Analytics
- Adding a Slicer to Billing Analytics
- New Billing Analytics Data Dictionary
- New Billing Analytics Drill-through
- New Billing Analytics Pivot Examples
- New Billing Analytics Dashboard Example
- New Billing Analytics Excel Setting: Pivot Table Report Layout
- New Billing Analytics Excel Setting: Pivot Table Design
- Connecting to New Billing Analytics with Power BI
-
- Overview of Denial Analytics
- Building a New Report with Denial Analytics
- Connecting with an Existing Denial Analytics Report
- Adding a Worksheet and PivotTable in Denial Analytics
- Denial Analytics Data Dictionary
- Denial Analytics Drill-Through
- Denial Analytics Dashboard Example
- Denial Analytics Pivot Examples
- Denial Analytics is Live!
-
-
- Run the Data Export
- Open a Data Export File
- InfoDive Data Extract
- Demographics Export
- Insurance Export
- Responsible Parties Export
- Appointments Export
- Authorizations Export
- Emergency Contacts Export
- Patient Comments Export
- Vitals Export
- Allergies Export
- Problem List Export
- Prescriptions Export
- Progress Notes Export
- Letters Export
- eDocument Metadata
- Patient Communications Export
- Payer Export
- Fee Schedule Export
- Claims Export
- Claim Procedure Lines Export
- Payments Export
-
-
- 2026 MIPS Reporting Year Summary
- 2025 MIPS Certification ID
- MIPS Assist Program 2025
- Check Your MIPS Participation Status
- MIPS 2024 Individual vs. Group Reporting
- MIPS 2024 Quality Payment Program Special Statuses
- How to Apply for a MIPS 2023 COVID Exception
- MIPS 2024 Promoting Interoperability Performance Category
- MIPS Quality Performance Category 2024
- MIPS 2024 Improvement Activities Performance Category
- How to Enable the FHIR API's for MIPS Reporting
- Add a Clinician to the MIPS Dashboard 2024
- Edit a Clinician on the MIPS Dashboard
- Delete a Clinician from the MIPS Dashboard
- Mingle Health Quality Data Extract File Contents
- Setup Mingle Health/Registry Quality Data Extract Settings
- Extract Mingle Health Quality Data
- Viewing Clinician Promoting Interoperability Scores
- Conduct a Security Risk Analysis
- Electronically Prescribe Medications
- Query of Prescription Drug Monitoring Program (PDMP)
- Provide Electronic Access
- Referral Loops - Send Health Information
- Referral Loops - Receive & Incorporate Health Information
- Public Health and Clinical Data Exchange
- ONC 2015 Edition CMS EHR Certification ID (2025 Reporting Year)
- How to Print MIPS Promoting Interoperability Report
- Example Patient FHIR API Welcome Email
- MIPS Promoting Interoperability FAQ's
- Additional MIPS Resources
-
- Add a Provider to the Meaningful Use Dashboard
- View Provider MU Promoting Interoperability Scores
- Delete a Provider from the MU Dashboard
- Meaningful Use Quality Reporting
- Conduct a Security Risk Analysis
- Implement 5 Clinical Decision Support Interventions
- Enable Drug-Drug and Drug-Allergy Interaction Checks
- Computerized Provider Order Entry (CPOE)
- Send Electronic Prescriptions
- Send Referral Summary of Care
- Receive and Incorporate Electronic Summary of Care Documents
- Reconcile Clinical Information
- Provide Electronic Access to Health Information
- Provide Patient Specific Education
- View, Download, Transmit
- Send Secure Messages
- Public Health and Clinical Data Registry Reporting
-
- ONC HT1 Readiness - What's Changing for Your Practice
- Practice Action 2026 CCDA Transition for Third Party Vendors
- 2026 CCDA Style-sheet
- 2026 CCDA Company Settings (New)
- Technical Overview of Persistent Identifiers for 2026 CCDA
- What Persistent IDs Mean for Your Practice (2026 CCDA)
- HT1 Required EMR Field Updates
- HT1 SDOH Panel Support via EMR Templates
- HT1 EHI (B10) Export Updates
- HT1 Public Health eICR Update to v3.1.1
- 2026 Reminder for MIPS Provide Patient Access Measure
- EMR Field Updates with USCDIv3 Value Sets
-
-
-
-
-
- How do I fix a rejection for "Other Payer Insurance Type Code"?
- How do I fix a rejection for "Line Level Procedure Code is Missing or Invalid"?
- How do I fix a rejection for "Claim Level Date is Missing or Invalid"?
- How do I fix a rejection for "Claim Frequency Code"?
- How do I fix a Smart Edits rejection?
- How do I fix a rejection for "National Drug Code must be 11 Bytes"
-
- What do I do if I haven't received an ERA from a payer?
- Why don't I see my claim when adding to a deposit batch?
- How can I add a custom adjustment to a manual EOB?
- What are the default/original CMS-1500 (HCFA) Form Setting Values?
- How do I write-off a patient balance on a claim?
- How do I switch my statements from RevSpring to Data Media
- Can I submit electronic claims to a payer which says "Invalid Payer ID" in Payer Setup?
- How do I post a returned (NSF) check to a patient's account?
- eProvider Solutions Emergency Access Clearinghouse Connection Option
-
-
-
- Resolving PDF Printing Issues after Windows 10 Update to build 2004 using Internet Explorer
- 2021 EM Coding Guidelines - Our Plan
- Is OfficeEMR 21 CFR, Part 11 Compliant?
- How do I add an alert to a patient's chart?
- How do I remove an attachment from a communication?
- Gmail / Google Email is not receiving my 2FA Token for logging into OfficeMD.net
- Text Content Display Issue in OfficeEMR
- Scanning Dynamsoft Install Caught in Install Loop
-
- Electronic Prescriptions FAQ
- I do not have a .PFX saved on my computer and I am unable to complete the EPCS Mobile Authentication setup in iSalus. How do I get the .PFX file?
- Add a pharmacy as a Favorite
- RxHub History Request: Eligibility has not been run for patient
- Prescription Error: Data on root level invalid line 1 position 1
-
- How do I know who closed an order?
- What changes should I expect in TOLMARsync when integrated with OfficeEMR?
- Where can I view Eligard medication orders in TOLMARsync?
- What features and functions will I continue performing in TOLMARsync?
- How do I remove a result linked to the wrong patient?
- How are electronic lab results matched to orders?
-
-
-
- What happens if I remove an item from my history template that exists on my Intelligent Intake questionnaire?
- What happens if I remove an item from my encounter based template that exists on my Intelligent Intake questionnaire?
- What happens if a remove a template from Intelligent Intake if that questionnaire has already been assigned to patients?
- How do I enable the use of Intake Links for Intelligent Intake?
- Intake on iPad Crashes When Using Camera for Patient Images
-
- Medicare Telehealth FAQ's March 17, 2020
- What is the difference between Telemedicine, Telehealth, eVists and Virtual Check-In?
- Telehealth Billing FAQ
- Unable to start a Telehealth Session
- Unable to Connect
- Logged Out After AnywhereCare Visit Ends
- Session Timer Logging Me Out During AnywhereCare Visit
- Getting a "Save Place in App" Screen
- Why does the user see this message: "The following permissions are required to start a telehealth session..."?
- Patient is Receiving Two Separate Text Messages
-
- What should I do when I can not access OfficeEMR?
- What is iSalus Healthcare's policy and plan for Internet Explorer?
- How can I keep OfficeEMR more secure?
- How do I stop Microsoft Edge browser from overriding Internet Explorer?
- How do I run Microsoft Edge in Internet Explorer mode?
- How does the Customer Support Details screen work?
- How to Contact Support
- How to Generate/Use the Support Pin
-
-
-
- Business Unit Setup
- Billing Queue Setup
-
- Procedure Codes Overview
- Procedure Advanced Search
- Adding a New Procedure Code
- Setting up Fee Groups/Individual Fees
- Updating Existing Charge/Fee Amounts
- Insert or Update an RVU Value
- Add an NDC Number to a Procedure Code
- Updating the Sliding Fee Scale
- Changing the CPT Group
- Procedure Code - Do Not Bill Flag
- Diagnosis Code Group Setup
- Insurance Profile Setup
-
- How to Update Company Settings
- Company Setting: Abnormal Results Processor
- Company Setting: Automated Reminder Email Consent
- Company Setting: Automated Reminder Phone Consent
- Company Setting: Automated Reminder Text Consent
- Company Setting: Auto Codify Problem List Codes to SNOMED
- Company Setting: Auto Create Temporary MML Account
- Company Setting: Auto Post ERA Delay
- Company Setting: Blackout Appointment Status ID - From
- Company Setting: Blackout Appointment Status ID - To
- Company Setting: CCD Version
- Company Setting: Change Claim Status for Completed Procedures
- Company Setting: Co-Pay receipts are applied to copay procedures
- Company Setting: Credit Deposit Claim Status
- Company Setting: Create Deposit Credit Error
- Company Setting: Default Vitals units to English (vs. Metric) in the EMR
- Company Setting: Display Co-Pay on Printed Schedule
- Company Setting: Display Interaction Alerts on Drug History
- Company Setting: Display Interaction Alerts on Drug Search Grids
- Company Setting: Display Interaction Alerts on the RxPad
- Company Setting: Display Level 1 Drug-Allergy Interaction Alerts
- Company Setting: Display Level 1 Drug-Disease Interaction Alerts
- Company Setting: Display Level 1 Drug-Drug Interaction Alerts
- Company Setting: Display Level 2 Drug-Allergy Interaction Alerts
- Company Setting: Display Level 2 Drug-Disease Interaction Alerts
- Company Setting: Display Level 2 Drug-Drug Interaction Alerts
- Company Setting: Display Level 3 Drug-Disease Interaction Alerts
- Company Setting: Display Level 3 Drug-Drug Interaction Alerts
- Company Setting: Display Level 9 Drug-Drug Interaction Alerts
- Company Setting: Display Outstanding Balance on Printed Schedule
- Company Setting: Do not run procedure/diagnosis validation for DoNotBill
- Company Setting: EPA Processor
- Company Setting: EMR Codified Allergy Required
- Company Setting: FHIR CCD Includes Appointment ID
- Company Setting: Full Contractual Adjustment Settings
- Company Setting: Include Physical Exams
- Company Setting: Insurance Profile
- Company Setting: Intake Create MML Account
- Company Setting: Intake Send Links
- Company Setting: iScheduler Primary Appointment Color (Background)
- Company Setting: iScheduler Secondary Appointment Color (Right Side Bar)
- Company Setting: Lab Result Via Collection Date
- Company Setting: Maximum number days password is valid, (0=always)
- Company Setting: Minimum password length
- Company Setting: Most recently used password count
- Company Setting: Normal Results Processor
- Company Setting: Open Dialysis Visits Chart Tab when Adding Visit
- Company Setting: Patient Roster Admission Date Defaulted
- Company Setting: Patient Roster Recurrence Pattern Defaulted
- Company Setting: Patient Roster Resource Required
- Company Setting: Prescription Settings and Rules - Mobile Phone - Use Wild Card Search
- Company Setting: Prescription Settings and Rules - MyMedicalLocker - MyMedicalLocker Prescription Refills
- Company Setting: Prescription Settings and Rules - MyMedicalLocker - MyMedicalLocker Prescription Refills Appointment Weeks
- Company Setting: Prescription Settings and Rules - MyMedicalLocker - MyMedicalLocker Prescription Refills Local Pharmacies
- Company Setting: Prescription Settings and Rules - Prescription Refills - Refill PIN Requirement
- Company Setting: Prescription Settings and Rules - Prescription Refills - Change Status when Refilling a Prescription
- Company Setting: Prescription Settings and Rules - Prescription Refills - Default prescription assignment user ID
- Company Setting: Prescription Settings and Rules - Prescriptions - Send RxCode as part of Electronic Prescription
- Company Setting: Prescription Settings and Rules - Prescriptions - Minimum Action Days, 0 = No Action
- Company Setting: Prescription Settings and Rules - Prescriptions - Display Prescriber Signature Image
- Company Setting: Prescription Settings and Rules - Prescriptions - NADEAN Pain Override Diagnosis Code
- Company Setting: Prescription Settings and Rules - Prescriptions - Print RX Using PDF
- Company Setting: Prescription Settings and Rules - Prescriptions - Use Company Profile Name
- Company Setting: Prescription Settings and Rules - Prescriptions - Use Company Profile Address
- Company Setting: Prescription Settings and Rules - Prescriptions - Use Company Profile Phones
- Company Setting: Prescription Settings and Rules - Prescriptions - Use Company Profile Email
- Company Setting: Prescription Settings and Rules - Prescriptions - PIN Requirement
- Company Setting: Prescription Settings and Rules - Prescriptions - Display Pharmacy Product Type
- Company Setting: Prescription Settings and Rules - Prescription Refills - Display Days Supply
- Company Setting: Prescription Settings and Rules - Prescriptions - Display Tiers
- Company Setting: Prescription Settings and Rules - Prescriptions - Use RxHub
- Company Setting: Prescription Settings and Rules - Prescriptions - Send Extended Prescription Fields
- Company Setting: Prescription Settings and Rules - Prescriptions - Display Secondary Plan Name
- Company Setting: Prescription Settings and Rules - Prescriptions - Display Plan Name ID
- Company Setting: Prescription Settings and Rules - Prescriptions - Display All Payer Drug Strengths and Forms
- Company Setting: Prescription Settings and Rules - Prescriptions - Use Signature Dosage to find Dispense Method
- Company Setting: Prescription Settings and Rules - Prescriptions - Check State DAW Messages
- Company Setting: Prescription Settings and Rules - Prescriptions - Require Height/Weight for Electronic Prescriptions
- Company Setting: Prescription Settings and Rules - Prescriptions - RxFill Indicator
- Company Setting: Prescription Settings and Rules - Prescriptions - Check Pharmacy Operating Status
- Company Setting: Procedure List for Vitals Timeline Wireframe Summary
- Company Setting: Progress Notes (Base) CCDA Type
- Company Setting: Progress Notes (Group Note) CCDA Type
- Company Setting: Prompt Insurance Assignment for Appointments Missing an Insurance
- Company Setting: Receipt Co-Pay applied to multiple procedures
- Company Setting: Removal of payments is done using the reversal process
- Company Setting: Reporting Year
- Company Setting: Resource View
- Company Setting: Run Real-Time Prescription Benefit Check (RxBC)
- Company Setting: Run real time prescription benefit check (RxBC)
- Company Setting: SBR 05 HMO Payer SysIDs
- Company Setting: Send Receipt Detail to MML Account
- Company Setting: Skip auto-posting of Co-Pay receipts
- Company Setting: Skip Auto-posting of Coinsurance receipts
- Company Setting: Skip auto-posting of Deductible receipts
- Company Setting: Split A/R into two buckets in cube, 0-15 and 16-30
- Company Setting: Unsolicited Results Processor
- Company Setting: Wireframe List for Vitals Timeline Wireframe Summary
- Company Setting: Webservice Setup Filter: Claim Procedure Codes
- Company Setting: Webservice Setup Filter: Document Folder Identifiers
- Company Setting: Webservice Setup Filter: Problem List Diagnosis Codes
- Company Setting: Override Loop 2320 SBR09
- Company Setting: CKCC Appointment Indicator
- Company Setting: Default 2FA Setting for Users
- Company Setting: Allow auto posting of prepayments for selected receipts
- Company Setting: Default alternate to rend. provider when blank
- Company Setting: Use Company Profile Practice Address for Return Address
- Company Setting: Enable Patient Demographics Sex for Clinical Use
- Company Setting: Check for New or Established Patient Procedure
- New Company Setting - Override Default referring to rend. provider when Medicare Requirement
- Company Setting - Populate Primary ICN Number When This Payer is the Secondary
- Company Setting: Patient Cost Estimator - Print Font
- Company Setting: Send Patient Notification on Approved Cost Estimate
- Company Setting: Default Benefit Type for Patient Eligibility
-
-
-
- How to Update the Prescription Rules and Settings
- Prescription Settings - RxFill Indicator
- Prescription Settings - Mobile Phone - Use Wild Card Search
- Prescription Settings - MyMedicalLocker - MyMedicalLocker Prescription Refills
- Prescription Settings and Rules - MyMedicalLocker - MyMedicalLocker Prescription Refills Appointment Weeks
- Prescription Settings and Rules - MyMedicalLocker - MyMedicalLocker Prescription Refills Local Pharmacies
- Prescription Settings and Rules - Prescription Refills - Display Days Supply
- Prescription Settings and Rules - Prescription Refills - Refill PIN Requirement
- Prescription Settings and Rules - Prescription Refills - Default prescription assignment user ID
- Prescription Settings and Rules - Prescription Refills - Change Status when Refilling a Prescription
- Prescription Settings and Rules - Prescriptions - Send RxCode as part of Electronic Prescription
- Prescription Settings and Rules - Prescriptions - Minimum Action Days, 0 = No Action
- Prescription Settings and Rules - Prescriptions - Prescriber Signature Line, * to blank
- Prescription Settings and Rules - Prescriptions - Display Prescriber Signature Image
- Prescription Settings and Rules - Prescriptions - Print RX Using PDF
- Prescription Settings and Rules - Prescriptions - Use Company Profile Name
- Prescription Settings and Rules - Prescriptions - Use Company Profile Address
- Prescription Settings and Rules - Prescriptions - Use Company Profile Phones
- Prescription Settings and Rules - Prescriptions - Use Company Profile Email
- Prescription Settings and Rules - Prescriptions - PIN Requirement
- Prescription Settings and Rules - Prescriptions - Display Tiers
- Prescription Settings and Rules - Prescriptions - Display Tiers
- Prescription Settings and Rules - Prescriptions - Use RxHub
- Prescription Settings and Rules - Prescriptions - Send Extended Prescription Fields
- Prescription Settings and Rules - Prescriptions - Display Secondary Plan Name
- Prescription Settings and Rules - Prescriptions - Display Plan Name ID
- Prescription Settings and Rules - Prescriptions - Use Signature Dosage to find Dispense Method
- Prescription Settings and Rules - Prescriptions - Use Signature Dosage to find Dispense Method
- Prescription Settings and Rules - Prescriptions - Check State DAW Messages
- Prescription Settings and Rules - Prescriptions - Check Pharmacy Operating Status
- Prescription Settings and Rules - Prescriptions - Require Height/Weight for Electronic Prescriptions
- Prescription Settings and Rules - Prescriptions - RxFill Indicator
-
- Sign Up & Implement the Intelligent Intake
- Setup Access for Intelligent Intake
- Setup New Letters and Templates for Intelligent Intake
- Access the Intelligent Intake Form Setup Screen
- Create a New Intake Form
- Setup a New Intelligent Intake Form
- Setup Intelligent Intake Patient Communication Preferences
- Assign Intelligent Intake Form to Appointment Types
- Inactivate an Intelligent Intake Form
- Remove or Add Intelligent Intake Required Field
- Remove or Add Intake Field
- Live Training, Questions and Answers - Intelligent Intake
- Template Demographics for Intake Templates (Age, Gender, Diagnosis, Payer/Financial Class)
- Intake Template Filter for Intelligent Intake (Last Completed Date, Specific Date)
- Intake Letter Filters for Intelligent Intake (Insurance & Date)
-
- Overview of Roles
- Assign a screen to a role
- Assign a Role to a User
- Add a new role
- EMR - General - User Setup - Templates New Tab - Orders
- External - MyMedicalLocker - ToDo - Task - Patient Portal Role
- Practice - Patient Intake - Setup - Intake Assignment Role
- Practice - Patient Intake - Setup - Intake Assignment Schedule Role
- Practice - Patient Intake - Setup - Intake Setup Role
- Practice - General - User Setup - User Setup (new)
- Practice - Patient Intake - ToDo - Task - Intelligent Intake
- Practice eDocuments - Processing - PDF Split Role
- Practice - General - Security - User Two Factor Authentication
-
- User Setting: Arrangement Order (Arrange By in My Task - Orders)
- User Setting: Automated Dialysis Letter Template
- User Setting: Automated Fax Auto Send
- User Setting: Claim Search Time Period
- User Setting: Default Order By
- User Setting: Default Time Increment
- User Setting: Display Amounts within Superbill
- User Setting: Display detailed medication information in Summary
- User Setting: Display Today's Allergy History
- User Setting: Display Today's Assessment History
- User Setting: Display Today's Chart Share History
- User Setting: Display Today's Extension History
- User Setting: Display Today's Exam History
- User Setting: Display Today's Goal History
- User Setting: Display Today's History of Present Illness (HPI) History
- User Setting: Display Today's Letter History
- User Setting: Display Today's Order History
- User Setting: Display Today's Patient Education History
- User Setting: Display Today's Prescription History
- User Setting: Display Today's Problem List History
- User Setting: Display Today's Review of System (ROS) History
- User Setting: Display Today's SOAP Note History
- User Setting: Display Today's Superbill History
- User Setting: Display Today's Treatment Plan History
- User Setting: Display Today's Vitals History
- User Setting: EMR Primary Appointment Color (Background)
- User Setting: EMR Secondary Appointment Color (Right Side Bar)
- User Setting: EMR Soap Secondary Sign Off Percentage
- User Setting: EMR Secondary Sign Off Percentage Start Date
- User Setting: Finding Narrative (Abnormal)
- User Setting: Finding Narrative (Normal)
- User Setting: Hide Order Processor and Status in Result Findings
- User Setting: Maximum claims per deposit page
- User Setting: Patient Search Maximum Rows
- User Setting: Problem List Favorite Search Days
- User Setting: Problem List Favorite Search Type
- User Setting: Problem List Favorites Search Max Rows
- User Setting: Problem List Summary View
- User Setting: Procedure List for Vitals Timeline Wireframe Summary
- User Setting: Prompt for Dialysis Visit delivery mechanism
- User Setting: Run Real Time Prescription Benefit Check (RxBC)
- User Setting: Search List Type
- User Setting: Timezone Zip Code
- User Setting: User Reported Rx - My Favorites Default Search Settings
- User Setting: User Reported Rx - Default Reported Favorites List
- User Setting: User Rx History - Default Status
- User Setting: User Rx Pad - Alert Text
- User Setting: User Rx Pad - Default Dispense as Written to Yes
- User Setting: User Rx Pad - Default RxPad Favorites List
- User Setting: User Rx Pad - My Favorites Default Search Settings
- User Setting: User Rx Pad - My Therapeutic Classes Default Search Settings
- User Setting: User Rx Pad - Default Status
- User Setting: User Rx Pad - Oral Code
- User Setting: User Rx Print Report
- User Setting: Vitals Summary Table View
- User Setting: EPA Processor
- User Setting: Toggle Display Date in AMP Results
- User Setting: Unsolicited Results Processor
-
- Access User Rx Settings
- Access User Settings
- Activate/Deactivate a User
- Add New User using Copy User
- Dashboard User Setup
- Modify Login Times for a User
- Obtain a DIRECT Email Address
- Reset a user password
- Setup and Authenticate User DIRECT Email
- Setup Two Factor Authentication
- Setup Two Factor Authentication Error Message
- Unlock an Active User
- User/Provider Connection
- User Sign Off Settings
- Modify Available Resources & Default Mobile Resource
- Give Access & Set Default Templates Per Chart Tab
- Assign access to My Task Fax numbers
- User is This Provider Connection
- Setup a User Group
- Assign All Users to User Group
- Setup 2FA Authenticator App for User Login
- How to Log In to OfficeEMR
-
-
-
-
- HL7 Result (ORU) Specifications
- HL7 Appointment (SIU) Specifications - Outbound
- Patient - Insurance - Guarantor - Relationship HL7 Mapping
- Patient - Responsible Party - Relationship HL7 Mapping
- Patient - Language - HL7 Mapping
- OBX.15 Performing Lab Information
- Health Exchange MSH, OBR, and Z-Segs | Facilities (Z4A) + Providers (Z4D)
- MSH.3 Specifications | Document Types and Subtypes
- OBR.4 Specifications | Health Exchange
-
-
- Overview of Statement Processing with Data Media
- Setup the Automated Statement Processing Integration with Data Media
- Data Media Enhanced Statement Layouts
- Data Media Recurring Payments and Payment Plans
- Data Media Website Link for Credit Card Payments
- Data Media eSkip Trace Report
- Data Media Deceased Master List Check
-
-
- Access to Webservices
- iSalusEMR.ProblemPatient
- iSalusExternal.BillingExport
- iSalusExternal.ExportClaimProcedures
- iSalusExternal.ExportClaims
- iSalusExternal.ExportDemographics
- iSalusExternal.SaveAppointmentStatus
- iSalusPatient.GetSetup
- iSalusPatient.PatientList
- iSalusPatient.UpdateSetup
- iSalusPayers.GetPayer
- iSalusRetrieve.GetRendering
- iSalusSchedule.AppointmentList
- iSalusSchedule.CancelAppointment
- iSalusSchedule.CreateAppointment
- iSalusSchedule.ScheduleList
- iSalusTPS.GetSender
- iSalusTPS.SetReceiver
- iSalusTPS.SetSenderResponse
- iSalusWindow.GetList
- iSalusEMR.SaveVitals
- iSalusCommunication.MailSend
- iSalusExternal.GetPatientFilterIdentifiers
- iSalusExternal.GetPatientFilterData
- iSalusExternal.GetPatientFilterDataImage
- iSalusExternal.SaveTemplateInput
- iSalusExternal.GetTemplateInput
-
-
-
-
-
- Overview of the Summary tab for Mobile Charts
- Start a Telehealth Visit from OfficeEMR Mobile
- View a patient's Problem List
- View a patient's Medication List
- View a patient's Allergy List
- View a patient's Immunization History
- View a patient's Vitals History
- View a patient's Medical History
- View a patient's Encounter History
-
-
-
- Overview of the Office Schedule on OfficeEMR Mobile
- View appointments on your office scheduled in OfficeEMR Mobile
- Add appointments to the Office Schedule on OfficeEMR Mobile
- Cancel appointments on the Office Schedule on OfficeEMR Mobile
- Add charges for appointments on the Office Schedule on OfficeEMR Mobile
-
-
-
-
-
-
-
-
-
-
- iSalus Healthcare 2022 Real World Test Plan
- iSalus 2022 Real World Test Results
- iSalus Healthcare 2023 Real World Test Plan
- iSalus Healthcare 2023 Real World Test Results
- iSalus Healthcare 2024 Real World Test Plan
- iSalus Healthcare 2024 Real World Test Results
- iSalus Healthcare 2025 Real World Test Plan
- iSalus Healthcare 2025 Real World Test Results
-
-
- Release 26.163 - June 25th, 2026
- Release 26.160 - June 4th, 2026
- Release 26.156 - April 23, 2026
- Release 26.151 - February 26, 2026
- Release 25.148 - December 18, 2025
- Release 25.146 - November 20, 2025
- Release 25.141 - October 23, 2025
- Release 25.139 - September 16, 2025
- Release 25.136 - June 5, 2025
- Release 25.132 - April 3, 2025
- Release 25.131 - March 20, 2025
- Release 25.130 - March 6th, 2025
- Release 25.129 - February 20th, 2025
- Release 25.127 - January 23rd, 2025
- Release 24.126 - January 14th, 2025
-
- Release 24.124 - December 12th, 2024
- Release 24.122 - November 14th, 2024
- Release 24.121 - October 31st, 2024
- Release 24.120 - October 17th, 2024
- Release 24.119 - October 3rd, 2024
- Release 24.118 - September 19th, 2024
- Release 24.117 - September 5th, 2024
- Release 24.115 - August 22nd, 2024
- Release 24.114 - July 25th, 2024
- Release 24.112 - June 27th, 2024
- OfficeEMR Mobile - Android v 1.4.0 (209) - June 17th, 2024
- OfficeEMR Mobile - iOS v 5.11.1 (206) - June 13th, 2024
- Release 24.111 - June 13th, 2024
- Release 24.110 - May 30th, 2024
- Release 24.109 - May 16th, 2024
- Release 24.108 - May 2nd, 2024
- Release 24.107 - April 18th, 2024
- Release 24.106 - April 4th, 2024
- Release 24.105 - March 21st, 2024
- Release 24.104 - March 7th, 2024
- Release 24.103 - February 22nd, 2024
- Release 24.102 - February 8th, 2024
- Release 24.101 - January 25th, 2024
- Release 24.100 - January 11th, 2024
-
- Release 23.22 - December 14th, 2023
- Release 23.21 - November 30th, 2023
- Release 23.20 - November 16th, 2023
- Release 24.113 - July 11th, 2024
- Release 23.19 - November 2nd, 2023
- Release 23.18 Post Release - October 27
- Release 23.18 - October 19th, 2023
- Release 23.17 - October 5th, 2023
- Release 23.16 - September 21st, 2023
- Release 23.15 - September 7th, 2023
- Release 23.14 - August 24th, 2023
- Release 23.13 - July 27th, 2023
- Release 23.11 - June 29th, 2023
- Release 23.10 - June 15th, 2023
- Release 23.09 - June 1, 2023
- Release 23.08 - May 18th, 2023
- Release 23.07 - May 4th, 2023
- Release 23.06 - April 20th, 2023
- OfficeEMR Mobile - Android v1.3.0 (195) - April 20th, 2023
- OfficeEMR Mobile - IOS v5.10.0 (195) - April 20th, 2023
- Release 23.05 - April 6th, 2023
- Release 23.04 - March 23rd, 2023
- Release 23.03 - March 9th, 2023
- Release 23.02 - February 16th, 2023
- Release 23.01 - February 2nd, 2023
-
- Release 22.18 - January 19th, 2023
- Release 22.17 - December 8th, 2022
- Release 22.16 - November 17th, 2022
- Release 22.15 - October 20th, 2022
- Release 22.14 - September 29th, 2022
- Release 22.13 - September 8th, 2022
- Release 22.12 - August 18th, 2022
- Release 22.11 - August 4th, 2022
- Release 22.10 - July 7th, 2022
- Release 22.09 - June 9th, 2022
- Release 22.08 - May 19th, 2022
- OfficeEMR Mobile - Android v1.2.6 (192) - May 11th, 2022
- Release 22.07 - May 5th, 2022
- Release 22.06 - April 21st, 2022
- Release 22.05 - April 7th, 2022
- Release 22.04 - March 26th, 2022
- Release 22.03 - March 10th, 2022
- Release 22.02 - February 24th, 2022
- OfficeEMR Mobile - Android v1.2.5.191 (191) - February 4th, 2021
- OfficeEMR Mobile - iOS v5.9.5 (181) - February 4th, 2021
- Release 22.01 - February 4th, 2022
- Release 21.14 - January 22, 2022
-
- Release 21.13 - October 7th, 2021
- Release 21.12.1 August 13th, 2021
- Release 21.12 - Release July 15th, 2021
- Release 21.11 - Release July 1st, 2021
- Release 21.10 - Release June 8th, 2021
- OfficeEMR Mobile - Android v1.2.0.183 (183) - June, 2021
- OfficeEMR Mobile - iOS v 5.9.0 (170) - June 8th, 2021
- Release 21.08 - Release May 20th, 2021
- OfficeEMR Mobile - Android v 1.1.0 (176) - April 18th, 2021
- OfficeEMR Mobile - iOS v 5.8.0 (165) - April 18th, 2021
- AnywhereCare - Android v 1.3.3 (42) - April 18th, 2021
- AnywhereCare - iOS v 2.2.0 (24) - April 18th, 2021
- Release 21.07 - Release April 8th, 2021
- Release 21.06 - Release March 25th, 2021
- Release 21.05 - Release March 11th, 2021
- OfficeEMR Mobile - iOS v 5.7.4 (161) - March 3, 2021
- Release 21.04 - Release February 25th, 2021
- OfficeEMR Mobile - Android v1.0.173 (173) - February 25, 2021
- OfficeEMR Mobile - iOS v 5.7.2 (159) - February 24, 2021
- Release 21.03 - Release February 11th, 2021
- Release 21.02 - Release February 2nd, 2021
- Release 21.01 - Release January 14th, 2021
-
- Release 20.11 - Release December 15th, 2020
- Release 20.10 - Release November 19th, 2020
- OfficeEMR Mobile - Android v1.0.167 (167) - November 18th, 2020
- OfficeEMR Mobile - iOS v5.7.0 - November 18th, 2020
- Release 20.9 - Release November 5th, 2020
- Release 20.8 - Release October 20th, 2020
- Release 20.7 - Release October 1st, 2020
- Release 20.6 - Release September 17th, 2020
- Release 20.5 - Release September 3rd, 2020
- Release 20.4 - Release August 20th, 2020
- Release 20.3 - Release August 6th, 2020
- Release 20.2 - Release July 23rd, 2020
- OfficeEMR Mobile - iOS v 5.6.0 (136) - July 24th, 2020
- OfficeEMR Mobile - Android v 1.0.153 (153) - July 24th, 2020
- OfficeEMR Mobile - iOS v 5.5.5 - July 9th, 2020
- OfficeEMR Mobile - Android v 1.0.146 (146) - July 9th, 2020
- Release 20.1.13 - Patch Release July 1st, 2020
- Release 20.1.12 - Patch Release June 25th, 2020
- Release 20.1.11 - Patch Release June 18th, 2020
- Release 20.1.10 - Patch Release June 11th, 2020
- AnywhereCare - Android v. 1.3.3 - June, 20, 2020
- Release 20.1.9 - Patch Release June 4th, 2020
- OfficeEMR Mobile - Android v 1.0.137 - June 8th, 2020
- Release 20.1.8 - Patch Release May 28th, 2020
- Release 20.1.7 - Patch Release May 21st, 2020
- AnywhereCare - Android v. 1.3.2 - May 25th, 2020
- Release 20.1.6 - Patch Release May 19th 2020
- AnywhereCare - IOS v 2.1.3 - May 19th, 2020
- OfficeEMR Mobile - iOS v 5.5.4 - May 18th, 2020
- Release 20.1.5 - Patch Release May 14th, 2020
- Release 20.1.4 - Patch Release May 12th, 2020
- OfficeEMR Mobile - Android v 1.0.135 - May 12th, 2020
- Release 20.1.3 - Patch Release May 7th, 2020
- Release 20.1.2 - Patch Release May 5th, 2020
- Release 20.1.1 - Patch Release - May 4th, 2020
- Release 20.1 - May 2020
- AnywhereCare - Android v. 1.3.1 - April 2020
- AnywhereCare - IOS v 2.1.2 - April 2020
- Release 19.7.1 - February 1st, 2020
- Version 25.130 – March 1, 2026


Copyright © 2019 iSalus Healthcare. All rights reserved.