The Summary of Care section within Reports exists so that practice users and/or internal staff can set up manual or interfaced exports of C-CDAs. Depending on the use case and volume, you may decide one option is more viable than the other. This article will describe the functionality within the Summary of Care screen and associates processes.

Function Definitions
Import
This button will allow a practice user to import an external source's CCDA. This will require the user has the .XML file saved locally to their machine. Once imported if more than 1 patient meets the search criteria for the data a list of potential matches will be displayed. The user will be required to select the appropriate patient and "Attach" the record.
Search
The search will allow a practice user to search all CCDs already generated for a specific patient and/or date range. Once the search criteria is entered a list of patients and post dates will be returned. These can be selected to view the historical CCDA.
Export
The export options will allow you to either export CCDAs manually or automatically. Files will be generated as .XML files.
Single Patient
In the event, you need to export a single patient's CCDA the "Single Patient" option should be selected from the Export dropdown. There are no interface options with single patient exports.
Schedule
The most commonly used option for export is the "Schedule", this option allows a practice user to set up Manual CCDA Exports or Interfaced CCDA Exports using either the TPSReceiver.exe or an Iguana SFTP transfer. There is a wide variety of options available for the timing and scope of the exports being scheduled. Read more on determining the appropriate export type(s) to use.
Transition of Care / Referral
The Transition of Care section allows for a provider or ancillary staff member to refer patients to outside providers using a CCDA. The reason and affiliated providers can be specified prior to exporting or sending via direct email. A direct email must be on file for the provider receiving the new patent. Otherwise, the CCDA will need to be exported to the local computer and transmitted by other means external to OfficeEMR.
Direct Email
This option is used as the inbox for the CCDA received via Direct Email. Similar to the Import screen, potential matches for the file will be displayed in a list and a practice user will be responsible for Attaching the record to a patient chart.
Version
Determines the CCDA version used when exporting.
One of the options for exporting Summary of Care files is to schedule an extract. This is especially helpful for individuals that need to download the CCDA files to send to a SINGLE third party. If the intention is for multiple vendors to receive your CCDAs it may be better for you to establish a CCDA Interface via Iguana. Once an extract has been scheduled, the data will be exported to your computer in the destination that you choose. In order to do this, a tool must be installed on your computer that coordinates this. This guide will explain how to schedule an extract and how to install the tool
Install the TPS Receiver
Obtain the necessary files
- Contact iSalus Healthcare to receive access to the necessary files
- Copy and Paste these files on your computer. It is best to add these files to the same location that you plan on having the files extracted to. In the example below, I have added the files to my C drive in a folder labeled, iSalus_Extract

Run the Install
- On your computer, click 'Start'
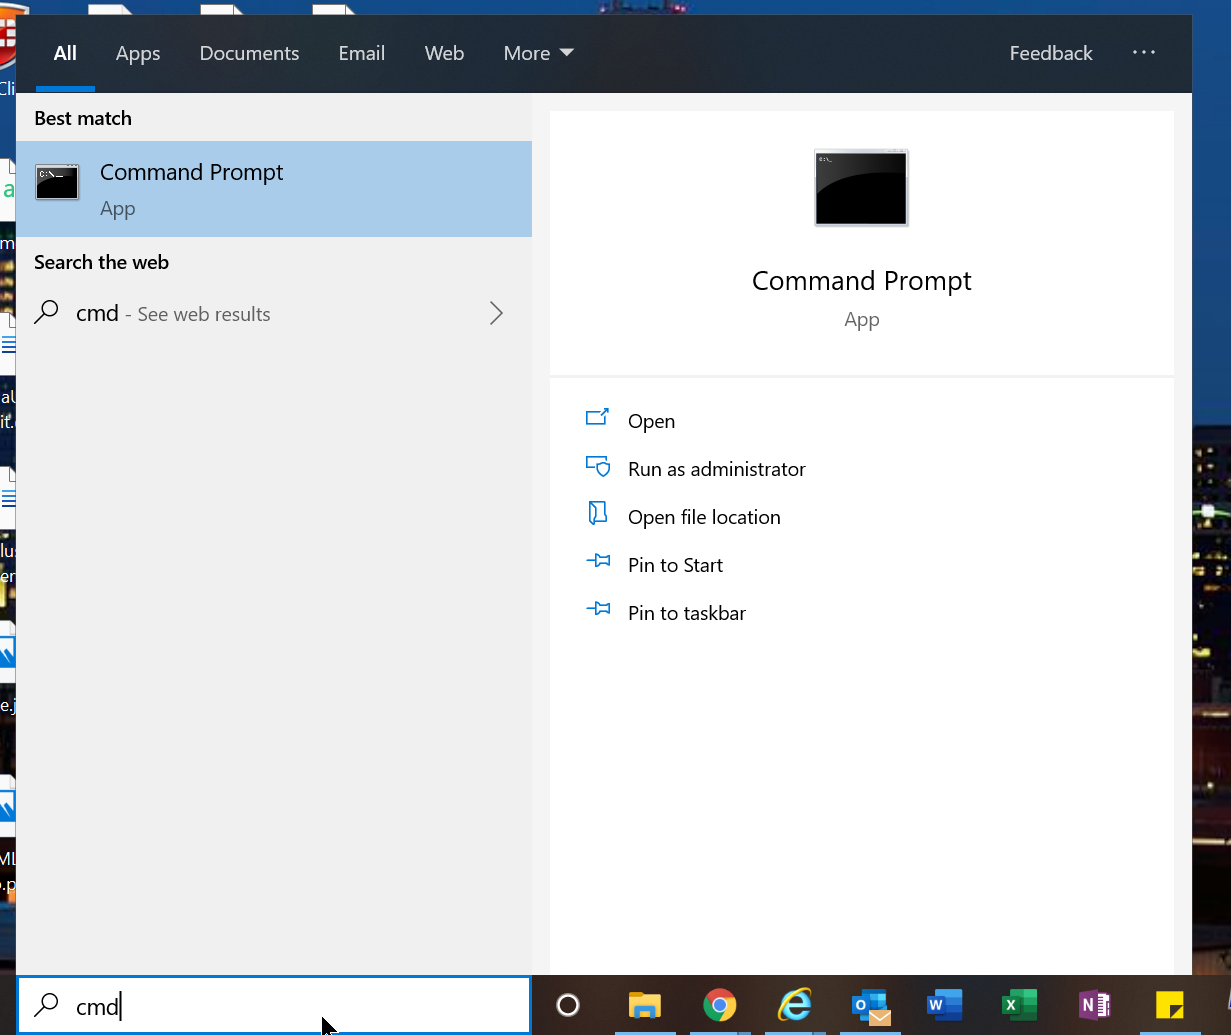
- Search for 'cmd' and select 'Command Prompt' when it appears
- Select 'Run as Administrator'. THIS STEP IS CRITICAL.

- In the Command Prompt window, you need to navigate to the folder that you saved the files.
- Usually the command prompt will open with your C drive selected.
- To change your directory type 'cd [enter your path here]'. For example, cd desktop\isalus_extract
- Click Enter. You should now be in that folder.
- Then, type the install command:
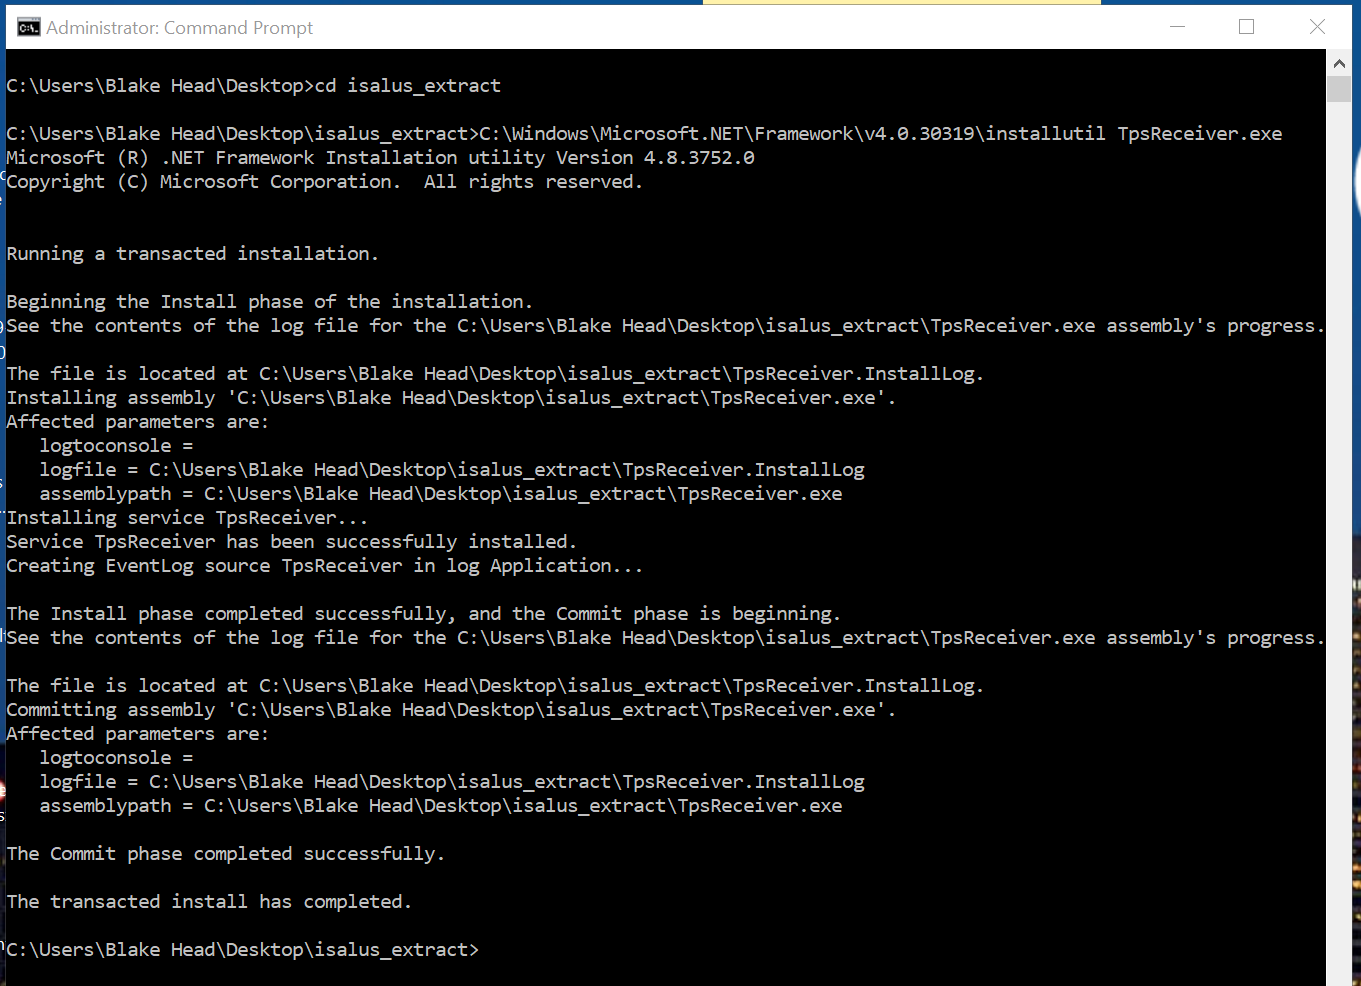
- C:\Windows\Microsoft.NET\Framework\v4.0.30319\installutil TpsReceiver.exe
- Click Enter. The tool will be installed.
- You want to make sure that the very last line says 'The transacted install has completed.'

Configure the TpsReceiver.config File
- Open the folder where you saved the files
- Open the file labeled 'TpsReceiver.exe.config' with a text editor like Notepad
- The following 'value' fields need to be updated:
- <add key="UserID" value="iSalusUserIDHere" />: Change this to be the User ID that has access to the Data Export window.
- <add key="Password" value="iSalusPasswordHere" />: Set the password for the User ID that you choose above
- <add key="Company" value="iSalusDatabasIDHere" />: Set the database ID to be the database that you use to log into. Please note, this must be the actual database ID. This might look like 'C9999'. It is unlikely to be a word. If you do not know what this is, follow these steps:
- Click 'Current User' at the bottom of any screen to open User Settings.
- Select the 'User' tab on the right
- The value is stored in the 'Company' field
- <add key="Folder1" value="c:\\TPS\client_hl7" />: Change this to be the file path that you want to save the data. For example, I added a new sub-directory inside of my isalus_extract folder labeled 'Files'. Therefore, my path is 'C:\Users\Blake Head\Desktop\isalus_extract\Files'
- Save the file
Best Practice: Create a new user in your system that only has access to the Data Export tools and use this User ID and Password.
Start the Service
- On you computer, search for 'Services' and open that tool.
- In the list, look for 'TpsReceiver' and select it
- Click 'Start'. The tool will now be running.

Schedule an Extract
To schedule an extract, follow these steps:
- Navigate to Reports > Summary of Care
- Click the down arrow next to 'Export' then 'Schedule'
- Click 'Add' to create a new schedule
- Enter the details accordingly:
- Export Type: You can choose an entire population or just a single provider.
- Appointment From and To: This finds patients for a specific provider by appointment date.
- Schedule Setup: Select either a specific date or a recurring pattern. You will also need to select a time. The time is important because the PC/Server will need to be available at this time.
- Click Apply to save changes.
Accessing the Data
Now that the tool is configured, the tool will check for data every 5 minutes and download it to your computer at the scheduled time. The files should be downloaded to the folder that you setup in the prior steps.
The option to manually set up and download CCDA exports to a local machine is now available in the Summary of Care - Export > Schedule section. This will allow practice users or others with access to the client database to set up recurring or one-time exports for a variety of scopes. This article describes the steps to set up and complete a manual CCDA export to a local machine.

Considerations
- Since exports are a taxing process both on the system (while preparing) and your computer (during download), be cognizant of the size of the data and the time of the export.
ex. Exporting the entire 500k patient population in the middle of the clinic may cause slowness for all staff members using the software. It may be worth exporting over the weekend and downloading the files on Monday morning. - Export Date: Be cognizant of whether you select Encounter or Latest Encounter in the Provider and Completed Notes options. The encounter will pull each instance of a CCDA for the selected date range for the patient, the Latest Encounter will only pull the most up-to-date information for the patient.
- The Problem List Diagnosis Group allows users to filter by a Procedure Diagnosis Code Group, allowing all active patients with an active problem list containing a code in the group to be exported. For more information on creating Diagnosis Code Groups, visit our Diagnosis Code Groups Setup Help Article.
- A highly specific Alias should be set for each export you set up.
ex."MIPS Monthly Export for MyCCD Company"
Steps to Complete
Add a New Export
- Navigate to Reports
- Under the EMR category, select Summary of Care
- Export > Schedule
- Select ADD
- Within the Add Schedule window:
- Export Type = Manual
- TPS Type = Any (Not relevant for manual exports, but still required)
- Select any of the three options depending on your use case: Entire Population, Provider, or Completed Notes
- Export Date:
- Encounter = Any encounter in the selected timeframe
- Latest Encounter = Only the most up-to-date CCDA available for a patient within the parameters
- Schedule Setup:
- Specific = The date the export will begin generating the CCDAs, used for one-time exports
- Recurring = The date the export will begin generating the CCDAs, used for exports needing to repeat on a schedule
- Alias = Description of reason and intended destination of the export
- Export Time = Preferably select a time outside of clinic hours. "NOW" is not recommended for large exports
- Within the Add Schedule window:
- Apply
- The export will begin preparing at the date and time set in Add Schedule above. Continue about your other daily tasks and return to the screen the day following the scheduled export.
Download a Prepared Export
- Navigate back to the Summary of Care > Export - Schedule
- Select the schedule setup in the prior steps, ensure the status indicates the export is ready for download
- Select Export located next to Results and Refresh
- Determine the # of files you would like to process per group. Having a smaller number of files/group may help your computer download the files easier.
- Select a file location for the .XML files
- Files will begin downloading into the directory you selected


