In the Billing portal, there is a category for Statements. Within that category is found the Ready to Send statements screen and the statement Batches screen. Users will use these screens to work statement warnings, review statements, create statement batches, review statement batches, and submit statements. In addition, using the Statement Setup Screen, a user can configure the system to batch statements manually, automatically, or in a hybrid fashion (a combination of both).
Training Video
Manual Statements
Manual statements are for practices that want to control every step of the process.
Statements can be reviewed prior to adding them to a batch. Batches are manually created based on a selection in the Ready to Send screen. Once the batch is created, users can then review the batch prior to submitting it in the Batches screen. When the user is satisfied the batch can then be manually submitted/printed using the More button on the Batches screen.
Automatic Statements
Automatic statements are for practices that want the most efficiency possible.
Statements will be automatically processed on the designated day of the month in the statement cycle settings and all of the statements without warnings will be automatically sent electronically. The statements with warnings will populate onto the Ready to Send screen with a "Past Due" indicator. The user will review and address the warnings. These statements can then be manually batched or they will go out in the next automatic cycle.
Hybrid Statements
Hybrid statements are for practices that want to be efficient but have chosen to print their statements in-house or for practices that wish to double-check the batch before they sent out.
Statement batches will be automatically created on the designated day of the month in the statement cycle settings. The user will then go to the batches screen the next day and correct any warnings as desired. Once satisfied the user will submit the batch manually using the More button or the Submit Batch button inside the Statement Batch Details screen.
Vendor Integration
We have chosen to partner with Data Media Associates as our print/mail/e-mail statement vendor. The features offered by this vendor will be very helpful to our practices going forward:
- Enhanced Statement Design to maximize patient collection
- eStatements to reach patients within hours of batch submission
- Automated pre-collect letters based on statement level
- Online payment integration that processed automatically back to the billing system
- Payment plans with Auto-Charge functionality

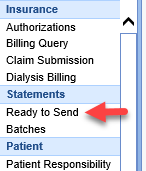
The Ready to Send screen can be found in the Billing portal under the Statements category on the navigation bar. This screen by default will display all statements that are ready to be sent out. It will be used for reviewing/correcting statement warnings, reviewing statements prior to submission, and creating statement batches. If there are claims that are missing responsible parties the Missing Responsible Parties screen will open automatically when the Ready to Send screen is first loaded.
Fields
- Checkbox: This box will be used to mark the statement(s) as part of the selection.
- Warnings: Used to denote this statement being in a warning status. Has an icon for financial warnings (credits or open receipts, denoted by a dollar sign warning icon) or misc warnings (regular warning icon).
- Letter: The qualifying letter group that the responsible party belongs to. This box will be highlighted in Pink if the statement is past due.
- Resp. Pty. Name: Shows the responsible party receiving this statement.
- Note: If responsible party is under 18 follow the name with (Minor).
- Resp. Pty. DOB: The responsible party's date of birth.
- Chart Number: The chart number of the patient whose claims are included on this statement.
- Patient Name: The name of the patient whose claims are included on this statement.
- Claim Count: The number of claims whose balances are in this statement.
- Balance: Total balance of all claims included in the statement.
- Last Statement: The date this responsible party last received a statement for this patient.
- Level: The level used to produce the statement message. This will show the highest number of statements sent on any part of the balance.
- Message: The message that will appear at the top of the statement based on its aging date or number of statements previously sent.
Filters at the top of the screen
Show Statements inside of Grace Period: This will not only just show items ready to be sent, but also statements for patients whose grace period hasn’t yet elapsed. Chose this option to see ALL statements regardless of Last Statement date.
Past Due Only: This option will list only accounts ready for statements that are older than the minimum days since last statement. This will provide the user with a quick list of all accounts that were excluded from the last statement run due to warnings.
Warnings Only: This option will list only accounts ready for statements that have warnings. This will allow users to quickly list and work accounts to ensure accurate statements are sent to patients.
Advanced search fields
Resp. Pty. ID: Enter the responsible party id for the statement(s) you wish to see.
Warnings: Multi-select list of “N/A,” “None,” “Both,” “Financial,” and “Demographic.”
Letter: Enter the letter range you wish to see.
Resp. Pty. First: Enter the responsible party's first name.
Resp. Pty. Middle: Enter the responsible party's middle name.
Resp. Pty. Last: Enter the responsible party's last name.
Resp. Pty. DOB: Enter the responsible party date of birth range.
Resp. Pty. Email: Enter the responsible party's email address.
Chart Number: Enter the patient's chart number.
Patient First: Enter the patient's first name.
Patient Middle: Enter the patient's middle name.
Patient Last: Enter the patient's last name.
Claim Count: Enter the claim count range.
Balance: Select the balance range you want to see on the page.
Last Statement: Select a date range to see only statements for patients whose last statement was within that range.
Level: Multi-select list of all active statement levels.
Buttons at the top of screen
New:
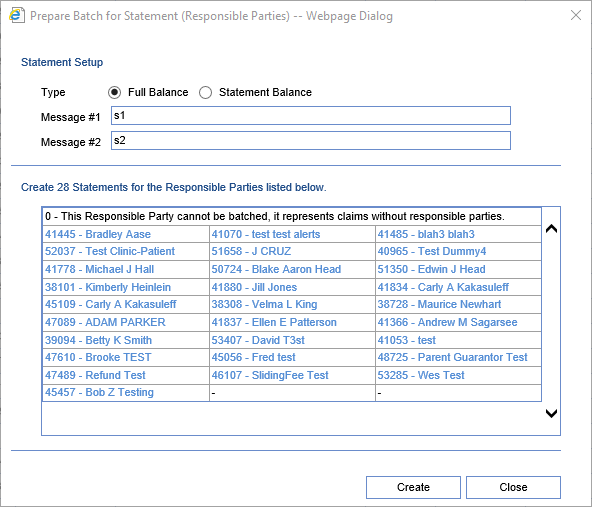
This option will take all selected statements that are marked with the checkbox and create a batch of statements.
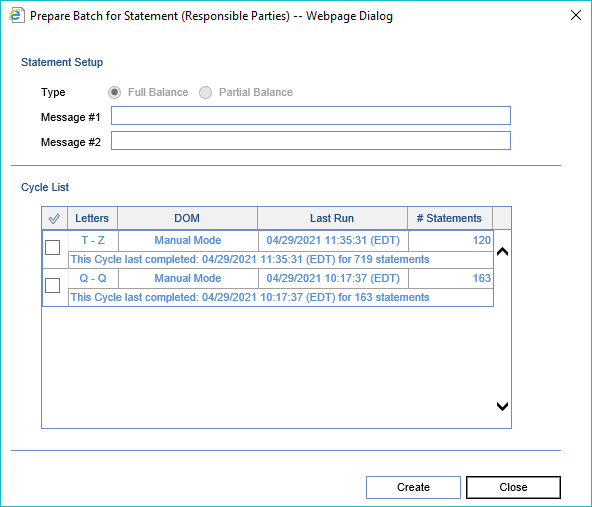
If no statements are selected, this option will allow the user to build a statement batch based on cycle.
Open: This button is inactive. To open the Statement Details screen double-clicking any row.
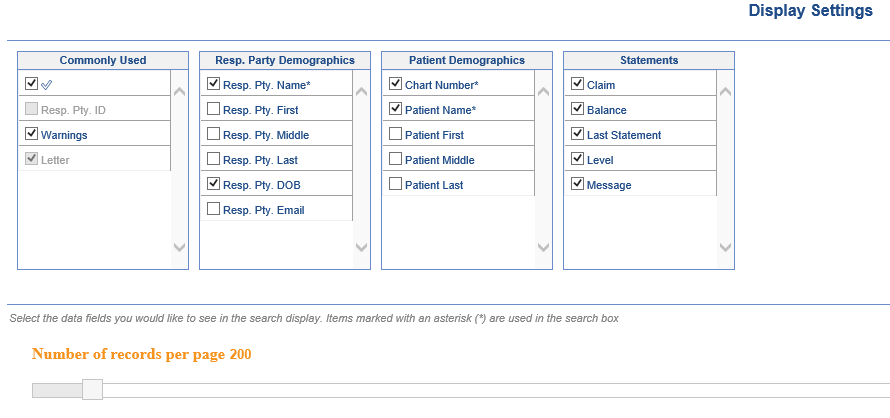
More > Change Display Settings: This button will allow the user to update the displayed fields on the Ready to Send screen as well as set the default number of records to display.
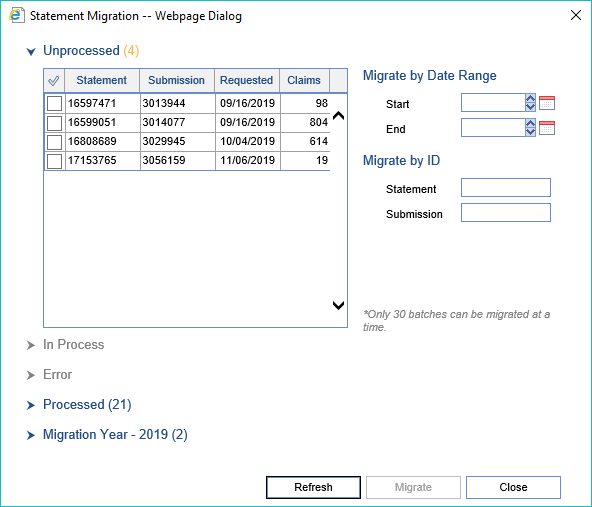
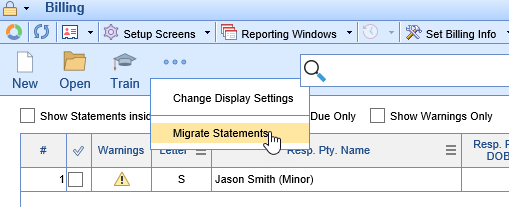
More > Migrate Statements: This button will all the user to Migrate Statements that were sent out using the legacy statement process.
More > Missing Resp. Parties: This button will allow the users to search for any claims that are missing responsible parties and quickly add them to the claim.
The Statement Details Screen can be accessed by opening any row on the Ready to Send screen or through the Batch Details screen. This screen can be used to review statements, fix issues, and view statements that were previously sent out.
Some fields are only available before or after they have been batched. If a field is screen specific that is noted below.
Fields
Statement Details
- Statement # (Batch Details): The unique id assigned to this statement after it has been created.
- Responsible Party: Shows the responsible party receiving this statement. Clicking the name will open the responsible party.
- Note: If responsible party is under 18 follow the name with (Minor).
- Patient: The patient's name whose claims are included on this statement. Clicking the name will open the patient setup screen.
- Total: Total balance of all claims included in the statement.
- Paper (Batch Details): The number of times this statement has been printed and the date and user it was last printed.
- Electronic (Batch Details): The number of times this statement has been submitted and the date and user that last submitted it.
- Download (Batch Details): The number of times this statement has been downloaded and the date and user that downloaded it.
- Message: The message that will appear at the top of the statement if batched now based on its aging date or number of statements previously sent.
Warnings
- Warning: Will show each warning on the statement.
- Action: Will provide a link to open a window to fix each issue.
Claims List
- Claim: The claim id associated with the claim. Clicking this id will open the Edit Claim screen for the claim.
- DOS: The date of service associated with the claim.
- Provider: The provider that is associated with the claim.
- Charges: The total amount of charges for the claim.
- Insurance Paid: The total amount of insurance payments for the claim.
- Patient Paid: The total amount of patient payments for the claim.
- Patient Balance: The current patient balance of the claim.
- Level: Number of statements that have been sent on this claim.
- Message: The message associated with the level for this claim.
Actions
- Create Batch (Ready to Send): Clicking will create a batch for just this single statement with the claims that have been selected.
- Quick Statement (Ready to Send): Clicking will create a statement view for quick printing.
- View Statement (Batch Details): Clicking will open a PDF view of the statement.
- Edit Message (Batch Details): Clicking will allow the statement message to be edited prior to the statement being sent.
- Rebuild Statement (Batch Details): Clicking will rebuild the statement applying any change to rules/company settings, balance info.
- Ignore Warnings (Batch Details): Clicking will ignore all warnings for this statement that have not been fixed.
- Prev/Next (Batch Details): Clicking will navigate to the previous or next statement within the current statement batch.
The Batches screen can be found in the Billing portal under the Statement category on the navigation bar. This screen, by default, will display all batches that have been prepared and are ready to be submitted and batches that have not been completely printed. This screen can be used for reviewing statement batches, submitting statement batches, and viewing statement batch history. If there are any pending batches that are currently in the process of being built the Statement Status screen will automatically open when you load the Batches screen.
Fields
Checkbox: This box will be used to mark the batch(es) as part of the selection.
Statement ID: The unique id of the batch.
Status: The current status of the batch.
Prepared: The date the statement batch was created.
Submitted: The date the statements were submitted or printed.
Statement Count: The number of statements in the batch.
Warning Count: The number of statements with warnings in the batch.
Print Completed: The print status of the batch.
Balance: The total balance of the statements in the batch.
Letter Search: The range of patient last names that statements in the batch were produced for.
Advanced Search Fields
- Statement ID: Enter the ID for the batch.
- Submission ID: Enter the Submission ID for the batch.
- Type: Select the Type of batch
- Status: Select the Status of the batch.
- Warnings: Select the Warning status of the batch.
- Prepared: Enter the date range for the Date Prepared.
- Due: Enter the date range for the Due Date.
- Submitted: Enter the date range for the Date Submitted.
- Statement Count: Enter the range for total Statement Count.
- Warning Count: Enter the range for total Warning Count.
- Balance: Enter the range for statement batch total Balance.
- Envelope: Select the Envelope type for the batch.
- Vendor: Select the Batch Vendor.
- File Status: Select the File Status.
- Letter Search: Select the Letter that you are looking for the batch to contain.
- Letter Range: Select the specific Letter Range for the batch.
- Claims List: Enter a List of Claim IDs.
- Claim ID: Enter a single Claim ID.
- Chart Number: Enter the Chart Number for the patient.
- Resp. Party List: Enter a List of Responsible Parties.
- Resp. Party ID: Enter a specific Responsible Party.
Buttons at the top of the screen
- New: There is not a function for this button on this screen. It will always be inactive.
- Open: To open the Batch Details screen double click any data row.
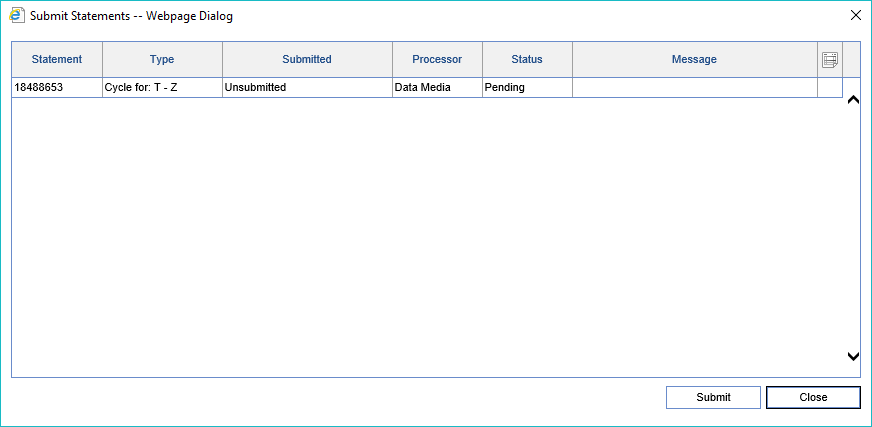
- More > Submit Statements: This button will allow the user to submit the selected batch(es) of statements.
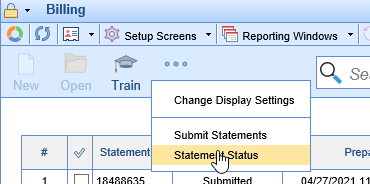
- More > Statement Status: This button will open the Statement Status screen displaying the build batch job statuses of recent statement batches.

The Batch Details Screen can be accessed by opening any row on the Batches screen. This screen can be used to review statement batches before or after sending. In addition this screen can be used to Send/Re-send or Print/Re-print statement batches, export batch information to Excel, and download an electronic version of the statement batch.
Fields
Batch Details
- IDs: The batch and submission id of the statement batch.
- Statement: The date the statement batch was run.
- Submitted: The date the statements were submitted to the statement processor or printed in the office.
- Due: The due date for the generated statements within the statement batch.
- Processor: The processor the statement batch was built for.
- Printed: The print status of the statement batch.
- Status: The status of the statement batch.
- Type: The type of statement batch.
- Total: The total balance of the batch's statements.
- Count: The number of statements in the statement batch.
- Warning: The number of warnings in the statement batch.
Statements
- Checkbox: Selection box that will be used for the Remove and Remove Past Due Actions.
- Warnings: Used to denote this statement being in a warning status. Has an icon for financial warnings (credits or open receipts, denoted by a dollar sign warning icon) or misc warnings (regular warning icon).
- Responsible Party: Shows the responsible party receiving the statement.
- Note: If responsible party is under 18 follow the name with (Minor).
- Patient: The patient's account number and name whose claims are included on the statement.
- Claims: The number of claims whose balances are in the statement.
- Balance: Total balance of all claims included in the statement.
- Last Statement: The date this responsible party last received a statement for this patient.
- Level: The level used to produce the statement message.
- Message: The message that will appear at the top of the statement based on its aging date or number of statements previously sent.
- Actions: Doc icon to view the statement and a View icon to open Statement Details.
Actions
- Send/Re-send: Sends or Re-sends the batch of statements to the statement processor.
- Print/Re-print: Prints or Re-prints the batch of statements to a local printer.
- Export: Exports the statements in the batch as a list to a .csv file.
- Download: Downloads the electronic statement file that was produced for the processor.
- Remove: Removes the selected statements from the batch and places them on the Ready to Send window.
- Past-Due: Removes the selected statements from the batch and places them on the Ready to Send window in the past-due status.
- Inactivate: Inactivates a batch that has not been sent. These statements will not appear on the patient accounts and will not advance the statement levels.

Migrate Statements is the process in which statements that were created using the legacy statement process will be imported into the new statement windows. This is an important feature because it will allow users to be able to:
- View all Statement Batch History in one screen
- View all Statement History in one screen
- Search for every Statement Batch that a single claim was included in
Workflow
- On the Statements Ready to Send Screen click the More button and Select Migrate Statements
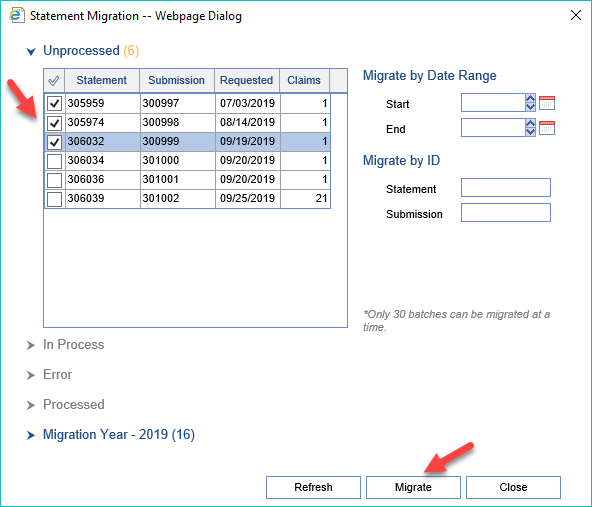
- In the Unprocessed section Select the check boxes of the batches to be Migrated and click the Migrate button
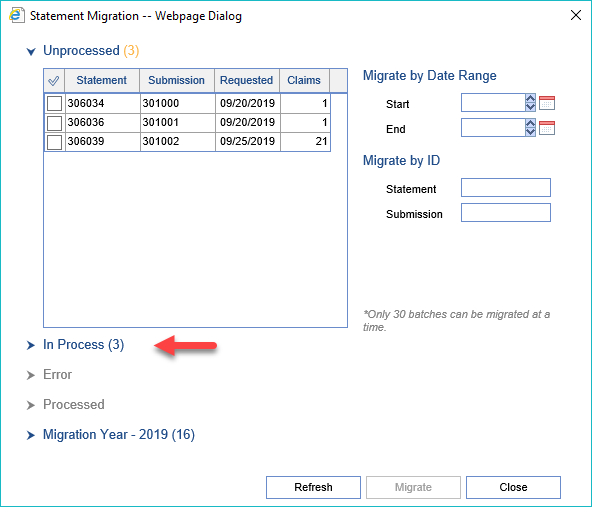
- The batches will move to the In Process section while they are being Migrated
- Click the Refresh button and when completed the batches will move to the Processed section
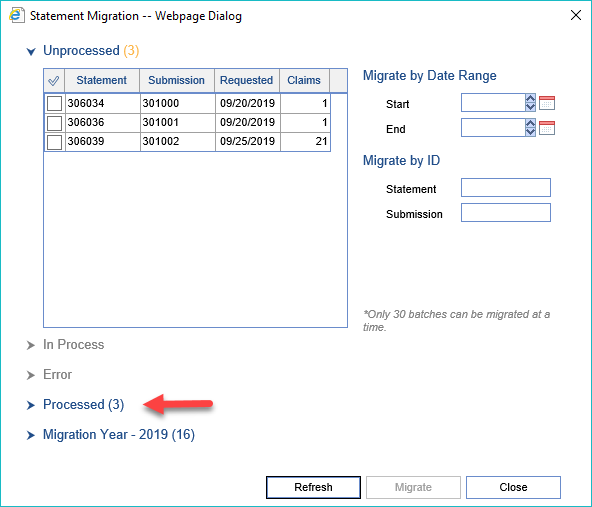
- All statements in these batches can now be found when using the Advanced Search in the Batches screen

There are multiple Statement Formats within the system that will change based on a variety of company settings.
Some choices are:
- Calendar at the bottom of the page (on/off)
- Aging Grid at the bottom of the page (on/off)
- Different credit cards or no credit cards
- Regular Statements
- Display Provider(default)/Facility or Both in statement grid
- Partial Balance Statements
- This means that the aging grid will be displayed
- Will never be in a Final/Past Due view
- Display Provider(default)//Facility or Both in statement grid
- Final Notice Statements
- Display in “Warning” format
- Past Due Statements
- Display in “letter” format
Regular Statement with Provider
Regular Statement with Service Facility
Regular Statement with Provider and Service Facility
Regular Statement without Aging
Regular Statement without Calendar
Regular Statement with fewer credit card options
Regular Statement without Credit Cards
Partial Balance Statements
Final Notice
Final Notice without Credit Cards
Past Due Notice
Past Due Notice without Credit Cards

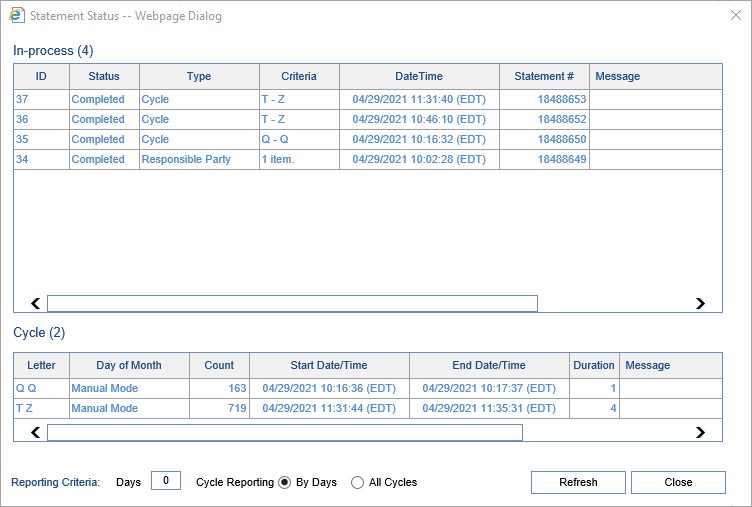
The Statement Status screen opens automatically the first time the Batches screen is opened if there are statement batches in process. In addition it can be opened by going to the More button in the Batches screen. This screen is to be used to see the status of batches that currently be built as well as view a listing of all batches/cycles that have been built in the last x number of days.
Workflow
Whenever a statement batch is created from the Ready to Send screen you get a notice that a job has been created and will be processed in the background. This screen was specifically designed to show you the status of the statement batch being built so you will know when it is completed.
- Open the Batches Screen
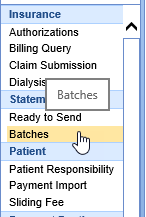
- Click More > Statement Status
Fields
In-Process
- ID: The build process id of the statement batch.
- Status: The status of the build process. (Completed - Batch is available on the Batches screen, Pending - Batch job is still running and batch is not yet available)
- Type: Type of statement batch that was processed.
- Criteria: The letter range that was used to build the batch.
- Date Time: The date and time the batch job was started.
- Statement #: The id number of the statement batch.
- Message: Any custom message that was used to build the batch.
Cycle
- Letter: The letter range that was used to build the batch.
- Day of Month: The Day of Month setting for the cycle.
- Count: The count of statements that were included in the cycle.
- Start Date/Time: The Start Date and Time the cycle job started.
- End Date/Time: The End Date and Time the cycle job completed.
- Duration: The duration of time the batch took to complete.
- Message: Any custom message that was used to build the batch.
Reporting Criteria
- Days: The number of days back to look at the batch jobs that have been ran. Default is 0 showing current day only.
- Cycle Reporting: By Days will allow you to list only what is recent. All Cycles will list every statement batch job that has ever been ran.

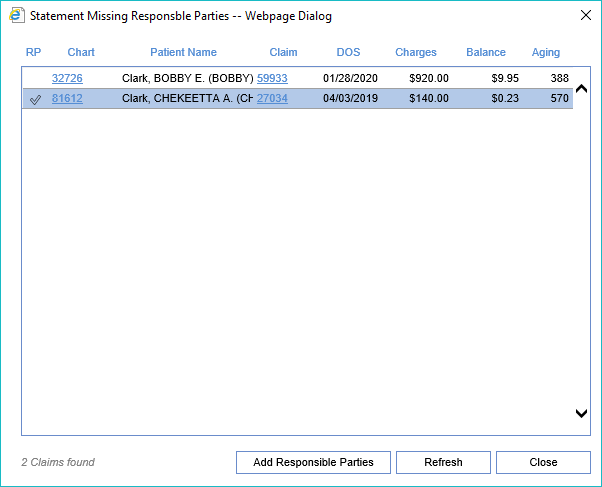
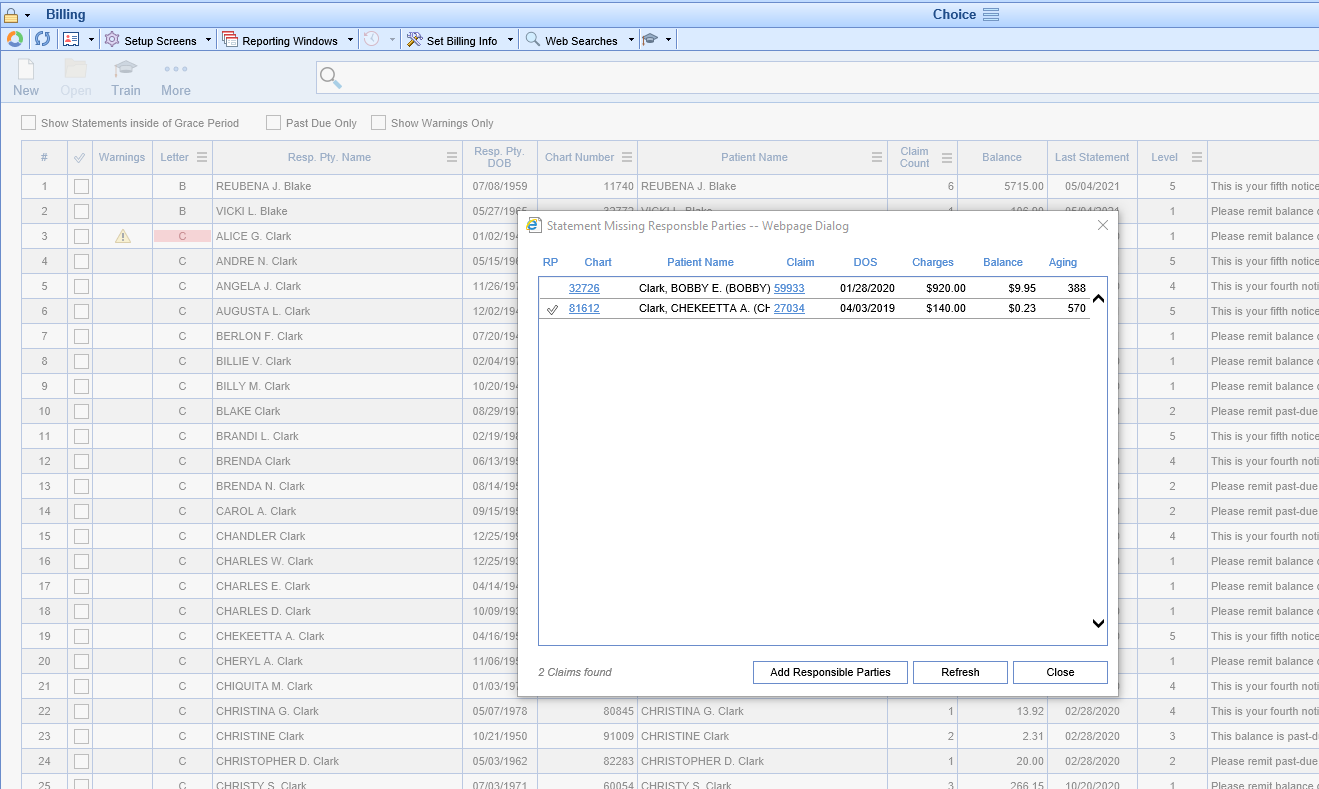
The Statement Missing Responsible Parties screen is found inside the Ready to Send Screen. This screen is designed to identify to the user whenever a claim is found that is missing a responsible party. Since the Ready to Send screen is based on responsible party no statements can be prepared with a responsible party that is missing. This screen will automatically load if missing responsible parties are found when you open the Ready to Send screen. It can additionally be accessed by clicking More button and selecting Missing Resp Parties.
Workflow
- Open the Ready to Send Screen
- The screen will automatically open if Missing Responsible Parties exists
- Click to select one of the data rows
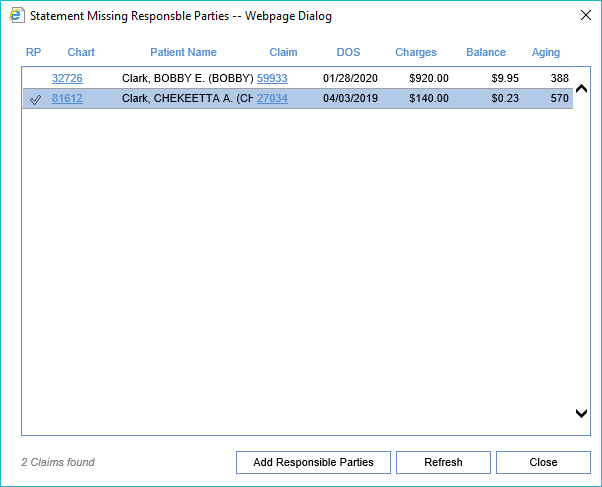
- If the Add Responsible Parties button is not greyed out then that means a Responsible Party is available on the account for the claim. Click the Add Responsible Parties button to add the responsible party automatically to the claim
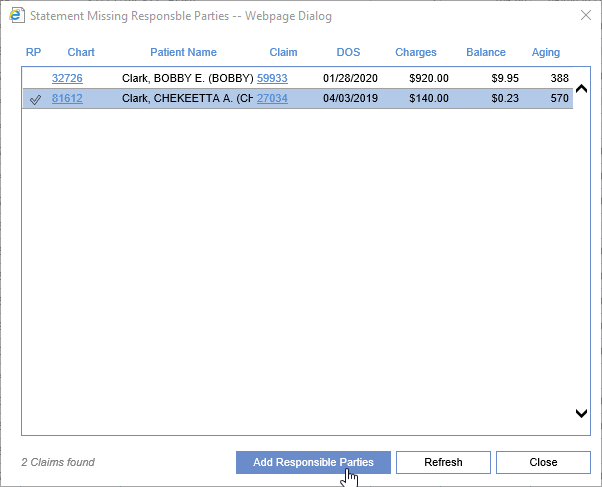
- The responsible party will be added and the row will be removed
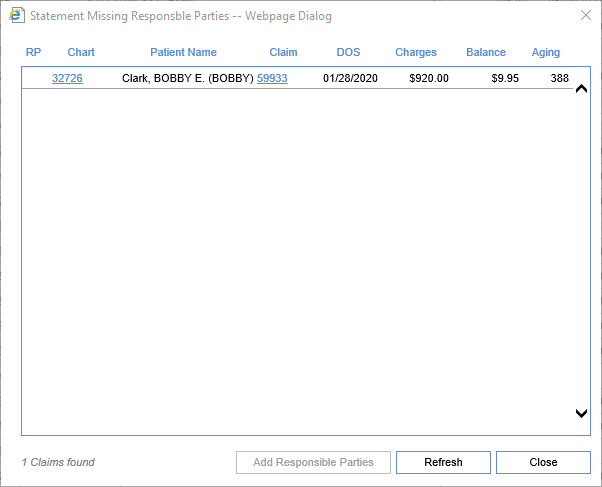
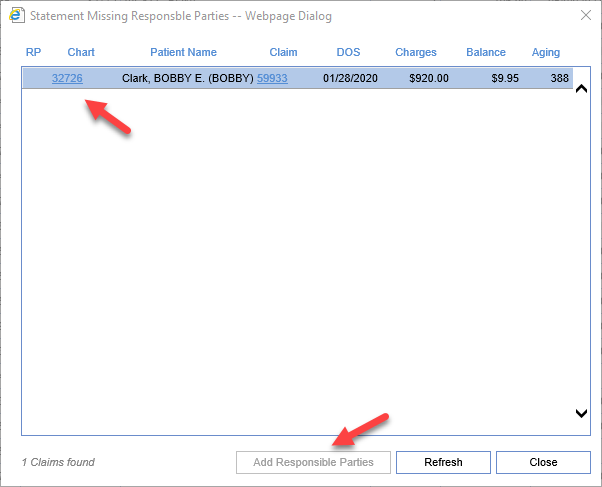
- If you select the row and the Add Responsible Parties button is greyed out then this means a responsible party does not exist on the patients account. Click the Chart Link to open Patient Setup
- Add your Responsible Party and then Save/Close the Patient Setup
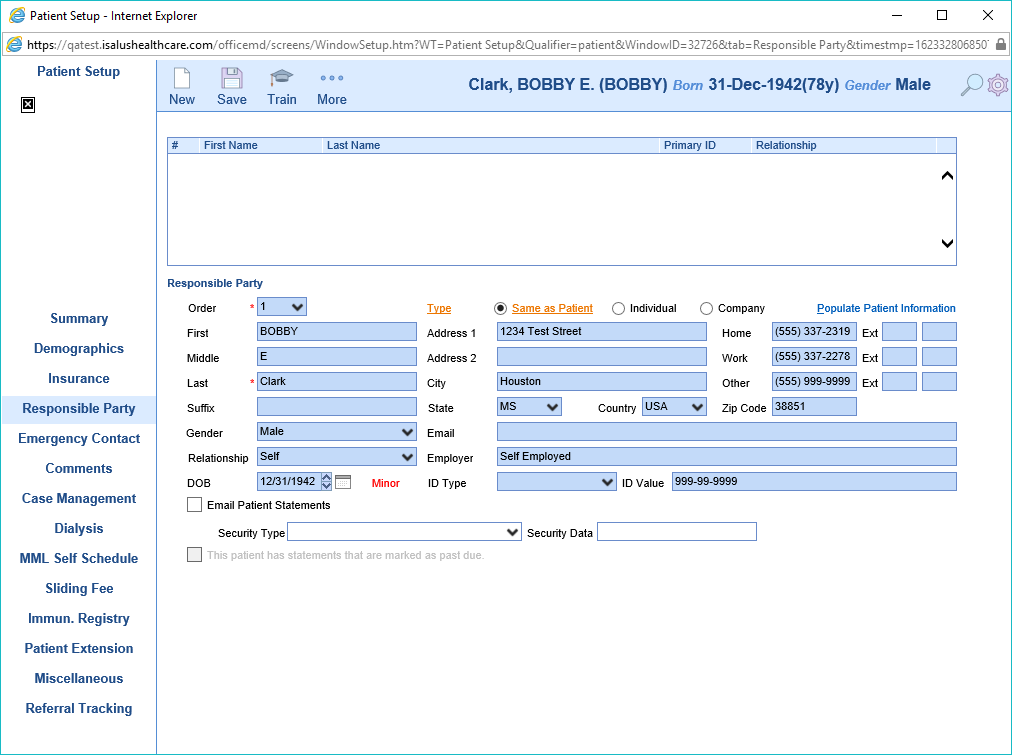
- Now the Add Responsible Parties button will be Active. Click the button to apply the responsible party to the claim
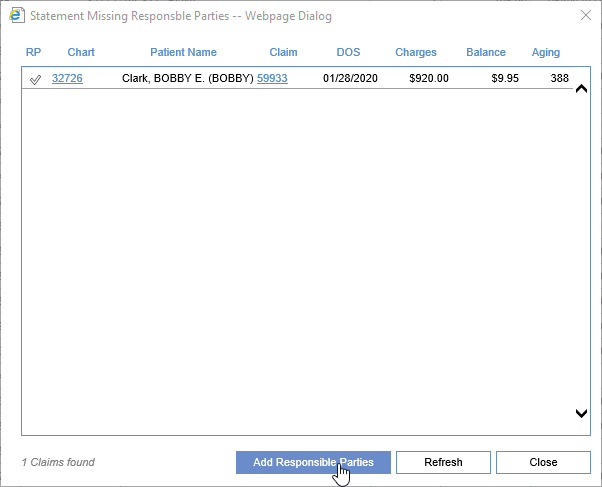
Fields
- RP: A check mark will be displayed if a Responsible Party exists on the patient account for the claim that is missing responsible party.
- Chart: The chart number attached to the claim missing the responsible party. Clicking the chart number will open Patient Setup.
- Patient Name: The patient name attached to the claim missing the responsible party.
- Claim: The claim id that is missing the responsible party. Clicking the claim number will open the Edit Claim window.
- DOS: The date of service of the claim missing the responsible party.
- Charges: The charges of the claim missing the responsible party.
- Balance: The balance of the claim missing the responsible party.
- Aging: The days aged of the claim missing the responsible party.
Buttons
- Add Responsible Parties: This button will be greyed out of no responsible parties exist for the patient. Clicking the button will apply the patient responsible party to the selected claim.
- Refresh: Clicking this button will reload the screen with the most current information.
- Close: Clicking this button will close the screen.


