Along with the new Identity Proofing via ID.me, a Prescription Queue has been added. This queue will display Electronically Prescribed Controlled Substances (EPCS) as well as non-controlled substances. It will eliminate the need for the prescriber to complete the 2FA/FOB process for each individual prescription and enable a single approval for a batch of prepared prescriptions related to a single patient. This process has passed DEA 1311 requirements and certification for Batch EPCS Approvals.
IMPORTANT: Electronically Prescribed Controlled Substances (EPCS) can only be sent from the Prescription Queue with an ID.me EPCS Credential. Please see the documentation on the ID.me Integration for more information. Non-controlled prescriptions may be queued and sent without this credential.
To begin using the Prescription Queue, the following settings need to be edited:
Role settings:
- Contact Customer Success to initiate enrollment
- Steps to complete enrollment with ID.me found here
- Role Setup/Security Screen:
- EMR > General > User Setup > Identity Proofing with access granted appropriately
- User Setup:
- Select Tooltip "Identity Proofing via ID.me"
- Create a new account or login with existing ID.me login information
This queue is accessible within a Patient Chart under Medications as well as the Prescription My Tasks list.
Follow these instructions to access this new feature:
Patient Chart within EMR
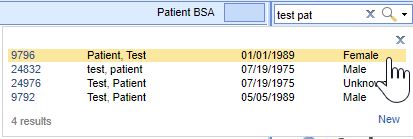
- Within the EMR Portal select patient or search for a patient.

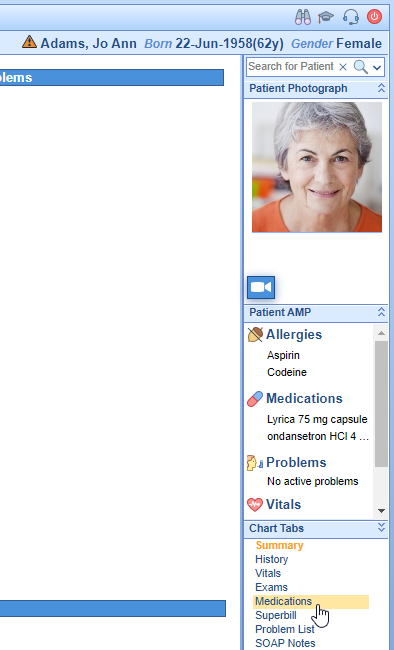
- Click on the Prescriptions/Medications chart tab.
- The prescriptions chart tab opens up to the Prescription Details/Rx Pad. This allows users to immediately add a patient reported medication or prescribe a new medication using the same process as has been used in the past. Rather than Click the Send button, users may select Queue at the bottom right of the prescription Details/Rx Pad to add it to the Prescription Queue to be reviewed, signed and sent later in a batch.
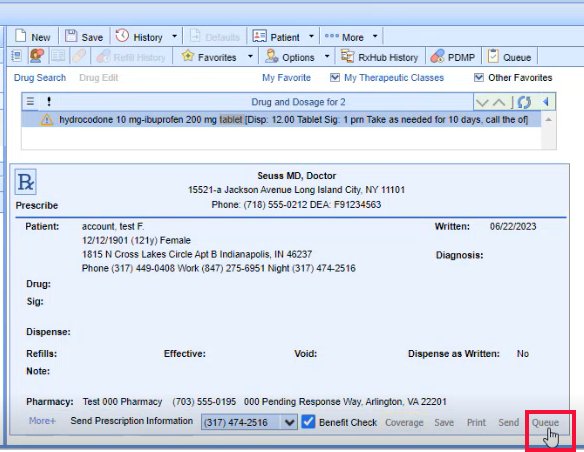
- Once the prescriber is ready to review all items within the Prescription Queue, Select the Queue button on the Prescription bar.


My Tasks List under Prescriptions
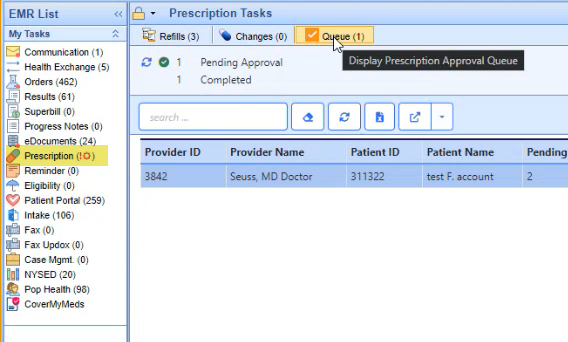
- Under My Tasks, select Prescriptions
- Select Queue on the toolbar

Patient Prescription Queue
- Provider: To view this Provider's queue
- Scheduled: To view EPCS drugs
- Non-scheduled: To view non-controlled drugs
- Interactions: To view all tabs in Interactions area including Drug Interactions, Allergy Interactions, Patient Education, Patient Guidelines, Provider Guidelines, Web Links and Interaction Comments as applicable. If an area is not applicable, that tab will not appear here.
- All: To view all medications for this patient regardless of Prescriber. This will not allow sign off/send for other providers
- Reload: To refresh screen
- Sign: To electronically sign all prescriptions marked as "Ready to Sign" in the queue. The number of prescriptions marked will be listed in parenthesis.
- Send: To Send all prescriptions marked as "Ready to Send" in the queue. The number of prescriptions marked will be listed in parenthesis.
- Cancel: To Cancel out of screen
- Interactions: To quickly view Drug Interactions and Disease Interactions
- Provider Setup: Opens Provider Setup screen for quick troubleshooting
- Patient Setup: Opens Patient Setup screen for quick troubleshooting
- Ready to Sign: Check to mark prescription to electronically sign in Step 7.
- Ready to Send: Check to mark prescription to electronically send in Step 8.

Prescription My Task List
- Under My Tasks, select Prescriptions
- Select Queue on the toolbar

- Prescription Status List: To view Prescriptions by status such as Pending Approval, Completed, etc.
- Search: To search this Provider's queue
- Clear: To clear search criteria
- Refresh List: To refresh the list view
- Export to Excel: Export results to an Excel file
- Portal Opener: Opens portal
- Options Dropdown: Lists links to
- Open Patient in EMR
- Open Patient in iScheduler
- Open Patient Setup
- Open Provider Setup
This functionality requires use of the Prescription Queue.
Introducing a streamlined solution to expedite Electronic Prescriptions for Controlled Substances (EPCS) within OfficeEMR. Addressing the time-consuming nature of meeting DEA requirements, we're implementing batch processing for EPCS scripts. This enhancement allows practices utilizing the prescription queue feature to optimize efficiency when creating prescriptions (e.g., EPCS maintenance medications) that have strict regulations preventing refills.
Current DEA regulations prevent refills for controlled substance maintenance medications and have limitations that only allow a 30-day supply for a single prescription and a maximum of 90 days to be written at one time. The current process means users must manually write and process three separate prescriptions.
Batch prescription functionality improves user efficiency by allowing the user to write the first prescription and then use the new Batch button to automatically create a series of three prescriptions from the initial EPCS prescription, each with a 30-day limit and sequential, non-overlapping effective dates. To utilize this new Batch prescription feature, practices must be using the Prescription Queue for processing of EPCS prescriptions (which means the EPCS provider must also be enrolled with IDme).
Note: Batch prescription functionality is intended to make EPCS prescribing more efficient, however it can be used with any prescription being submitted to the queue if refills are not appropriate.
Creating a series of 3 prescriptions as a Batch
Practice users that utilize IDme EPCS and the Prescription Queue will notice a new look. We have updated the screen to include a Batch option. This batch option button will streamline the creation of a series of 3 EPCS prescriptions as outlined below.

The process for using Batch prescriptions is identical to using Queue but clicking 'Batch' is what causes a series of 3 of the prescription being written to be created for processing in the Prescription Queue. Therefore, when a user wants a series of 3 prescriptions for an EPCS or other 90-day prescription to be created the user will:
- Create the first prescription for the patient the same way you currently create an EPCS prescription
- Click on Batch to have iSalus create that specific prescription as a series of 3 prescriptions that are exact duplicates except the process will increment the Effective Date by 30 days on the two additional copies
- If using the Real Time Benefit check that window will open for processing (just as it currently does when using the Queue option) and upon success the user will see a pop-up notification in the bottom right cornet of their screen that the batch was successfully added to the Prescription Queue
- Users can see the Batch prescription series in the Prescription Queue and process just as they currently do

