The My Tasks Fax (UpDox) portal is used to manage electronic faxes that are sent to your practice. This portal allows you to see new faxes received for numbers that have been assigned to you. Once received, you will use this queue to manage these faxes. Also, users can access the sent box for faxes here as well.

The Inbox within the Fax (UpDox) My Task lists provides a user with a queue of faxes that have been sent to a fax number that the logged-in user has access to. From this Inbox, users will be able to make a decision on what to do with each fax that has been received. Users may decide to send the fax as a communication, send the fax to a patient's chart, or delete the fax. This article describes how to complete these various tasks.
Inbox List
The Fax Inbox will contain a list of faxes that have been sent to a fax number that you have been assigned to. The list will contain the following details:
- Received From: This is the fax number that sent the fax to you.
- Sent To: This is the fax number that the fax was sent to.
- Posted: This is the date/time that the fax was received.
- Filename: This is the name of the file that was sent.

Inbox Search
Users will be able to use the Search box at the top of the inbox to search for an item in the inbox. You can search by any of the fields described above. Simply type in the details and click the search icon.

Inbox Work Area
By selecting a fax from the Inbox List, that fax will be displayed to the right in the Inbox Work Area. This is where you will be able to take action on an item from your inbox.
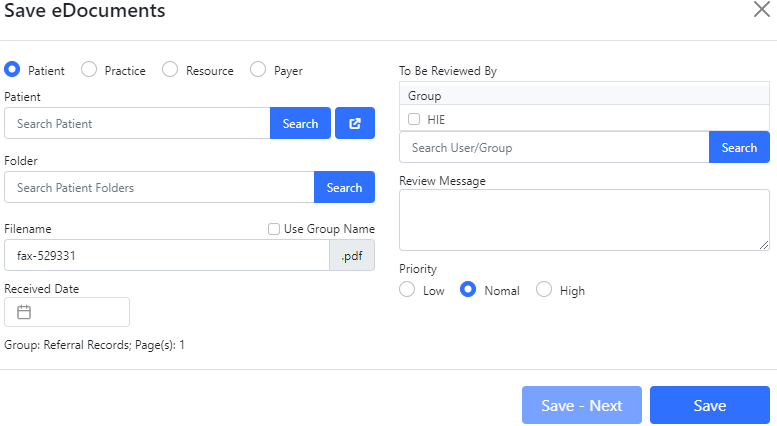
Save to eDocs
The Save to eDocs feature allows a fax to be stored into the eDocuments portion of the application. Most commonly, eDocs are associated with a patient. However, other types of documents can be stored here as well. The system supports documents related to specific resources, payers, or the company as a whole.
- Select the fax from the Inbox List
- Click Save to eDocs
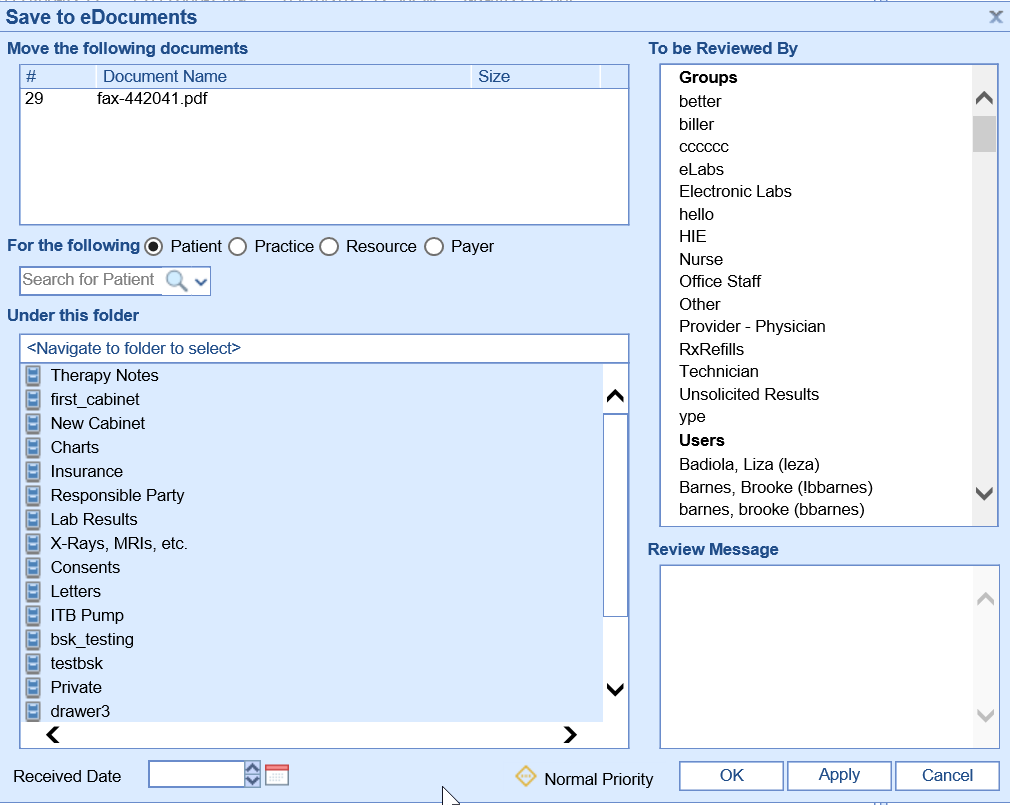
- Complete the Save to eDocs settings:
- For the Following: Based on your selection here, the search and folder navigation will change.
- Patient - Allows the document to be stored at the patient level.
- Practice - Allows the document to be stored at the practice level.
- Resource - Allows the document to be stored at the resource level.
- Payer - Allows the document to be stored at the payer level.
- Search: Based on the type of document you are saving, you will be able to search for that entity as needed.
- Under this Folder: Based on the type of document you are saving, you will see the pre-defined folder structure for that type. Select the Cabinet, Drawer, and Folder you wish to save this document to.
- To Be Reviewed By: By selecting a user to user group from this list, this document will be assigned to the appropriate individual within the My Task eDocuments list.
- Review Message: If sending a document to a user for review, this comment will accompany that review request.
- For the Following: Based on your selection here, the search and folder navigation will change.
- Click OK.
- The item will be removed from your inbox.
Send Communication
The Send Communication feature allows a fax to be sent as an attachment to a user via My Tasks - Communications. When doing this, the fax is not permanently saved into eDocuments.
- Select the fax from the Inbox List.
- Click Send Communication
- A new communication window will appear with the fax automatically attached. Complete the communication information and click Send or Task.

- The item will be removed from your inbox.
Delete
The Delete feature allows a fax to be permanently deleted. This is most commonly used for "junk" faxes that are not needed.
- Select the fax from the Inbox List.
- Click Delete
- Confirm that you would like to delete the message.
- This item will be removed from your inbox and permanently deleted.
The Sent Items within the Fax (UpDox) My Task lists provides a user with a list of faxes that have been sent out by the practice for the fax number that the logged-in user has access to. From this Sent queue, users will be able to see the status of faxes sent and re-send faxes that failed.
Sent Items List
The Fax Sent Queue will contain a list of faxes that have been sent out for fax number that you have been assigned to. The list will contain the following details:
- Status: The status of the sent fax
- Success - A green checkmark icon will be displayed to indicate the fax was successfully sent.
- Retrieve - A download icon will be displayed to indicate the fax status has not been updated. Clicking this will retrieve the most current status.
- In Process - A clock icon will be displayed to indicate the fax is in the queue to be processed. Click this will retrieve the most current status.
- Error - A red circle with an exclamation point will be displayed to indicate the fax failed.
- Sent To - The name of the recipient that received the fax.
- Fax # - The fax number that the fax was sent to.
- Subject - The subject line for the fax.
- Posted - The date the fax was sent.
- Chart # - The chart number for the patient associated with the fax.

Sent Items Search
Users will be able to use the Search box at the top of the sent items list to search for an item in the inbox. You can search by any of the fields described above. Simply type in the details and click the search icon.

Sent Items List Work Area
By selecting a fax from the Sent Items List, that fax will be displayed to the right in the Sent Items Work Area. This is where you will be able to take action on an item from your sent box.
Resend Fax
The Re-Send Fax feature allows a fax to be re-sent as needed. This is especially helpful if the fax does not send successfully the first time.
- Select the fax from the Sent Items List
- Click Resend Fax.

- Complete the Fax Details.
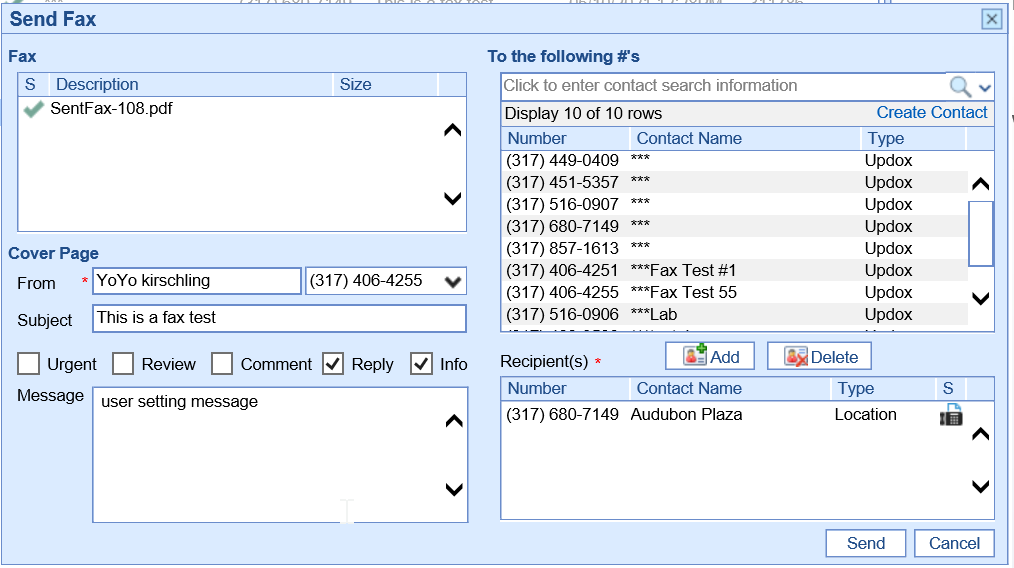
- Click Send.
Send Communication
The Send Communication feature allows a fax to be sent as an attachment to a user via My Tasks - Communications.
- Select the fax from the Inbox List.
- Click Send Communication

- A new communication window will appear with the fax automatically attached. Complete the communication information and click Send or Task.

This article describes the functionality of the  feature available within My Tasks > Fax Updox - Inbox. The PDF splitter allows users to organize pages of a received fax and upload individual pages (or groups) to separate patients and folders. This feature removes the need for third-party document management software and reduces the time spent managing the fax inbox. An article for screen definitions is available for further clarification of additional features and pop-out screens.
Designed Functionality
- Separate pages of received faxes in order to save specific pages for individual patients and eDocument locations.
- Group specific pages of a PDF that can be saved as a single file in eDocuments
- Send a Communication to user/user groups containing an attachment of the split pages
- Audit specific pages of faxes to see the associated activity
- Mark the fax in the inbox as completed from within the PDF Split window

Prerequisites
- (iSalus Support Step) Enable PDF Split Feature via Database SetupContact support to enable this feature. If you are already an Updox Faxing client within iSalus this feature would have been enabled on 3.23.23, however, the next step will still need to be completed.
- Practice eDocuments - Processing - PDF Split Role: Enable Write Access
Steps to Complete
- Within My Tasks - Fax Updox navigate to the Inbox
- Select a fax from the Inbox
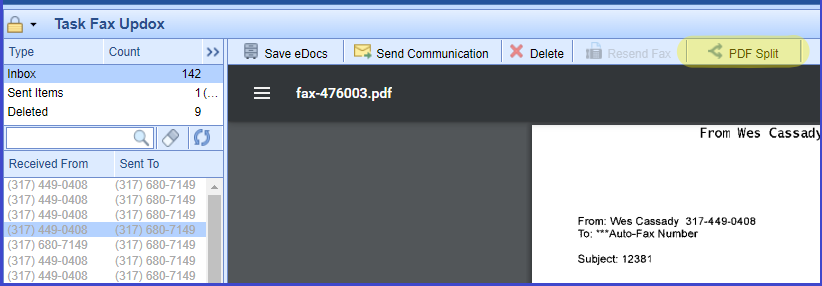
- In the Toolbar (right-hand side), select the PDF Split button.
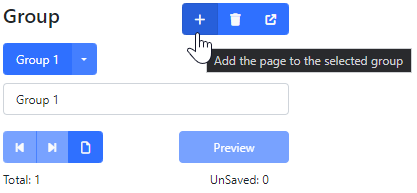
- To assign pages to a group, select the option next to Select Group, [New Group]

- This item has a default description of [New Group], you may rename this group to keep track of what documents are to be added to the Group. This description may be used as the File Name when saving to eDocuments. ex. Radiology, Referral Records
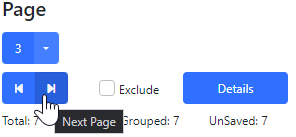
- Using the Page section, you can navigate using the Previous & Next buttons as well as the supplied dropdown. Once you are on a page that fits within the created Group, use the ADD button to assign the page to the Group
- Repeat Steps 4 - 4c until all pages are organized into each "file" you intend to upload.
- Select Preview once completed. This will display all pages associated with the selected group in the viewing pane. Confirm the contents are accurate.
- Select Save eDocs once the appropriate page or group is displayed. Use the navigation buttons or dropdown under the Page section to upload individual pages. If uploading a group, select it from the Group section and Preview it. The current item in context is indicated by the label next to the Audit:

- From the Save eDocuments window:
- Search for the appropriate Patient & Folder
- Set Filename (use group name as filename available via checkbox)
- Set Received Date (if applicable)
- Search & Select User/Group for eDocument Review & add a Review Message w/ priority if desired.
- Save - Next - This option will save & assign the eDocument and navigate to the next unsaved group.
- Once all desired pages/groups are indexed, Mark as Completed. This will add a strikethrough to the fax in the inbox and will be moved to the Fax Updox - Deleted category once refreshed.

This article describes the functionality of all buttons and pop-out screens within the PDF Split window. A quick use guide is available for step-by-step instructions on the screen.
Page Section
| Page Selection The dropdown is available to navigate between all pages non-sequentially quickly and will display the currently associated group alongside the page number. |  | ||||
| Page Navigation The arrows allow you to navigate forward and backward through the pages. |
| ||||
| Exclude Page The checkbox will allow a specific page to be removed/excluded from group assignments. The main purpose of this feature is to allow Cover Pages to be excluded when doing mass page associations. | |||||
Page Counts
|  | ||||
| Details (Page Summary) The Page Details pop-out window allows the user to view a summary of the state of each page within the session. The Details screen allows the user to gain insights into the current state of all pages within the PDF Split window. This includes Page Exclusion, Group Assignment, Saved Status, and Communication Status. |  |
The Icons seen next to the Page header indicate these same details: eDocument Saved = Communication Sent = |  |
Group Section
Page Assignment
|   |
Group Selection & Navigation
|  |
Group Name |  |
| Group Creation In addition to the [New Group] option within the dropdown, the New icon can be used to create a new group with a single click. |  |
| Group Preview IMPORTANT! The preview is used to display the prepared pages in the selected group. Prior to saving the Group to eDocuments, it MUST BE PREVIEWED to bring the group into context. |  |

Toolbar
The toolbar contains the actions related to either the Previewed/Displayed Group or Page, with the exception of the Audit which shows the historic actions related to PDF Split for the entire Fax Inbox item.
Save to eDocuments This screen contains the same functionality as other Save eDocuments / Mark for Review screens within the system. This screen allows for individual Pages or Groups to be Saved to a specified eDocument Location AND/OR assigned to a User/User Group's My Task eDocuments list for review. |  |
Send Communication This screen contains the same functionality as other Send Communication screens within the system. This screen allows for individual Pages or Groups to be attached to a communication and sent to User(s)/User Group(s). |  |
Audit History The Audit contains the relevant information to the entire fax and will show a detailed history of finalized actions for each of the pages/groups organized chronologically. |  |
Displayed Page/Group The currently Displayed Page or Previewed Group will be shown within the toolbar. The toolbar actions such as Save to eDocuments & Send Communication affect the shown Page/Group. | Page Displayed Group Previewed Group Previewed |
Working File The working file (the PDF being split) is shown in the top-right of the screen indicating which item within the Fax Inbox is being split. |  |
Completion
| Mark as Completed The 'Mark as Completed' button will place a strikethrough on the fax record and navigate to the next item within the Fax Inbox. |  |


