- Go to the Reports section, then under EMR select Connect.
- Click the icon with a plus sign in the toolbar to create a new Connect report entry.

- When asked to select the Report, scroll under the Patient header and find Lab Result Search. Then fill out the parameter list as follows:
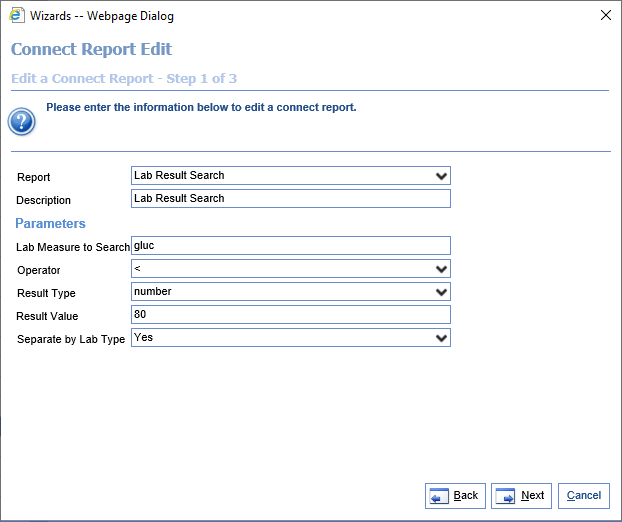
- Lab Measure to Search: Enter a part of the lab measure's name that you're hoping to search. Please note that this report will only return lab measures that match the entered string -- if you type "gluc," it will find both "GLUCOSE" and "BLOOD GLUC" but if you type "glucose" it would find "GLUCOSE" but not "BLOOD GLUC."
- Operator: The operator you would like to apply to the entered result value. For instance, if you are looking where your lab measure has a value of less than 20, for Operator you would select "<" and for Result Value you would select 20.
- Result Type: Here you select whether the result type you search will be an alpha value or a number. If alpha, it will only search result values that are not numbers to attempt to find the string entered in Result Value. If numeric, it will apply the logic entered in Operator and Result Value.
- Result Value: The value you're searching for. The report will apply the operator to the result value if search for numeric results, or search for the Result Value if alpha.
- Separate by Lab Type: This denotes whether the report should look at only the most recent lab that matches the Lab Measure to Search, or whether the report should look at each different lab measure that matches the Lab Measure to search. For instance, if given a "Gluc" and a "Glucose" whose names both match the Lab Measure to Search, if you select 'No' here, it would only return if the most recent lab value between them met the entered criteria. If you select "Yes" here, it would return the most recent "Gluc" value if it met the criteria and separately return the most recent "Glucose" value if it met the criteria.
- Select the desired fields for the report to show, or simply select 'All.' Then hit 'Finish,' then 'Close,' to complete adding the report. The available fields are as follows:
- Chart: The chart number from the patient's account.
- Address 1: The first line of the patient's address.
- Address 2: The second line of the patient's address.
- City: The city from the patient's address.
- Home Phone: The patient's primary "Home Phone" number.
- Last Lab Result Date: The date of the lab measure that met the selected criteria.
- Lab Measure: The name of the lab measure that met the selected criteria.
- First Name: The first name of the patient.
- Last Name: The last name of the patient.
- Result Value: The lab result value that meets the selected criteria.
- State: The state from the patient's address.
- Zip: The zip code from the patient's address.
-
-
-
-
-
-
- Entering a New Claim from the Billing Portal
- Copy an Existing Claim
- Modifying Multiple Claims
- Add a Note to a Claim
- Add a Medicare ICN to a Secondary Claim
- Add an NDC Number to a Claim
- Fixing an Inactive Procedure Validation Error
- Procedure Code - Billing Setting
- Missing Procedure
- Missing Diagnosis
- Missing Responsible Party
- Missing Primary Insurance
- Missing Rendering Provider
- Missing Service Location
- Missing Signature
- NDC Errors
- Claim Issues - Global Period
- Introduction to Claim Comments
- Creating a Claim Comment
- Accessing Claim Comments from the Transaction History
- Insurance Profiles
-
-
-
-
- Deposits - Poster - Day to Day Process
- Deposits - Manager Priorities
-
-
- Carrier Payment Mismatch
- Claim Not Found
- Claim-Level Adjustment Found
- Claim Supplemental Amount Found
- ERA Missing Procedures
- Invalid Recoup
- Missing Payer
- Missing Payment Information
- Patient Import Error
- Payer Level Mismatch Error
- Procedure Status Conflict
- Procedure Level Conflict
- Patient Responsibility Inconsistent
- Deposit Claim Error - Missing Procedures
- Creating a New Deposit
- Importing Patient Payments
- Add a Claim to a Deposit
- Edit Claim Details in a Deposit
- Deposit Actions
- Link a paper EOB to a Deposit
- Finding Deleted Deposits
-
-
- Initial Setup of Scanning Solution
- Open Patient in eDocuments
- Navigate the Folders
- Import a Document
- Send a Document for Review
- Move, Copy, Delete and Export a Document
- Printing an eDocument
- Fax a Document
- Add Patient Education
- Save as Faxable
- Chrome Scanning Screen Definitions
- Using the Filter to Create Multiple Files to Upload When Scanning
- Chrome Scanning Quick Use Guide
- Sharing eDocuments to Patients via MML
-
-
-
-
-
- Access the Prescriptions Chart Tab
- Document a Patient Reported Medication
- Pull a Patient Medication History Report
- Add Medications from the RxHub Medication History
- Print a Patient's Medication List
- Send an Electronic Prescription from a Drug Search
- Send an Electronic Prescription from Rx Favorites List
- Send an Electronic Prescription Using Mobile EPCS
- Send an Electronic Prescription Using USB Token EPCS
- New Prescription EPCS Rules
- Print a Prescription from a Drug Search
- Print a Prescription from Rx Favorites List
- Cancel Future Prescription Fills
- Copy a Prescription
- Refill a Medication
- Run a PDMP Report
- Search for a Drug
- Search for a Pharmacy
- Stop/Discontinue a Medication
- Stop/Discontinue Multiple Medications at Once
- View a Patient's Active Medication List
- View Medication Fill Status
- View Medication Refill History
- View Stopped/Discontinued Medications
- Prescription Details
- How to Override the NADEAN Requirement When Prescribing Buprenorphine for Pain
- Electronic Prescriptions SCRIPT 2017071 Release Checklist
-
-
- Overview of Telehealth
- Setup Telehealth
- Schedule a Telehealth Visit (Optional)
- Initiate the Telehealth Session
- Conduct the Telehealth Visit
- Complete the Telehealth Visit
- Telehealth Visit (Patient Perspective - iOS/Android Required)
- Telehealth Billing FAQ
- Telehealth Billing Decision Trees
- Create a Bluebar in a Superbill for Telehealth
- Create a Telehealth Service Location
- Create a Telehealth Procedure Code (Fee Grouping)
- Create a Telehealth Procedure Code (Custom Code)
- Bill a Telehealth Visit from the EMR Superbill
- Telehealth Preferred Contact
-
-
-
- Automatically Assign an Intelligent Intake via Appointment Type
- Manual Intake Assignment Locations
- Assign an Intake Using the Intake Schedule
- Assign an Intake Using the Quick Pay Window
- Assign an Intake from iScheduler Using Intake Assignment
- Assign an Intake from the EMR Using Intake Assignment
- Initiate the Intake on the iPad Using the Intake Schedule or Quick Pay window
- Initiate the Intake on the iPad Using the Intake Assignment Window
- Manually Send An Intake Link to a Patient via Intake Assignment
-
- Complete Intake Forms Using a Link (Mobile Device)
- Complete Intake Forms at Home (Desktop)
- Complete Forms in the Office (Practice iPad)
- Complete Intake Forms by Logging Into MyMedicalLocker (Mobile Device)
- Intake Form | Patient View - Demographics
- Intake Form | Patient View - Responsible Party
- Intake Form | Patient View - Emergency Contact
- Intake Form | Patient View - Appointment Reminders
- Intake Form | Patient View - Photo (Photo ID)
- Intake Form | Patient View - Insurance Cards
- Intake Form | Patient View - Allergies
- Intake Form | Patient View - Medications
- Intake Form | Patient View - Templates (History, ROS, HPI, etc.)
- Intake Form | Patient View - Letters (Consents, Releases, Signature Forms)
- Intake Form | Patient View - Copay Collection
- Intake Form | Patient View - Outstanding Balance Collection
- Intake Form | Patient View - Preferred Pharmacies
-
- Merge Practice Management Information from an Intake via Intake Schedule or Quick Pay Window
- Merge Practice Management Information from an Intake using the My Task - Patient Portal
- Merge the Clinical Information from an Intake Using Reconciliation Window (Allergies & Medications)
- Merge the Clinical Information from an Intake (Templates)
- View the Completed Signature Forms in iScheduler
- View Completed Signature Forms in EMR
-
-
- Check In-Out Dashboard Summary
- Getting Started - Practice & Role Required Settings
- Getting Started - A Quick Reference for Users to Get Started
- User Settings Written Tutorials
- User Settings Video Tutorials
- Check In/Out Dashboard Overview Summary
- Check In-Out Dashboard Overview Video Detailed
- Check In/Out Dashboard Overview Written Detailed
- User Setting to Auto Copy Patient ID to Patient Photo
- User Setup for Single Monitor Dashboard Viewing
- Dashboard Features and Updates
- Beta Client Feedback Enhancements Completed
-
-
- My Tasks - Orders | Overview
- Select an Order in the My Task List
- Print a Requisition from My Task Orders
- Open Patient in the EMR from My Task Orders
- Complete an Advanced Search for Orders
- Complete Order Fulfillment Details via My Task - Orders
- Setting Appointment with Service Facility in Order Appointment Screen
- Change the Processor on an order via My Task - Orders
- Change the Status of an Order via My Task - Orders
-
-
-
-
-
- Overview of My Tasks - Prescriptions - Refills
- Configure Refill Queues (Assignment Setup)
- Manage the Prescription Refills Task Queues
- Link an unsolicited refill request to a patient
- Change the owner of a prescription refill request
- Respond to a prescription refill request - Approve/Replace/Deny/Reassign
- Delete a Prescription Refill Request
- Reassign several refill requests at once
-
- Overview of My Tasks - Prescriptions - Changes
- Configure Changes Queue (Assignment Setup)
- Manage Prescription Change Task Queue
- Link an Unsolicited Change Request to a Patient
- Change the Owner of a Prescription Change Request
- Respond to a Prescription Change Request - Approve/Replace/Deny/Reassign
- Delete a Prescription Change Request
- Reassign Several Change Requests at Once
-
-
-
-
-
-
- Overview of Choice Analytics
-
- Overview of New Billing Analytics
- Building a New Report with New Billing Analytics
- Connecting an Existing New Analytics Report to a Local Connection File
- Adding a Worksheet and PivotTable in Billing Analytics
- Adding a Chart to Billing Analytics
- Adding a Slicer to Billing Analytics
- New Billing Analytics Data Dictionary
- New Billing Analytics Drill-through
- New Billing Analytics Pivot Examples
- New Billing Analytics Dashboard Example
- New Billing Analytics Excel Setting: Pivot Table Report Layout
- New Billing Analytics Excel Setting: Pivot Table Design
- Connecting to New Billing Analytics with Power BI
-
- Overview of Denial Analytics
- Building a New Report with Denial Analytics
- Connecting with an Existing Denial Analytics Report
- Adding a Worksheet and PivotTable in Denial Analytics
- Denial Analytics Data Dictionary
- Denial Analytics Drill-Through
- Denial Analytics Dashboard Example
- Denial Analytics Pivot Examples
- Denial Analytics is Live!
-
-
- Run the Data Export
- Open a Data Export File
- InfoDive Data Extract
- Demographics Export
- Insurance Export
- Responsible Parties Export
- Appointments Export
- Authorizations Export
- Emergency Contacts Export
- Patient Comments Export
- Vitals Export
- Allergies Export
- Problem List Export
- Prescriptions Export
- Progress Notes Export
- Letters Export
- eDocument Metadata
- Patient Communications Export
- Payer Export
- Fee Schedule Export
- Claims Export
- Claim Procedure Lines Export
- Payments Export
-
-
- 2026 MIPS Reporting Year Summary
- 2025 MIPS Certification ID
- MIPS Assist Program 2025
- Check Your MIPS Participation Status
- MIPS 2024 Individual vs. Group Reporting
- MIPS 2024 Quality Payment Program Special Statuses
- How to Apply for a MIPS 2023 COVID Exception
- MIPS 2024 Promoting Interoperability Performance Category
- MIPS Quality Performance Category 2024
- MIPS 2024 Improvement Activities Performance Category
- How to Enable the FHIR API's for MIPS Reporting
- Add a Clinician to the MIPS Dashboard 2024
- Edit a Clinician on the MIPS Dashboard
- Delete a Clinician from the MIPS Dashboard
- Mingle Health Quality Data Extract File Contents
- Setup Mingle Health/Registry Quality Data Extract Settings
- Extract Mingle Health Quality Data
- Viewing Clinician Promoting Interoperability Scores
- Conduct a Security Risk Analysis
- Electronically Prescribe Medications
- Query of Prescription Drug Monitoring Program (PDMP)
- Provide Electronic Access
- Referral Loops - Send Health Information
- Referral Loops - Receive & Incorporate Health Information
- Public Health and Clinical Data Exchange
- ONC 2015 Edition CMS EHR Certification ID (2025 Reporting Year)
- How to Print MIPS Promoting Interoperability Report
- Example Patient FHIR API Welcome Email
- MIPS Promoting Interoperability FAQ's
- Additional MIPS Resources
-
- Add a Provider to the Meaningful Use Dashboard
- View Provider MU Promoting Interoperability Scores
- Delete a Provider from the MU Dashboard
- Meaningful Use Quality Reporting
- Conduct a Security Risk Analysis
- Implement 5 Clinical Decision Support Interventions
- Enable Drug-Drug and Drug-Allergy Interaction Checks
- Computerized Provider Order Entry (CPOE)
- Send Electronic Prescriptions
- Send Referral Summary of Care
- Receive and Incorporate Electronic Summary of Care Documents
- Reconcile Clinical Information
- Provide Electronic Access to Health Information
- Provide Patient Specific Education
- View, Download, Transmit
- Send Secure Messages
- Public Health and Clinical Data Registry Reporting
-
- ONC HT1 Readiness - What's Changing for Your Practice
- Practice Action 2026 CCDA Transition for Third Party Vendors
- 2026 CCDA Style-sheet
- 2026 CCDA Company Settings (New)
- Technical Overview of Persistent Identifiers for 2026 CCDA
- What Persistent IDs Mean for Your Practice (2026 CCDA)
- HT1 Required EMR Field Updates
- HT1 SDOH Panel Support via EMR Templates
- HT1 EHI (B10) Export Updates
- HT1 Public Health eICR Update to v3.1.1
- 2026 Reminder for MIPS Provide Patient Access Measure
- EMR Field Updates with USCDIv3 Value Sets
-
-
-
-
-
- How do I fix a rejection for "Other Payer Insurance Type Code"?
- How do I fix a rejection for "Line Level Procedure Code is Missing or Invalid"?
- How do I fix a rejection for "Claim Level Date is Missing or Invalid"?
- How do I fix a rejection for "Claim Frequency Code"?
- How do I fix a Smart Edits rejection?
- How do I fix a rejection for "National Drug Code must be 11 Bytes"
-
- What do I do if I haven't received an ERA from a payer?
- Why don't I see my claim when adding to a deposit batch?
- How can I add a custom adjustment to a manual EOB?
- What are the default/original CMS-1500 (HCFA) Form Setting Values?
- How do I write-off a patient balance on a claim?
- How do I switch my statements from RevSpring to Data Media
- Can I submit electronic claims to a payer which says "Invalid Payer ID" in Payer Setup?
- How do I post a returned (NSF) check to a patient's account?
- eProvider Solutions Emergency Access Clearinghouse Connection Option
-
-
-
- Resolving PDF Printing Issues after Windows 10 Update to build 2004 using Internet Explorer
- 2021 EM Coding Guidelines - Our Plan
- Is OfficeEMR 21 CFR, Part 11 Compliant?
- How do I add an alert to a patient's chart?
- How do I remove an attachment from a communication?
- Gmail / Google Email is not receiving my 2FA Token for logging into OfficeMD.net
- Text Content Display Issue in OfficeEMR
- Scanning Dynamsoft Install Caught in Install Loop
-
- Electronic Prescriptions FAQ
- I do not have a .PFX saved on my computer and I am unable to complete the EPCS Mobile Authentication setup in iSalus. How do I get the .PFX file?
- Add a pharmacy as a Favorite
- RxHub History Request: Eligibility has not been run for patient
- Prescription Error: Data on root level invalid line 1 position 1
-
- How do I know who closed an order?
- What changes should I expect in TOLMARsync when integrated with OfficeEMR?
- Where can I view Eligard medication orders in TOLMARsync?
- What features and functions will I continue performing in TOLMARsync?
- How do I remove a result linked to the wrong patient?
- How are electronic lab results matched to orders?
-
-
-
- What happens if I remove an item from my history template that exists on my Intelligent Intake questionnaire?
- What happens if I remove an item from my encounter based template that exists on my Intelligent Intake questionnaire?
- What happens if a remove a template from Intelligent Intake if that questionnaire has already been assigned to patients?
- How do I enable the use of Intake Links for Intelligent Intake?
- Intake on iPad Crashes When Using Camera for Patient Images
-
- Medicare Telehealth FAQ's March 17, 2020
- What is the difference between Telemedicine, Telehealth, eVists and Virtual Check-In?
- Telehealth Billing FAQ
- Unable to start a Telehealth Session
- Unable to Connect
- Logged Out After AnywhereCare Visit Ends
- Session Timer Logging Me Out During AnywhereCare Visit
- Getting a "Save Place in App" Screen
- Why does the user see this message: "The following permissions are required to start a telehealth session..."?
- Patient is Receiving Two Separate Text Messages
-
- What should I do when I can not access OfficeEMR?
- What is iSalus Healthcare's policy and plan for Internet Explorer?
- How can I keep OfficeEMR more secure?
- How do I stop Microsoft Edge browser from overriding Internet Explorer?
- How do I run Microsoft Edge in Internet Explorer mode?
- How does the Customer Support Details screen work?
- How to Contact Support
- How to Generate/Use the Support Pin
-
-
-
- Business Unit Setup
- Billing Queue Setup
-
- Procedure Codes Overview
- Procedure Advanced Search
- Adding a New Procedure Code
- Setting up Fee Groups/Individual Fees
- Updating Existing Charge/Fee Amounts
- Insert or Update an RVU Value
- Add an NDC Number to a Procedure Code
- Updating the Sliding Fee Scale
- Changing the CPT Group
- Procedure Code - Do Not Bill Flag
- Diagnosis Code Group Setup
- Insurance Profile Setup
-
- How to Update Company Settings
- Company Setting: Abnormal Results Processor
- Company Setting: Automated Reminder Email Consent
- Company Setting: Automated Reminder Phone Consent
- Company Setting: Automated Reminder Text Consent
- Company Setting: Auto Codify Problem List Codes to SNOMED
- Company Setting: Auto Create Temporary MML Account
- Company Setting: Auto Post ERA Delay
- Company Setting: Blackout Appointment Status ID - From
- Company Setting: Blackout Appointment Status ID - To
- Company Setting: CCD Version
- Company Setting: Change Claim Status for Completed Procedures
- Company Setting: Co-Pay receipts are applied to copay procedures
- Company Setting: Credit Deposit Claim Status
- Company Setting: Create Deposit Credit Error
- Company Setting: Default Vitals units to English (vs. Metric) in the EMR
- Company Setting: Display Co-Pay on Printed Schedule
- Company Setting: Display Interaction Alerts on Drug History
- Company Setting: Display Interaction Alerts on Drug Search Grids
- Company Setting: Display Interaction Alerts on the RxPad
- Company Setting: Display Level 1 Drug-Allergy Interaction Alerts
- Company Setting: Display Level 1 Drug-Disease Interaction Alerts
- Company Setting: Display Level 1 Drug-Drug Interaction Alerts
- Company Setting: Display Level 2 Drug-Allergy Interaction Alerts
- Company Setting: Display Level 2 Drug-Disease Interaction Alerts
- Company Setting: Display Level 2 Drug-Drug Interaction Alerts
- Company Setting: Display Level 3 Drug-Disease Interaction Alerts
- Company Setting: Display Level 3 Drug-Drug Interaction Alerts
- Company Setting: Display Level 9 Drug-Drug Interaction Alerts
- Company Setting: Display Outstanding Balance on Printed Schedule
- Company Setting: Do not run procedure/diagnosis validation for DoNotBill
- Company Setting: EPA Processor
- Company Setting: EMR Codified Allergy Required
- Company Setting: FHIR CCD Includes Appointment ID
- Company Setting: Full Contractual Adjustment Settings
- Company Setting: Include Physical Exams
- Company Setting: Insurance Profile
- Company Setting: Intake Create MML Account
- Company Setting: Intake Send Links
- Company Setting: iScheduler Primary Appointment Color (Background)
- Company Setting: iScheduler Secondary Appointment Color (Right Side Bar)
- Company Setting: Lab Result Via Collection Date
- Company Setting: Maximum number days password is valid, (0=always)
- Company Setting: Minimum password length
- Company Setting: Most recently used password count
- Company Setting: Normal Results Processor
- Company Setting: Open Dialysis Visits Chart Tab when Adding Visit
- Company Setting: Patient Roster Admission Date Defaulted
- Company Setting: Patient Roster Recurrence Pattern Defaulted
- Company Setting: Patient Roster Resource Required
- Company Setting: Prescription Settings and Rules - Mobile Phone - Use Wild Card Search
- Company Setting: Prescription Settings and Rules - MyMedicalLocker - MyMedicalLocker Prescription Refills
- Company Setting: Prescription Settings and Rules - MyMedicalLocker - MyMedicalLocker Prescription Refills Appointment Weeks
- Company Setting: Prescription Settings and Rules - MyMedicalLocker - MyMedicalLocker Prescription Refills Local Pharmacies
- Company Setting: Prescription Settings and Rules - Prescription Refills - Refill PIN Requirement
- Company Setting: Prescription Settings and Rules - Prescription Refills - Change Status when Refilling a Prescription
- Company Setting: Prescription Settings and Rules - Prescription Refills - Default prescription assignment user ID
- Company Setting: Prescription Settings and Rules - Prescriptions - Send RxCode as part of Electronic Prescription
- Company Setting: Prescription Settings and Rules - Prescriptions - Minimum Action Days, 0 = No Action
- Company Setting: Prescription Settings and Rules - Prescriptions - Display Prescriber Signature Image
- Company Setting: Prescription Settings and Rules - Prescriptions - NADEAN Pain Override Diagnosis Code
- Company Setting: Prescription Settings and Rules - Prescriptions - Print RX Using PDF
- Company Setting: Prescription Settings and Rules - Prescriptions - Use Company Profile Name
- Company Setting: Prescription Settings and Rules - Prescriptions - Use Company Profile Address
- Company Setting: Prescription Settings and Rules - Prescriptions - Use Company Profile Phones
- Company Setting: Prescription Settings and Rules - Prescriptions - Use Company Profile Email
- Company Setting: Prescription Settings and Rules - Prescriptions - PIN Requirement
- Company Setting: Prescription Settings and Rules - Prescriptions - Display Pharmacy Product Type
- Company Setting: Prescription Settings and Rules - Prescription Refills - Display Days Supply
- Company Setting: Prescription Settings and Rules - Prescriptions - Display Tiers
- Company Setting: Prescription Settings and Rules - Prescriptions - Use RxHub
- Company Setting: Prescription Settings and Rules - Prescriptions - Send Extended Prescription Fields
- Company Setting: Prescription Settings and Rules - Prescriptions - Display Secondary Plan Name
- Company Setting: Prescription Settings and Rules - Prescriptions - Display Plan Name ID
- Company Setting: Prescription Settings and Rules - Prescriptions - Display All Payer Drug Strengths and Forms
- Company Setting: Prescription Settings and Rules - Prescriptions - Use Signature Dosage to find Dispense Method
- Company Setting: Prescription Settings and Rules - Prescriptions - Check State DAW Messages
- Company Setting: Prescription Settings and Rules - Prescriptions - Require Height/Weight for Electronic Prescriptions
- Company Setting: Prescription Settings and Rules - Prescriptions - RxFill Indicator
- Company Setting: Prescription Settings and Rules - Prescriptions - Check Pharmacy Operating Status
- Company Setting: Procedure List for Vitals Timeline Wireframe Summary
- Company Setting: Progress Notes (Base) CCDA Type
- Company Setting: Progress Notes (Group Note) CCDA Type
- Company Setting: Prompt Insurance Assignment for Appointments Missing an Insurance
- Company Setting: Receipt Co-Pay applied to multiple procedures
- Company Setting: Removal of payments is done using the reversal process
- Company Setting: Reporting Year
- Company Setting: Resource View
- Company Setting: Run Real-Time Prescription Benefit Check (RxBC)
- Company Setting: Run real time prescription benefit check (RxBC)
- Company Setting: SBR 05 HMO Payer SysIDs
- Company Setting: Send Receipt Detail to MML Account
- Company Setting: Skip auto-posting of Co-Pay receipts
- Company Setting: Skip Auto-posting of Coinsurance receipts
- Company Setting: Skip auto-posting of Deductible receipts
- Company Setting: Split A/R into two buckets in cube, 0-15 and 16-30
- Company Setting: Unsolicited Results Processor
- Company Setting: Wireframe List for Vitals Timeline Wireframe Summary
- Company Setting: Webservice Setup Filter: Claim Procedure Codes
- Company Setting: Webservice Setup Filter: Document Folder Identifiers
- Company Setting: Webservice Setup Filter: Problem List Diagnosis Codes
- Company Setting: Override Loop 2320 SBR09
- Company Setting: CKCC Appointment Indicator
- Company Setting: Default 2FA Setting for Users
- Company Setting: Allow auto posting of prepayments for selected receipts
- Company Setting: Default alternate to rend. provider when blank
- Company Setting: Use Company Profile Practice Address for Return Address
- Company Setting: Enable Patient Demographics Sex for Clinical Use
- Company Setting: Check for New or Established Patient Procedure
- New Company Setting - Override Default referring to rend. provider when Medicare Requirement
- Company Setting - Populate Primary ICN Number When This Payer is the Secondary
- Company Setting: Patient Cost Estimator - Print Font
- Company Setting: Send Patient Notification on Approved Cost Estimate
- Company Setting: Default Benefit Type for Patient Eligibility
-
-
-
- How to Update the Prescription Rules and Settings
- Prescription Settings - RxFill Indicator
- Prescription Settings - Mobile Phone - Use Wild Card Search
- Prescription Settings - MyMedicalLocker - MyMedicalLocker Prescription Refills
- Prescription Settings and Rules - MyMedicalLocker - MyMedicalLocker Prescription Refills Appointment Weeks
- Prescription Settings and Rules - MyMedicalLocker - MyMedicalLocker Prescription Refills Local Pharmacies
- Prescription Settings and Rules - Prescription Refills - Display Days Supply
- Prescription Settings and Rules - Prescription Refills - Refill PIN Requirement
- Prescription Settings and Rules - Prescription Refills - Default prescription assignment user ID
- Prescription Settings and Rules - Prescription Refills - Change Status when Refilling a Prescription
- Prescription Settings and Rules - Prescriptions - Send RxCode as part of Electronic Prescription
- Prescription Settings and Rules - Prescriptions - Minimum Action Days, 0 = No Action
- Prescription Settings and Rules - Prescriptions - Prescriber Signature Line, * to blank
- Prescription Settings and Rules - Prescriptions - Display Prescriber Signature Image
- Prescription Settings and Rules - Prescriptions - Print RX Using PDF
- Prescription Settings and Rules - Prescriptions - Use Company Profile Name
- Prescription Settings and Rules - Prescriptions - Use Company Profile Address
- Prescription Settings and Rules - Prescriptions - Use Company Profile Phones
- Prescription Settings and Rules - Prescriptions - Use Company Profile Email
- Prescription Settings and Rules - Prescriptions - PIN Requirement
- Prescription Settings and Rules - Prescriptions - Display Tiers
- Prescription Settings and Rules - Prescriptions - Display Tiers
- Prescription Settings and Rules - Prescriptions - Use RxHub
- Prescription Settings and Rules - Prescriptions - Send Extended Prescription Fields
- Prescription Settings and Rules - Prescriptions - Display Secondary Plan Name
- Prescription Settings and Rules - Prescriptions - Display Plan Name ID
- Prescription Settings and Rules - Prescriptions - Use Signature Dosage to find Dispense Method
- Prescription Settings and Rules - Prescriptions - Use Signature Dosage to find Dispense Method
- Prescription Settings and Rules - Prescriptions - Check State DAW Messages
- Prescription Settings and Rules - Prescriptions - Check Pharmacy Operating Status
- Prescription Settings and Rules - Prescriptions - Require Height/Weight for Electronic Prescriptions
- Prescription Settings and Rules - Prescriptions - RxFill Indicator
-
- Sign Up & Implement the Intelligent Intake
- Setup Access for Intelligent Intake
- Setup New Letters and Templates for Intelligent Intake
- Access the Intelligent Intake Form Setup Screen
- Create a New Intake Form
- Setup a New Intelligent Intake Form
- Setup Intelligent Intake Patient Communication Preferences
- Assign Intelligent Intake Form to Appointment Types
- Inactivate an Intelligent Intake Form
- Remove or Add Intelligent Intake Required Field
- Remove or Add Intake Field
- Live Training, Questions and Answers - Intelligent Intake
- Template Demographics for Intake Templates (Age, Gender, Diagnosis, Payer/Financial Class)
- Intake Template Filter for Intelligent Intake (Last Completed Date, Specific Date)
- Intake Letter Filters for Intelligent Intake (Insurance & Date)
-
- Overview of Roles
- Assign a screen to a role
- Assign a Role to a User
- Add a new role
- EMR - General - User Setup - Templates New Tab - Orders
- External - MyMedicalLocker - ToDo - Task - Patient Portal Role
- Practice - Patient Intake - Setup - Intake Assignment Role
- Practice - Patient Intake - Setup - Intake Assignment Schedule Role
- Practice - Patient Intake - Setup - Intake Setup Role
- Practice - General - User Setup - User Setup (new)
- Practice - Patient Intake - ToDo - Task - Intelligent Intake
- Practice eDocuments - Processing - PDF Split Role
- Practice - General - Security - User Two Factor Authentication
-
- User Setting: Arrangement Order (Arrange By in My Task - Orders)
- User Setting: Automated Dialysis Letter Template
- User Setting: Automated Fax Auto Send
- User Setting: Claim Search Time Period
- User Setting: Default Order By
- User Setting: Default Time Increment
- User Setting: Display Amounts within Superbill
- User Setting: Display detailed medication information in Summary
- User Setting: Display Today's Allergy History
- User Setting: Display Today's Assessment History
- User Setting: Display Today's Chart Share History
- User Setting: Display Today's Extension History
- User Setting: Display Today's Exam History
- User Setting: Display Today's Goal History
- User Setting: Display Today's History of Present Illness (HPI) History
- User Setting: Display Today's Letter History
- User Setting: Display Today's Order History
- User Setting: Display Today's Patient Education History
- User Setting: Display Today's Prescription History
- User Setting: Display Today's Problem List History
- User Setting: Display Today's Review of System (ROS) History
- User Setting: Display Today's SOAP Note History
- User Setting: Display Today's Superbill History
- User Setting: Display Today's Treatment Plan History
- User Setting: Display Today's Vitals History
- User Setting: EMR Primary Appointment Color (Background)
- User Setting: EMR Secondary Appointment Color (Right Side Bar)
- User Setting: EMR Soap Secondary Sign Off Percentage
- User Setting: EMR Secondary Sign Off Percentage Start Date
- User Setting: Finding Narrative (Abnormal)
- User Setting: Finding Narrative (Normal)
- User Setting: Hide Order Processor and Status in Result Findings
- User Setting: Maximum claims per deposit page
- User Setting: Patient Search Maximum Rows
- User Setting: Problem List Favorite Search Days
- User Setting: Problem List Favorite Search Type
- User Setting: Problem List Favorites Search Max Rows
- User Setting: Problem List Summary View
- User Setting: Procedure List for Vitals Timeline Wireframe Summary
- User Setting: Prompt for Dialysis Visit delivery mechanism
- User Setting: Run Real Time Prescription Benefit Check (RxBC)
- User Setting: Search List Type
- User Setting: Timezone Zip Code
- User Setting: User Reported Rx - My Favorites Default Search Settings
- User Setting: User Reported Rx - Default Reported Favorites List
- User Setting: User Rx History - Default Status
- User Setting: User Rx Pad - Alert Text
- User Setting: User Rx Pad - Default Dispense as Written to Yes
- User Setting: User Rx Pad - Default RxPad Favorites List
- User Setting: User Rx Pad - My Favorites Default Search Settings
- User Setting: User Rx Pad - My Therapeutic Classes Default Search Settings
- User Setting: User Rx Pad - Default Status
- User Setting: User Rx Pad - Oral Code
- User Setting: User Rx Print Report
- User Setting: Vitals Summary Table View
- User Setting: EPA Processor
- User Setting: Toggle Display Date in AMP Results
- User Setting: Unsolicited Results Processor
-
- Access User Rx Settings
- Access User Settings
- Activate/Deactivate a User
- Add New User using Copy User
- Dashboard User Setup
- Modify Login Times for a User
- Obtain a DIRECT Email Address
- Reset a user password
- Setup and Authenticate User DIRECT Email
- Setup Two Factor Authentication
- Setup Two Factor Authentication Error Message
- Unlock an Active User
- User/Provider Connection
- User Sign Off Settings
- Modify Available Resources & Default Mobile Resource
- Give Access & Set Default Templates Per Chart Tab
- Assign access to My Task Fax numbers
- User is This Provider Connection
- Setup a User Group
- Assign All Users to User Group
- Setup 2FA Authenticator App for User Login
- How to Log In to OfficeEMR
-
-
-
-
- HL7 Result (ORU) Specifications
- HL7 Appointment (SIU) Specifications - Outbound
- Patient - Insurance - Guarantor - Relationship HL7 Mapping
- Patient - Responsible Party - Relationship HL7 Mapping
- Patient - Language - HL7 Mapping
- OBX.15 Performing Lab Information
- Health Exchange MSH, OBR, and Z-Segs | Facilities (Z4A) + Providers (Z4D)
- MSH.3 Specifications | Document Types and Subtypes
- OBR.4 Specifications | Health Exchange
-
-
- Overview of Statement Processing with Data Media
- Setup the Automated Statement Processing Integration with Data Media
- Data Media Enhanced Statement Layouts
- Data Media Recurring Payments and Payment Plans
- Data Media Website Link for Credit Card Payments
- Data Media eSkip Trace Report
- Data Media Deceased Master List Check
-
-
- Access to Webservices
- iSalusEMR.ProblemPatient
- iSalusExternal.BillingExport
- iSalusExternal.ExportClaimProcedures
- iSalusExternal.ExportClaims
- iSalusExternal.ExportDemographics
- iSalusExternal.SaveAppointmentStatus
- iSalusPatient.GetSetup
- iSalusPatient.PatientList
- iSalusPatient.UpdateSetup
- iSalusPayers.GetPayer
- iSalusRetrieve.GetRendering
- iSalusSchedule.AppointmentList
- iSalusSchedule.CancelAppointment
- iSalusSchedule.CreateAppointment
- iSalusSchedule.ScheduleList
- iSalusTPS.GetSender
- iSalusTPS.SetReceiver
- iSalusTPS.SetSenderResponse
- iSalusWindow.GetList
- iSalusEMR.SaveVitals
- iSalusCommunication.MailSend
- iSalusExternal.GetPatientFilterIdentifiers
- iSalusExternal.GetPatientFilterData
- iSalusExternal.GetPatientFilterDataImage
- iSalusExternal.SaveTemplateInput
- iSalusExternal.GetTemplateInput
-
-
-
-
-
- Overview of the Summary tab for Mobile Charts
- Start a Telehealth Visit from OfficeEMR Mobile
- View a patient's Problem List
- View a patient's Medication List
- View a patient's Allergy List
- View a patient's Immunization History
- View a patient's Vitals History
- View a patient's Medical History
- View a patient's Encounter History
-
-
-
- Overview of the Office Schedule on OfficeEMR Mobile
- View appointments on your office scheduled in OfficeEMR Mobile
- Add appointments to the Office Schedule on OfficeEMR Mobile
- Cancel appointments on the Office Schedule on OfficeEMR Mobile
- Add charges for appointments on the Office Schedule on OfficeEMR Mobile
-
-
-
-
-
-
-
-
-
-
- iSalus Healthcare 2022 Real World Test Plan
- iSalus 2022 Real World Test Results
- iSalus Healthcare 2023 Real World Test Plan
- iSalus Healthcare 2023 Real World Test Results
- iSalus Healthcare 2024 Real World Test Plan
- iSalus Healthcare 2024 Real World Test Results
- iSalus Healthcare 2025 Real World Test Plan
- iSalus Healthcare 2025 Real World Test Results
-
-
- Release 26.163 - June 25th, 2026
- Release 26.160 - June 4th, 2026
- Release 26.156 - April 23, 2026
- Release 26.151 - February 26, 2026
- Release 25.148 - December 18, 2025
- Release 25.146 - November 20, 2025
- Release 25.141 - October 23, 2025
- Release 25.139 - September 16, 2025
- Release 25.136 - June 5, 2025
- Release 25.132 - April 3, 2025
- Release 25.131 - March 20, 2025
- Release 25.130 - March 6th, 2025
- Release 25.129 - February 20th, 2025
- Release 25.127 - January 23rd, 2025
- Release 24.126 - January 14th, 2025
-
- Release 24.124 - December 12th, 2024
- Release 24.122 - November 14th, 2024
- Release 24.121 - October 31st, 2024
- Release 24.120 - October 17th, 2024
- Release 24.119 - October 3rd, 2024
- Release 24.118 - September 19th, 2024
- Release 24.117 - September 5th, 2024
- Release 24.115 - August 22nd, 2024
- Release 24.114 - July 25th, 2024
- Release 24.112 - June 27th, 2024
- OfficeEMR Mobile - Android v 1.4.0 (209) - June 17th, 2024
- OfficeEMR Mobile - iOS v 5.11.1 (206) - June 13th, 2024
- Release 24.111 - June 13th, 2024
- Release 24.110 - May 30th, 2024
- Release 24.109 - May 16th, 2024
- Release 24.108 - May 2nd, 2024
- Release 24.107 - April 18th, 2024
- Release 24.106 - April 4th, 2024
- Release 24.105 - March 21st, 2024
- Release 24.104 - March 7th, 2024
- Release 24.103 - February 22nd, 2024
- Release 24.102 - February 8th, 2024
- Release 24.101 - January 25th, 2024
- Release 24.100 - January 11th, 2024
-
- Release 23.22 - December 14th, 2023
- Release 23.21 - November 30th, 2023
- Release 23.20 - November 16th, 2023
- Release 24.113 - July 11th, 2024
- Release 23.19 - November 2nd, 2023
- Release 23.18 Post Release - October 27
- Release 23.18 - October 19th, 2023
- Release 23.17 - October 5th, 2023
- Release 23.16 - September 21st, 2023
- Release 23.15 - September 7th, 2023
- Release 23.14 - August 24th, 2023
- Release 23.13 - July 27th, 2023
- Release 23.11 - June 29th, 2023
- Release 23.10 - June 15th, 2023
- Release 23.09 - June 1, 2023
- Release 23.08 - May 18th, 2023
- Release 23.07 - May 4th, 2023
- Release 23.06 - April 20th, 2023
- OfficeEMR Mobile - Android v1.3.0 (195) - April 20th, 2023
- OfficeEMR Mobile - IOS v5.10.0 (195) - April 20th, 2023
- Release 23.05 - April 6th, 2023
- Release 23.04 - March 23rd, 2023
- Release 23.03 - March 9th, 2023
- Release 23.02 - February 16th, 2023
- Release 23.01 - February 2nd, 2023
-
- Release 22.18 - January 19th, 2023
- Release 22.17 - December 8th, 2022
- Release 22.16 - November 17th, 2022
- Release 22.15 - October 20th, 2022
- Release 22.14 - September 29th, 2022
- Release 22.13 - September 8th, 2022
- Release 22.12 - August 18th, 2022
- Release 22.11 - August 4th, 2022
- Release 22.10 - July 7th, 2022
- Release 22.09 - June 9th, 2022
- Release 22.08 - May 19th, 2022
- OfficeEMR Mobile - Android v1.2.6 (192) - May 11th, 2022
- Release 22.07 - May 5th, 2022
- Release 22.06 - April 21st, 2022
- Release 22.05 - April 7th, 2022
- Release 22.04 - March 26th, 2022
- Release 22.03 - March 10th, 2022
- Release 22.02 - February 24th, 2022
- OfficeEMR Mobile - Android v1.2.5.191 (191) - February 4th, 2021
- OfficeEMR Mobile - iOS v5.9.5 (181) - February 4th, 2021
- Release 22.01 - February 4th, 2022
- Release 21.14 - January 22, 2022
-
- Release 21.13 - October 7th, 2021
- Release 21.12.1 August 13th, 2021
- Release 21.12 - Release July 15th, 2021
- Release 21.11 - Release July 1st, 2021
- Release 21.10 - Release June 8th, 2021
- OfficeEMR Mobile - Android v1.2.0.183 (183) - June, 2021
- OfficeEMR Mobile - iOS v 5.9.0 (170) - June 8th, 2021
- Release 21.08 - Release May 20th, 2021
- OfficeEMR Mobile - Android v 1.1.0 (176) - April 18th, 2021
- OfficeEMR Mobile - iOS v 5.8.0 (165) - April 18th, 2021
- AnywhereCare - Android v 1.3.3 (42) - April 18th, 2021
- AnywhereCare - iOS v 2.2.0 (24) - April 18th, 2021
- Release 21.07 - Release April 8th, 2021
- Release 21.06 - Release March 25th, 2021
- Release 21.05 - Release March 11th, 2021
- OfficeEMR Mobile - iOS v 5.7.4 (161) - March 3, 2021
- Release 21.04 - Release February 25th, 2021
- OfficeEMR Mobile - Android v1.0.173 (173) - February 25, 2021
- OfficeEMR Mobile - iOS v 5.7.2 (159) - February 24, 2021
- Release 21.03 - Release February 11th, 2021
- Release 21.02 - Release February 2nd, 2021
- Release 21.01 - Release January 14th, 2021
-
- Release 20.11 - Release December 15th, 2020
- Release 20.10 - Release November 19th, 2020
- OfficeEMR Mobile - Android v1.0.167 (167) - November 18th, 2020
- OfficeEMR Mobile - iOS v5.7.0 - November 18th, 2020
- Release 20.9 - Release November 5th, 2020
- Release 20.8 - Release October 20th, 2020
- Release 20.7 - Release October 1st, 2020
- Release 20.6 - Release September 17th, 2020
- Release 20.5 - Release September 3rd, 2020
- Release 20.4 - Release August 20th, 2020
- Release 20.3 - Release August 6th, 2020
- Release 20.2 - Release July 23rd, 2020
- OfficeEMR Mobile - iOS v 5.6.0 (136) - July 24th, 2020
- OfficeEMR Mobile - Android v 1.0.153 (153) - July 24th, 2020
- OfficeEMR Mobile - iOS v 5.5.5 - July 9th, 2020
- OfficeEMR Mobile - Android v 1.0.146 (146) - July 9th, 2020
- Release 20.1.13 - Patch Release July 1st, 2020
- Release 20.1.12 - Patch Release June 25th, 2020
- Release 20.1.11 - Patch Release June 18th, 2020
- Release 20.1.10 - Patch Release June 11th, 2020
- AnywhereCare - Android v. 1.3.3 - June, 20, 2020
- Release 20.1.9 - Patch Release June 4th, 2020
- OfficeEMR Mobile - Android v 1.0.137 - June 8th, 2020
- Release 20.1.8 - Patch Release May 28th, 2020
- Release 20.1.7 - Patch Release May 21st, 2020
- AnywhereCare - Android v. 1.3.2 - May 25th, 2020
- Release 20.1.6 - Patch Release May 19th 2020
- AnywhereCare - IOS v 2.1.3 - May 19th, 2020
- OfficeEMR Mobile - iOS v 5.5.4 - May 18th, 2020
- Release 20.1.5 - Patch Release May 14th, 2020
- Release 20.1.4 - Patch Release May 12th, 2020
- OfficeEMR Mobile - Android v 1.0.135 - May 12th, 2020
- Release 20.1.3 - Patch Release May 7th, 2020
- Release 20.1.2 - Patch Release May 5th, 2020
- Release 20.1.1 - Patch Release - May 4th, 2020
- Release 20.1 - May 2020
- AnywhereCare - Android v. 1.3.1 - April 2020
- AnywhereCare - IOS v 2.1.2 - April 2020
- Release 19.7.1 - February 1st, 2020
- Version 25.130 – March 1, 2026


Copyright © 2019 iSalus Healthcare. All rights reserved.