The Scheduler Analytics package allows user to develop custom reports surrounding scheduling, based on fields and measures in the below data dictionary. The data is refreshed on Sunday nights and on the last night of each month.
Once your practice has been set up to utilize this feature, you can launch Scheduler Analytics by following these steps:
- Navigate to Reports
- Click Scheduler Analytics
- A pop up will appear prompting you to save the report – Save the ‘iCube’ file in a location that you plan on saving the report.
- Once you save the report, Microsoft Excel will open for you automatically with the Pivot Fields displayed on the right hand side.
Facts
In Microsoft Excel, ‘Facts’ are the actual numbers that you are able to analyze/report on. This type of data is quantitative (numbers).
- Appointment: This data is derived from all appointments created in the iScheduler.
- Appointment Count: The total number of unique appointments.
- Appointment Duration: The total number of minutes for all appointments.
- Blackout: Users can add Blackout Overlays on a schedule template. This type of overlay prevents appointments from being scheduled in this space.
- Blackout Count: The total number of unique blackout overlays on a schedule template.
- Blacount Duration: The total number of minutes for all blackout overlays.
- Employer: Some practices may utilize the iSalus Employer Module. If so, this is the Employer Entity that is configured. This is very rarely used.
- Employer Count: The total number of unique employers in the employer module.
- Placeholder: Users can add placeholders on a schedule template. This is a predetermined appointment slot used to force specific scheduling habits.
- Placeholder Count: The total number of unique placeholders slots.
- Placeholder Duration: The total number of minutes for all placeholder slots.
- Resource: A resource is an entity that an appointment can be scheduled with. Most commonly, this is a provider, but could be a room, a nurse, or any other type of schedule that makes sense for the practice.
- Resource Count: The total number of unique resources.
- Workday Duration: Each resource must have a Workday Start Time and Workday End time (used to determine when they are expected to be in the office). This represents the total number of workday minutes allotted.
- Values
- Appointment Type %: Expected to be used with the 'Appointment Type' dimension. This specifies how frequently an appointment type is used in the practice.
- Employee Appointment Count %: Only used for practices with Employer Module feature enabled.
- Employee Type %: Only used for practices with Employer Module feature enabled.
- Employer Appointment Count: Only used for practices with Employer Module feature enabled.
- Placeholder Usage %: Percentage of placeholders that have appointments assigned to them.
- Resource Usage %: Percentage of resources workday filled with appointments.
Dimensions
In Microsoft Excel, ‘Dimensions’ are how you might analyze or break down a number. This type of data is qualitative (categories).
- Appointment Status: Appointments will always be assigned to a status. This represents where the appointment is within the workflow.
- Appointment Status: The name of the status of the appointment (i.e. Scheduled, Cancelled).
- Appointment Status ID: The internal ID of the status of the appointment (i.e. 1, 6).
- Appointment Type: Appointments and Placeholders will always be assigned an appointment type.
- Appointment Type: The name of the appointment type utilized (i.e. New Patient).
- Appointment Type ID: The internal ID of the appointment type (i.e. 3).
- Blackout Reason: All blackout overlays that are scheduled can have a predetermined Blackout Reason.
- Blackout Reason: The name of the reasons associated with the blackout overlay (i.e. Vacation, Sick).
- Blackout Rason ID: The internal ID of the reason associated with the blackout overlay (i.e. 1, 3).
- Clinic Access End Date: Only used for practices with Employer Module feature enabled.
- Clinic Access Start Date: Only used for practices with Employer Module feature enabled.
- Date: Date of the appointment or placeholder.
- Date.Hierarchy: Selecting this value will break out the included appointments, starting with the year, then drills deeper.
- Example: 2018 -> Q1 -> January, February, March -> 2018-01-01, 2018-01-02, 2018-01-03, etc.
- Date.Date Id: The iSalus unique identifier for the calendar date.
- Date.Date Value: Selecting this value will break out the included appointments by calendar date, regardless of year.
- Date.Quarter Value: Selecting this value will break out the included appointments by Quarter, regardless of year.
- Date.Year Month: Selecting this value will break out the included appointments by Month, regardless of year.
- Date.Year Value: Selecting this value will break out the included appointments by Year.
- Date.Hierarchy: Selecting this value will break out the included appointments, starting with the year, then drills deeper.
- Department: Only used for practices with Employer Module feature enabled.
- Employee Type: Only used for practices with Employer Module feature enabled.
- Employer: Only used for practices with Employer Module feature enabled.
- Employer Group: Only used for practices with Employer Module feature enabled.
- First Appt Date: Date of the patients first scheduled appointment.
- First Appt Date.Hierarchy: Selecting this value will break out the included appointments, starting with the year, then drills deeper.
- Example: 2018 -> Q1 -> January, February, March -> 2018-01-01, 2018-01-02, 2018-01-03, etc.
- First Appt Date.Date Id: The iSalus unique identifier for the calendar date.
- First Appt Date.Date Value: Selecting this value will break out the included appointments by calendar date, regardless of year.
- First Appt Date.Quarter Value: Selecting this value will break out the included appointments by Quarter, regardless of year.
- First Appt Date.Year Month: Selecting this value will break out the included appointments by Month, regardless of year.
- First Appt Date.Year Value: Selecting this value will break out the included appointments by Year.
- First Appt Date.Hierarchy: Selecting this value will break out the included appointments, starting with the year, then drills deeper.
- Health Plan Group: Only used for practices with Employer Module feature enabled.
- Locality: Only used for practices with Employer Module feature enabled.
- Patient: Patient associated with the appointment.
- Address: Patient address
- City: Patient city
- Dob: Date of Birth
- First Name: Patient first name
- Last Name: Patient last name
- Patient Id: iSalus Unique ID
- Patient Name: The patient's full name, structured in the following manner: Patient Last Name, Patient First Name, Patient Middle Initial (Patient Nick Name).
- State: Patient state
- Zip Code: Patient zip code
- Placeholder: Users can add placeholders on a schedule template. This is a predetermined appointment slot used to force specific scheduling habits.
- Utilized: Determines if a placeholder has an appointment associated with it or not. Produces the options of 'Utilized' or 'Not Utilized'.
- Utilized Id: Determines if a placeholder has an appointment associated with it or not. Produces the options of '1' or '0'.
- Registration Date: Only used for practices with Employer Module feature enabled.
- Resource: A resource is an entity that an appointment can be scheduled with. Most commonly, this is a provider, but could be a room, a nurse, or any other type of schedule that makes sense for the practice.
- Resource Id: Internal ID of the resource (i.e. 343)
- Resource Name: Name of the resource (i.e. Nurse Schedule)
- Resource Category: A resource can be assigned to a category and grouped in a logical fashion. Practices can setup their own categories as desired.
- Resource Category ID: Internal ID of the resource category (i.e. 1).
- Resource Category Name: Name of the resource category (i.e. Personnel).
- Resource Type: A resource category can be further classified by creating resource types. Practices can setup their own types as desired.
- Resource Type ID: Internal ID of the resource type (i.e. 2).
- Resource Type Name: Name of the resource type (i.e. Providers or Therapists).
- Service Location: A service location is the physical place where the appointment is to take place.
- Service Location ID: Internal ID of the service location (i.e. 2282).
- Service Location Name: Name of the service location (i.e. North Office).
- Sub Population: Only used for practices with Employer Module feature enabled.
- Time: This refers to the time of the scheduled appointment or placeholder.
- Time Display: Appointment time, formatted as HH:MM AM/PM (i.e. 11:15 AM).
- Time Hour: The hour of the scheduled appointment (i.e. 11).
- Time Id: The unique ID that represents the time (not recommended to use).
- Time Minute: The minute of the scheduled appointment (i.e. 15).
- Wellness Date: Only used for practices with Employer Module feature enabled.
Here are a few examples of reports that can be created with Scheduler Analytics:
Appointment Type Counts/% over Date Range
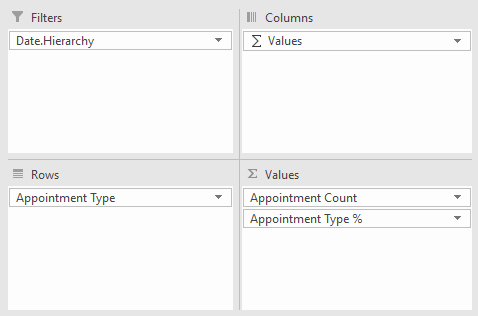
- First, drag the desired fields to the PivotTable areas. Please note that 'Values' is not a field that you need to add to the Columns area -- it's automatically populated if more than one measure is added to the Values section, to denote that you'll have columns associated with each value.
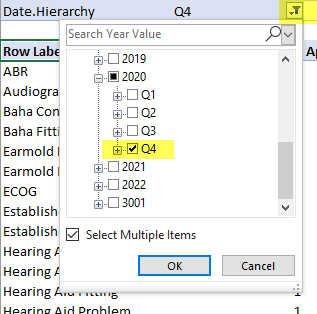
- Next, apply the desired date filter by clicking on the filter icon where the filter is listed at the top of the report:
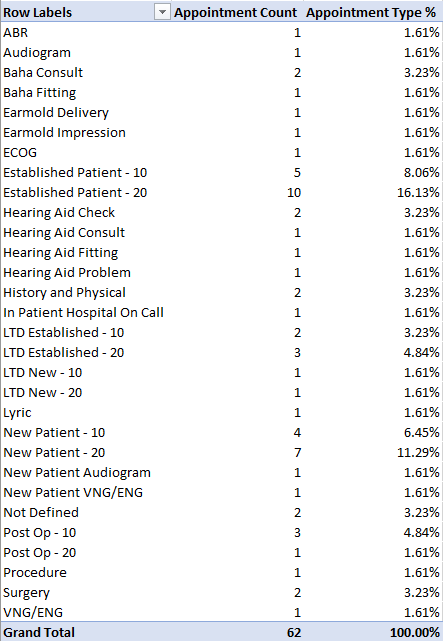
- You can now see the desired output, appointment type counts and percentage, filtered to the desired date range:
Appointment Count by Resource by Appointment Status over Date Range
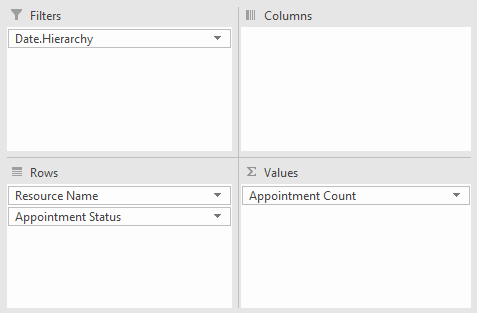
- First, drag the desired fields to the PivotTable areas.
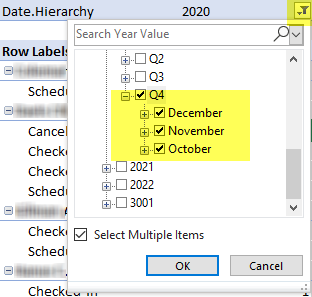
- Next, apply the desired date filter by clicking on the filter icon where the filter is listed at the top of the report:
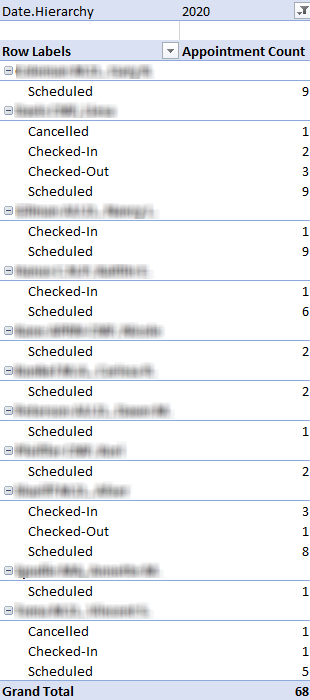
- You can now see the appointment counts by resource and status, filtered to the desired date range:
It's possible to connect Power BI Desktop with an existing New Billing Analytics cube. This will require the following steps:
- Look in Accessing Scheduler Analytics to see how to open a new scheduler analytics file in Excel, if you haven't already done so.
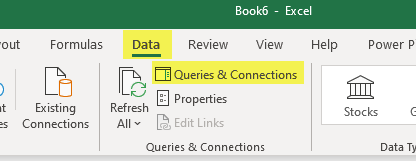
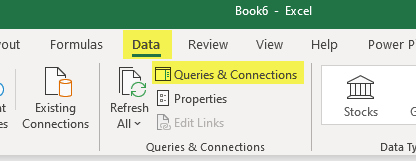
- In your Excel report connected to the scheduler analytics, at the top of the screen, click Data, then Queries and Connections:
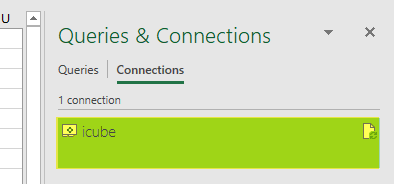
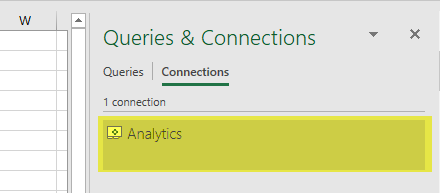
- You will see your connection in the right-hand pane. Double-click this connection:
- In the Definition tab of the Connection Properties, ensure that the Save password box is checked (clicking Yes for confirmation). Then examine what's in the Connection string box, copying the Password (including any special characters) and DB information for later use:

- Start a new file in Power BI Desktop.
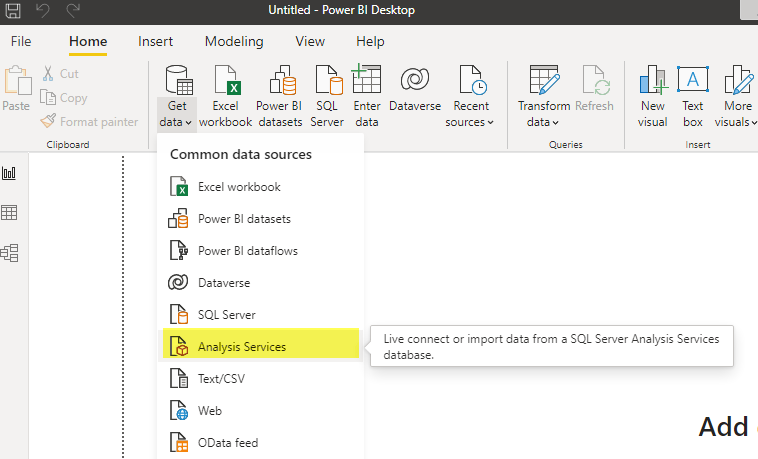
- Select the Get Data drop-down, then Analysis Services:
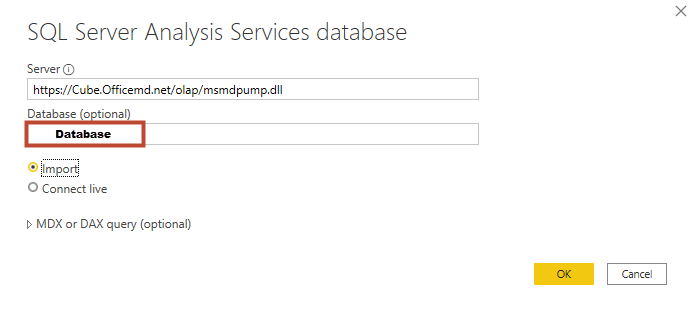
- Enter the following server information, enter the DB value from step 4 in the database field, and select Import. Then click OK.
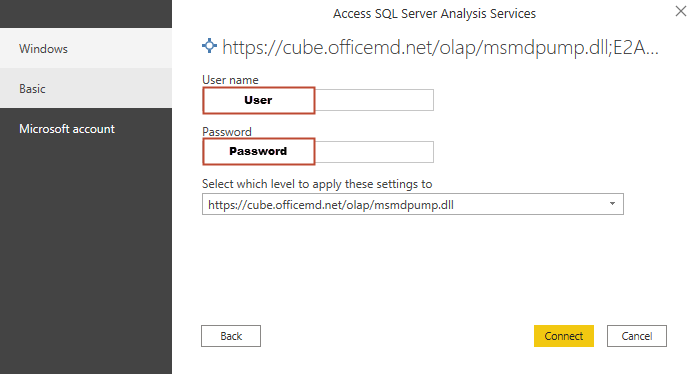
- Select Basic authentication, and enter the DB and Password from step 4. Then click Connect:
- In the Navigator, expand the folders to see available Measures and Fields. Then select the Measures and Fields you'd like to pull into Power BI. Note that memory limitations will mean that you will only be able to pull in a relevant subset of data. When ready, hit Load.
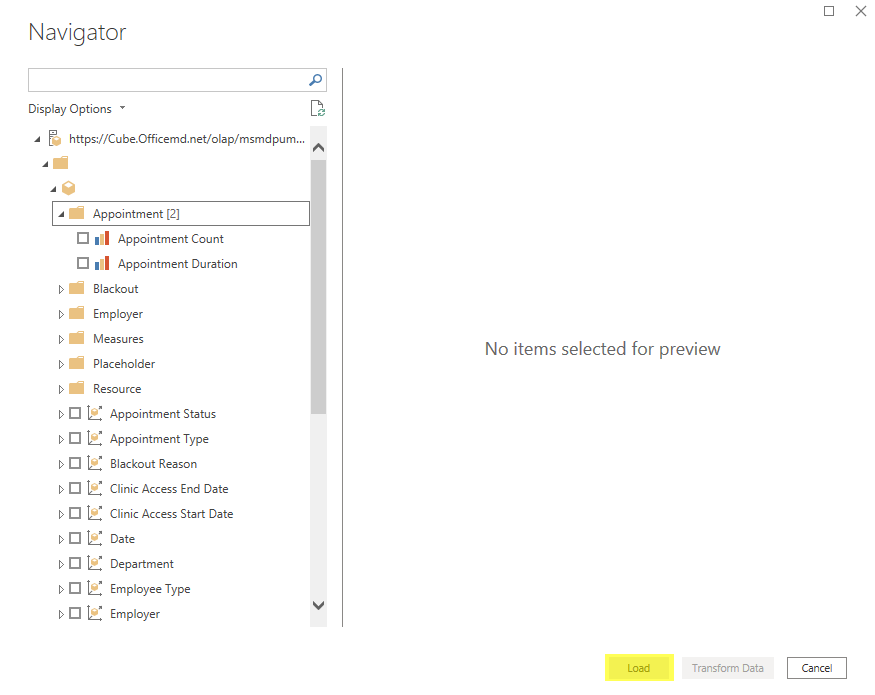
- Your selected data should now be available to use in creating Power BI reports.
- In iSalus, navigate to Reports.
- Click Scheduler Analytics.
- A pop up will appear for downloads – hover over and click Show in folder.
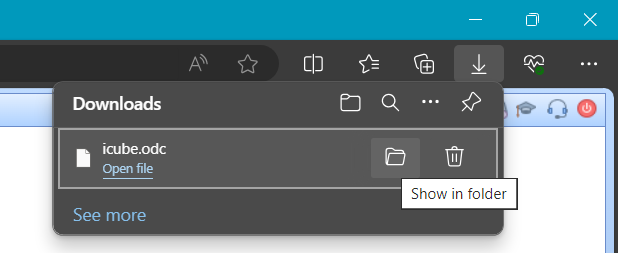
- Move the icube.odc to the desired save location. Also, rename as needed for easy identification. Be sure not to change the file type.

- Open the report that you’re wanting to connect to the cube on your own machine. At the top of the screen, click Data, then Queries and Connections:
- You will see a connection in the right-hand pane. Double-click this connection:
- In the Definition tab of the Connection Properties, use the Browse button to navigate to where you have saved your local connection file, and select it.
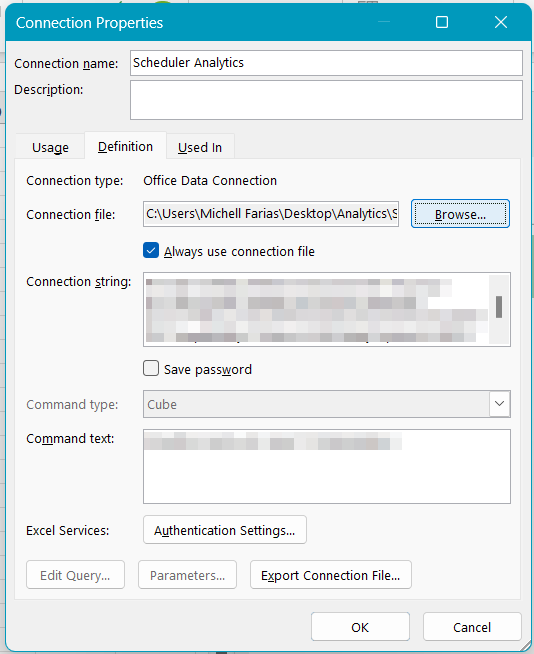
- Back in the Definition tab, ensure that the Always use connection file box is checked (clicking Yes for confirmation), and click OK:
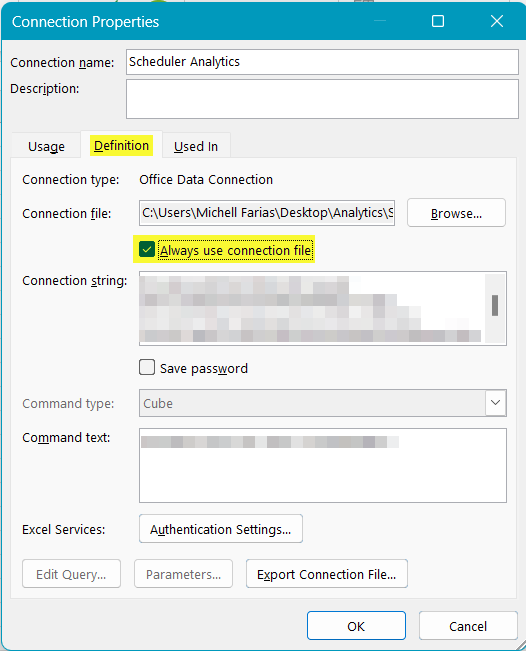
- At this point you can save your report, preferably in the same folder as the connection file. If you ever move the connection file, you may need to modify the Connection file property in the Connection Properties window shown above.


