The My Tasks Results portal is used to manage electronic results that are sent back electronically to the application. This portal allows you to see new results assigned to you, add findings to results, and link unsolicited results to the correct patient.
The My Tasks - Results screen has several different queues that are used to organize results. This article will explain these various queues, their purpose, and how a result might get here.

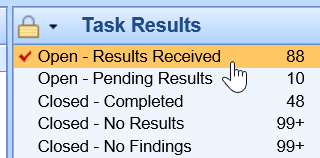
Open - Results Received
This queue represents results that have been sent into the application that has not yet been closed. These results are assigned to either your user or a User Group that your user is a part of. The person that is assigned to the result at any given moment is called the Processor. Different types of results may be assigned to different processors based on a number of business rules that the practice may configure.
Default Results Processor
By default, results are returned to the user that was selected in the 'Ordered By' field when the original order was created.
NOTE: The 'Ordered By' field is found here: EMR > Orders > Ordered By. This defaults to the logged-in user. However, there is a User Settings (Default Order By) where this may be set to a specific person automatically.
Normal Results Processor
Some practices may have a process in place where results that are marked as "All Normal' based on the supplied lab values will be automatically routed to a specific user or user group. This can be controlled through the following Company Setting: Normal Results Processor
To determine "All Normal", the system analyzes the "Flags" supplied for each result value by the lab. If all values are marked as "N" (normal), then the entire result is considered to be normal. If any values are not normal, then the result would not go through this process.
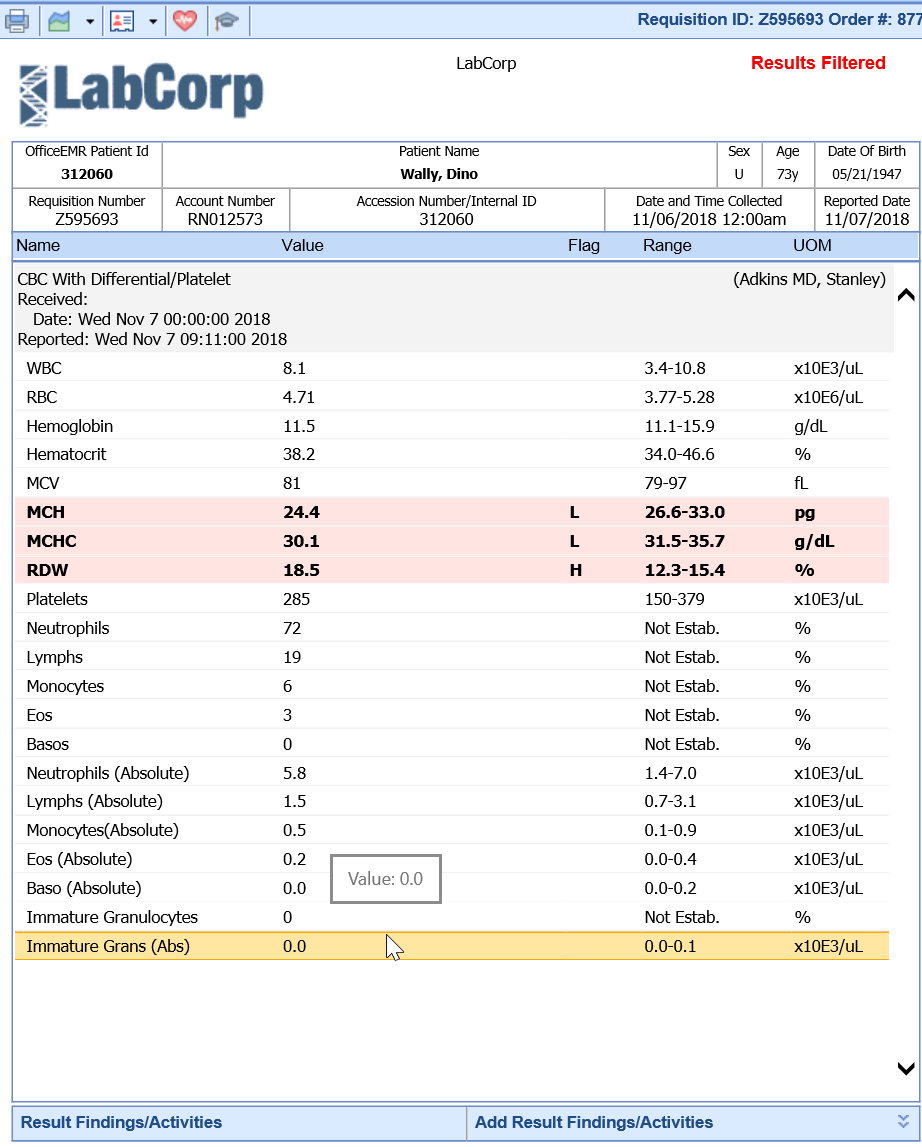
Below, you will see the 'Flag' column. In this example, both a "Low" and "High" value are found as dictated by the lab, therefore this result would not be "All Normal".

Abnormal Results Processor
Some practices may have a process in place where results that are marked as "Abnormal' based on the supplied lab values will be automatically routed to a specific user or user group. This can be controlled through the following Company Setting: Abnormal Results Processor
To determine "Abnormal", the system analyzes the "Flags" supplied for each result value by the lab. If any value is marked as something other than "N" (normal), then the entire result is considered to be abnormal.
Below, you will see the 'Flag' column. In this example, both a "Low" and "High" value are found as dictated by the lab, therefore this result would be "Abnormal"

Unsolicited Results Processor
In the event that a result does not automatically connect back to the correct patient/order, then the order will be assigned to the correct Unsolicited Results user group as defined by the corresponding Company Setting: Unsolicited Results Processor. For a more granular workflow, it is possible to change the Result Processor for unsolicited results received for a specific provider/user. This is determined by the value of User Setting: Unsolicited Results Processor.
WARNING: When using the User Setting for result processing automation, this will supersede the Company Setting. Additionally, using the User Settings will require a match between the NPI from the HL7 and the provider connected to the user in User Setup > ID.me Verification (toolbar). Lastly, some labs do not provide the NPI for the Ordering Provider as the identifier. It is possible you need to work with our Support team and/or your lab vendor to ensure the OBR.16.1 value is an NPI.
Open - Results Pending
The Results Pending queue represents orders that have been created, but no results have been received. These results will be assigned to the user that was selected in the 'Ordered By' field when the order was originally placed.
Pro Tip
Not all orders necessarily expect to have a result returned. Therefore, you can update a setting for a given order route that will automatically move these types of orders out of the Pending Results list into the 'Closed - No Results' list after a set period of time. This is controlled via the Closed - "No Results" days setting found on the Service Location setup window. By way of example, a 'Scheduling' order for Follow-Up in 3 days is unlikely to receive an electronic result. Therefore, the 'Scheduling' Service Location may have the Closed - No Results days set to 0 so that these orders do not show in this queue
Closed - Completed
The Completed queue represents orders that have had findings entered on a result that was returned and the result has been set to a status of closed. Results will typically make it into this queue via the Results Review process described below.
Closed - No Results
The No Results queue represents orders that have not had results returned and the result status has been set to a status of closed. Results will typically make it into this queue because of an automated process that moves results out of the Open - Pending Results queue into the Closed - No Results queue. This automated process is controlled via the Closed - "No Results" days setting found on the Service Location setup window.
Closed - No Findings
The No Findings queue represents results have been returned, but no finding was ever entered on the result. Results will typically make it into this queue because of an automated process that moves results out of the Open - Results Received queue into the Closed - No Findings queue. This automated process is controlled via the Closed - "No Findings" days setting found on the Service Location setup window.
The My Tasks - Results screen has several different Result Queues. Once a user selects a queue, the results in that queue are then returned and displayed in the Results List. This article will explain each field in the result list.

Result Lists Definitions
- M - This represents results that were recently modified (changed/findings added/etc...) since the last time the screen was refreshed. Items recently modified will contain a black check icon to indicate this.
- Chart - The patient chart number for the result. If the patient is unknown, this will display as a '?'.
- Patient - The patient name (Last, First) for the result. If the patient is unknown, this will display as 'Unsolicited'
- Ordered - Date the order was placed
- Orders - Pulls the name of the orders associated with this requisition. If a result has been received, the order names come from the order information inside the electronic result. If the result has not been received, the order names come from the orders originally placed in iSalus.
- Received - Date the result was received
- Abnormal - If any 'Flag' in the result contains anything other than a 'N', the result is considered Abnormal and a red exclamation icon will be displayed. If all 'Flag' values are 'N', then no icon is displayed and this is considered Normal. This may change the processor of the result based on the following company settings:
- Findings - If any finding has been entered on the result, this column will display a green check mark icon. Otherwise, it will be blank.
- MML - If this electronic result has been shared with the patient via MyMedicalLocker, a green check mark icon will display. Otherwise, it will be blank.
- Next Appointment: Date and time of the patients next scheduled appointment.
- Processor: The user or user group that this order is assigned to.
- Provider: Name of the provider that placed the order.
- Lab: The name of the lab that this result is connected to.
- Orig. Req ID - The requisition ID supplied in the electronic result file.
- Req ID - The internal requisition ID that our application has connected this order to.
Result List Actions
Several actions can be taken against the result list. Those actions are described below.
Search
The search bar above the result list is used for searching within the queue that you have selected. This will search all results in this queue based on your input, not just results assigned to your user. You can type in nearly any value that is displayed in the columns and the system will return the matching values.
Export to Excel
Clicking the 'Export to Excel' icon on the Results List toolbar will open Microsoft Excel on your computer and export the results list to excel.
Open Patient in EMR:
Clicking the 'Open Patient in EMR' icon will open the EMR Portal and then automatically load the patient chart that you had selected in the Results List. This is helpful when you need to do advanced research related to the patients medical record.
Open Patient in iScheduler
Clicking the 'Open Patient in iScheduler' icon will open the iScheduler Portal and then automatically load the patient chart that you had selected in the Results List. This is helpful when you need to do advanced research related to the patients appointment history or you need to schedule a new appointment.
More - Reassign
Clicking the 'Reassign' icon will open the Result Reassign screen which is used for making mass updates to a set of results. This screen allows for a mass update of the Processor and/or the Status.
When the Reassign window is launched, users will be able to set the new Processor and new Status of the selected results. Take note, that the updates can be applied to the 'Current Task List' (the results that you can see on the screen in the background) or based on a custom 'Search Criteria'.
The My Tasks - Results Work area is displayed once a result is selected from the Results List. The Results Work Area is used to review the individual result for a patient and add the necessary findings.

Result Work Area Actions
The Print option will be used to print out a copy of the selected results.

When the Print button is clicked, you will be prompted to choose to 'Include Practice Findings' and/or to 'Include Patient Findings'. These findings that are entered will print at the bottom of the report if selected.
Result Options - Edit Result
The 'Edit Result' option is used when manually entering results into this window. This is rarely used and is disabled for electronic lab results.

When clicked, it will show you the individual data points for the selected result if it has already been entered or received electronically.

Result Options - Settings
The 'Settings' window is used to launch the User Settings related to how this window displays and works for the individual user that is logged in. 
When clicked, the Settings window will display, and the user will be able to set the following values:
- Display Comments: If on, shows "Report Comments", if off, report comments are hidden. This is a specific data structure for some type of lab results. We recommend this be left on.
- Display Notes: If on, note records (NTE fields) will be displayed. If off, note records will be hidden. We recommend this be left on.
- Display Orders: Every result will have a parent order that this result is for. Users may choose to hide the order and just display the individual results on the screen. We recommend this be left on.
- Display Empty Results: Sometimes this system "expects" a result to be received based on the order, but the result may not yet be returned yet. This setting will determine if the placeholders for the result fields are visible when no actual result is available. We recommend this be turned off.
- Display Additional columns: Some users may to hide some columns on their results. If off, the following columns are hidden: Lab, Date, Status. We have not specific recommendation for this.
- Display Abnormal Results in red: When a result flag is anything other than Normal, the result is assumed to be abnormal. In these cases, the system can highlight the abnormal result line in red to draw attention to it. We recommend this setting be left on.
- Display Abnormal Results in bold: When a result flag is anything other than Normal, the result is assumed to be abnormal. In these cases, the system can display the abnormal result line in bold to draw attention to it. We recommend this setting be left on.
- Normal Finding/Activity Settings and Abnormal Findings/Activity Settings: The primary purpose of the Results Work area is to review results and enter findings. The settings described here are used to expedite the review process. Users will have a 'Normal' button that can be clicked when entering findings that will set the values defined as well as an 'Abnormal' button. When click the following fields will be st:
- Order Processor: The user or user group that the ORDER will be assigned to. If left blank, the order processor will not change. Recommendation - leave this blank as the order is often handled separate from the result. If the order processor is changed, this will affect the My Tasks - Orders section, not My Tasks - Results.
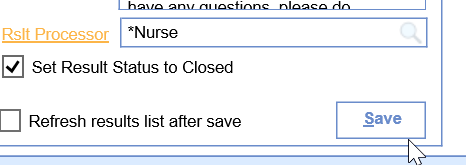
- Result Processor: The user or user group that the RESULT will be assigned to. If left blank, the result processor will not change.
- Order Status: The status that the ORDER will be set to. If left blank, the order status will not change. Recommendation - leave this blank as the order is often handled separate from the result. If the order status is changed, this will affect the My Tasks - Orders section, not My Tasks - Results section.
- Set Result Status to Closed: Results only have two statuses - open and closed. If open, this means that the result will show up in the selected processors task list to work on. If closed, the result will not show up in any processors task list. When assigning a result to a new processor, leave this value blank to ensure it displays in their queue.
- Order Finding: The default findings that you want to add to the result. These are used for internal communication only.
- Patient Comments: The default comments that you want to share with a patient when this result is shared with the patient via My Medical Locker.
- MML Send: Determines if this result is sent to MyMedicalLocker or not.

Result Options - Flows
The 'Flows' window is used to view and graph any lab result that has been received for this patient over time.

When selected, the 'Flows' window will be displayed and you can see the past data.

To view this data in a graph, select the desired values on the left and click 'Graph'.

Result Options - Letters
The 'Letters' option allows a user to print out a letter for the patient. 
Clicking this option will display a list of letters that can be generated from the result screen.
Once the letter has been selected, click Print. This will pull in the letter and all of the corresponding fields that have been setup for that letter that will make it patient specific.

Result Options - HL7
The 'HL7' option is used to display the electronic lab result file that was received that generated this result.
Result Options - Audit Log
The 'Audit Log' option is used to display the audit log for this specific result. The audit log tracks changes, views, and other activities related to a given item.

Patient Options - Display Patient
The 'Display Patient' option is used to launch the patient setup window for the given patient.

Clicking this will open the patient Setup window in it's own screen so that you can review and change demographic, insurance, emergency contact, and other details as needed.

Patient Options - Send Communication
The 'Communication' option is used to launch a new Office Communications window with the patient and result attached.

When clicked, the new communication will automatically load. The patient chart will be listed as an attachment along with the result. This communication can then be sent internally to other users to communicate information about this patient and result.

Display Vitals Timeline
The 'Vitals Timeline' button is used to launch the Vitals Timeline that is typically found in the EMR. This window may be helpful in analyzing complex data sets like results, medications, and vitals all in one place.

Clicking this button will launch this window: Vitals Clinical Marker

View the Result
The result will be displayed in the middle portion of the screen. Keep in mind, the way that this screen looks may be different based on the settings for your user.

Enter and Review Findings
The findings that have already been entered, as well as the process of entering findings, takes place in the area just below the result. The left side of the screen will display findings that have been entered in the past. The area on the right will be used to enter new findings. The process of entering findings is covered more here: Entering Findings.

Related Results
One thing to keep in mind about results, is that the lab may send the same result multiple times. This may happen when preliminary results are sent and then final results are sent once completed. This can happen when an add-on test is called in. Or, it can happen for any other reason that lab determines. When this happens, our application will link the results together. Prior versions of the same result can be viewed by clicking through the paging buttons at the bottom of the screen. The most recent will result will be on top.

The primary purpose of the My Tasks - Results Work Area is to review the results, enter your findings, and determine the next step of the result. This article is used to describe workflow considerations with this process.

Considerations before reviewing results
- Determine Workflow: Before reviewing results, it is best to talk internally with your team about what you want to happen under various scenarios. The two most common considerations are what to do if a result is normal and what to do if a result is abnormal. Ask questions like the ones below to get prepared:
- Who should the results go to if the results are normal?
- Who should the results go to if the results are abnormal?
- Do we want our patients to be able to see these results in the patient portal (MyMedicalLocker)?
- Configure your User Settings: Once you understand your desired workflows, configure your user settings. This can be done by selecting Report Options > Settings. More can be found here on what each setting does: Results Work Area
Pro Tip: Sample Setup
Normal Results Workflow
Imagine a practice that has decided that if a result is normal that the patient will not be directly contacted. Therefore, no one else in the practice needs to receive these results after the initial review Rather, the result will be shared with the patient via their Patient Portal. If this is the workflow, the 'Normal Finding/Activity Settings' might look like this.

Abnormal Results Workflow
Now, for the same practice, if the result is abnormal, maybe the practice wants to play it safe and follow-up with the patient by scheduling an in-office visit. This task may be completed by the Scheduling team. Because of the sensitive nature of some results, it may not be a good idea to automatically share these results with the patient. If this is the workflow, the 'Abnormal Finding/Activity Settings' might look like this.

Steps to enter a finding
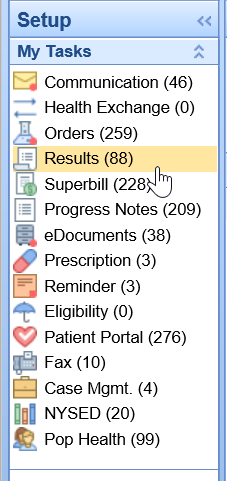
- Open the My Tasks - Results portal
- Select the Open - Results Received queue from the Results Queues
- Select the result from the Result List

- The result will display in the Result Work Area.
- Click the 'Normal' icon to auto-set the Result Finding values based on your normal workflow or the 'Abnormal' icon for your abnormal workflow.
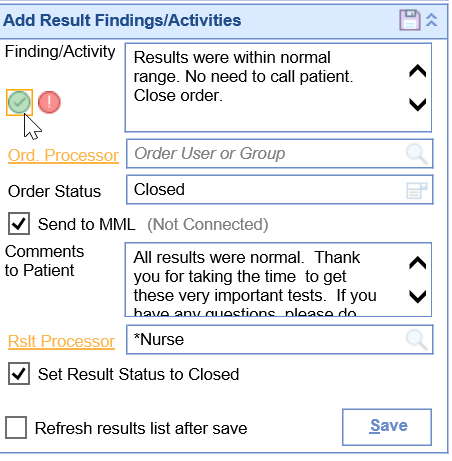
- Make any necessary changes to the defaults that were set to personalize the findings for this specific result.
- Click Save
The primary purpose of the My Tasks - Results Work Area is to review the results, enter your findings, and determine the next step of the result. This article is used to describe workflow considerations with this process.
Considerations before reviewing results
- Determine Workflow: Before reviewing results, it is best to talk internally with your team about what you want to happen under various scenarios. The two most common considerations are what to do if a result is normal and what to do if a result is abnormal. Ask questions like the ones below to get prepared:
- Who should the results go to if the results are normal?
- Who should the results go to if the results are abnormal?
- Do we want our patients to be able to see these results in the patient portal (MyMedicalLocker)?
- Configure your User Settings: Once you understand your desired workflows, configure your user settings. This can be done by selecting Report Options > Settings. More can be found here on what each setting does: Results Work Area
Pro Tip: Sample Setup
Normal Results Workflow
Imagine a practice that has decided that if a result is normal that the patient will not be directly contacted. Therefore, no one else in the practice needs to receive these results after the initial review Rather, the result will be shared with the patient via their Patient Portal. If this is the workflow, the 'Normal Finding/Activity Settings' might look like this.

Abnormal Results Workflow
Now, for the same practice, if the result is abnormal, maybe the practice wants to play it safe and follow-up with the patient by scheduling an in-office visit. This task may be completed by the Scheduling team. Because of the sensitive nature of some results, it may not be a good idea to automatically share these results with the patient. If this is the workflow, the 'Abnormal Finding/Activity Settings' might look like this.

Steps to enter a finding
- Open the My Tasks - Results portal

- Select the Open - Results Received queue from the Results Queues

- Select the result from the Result List

- The result will display in the Result Work Area.

- Click the 'Normal' icon to auto-set the Result Finding values based on your normal workflow or the 'Abnormal' icon for your abnormal workflow.

- Make any necessary changes to the defaults that were set to personalize the findings for this specific result.
- Click Save


