The My Tasks Communication tool allows for interoffice communications that can be initiated from the EMR, iScheduler, Billing Portal or My Task areas. Additionally, you can link a patient chart, claim, or eDocument to the Communication. Communications can be sent without a patient's chart linked or they can be linked to a patient chart when initiated from a patient record.
Send a General Communication to Users/Groups
To create or send a general communication that is not linked to a patient, navigate to My Tasks - Communications
- Select New (manila envelope)

2. The New Message window pops-up

3. Add users and/or groups that will receive this communication by clicking on To. Search for User/Groups, add and click OK

4. Type in the subject on the Subject line, add message details, then click Send

Send a Communication from the EMR Portal
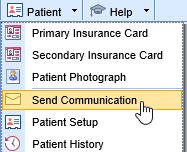
- Open a patient and then use the Patient drop down and select Communication

2. The New Message window appears.

3. Select the To field to select the user/group to send the message to. A communication can be sent to any combination of users and/or groups

4. Subject line- by default the Subject line is New Office Communication, it is best practice to type in a more specific subject line

5. Attachment- by default the Patient Chart is attached to the Communication initiated in the EMR. Click on the Attach (paperclip) to attach additional items to the message

6. Type in body of message and select to Send or Task and optional Importance

7. Select Send to send communication to users/groups in the To field and closed window
8. Select Task communication to send to users/groups as a task they can own for tracking of completion
9. Importance drop down can be utilized to select Low, Normal or High Importance

Send a Communication from the iScheduler Portal
- Open a patient or select patient on the schedule. Use the Patient drop down and select Send Communication

2. The New Message window pops up, fill-in all message options and click Send or Task

Send a Communication Billing Portal
- Receipts Details window

2. Claims Detail window

3. Communications sent from the Claims Detail window automatically attach the Patient Chart and the Claim

Viewing Communications
Once a Communication is sent, it is saved to the Patient’s Chart. The Communications can be viewed in several areas:
- EMR Summary – Encounters

2. EMR Timeline - Communications

3. EMR/iScheduler - Patient Index drop down/Patient Communications


4. Billing Portal – Claims


