The below will guide will walk you through how to create a claim from the Billing Query window in the instance you are manually entering a claim.
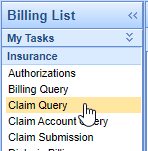
- In the Billing portal select the Claim Query window.
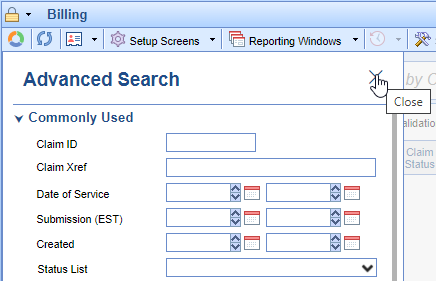
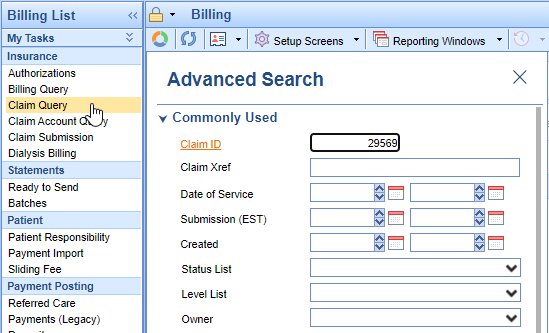
- Close the Advanced Search options.
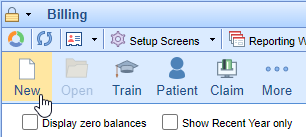
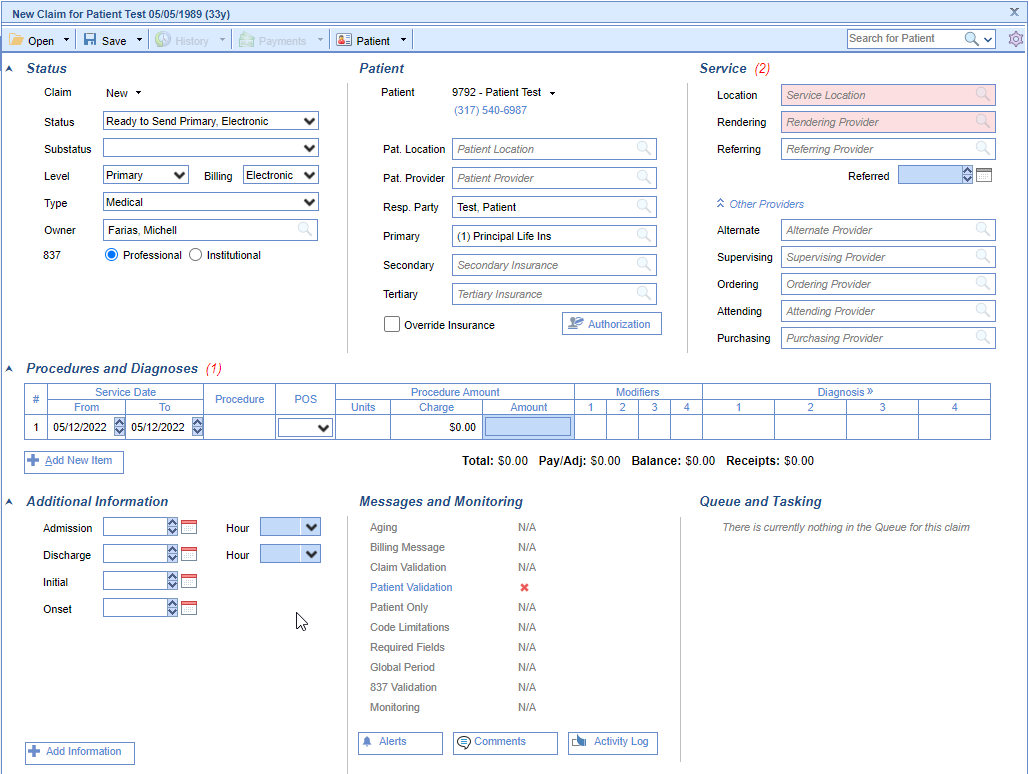
- Click the New button on the toolbar.
- Enter patient’s last name, first name, or date of birth in the textbox to search for the patient.
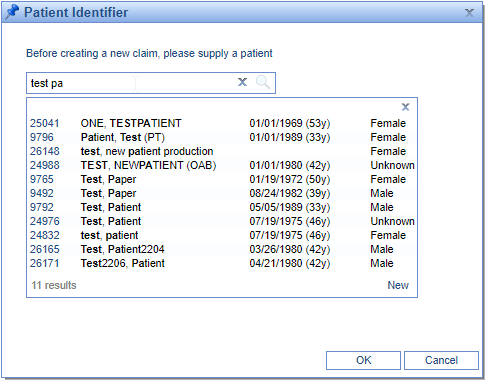
- Click on the patient’s name you wish to create a claim for and click the Ok button.
- In the new claim window complete the necessary claim info.
There are a number of reasons why a user may need to copy an existing claim. The most common reasons are that the provider performs the same procedures every visit and does not complete a new Superbill, or that a claim needs to be split, or procedures on a single claim need to be on two separate claims. In the event that you need to copy an existing claim, here are the appropriate steps.
- Go to Claim Query screen and search for the claim you wish to copy.
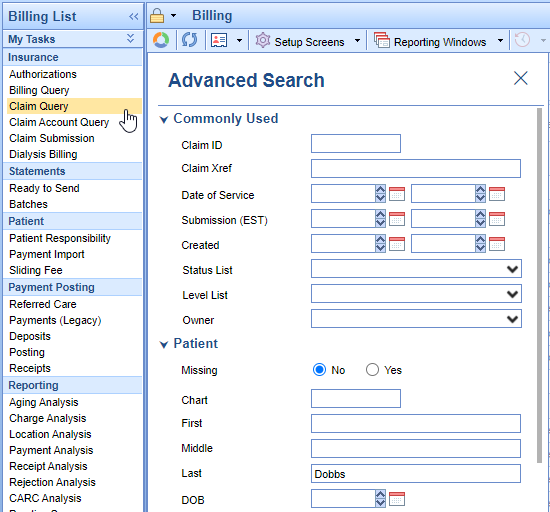
- Double click to open the claim.


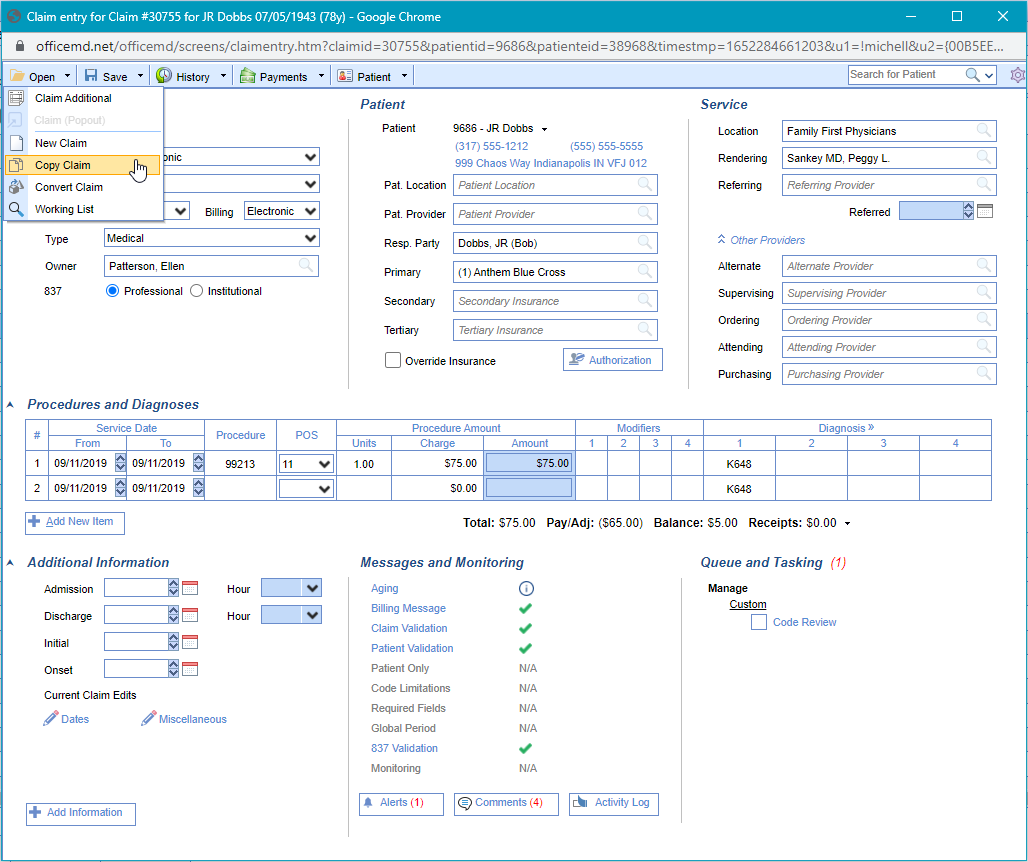
- From the Open icon, click the drop down arrow and select Copy.
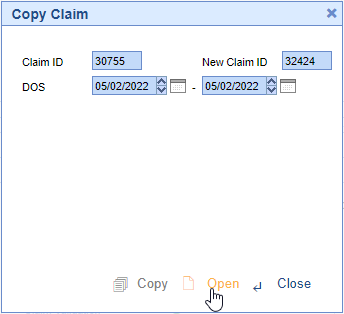
- Enter the new appropriate claim From/To date, and click OK.
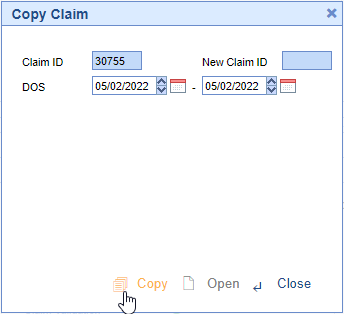
- Click Open in the Copy Claim window.
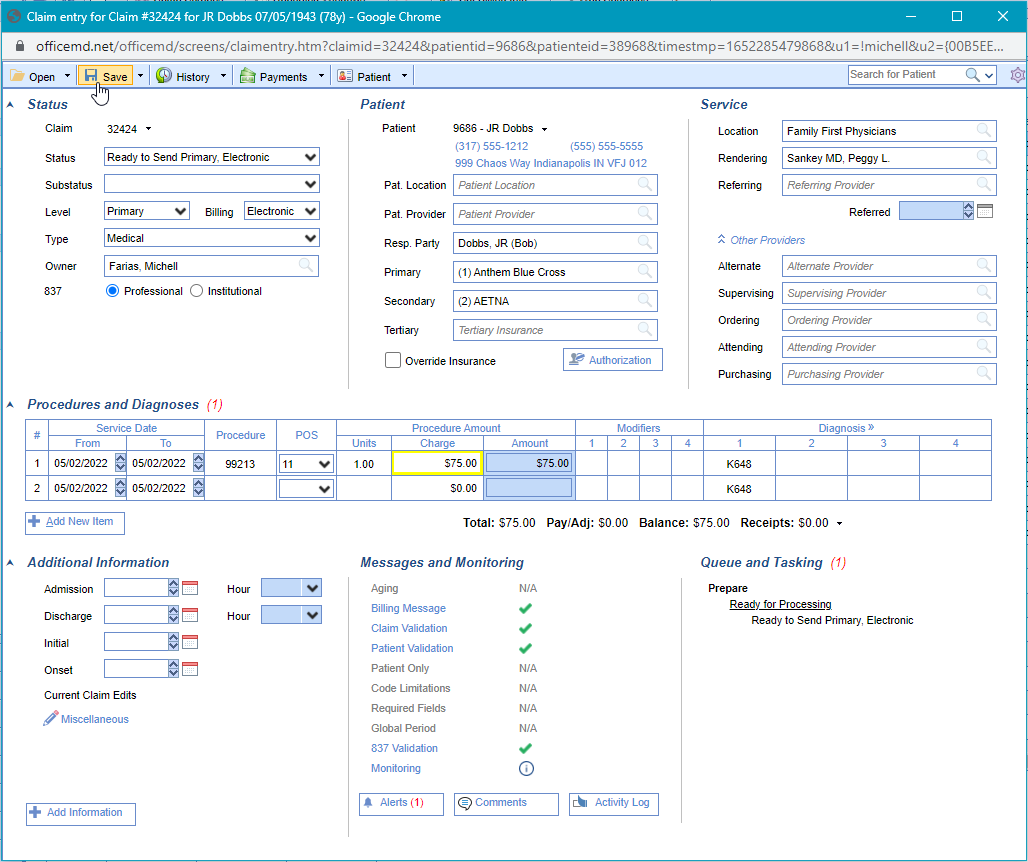
- The new claim will open for you in another window to make any necessary edits. The claim will be in a status of Ready to Send Primary by default.
- Save any changes.

Choice EMR offers an option to make certain changes to multiple claims at one time. This option is called Modify Selected Claim(s). Changes which involve patient information, such as insurance or responsible party, cannot be changed using this functionality; however, changes such as Claim Status, Rendering Provider, Service Location, etc. can be changed for a group of claims. In the event that you need to modify claims, here are the appropriate steps.
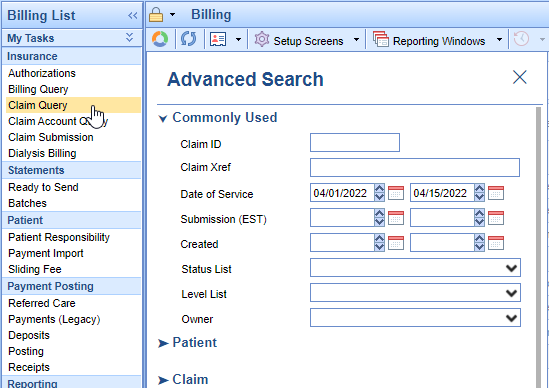
- Go to Claim Query and search for the claims you wish to modify.
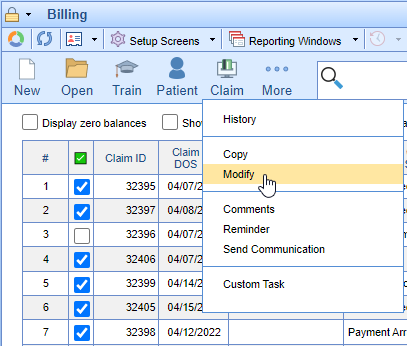
- Check the box next to the claims which need to be updated, click the Claim icon, and select Modify.
- In the dialog box that opens, you will see multiple options which will allow you to make changes to the selected claims. Check the box next to the item(s) you wish to modify, then use the drop down to select the result.
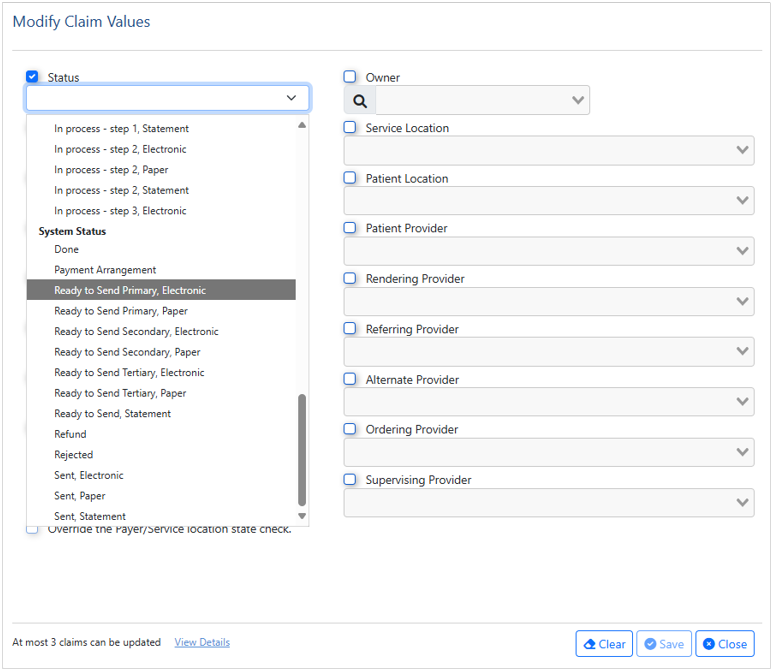
- When all appropriate selections are made, click Save.
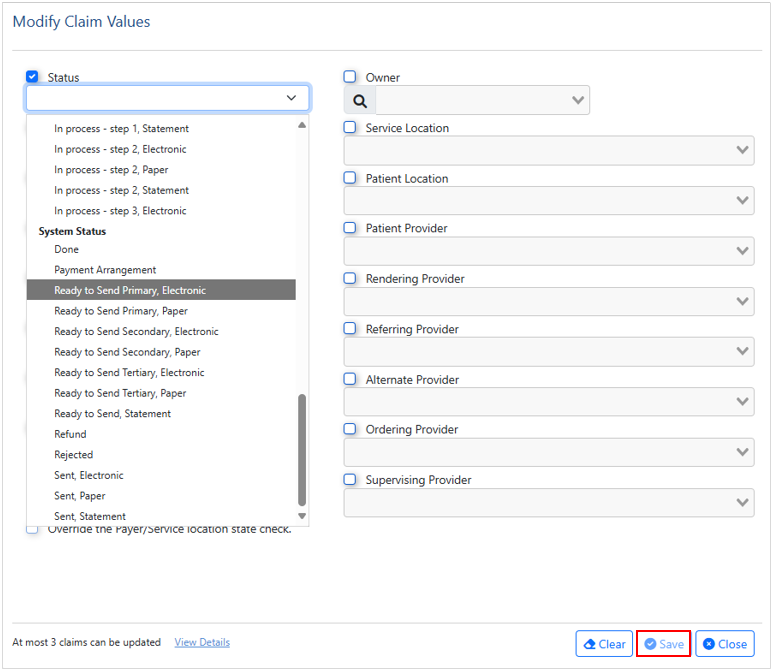
- Note: If you choose the Balance Write-Off functionality, this option will zero out any remaining balance on any of the selected claims. You cannot do a partial amount write-off, or only write-off certain procedure lines.
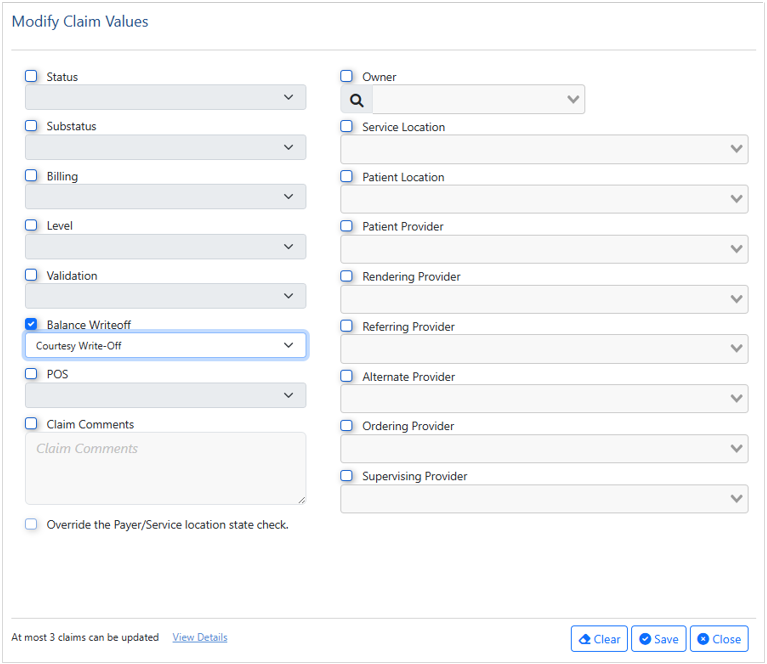
Occasionally, you may need to send a note or documentation to a payer on a claim. Traditionally, those notes go in Box 19 of the CMS-1500 Form, or in the NTE field of the 837 Electronic Claim.
- In an open claim, click the Add Information button on the bottom left of the Claim Entry screen.
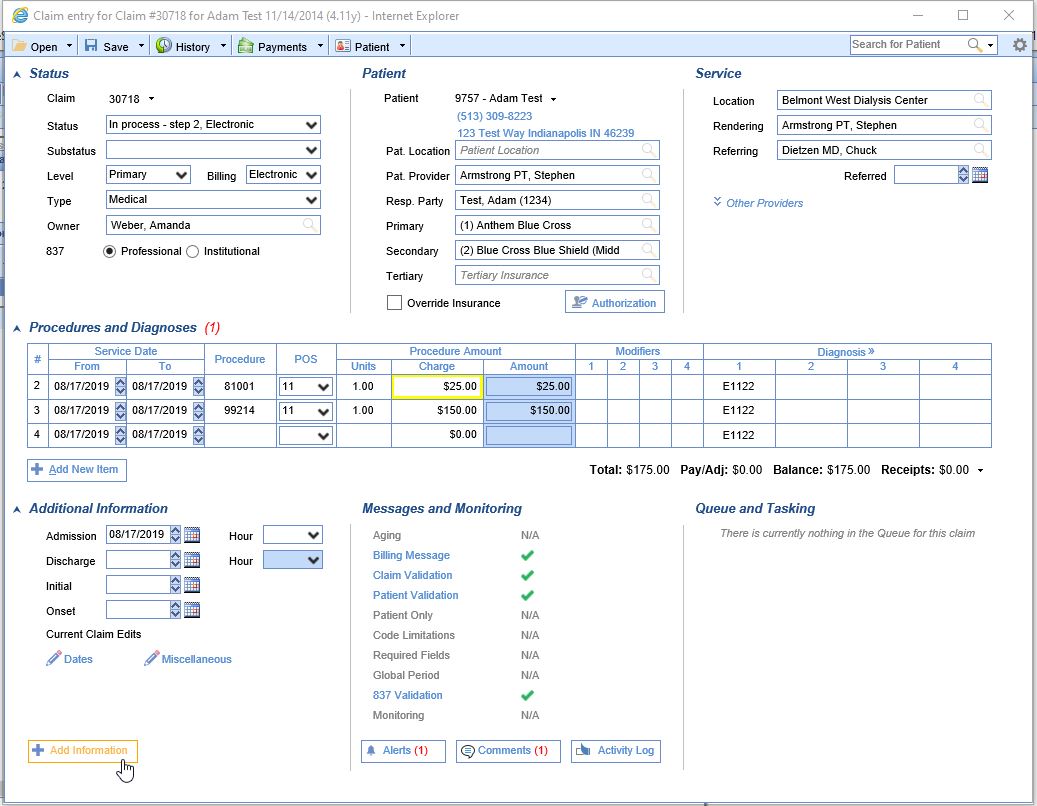

- Under the section Documentation, select Narrative.
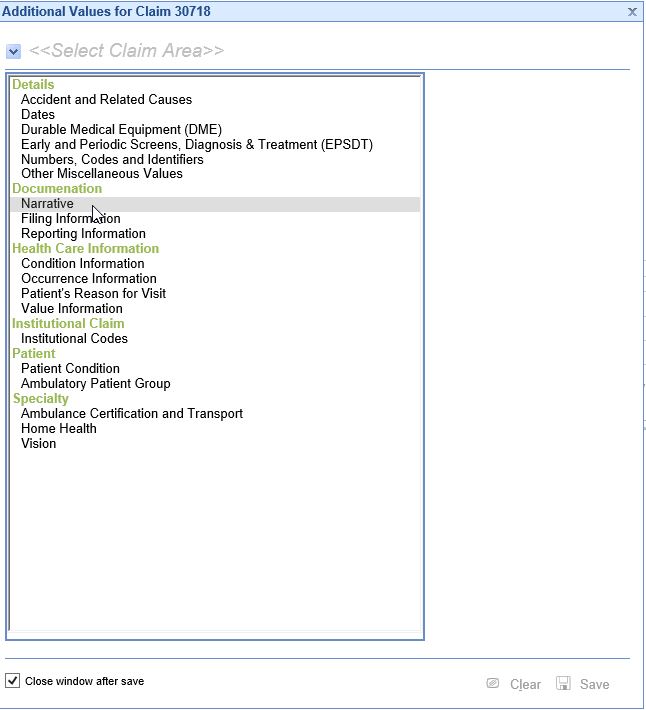
- Set the Code = ADD-Additional Information. Type the necessary information in the open text box. There is a maximum of 80 characters for an electronic claim, and a maximum of 71 characters for a paper claim. The maximum character total includes spaces.
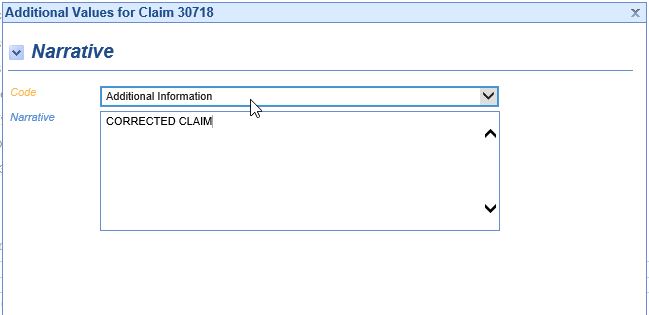
- When completed, click Save, and the Additional Information window will close.


There are instances where the primary payer is Medicare and the Medicare ICN number must be sent on the claim to the seoncdary in order for them to process the claim. In these intances you can document the Medicare ICN number on the claim by doing the following.
In the Claim Query, search for the claim that needs to have the ICN entered.
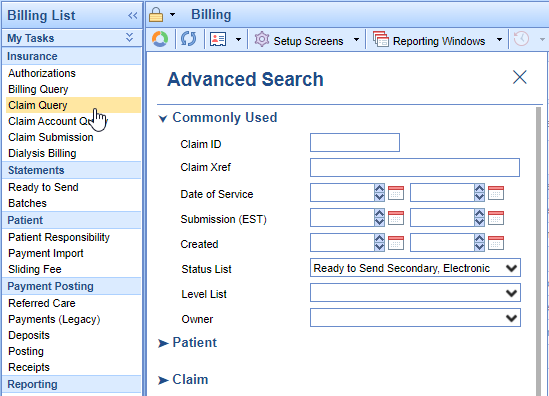
Double click on the claim to open it.

- Click on "Add Information" on the lower left of the claim entry screen.
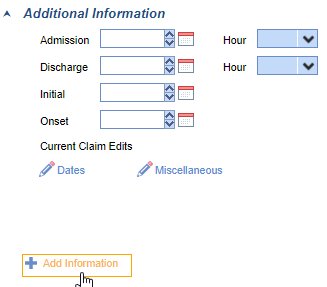
- Click on Numbers, Codes, and Identifiers.
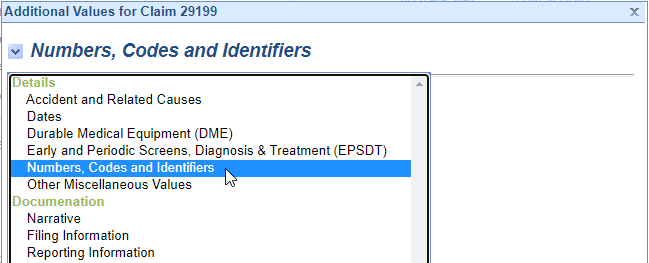
- Add the ICN as depicted below and Save.
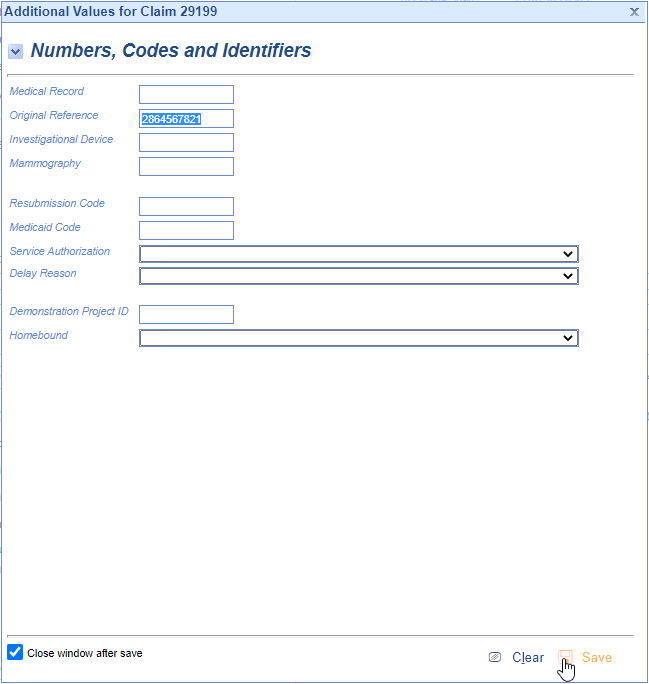
- Claim is now ready to submit to the secondary payer.
The NDC (National Drug Code) is a unique product identifier issued by the FDA for drugs intended for human use. Certain insurance companies require that when a drug is reported on a claim, the NDC information must also be attached to that claim. The NDC must be 11-digits long on a claim; to know how to set this, please see our NDC Formats guide. Within OfficeEMR there are two ways to set up the NDC to transmit electronically on a claim: at the Claim Level or at the Code Level. Below are the steps on documenting it at the claim level.
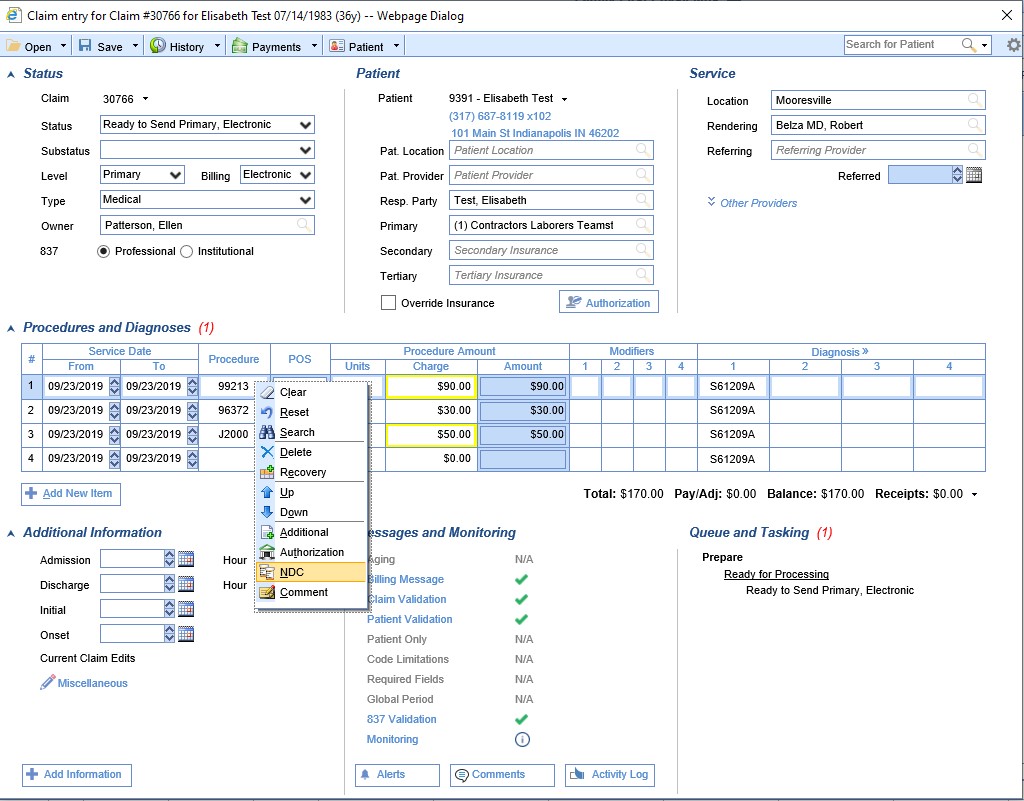
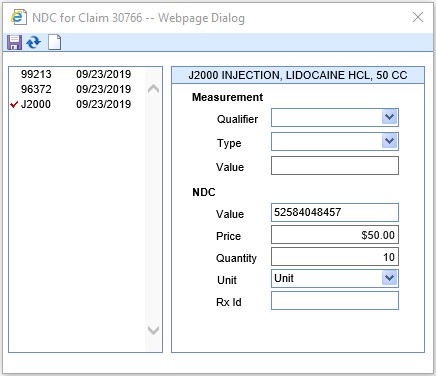
- Right click in any procedure code box and select NDC from the menu. The NDC box will open.

- Select the code which requires an NDC and then complete the NDC section. Select the appropriate unit type from the drop down box and save.
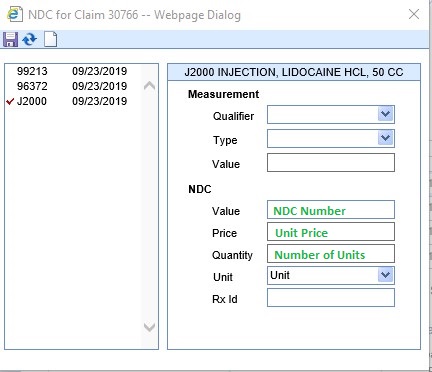
- All fields (except Rx ID) MUST be completed or claims will reject for incomplete information.

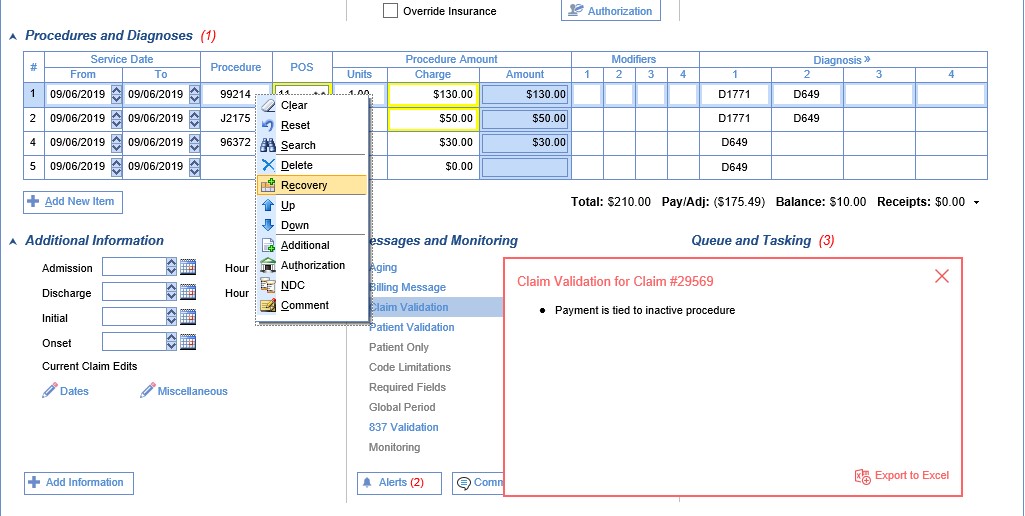
An inactive procedure is a procedure which has been removed from a claim; the validation error (visible under Messages and Monitoring on a claim) means that there is a payment tied to that procedure. Until that payment is removed, the claim will not be able to be submitted or resubmitted. In the event that this occurs, here are the appropriate steps to correct it.
- Find the claim in the Claim Query screen, and open the claim.
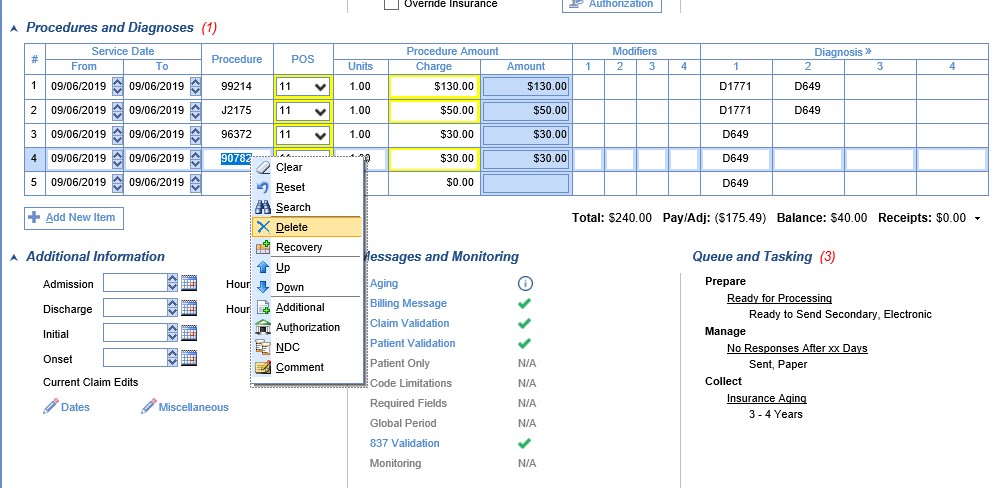
- Right-click over any procedure and select 'Recovery' from the menu.
- In the window that opens, you will want to find the procedure that has a strike-through and also has a Yes in the Payments column. Select that procedure. Click Undo, then Save to close the window.
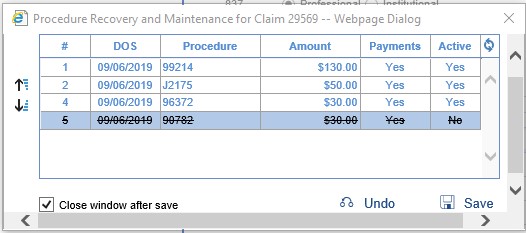
The recovered procedure code should now be visible on the claim. At the top of the claim screen, select History/Claim History.
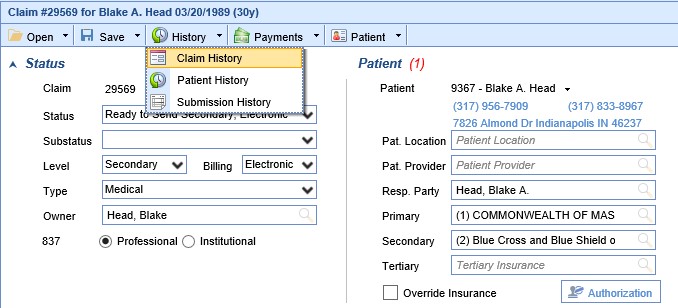
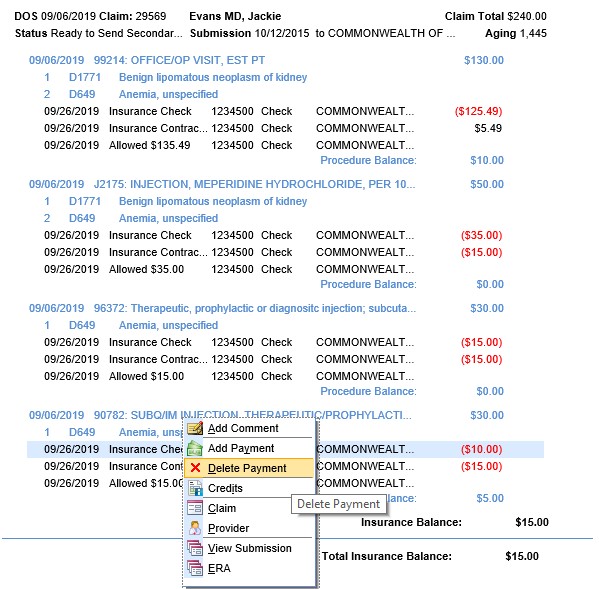
- Right click and select Delete over the payment (and any adjustments) associated with that line item. (If the recovered procedure code is a duplicate of another procedure on the claim, you do have the option of removing the duplicate procedure and leaving the procedure with the payment instead.) On the next screen, click OK.
- Once the payment(s) has been removed, the procedure code can be deleted again, if appropriate.

The Procedure Code - Do Not Bill Flag will affect the Claims screen by placing a strikethrough line through the Procedure Code when the code is set to 'Do Not Bill.' If you see a code displayed with a line through it then that code will not be billed out on a Claim or on a Statement.

This setting can be changed from the Claim deatils screen by right-clicking on the Procedure line and selecting the Billing option. Selecting this will toggle the 'Do Not Bill' flag on/off for only this claim, based on its current status.

Claims that are Missing a Procedure code can be found a couple different ways.
Starting from the Revenue Cycle Wheel:
- Hover over the group and click the magnifying glass to open the billing query screen
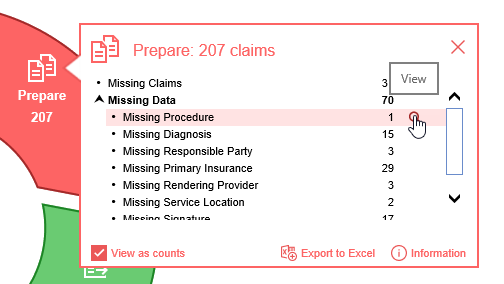
Starting from Claim Query
- In the Billing portal click on Claim Query
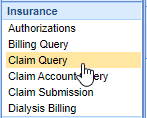
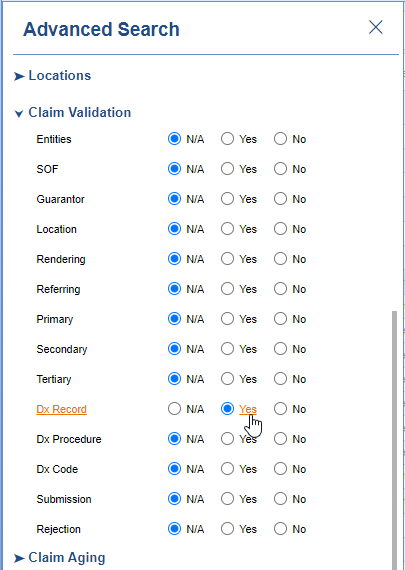
- On the Claim Query Screen under Advanced Search within the Claim Validation section select Yes for DX Record
- Click the Search button to search and find the claims
To add the Missing Procedure
- Double click on one of the claims
- The Procedure box will be outlined in red
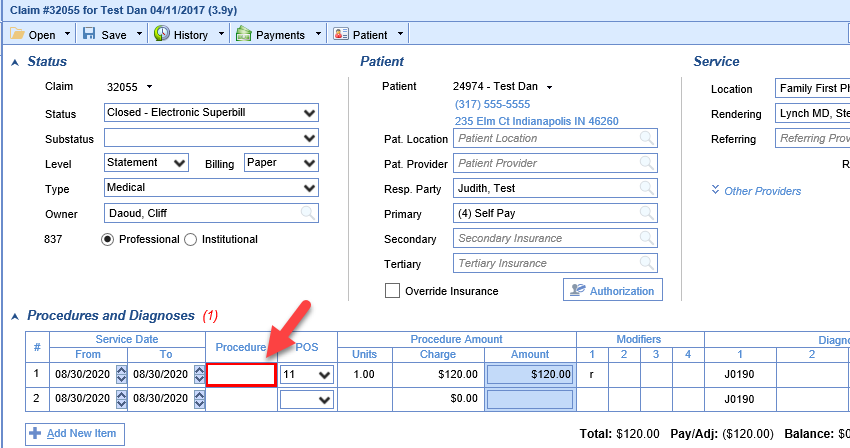
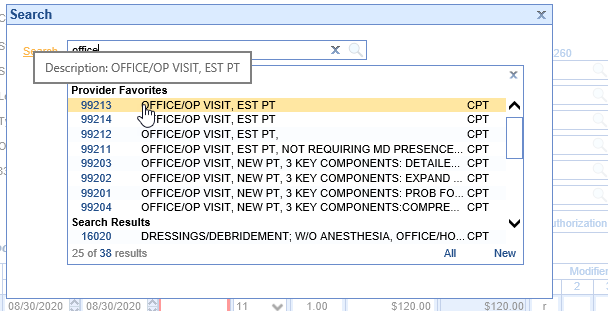
- Right-click inside the Procedure box and select Search
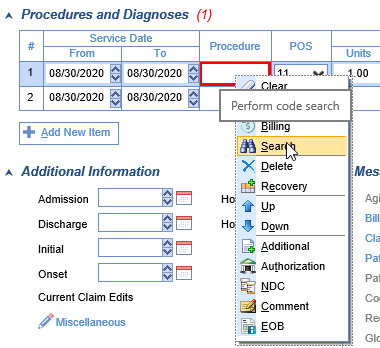
- Find your procedure code on the search screen and click to select it
- Save the claim
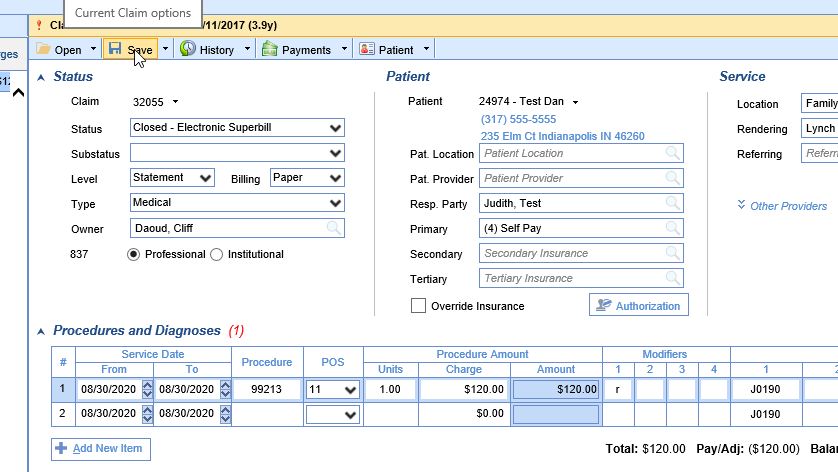
Claims that are Missing Diagnosis codes can be found a couple different ways.
Starting from the Revenue Cycle Wheel:
- Hover over the group and click the magnifying glass to open the billing query screen
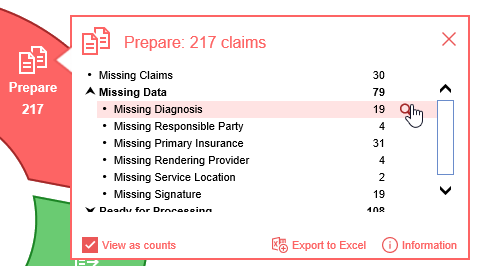
Starting from Claim Query
- In the Billing portal click on Claim Query

- On the Claim Query Screen under Advanced Search within the Claim Validation section select Yes for DX Code
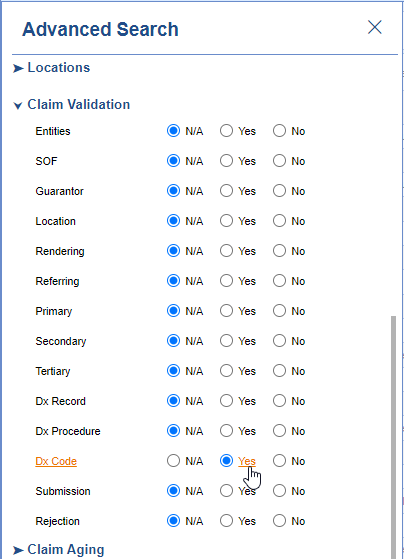
- Click the Search button to search and find the claims
To add the Missing Diagnosis
- Double click on one of the claims
- The Diagnosis 1 box will be outlined in red
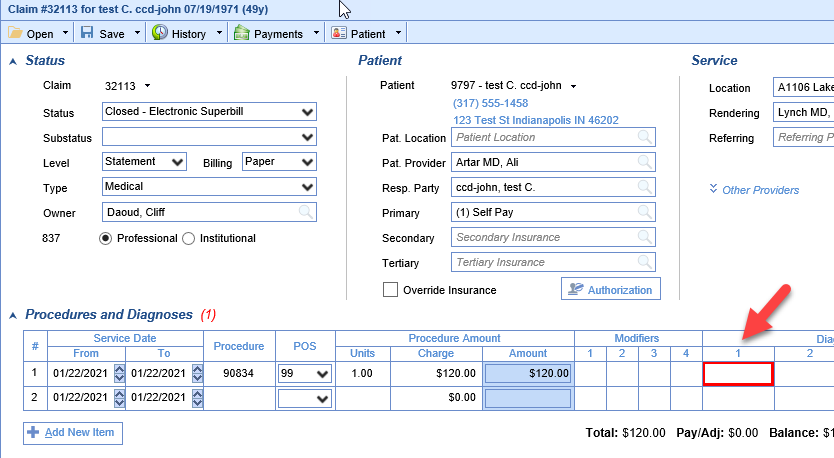
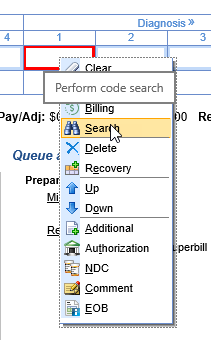
- Right-click inside the Diagnosis 1 box and select Search
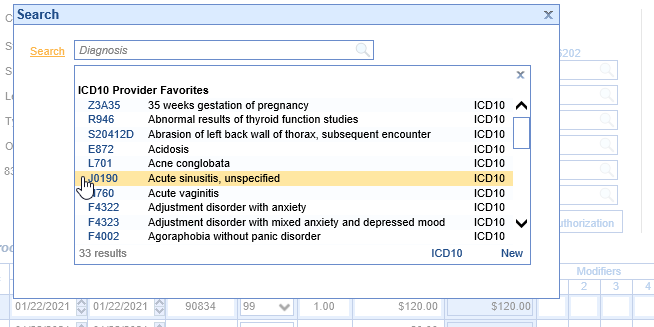
- Find your diagnosis code on the search screen and click to select it
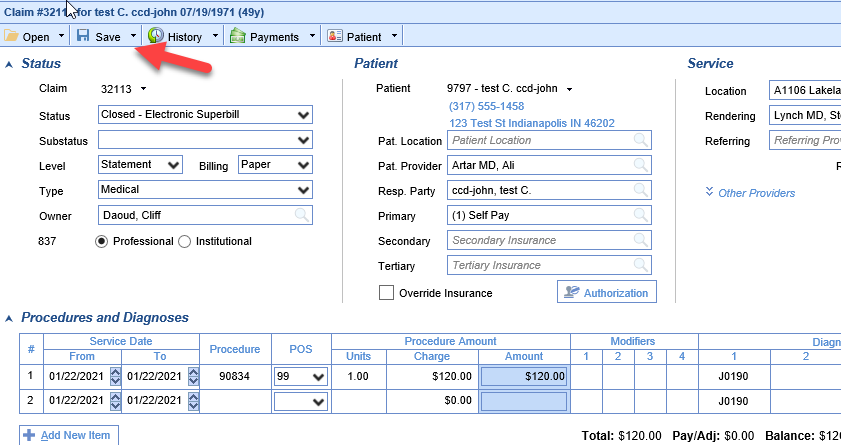
- Save the claim
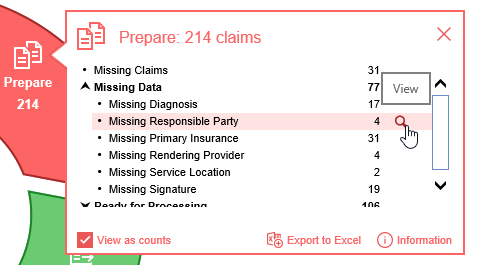
Claims that are Missing a Responsible Party can be found a couple different ways.
Starting from the Revenue Cycle Wheel:
- Hover over the group and click the magnifying glass to open the billing query screen
Starting from Claim Query
- In the Billing portal click on Claim Query

- On the Claim Query Screen under Advanced Search within the Claim Validation section select Yes for Guarantor
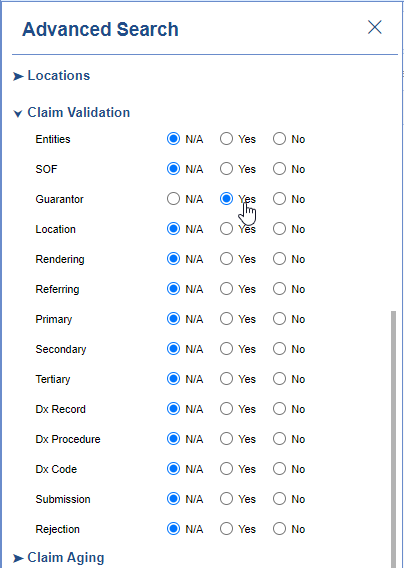
- Click the Search button to search and find the claims
To add the Missing Responsible Party
- Double click on one of the claims
- The Resp. Party box will be filled in pink
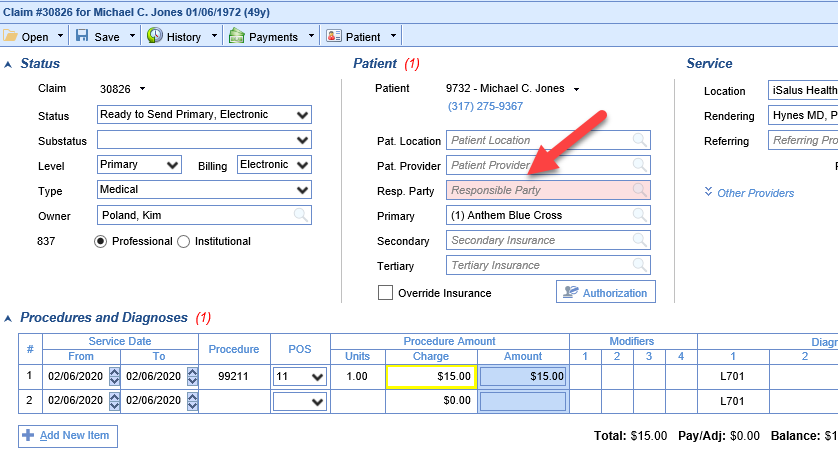
- Click on the search button in the right side of the box

- Select the responsible party (If no responsible party is listed see below)
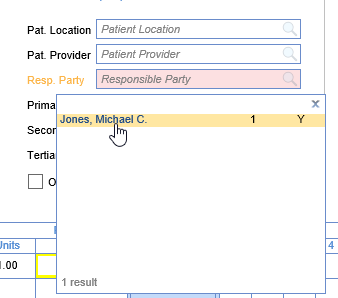
- Save the claim
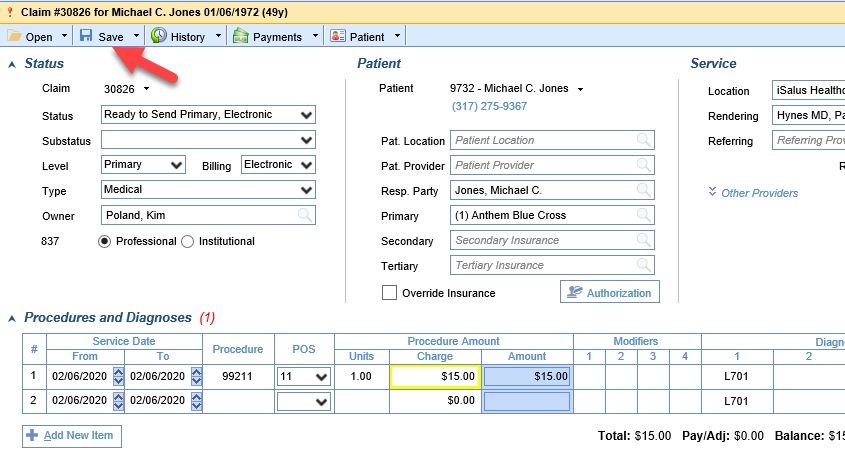
If no Responsible Party is listed
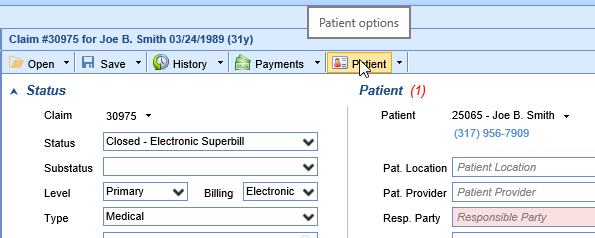
- Click Patient on the toolbar
- Click the Responsible Party section on the left
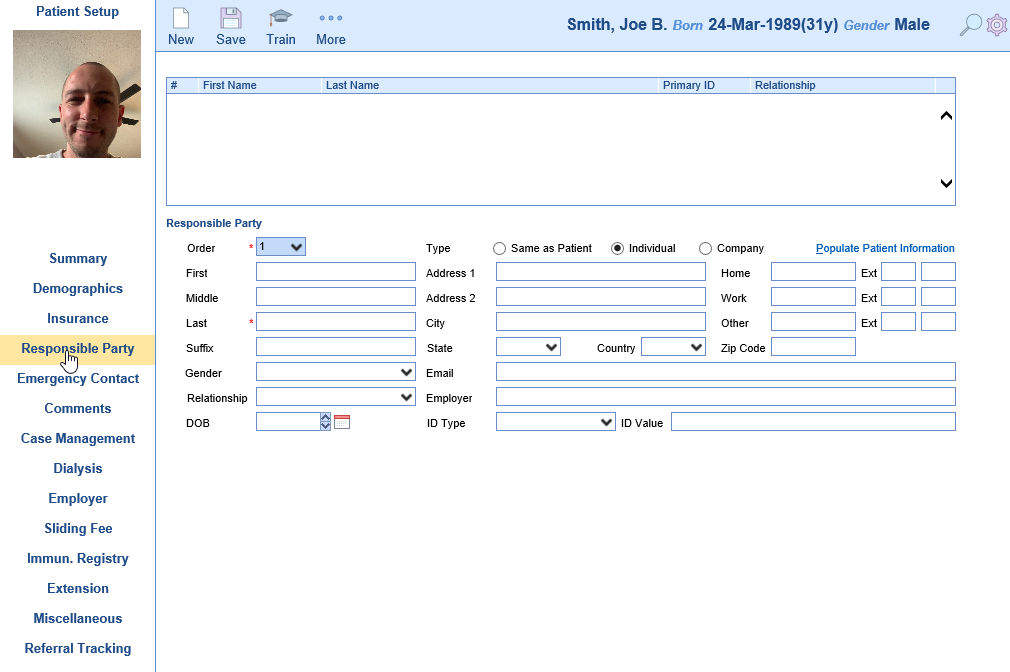
- Add a responsible party
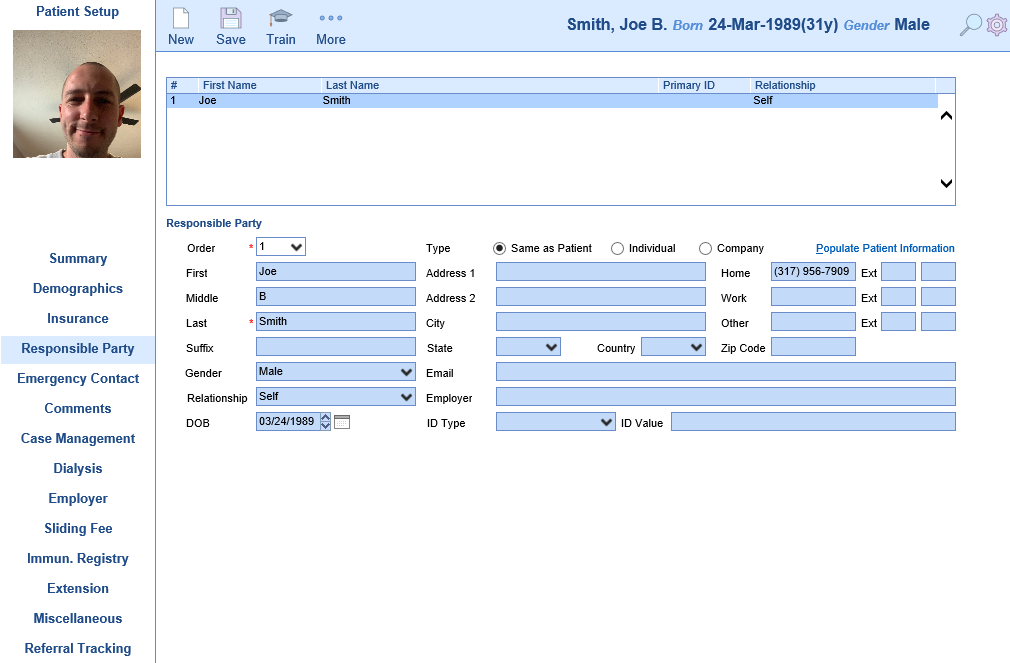
- Close the Patient Setup screen
- Return to "Select the responsible party" step above and continue
Claims that are Missing a Primary Insurance Plan can be found a couple different ways.
Starting from the Revenue Cycle Wheel:
- Hover over the group and click the magnifying glass to open the billing query screen
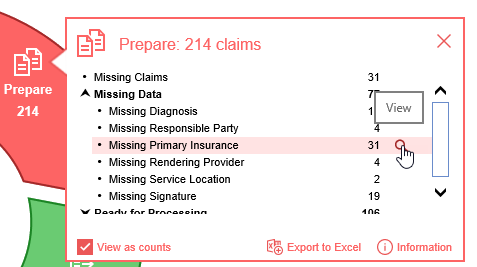
Starting from Claim Query
- In the Billing portal click on Claim Query

- On the Claim Query Screen under Advanced Search within the Claim Validation section select Yes for Primary
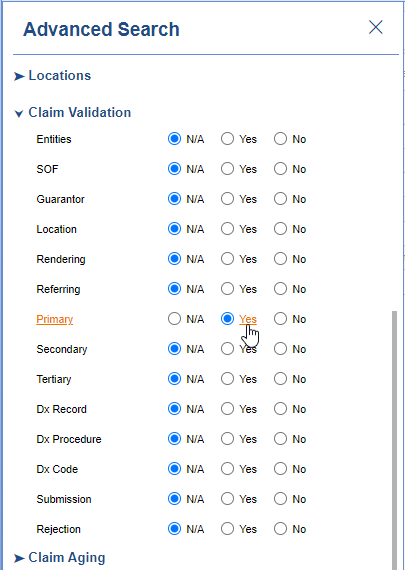
- Click the Search button to search and find the claims
To add the Primary Insurance
- Double click on one of the claims
- The Primary Insurance box will be filled in pink
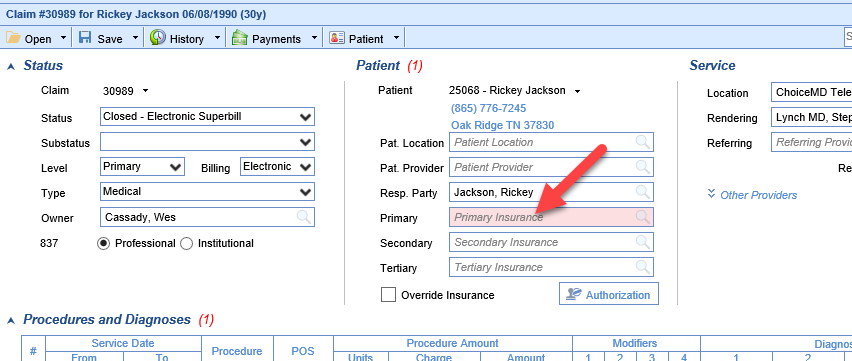
- Click on the search button in the right side of the box
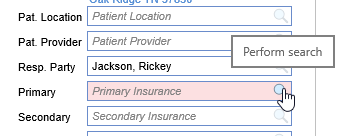
- Select the insurance plan (If no insurance plan is listed see below)
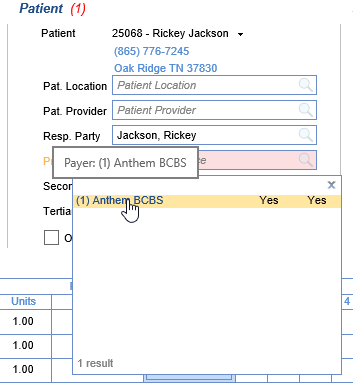
- Save the claim
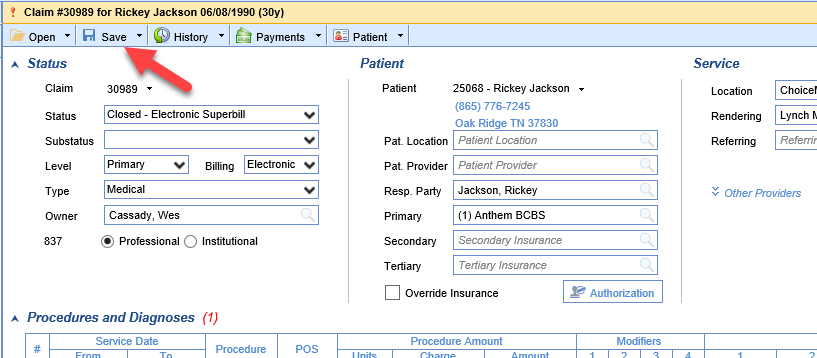
If the Insurance Plan you are looking for is not listed
- Click Patient on the toolbar
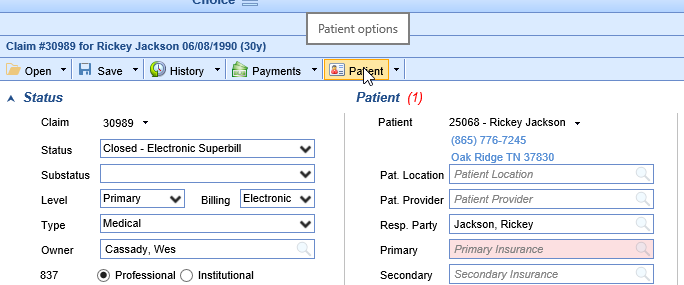
- Click the Insurance section on the left
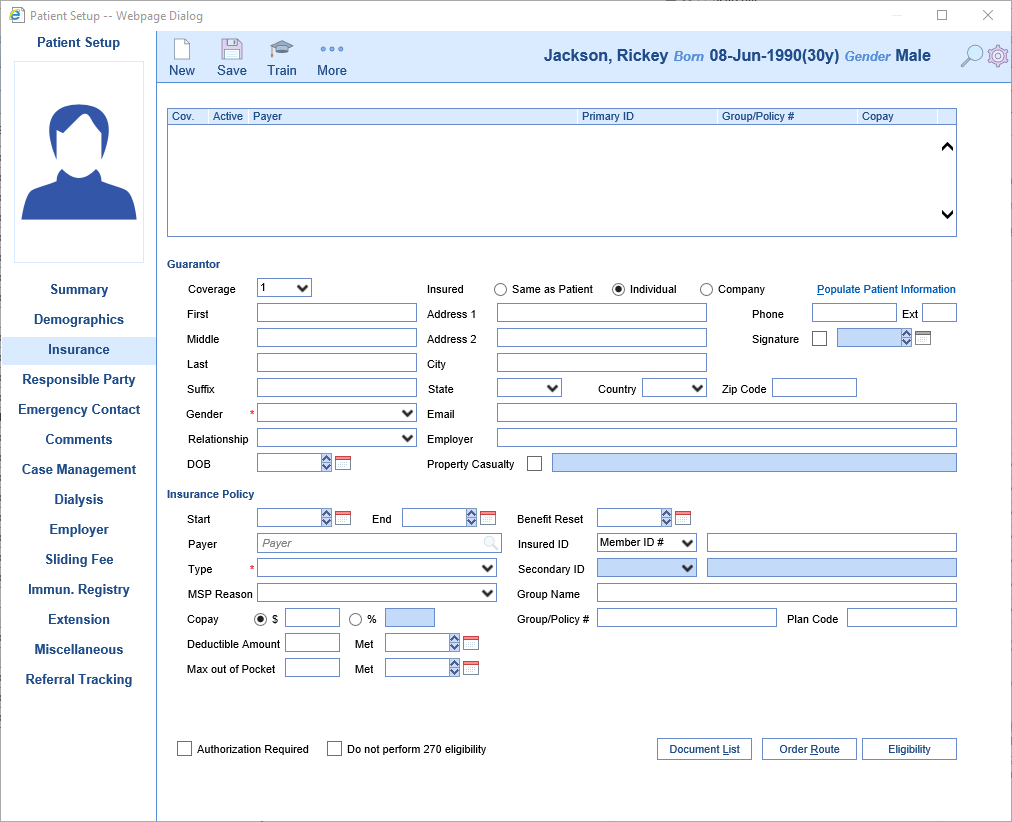
- Add a primary insurance
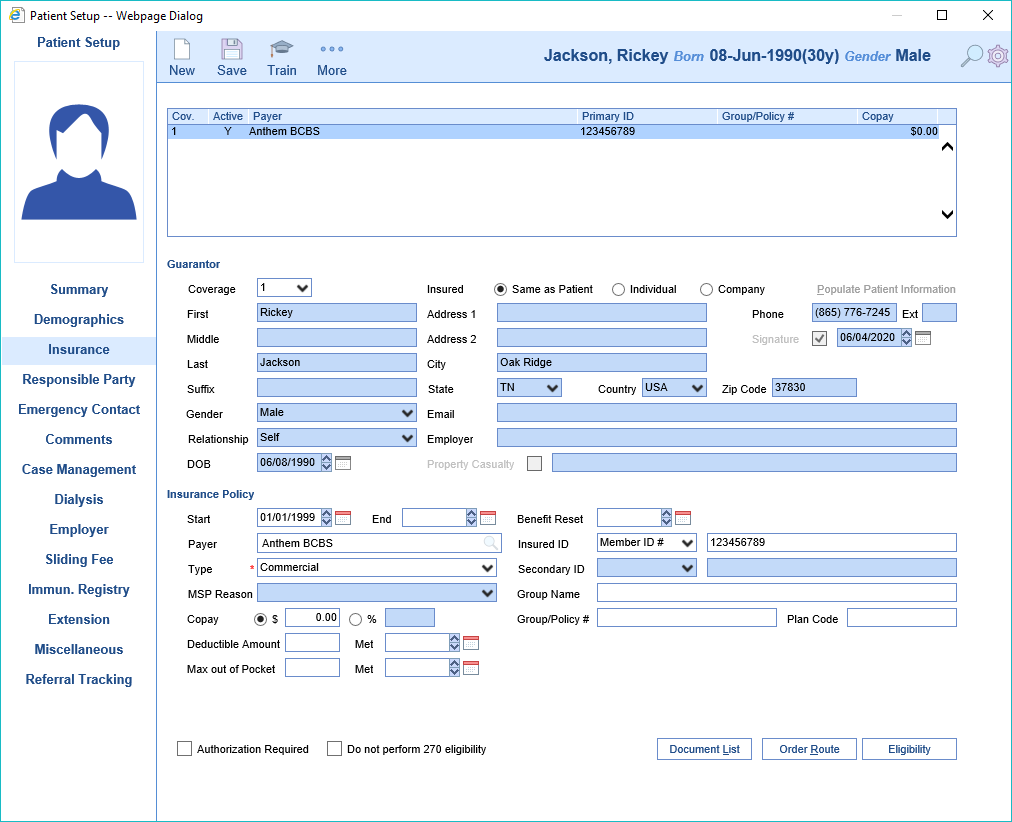
- Close the Patient Setup screen

- Return to "Select the insurance plan" step above and continue
Claims that are Missing a Rendering Provider can be found a couple different ways.
Starting from the Revenue Cycle Wheel:
- Hover over the group and click the magnifying glass to open the billing query screen
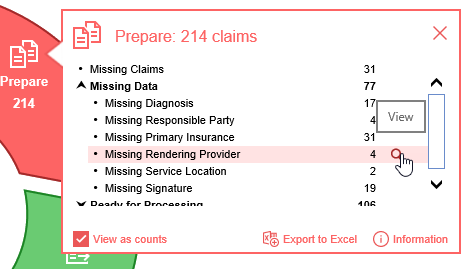
Starting from Claim Query
- In the Billing portal click on Claim Query

- On the Claim Query Screen under Advanced Search within the Claim Validation section select Yes for Rendering
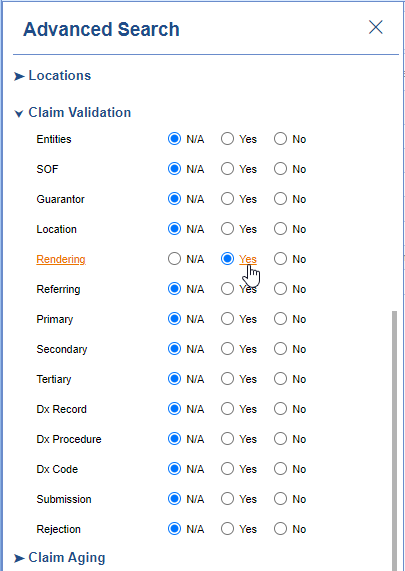
- Click the Search button to search and find the claims
To add the Missing Rendering Provider
- Double click on one of the claims
- The Rendering Provider box will be filled in pink
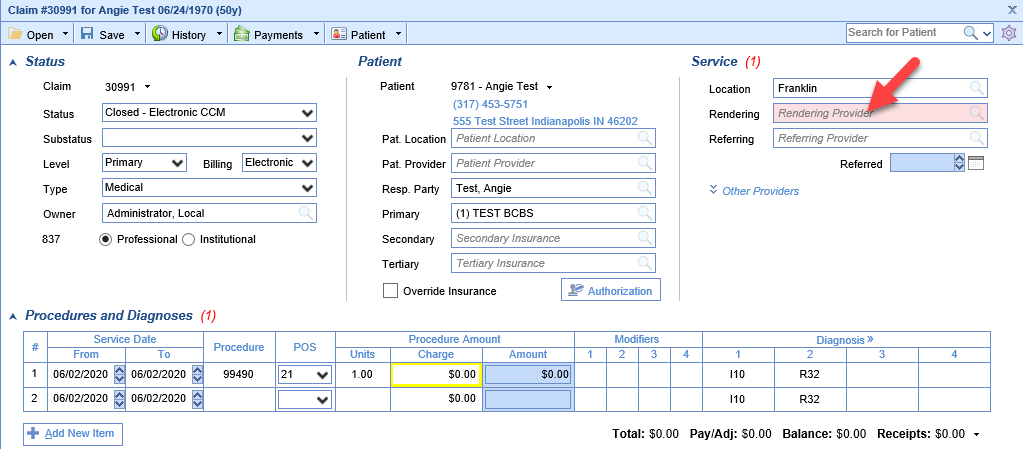
- Either begin typing the provider's name or click on the search button in the right side of the box
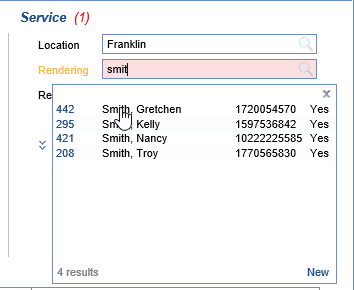
- Find your provider in the search results and click to select it
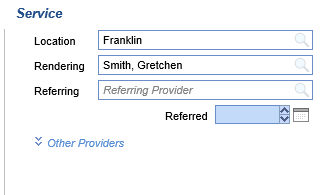
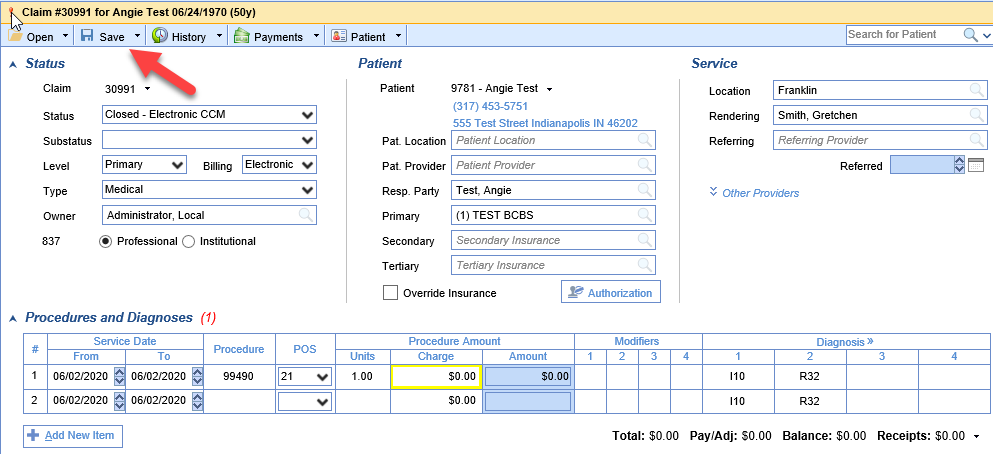
- Save the claim
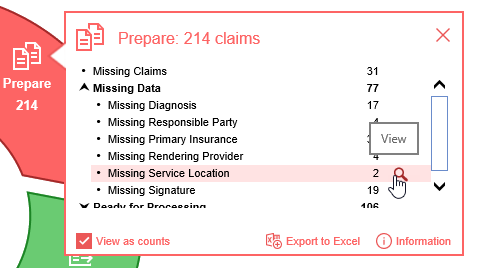
Claims that are Missing a Service Location can be found a couple different ways.
Starting from the Revenue Cycle Wheel:
- Hover over the group and click the magnifying glass to open the billing query screen
Starting from Claim Query
- In the Billing portal click on Claim Query

- On the Claim Query Screen under Advanced Search within the Claim Validation section select Yes for Location
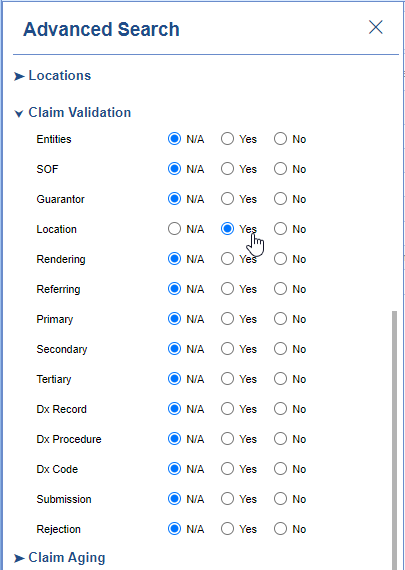
- Click the Search button to search and find the claims
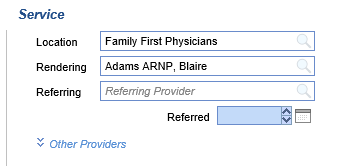
To add the Missing Service Location
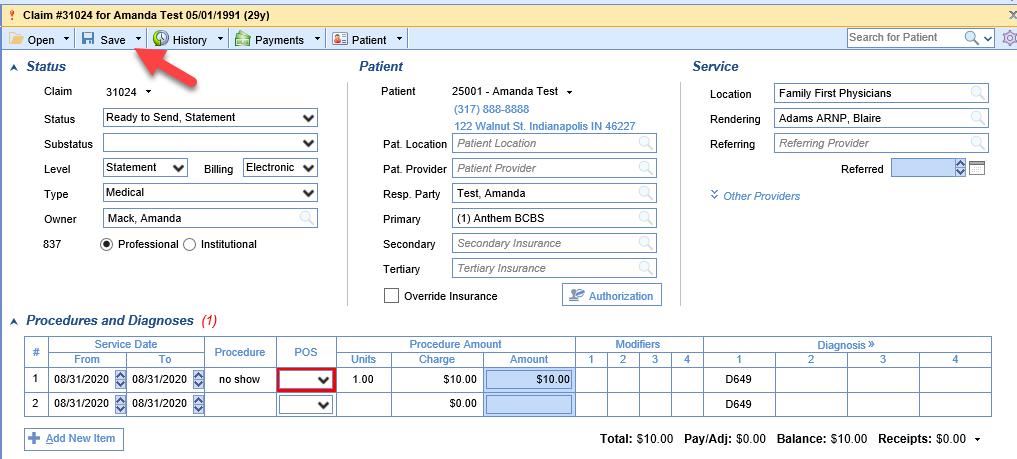
- Double click on one of the claims
- The Service Location box will be filled in pink
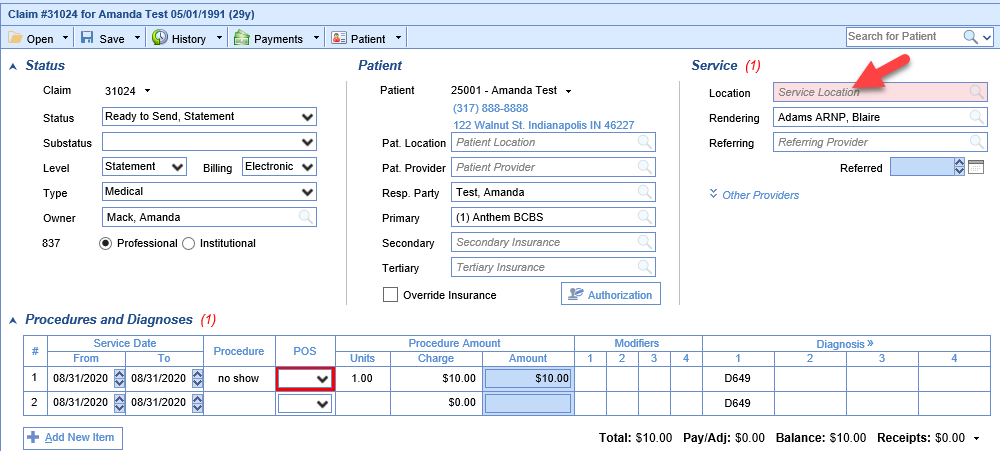
- Either begin typing the location name, part of the address, or click on the search button in the right side of the box
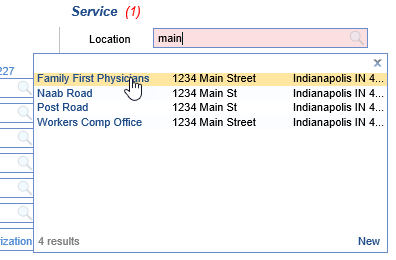
- Find your location in the search results and click to select it
- Save the claim
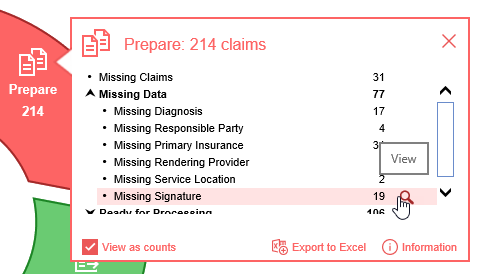
Claims that are Missing a Signature can be found a couple different ways.
Starting from the Revenue Cycle Wheel:
- Hover over the group and click the magnifying glass to open the billing query screen
Starting from Claim Query
- In the Billing portal click on Claim Query

- On the Claim Query Screen under Advanced Search within the Claim Validation section select Yes for SOF
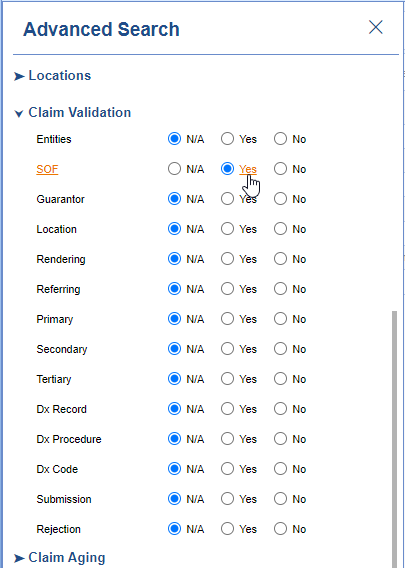
- Click the Search button to search and find the claims
To add the Missing Signature
- Double click on one of the claims
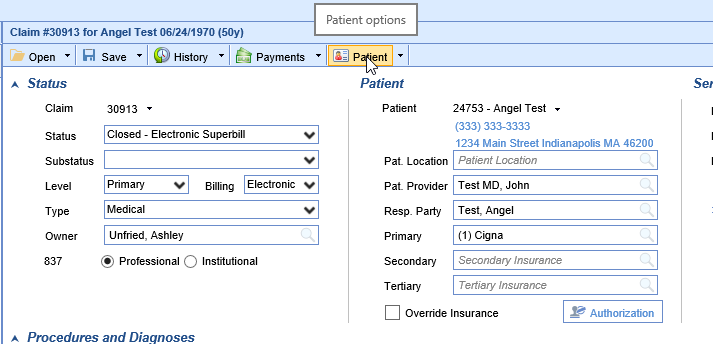
- Click Patient button on the toolbar
- Click the Demographics tab on the left
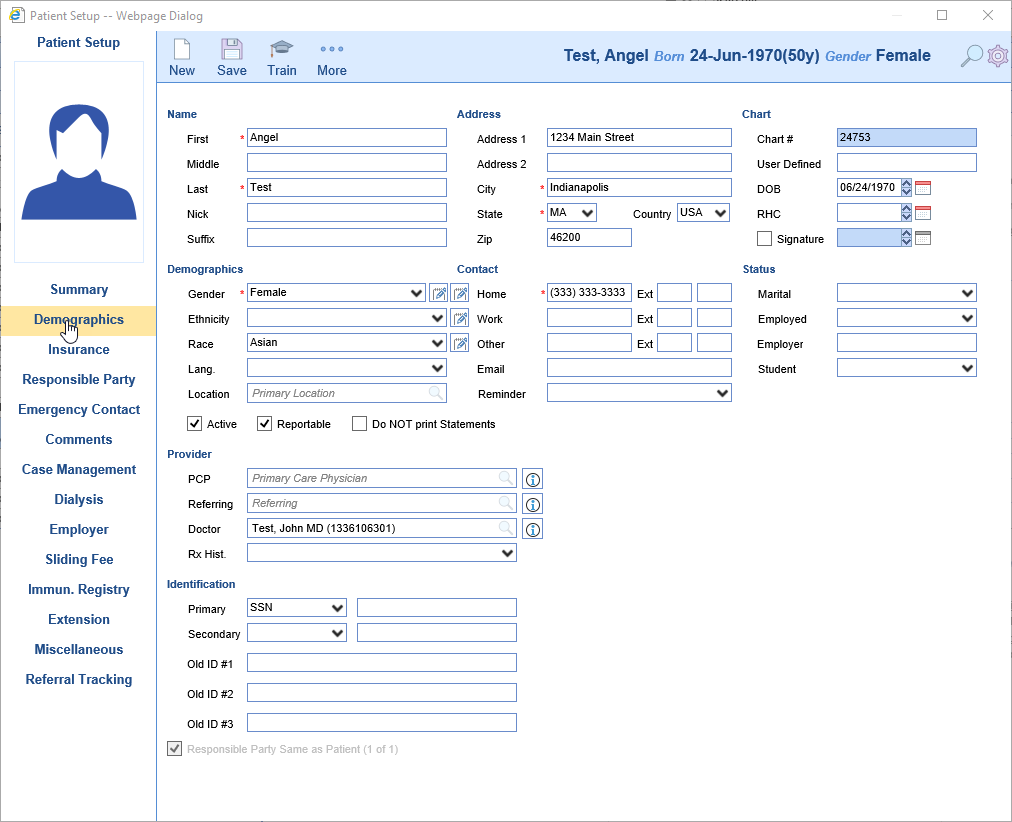
- Click the Signature check box and set the date accordingly

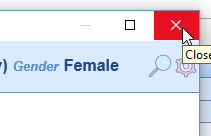
- Close the Patient Setup screen
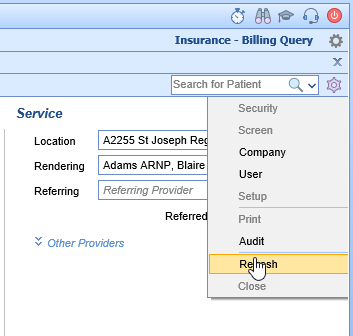
- Refresh the Claim Screen by clicking the gear icon and then click Refresh
Claims that contain NDC Errors can be found:
Starting from the Revenue Cycle Wheel:
- Hover over the group and click the magnifying glass to open the billing query screen
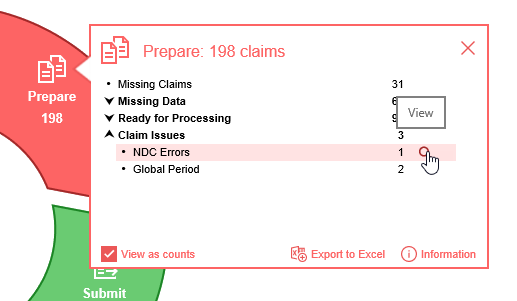
To Correct an NDC Error
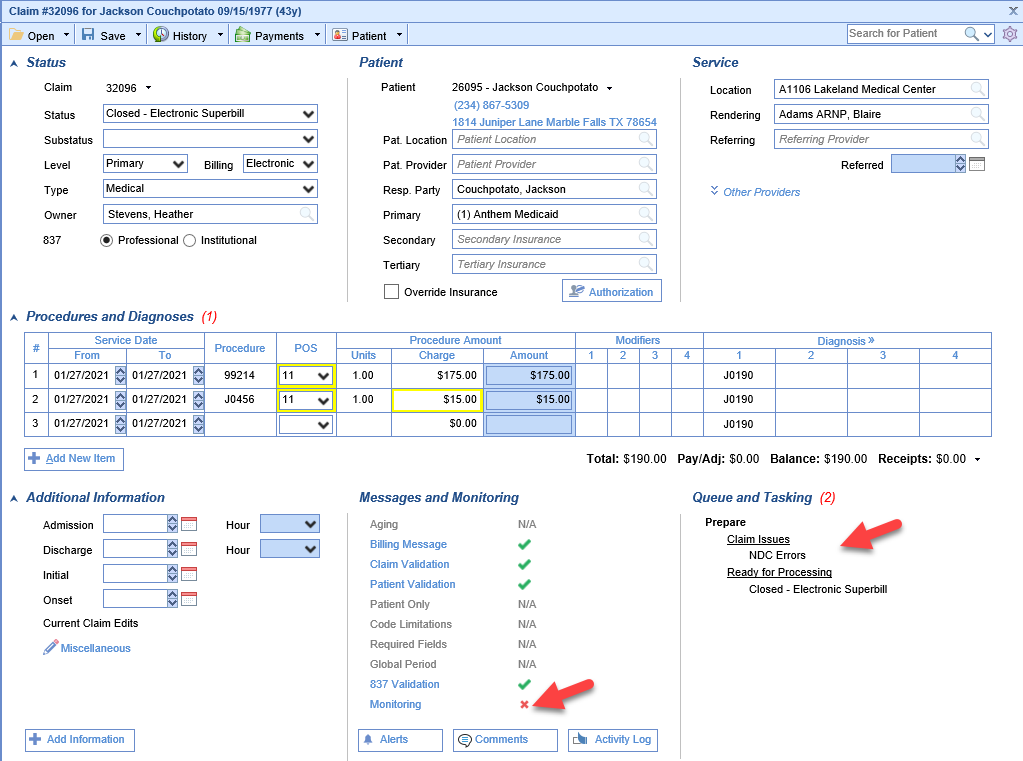
- Double click on one of the claims
- There will be a red X next to Monitoring under Messages and Monitoring and NDC Errors will be listed under Claim Issues under Queue and Tasking
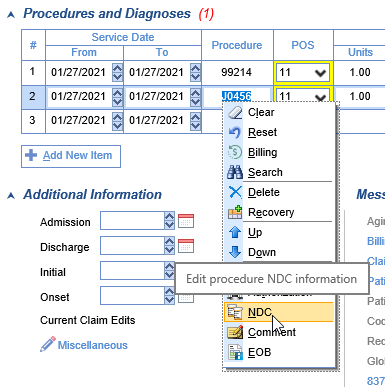
- Right-click on the procedure code and choose NDC.
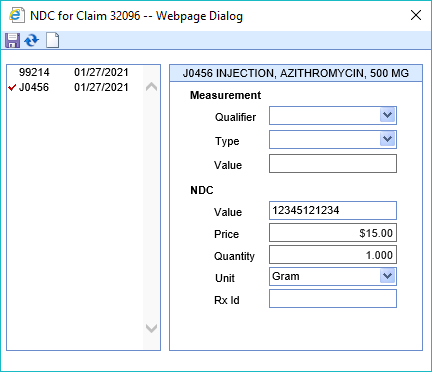
- From this screen you can quickly move between procedure lines to enter the correct values for NDC Value, Price, Quantity, and Unit. These fields are often required for NDC codes. Once changes are made click the Save button
- Monitoring should now have a green check mark and the Claim Issues are now gone. Close the Edit Claim screen. (Note: The NDC error may persist if the documented price and quantity do match the charge on the claim)
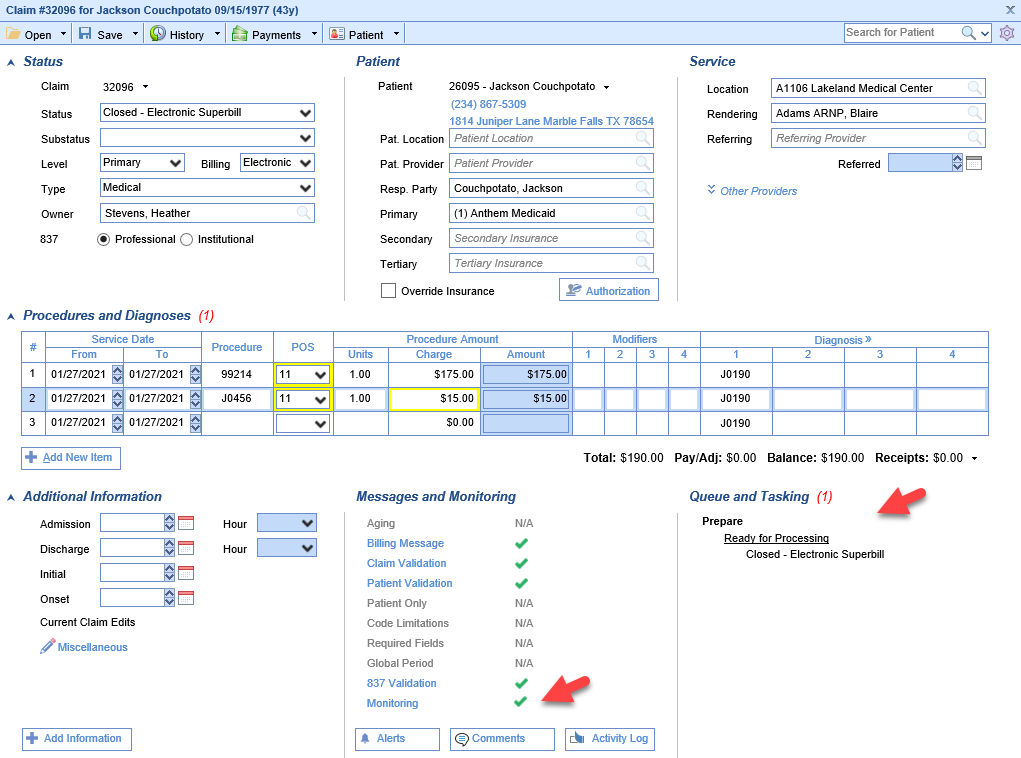
Claims that contain Global Period Issues can be found:
Starting from the Revenue Cycle Wheel:
- Hover over the group and click the magnifying glass to open the billing query screen
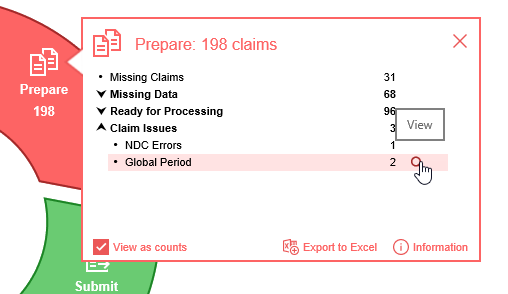
To Correct a Claim with a Global Period Claim Issue
Global Period claims are typically entered with a charge of $0.00 or they are written off. Per example, if a patient has a procedure that has a 90 day global period and that patient is seen by the provider the provider will typically bill a $0.00 post-op visit. If the provider bills an office visit instead then the claim will be flagged as having a Global Period Claim Issue. The office can then:
Change the Charge Amount for the Claim to $0.00
- Double click on one of the claims
- Click the X to clear the amount from the Charge field
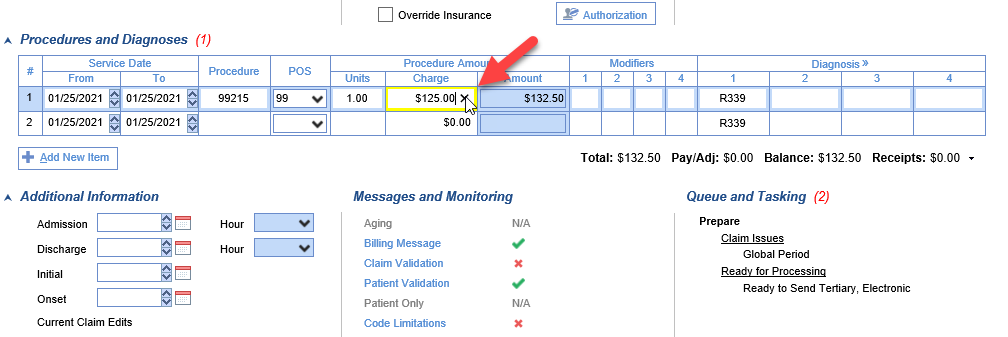
- Click Save
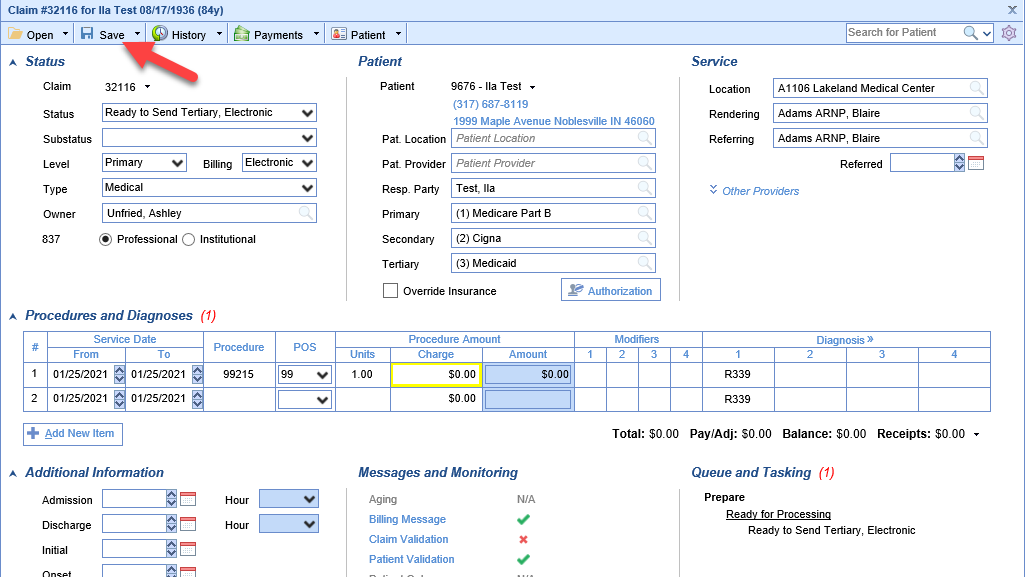
Adjust the Claim Balance to $0.00
- Click once to select one of the claims
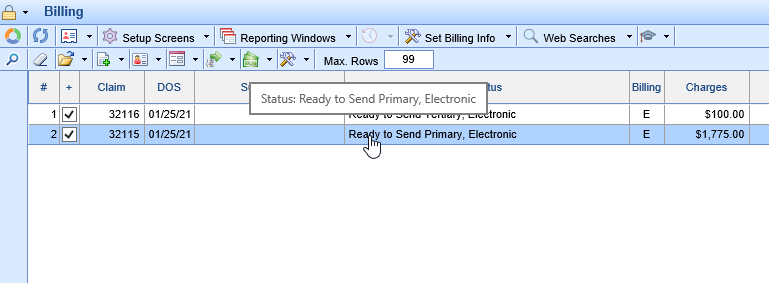
- Click the Billing Options icon on the toolbar and select Payment

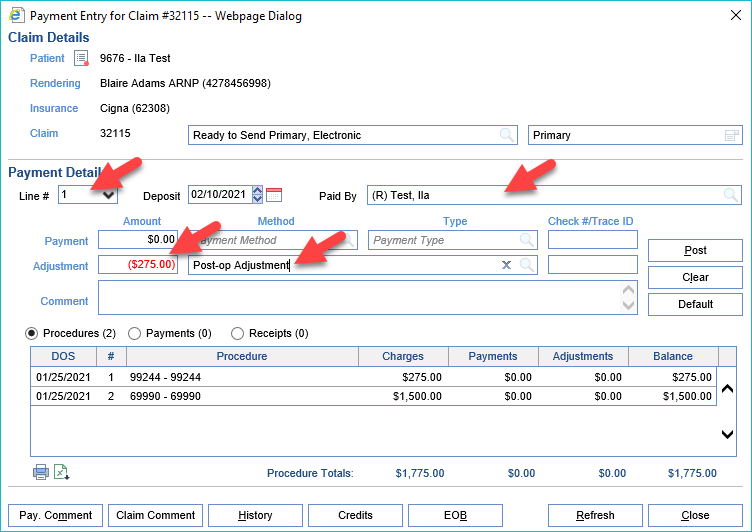
- Select the Line, Add the Paid By, Adjustment Amount, and Adjustment Type
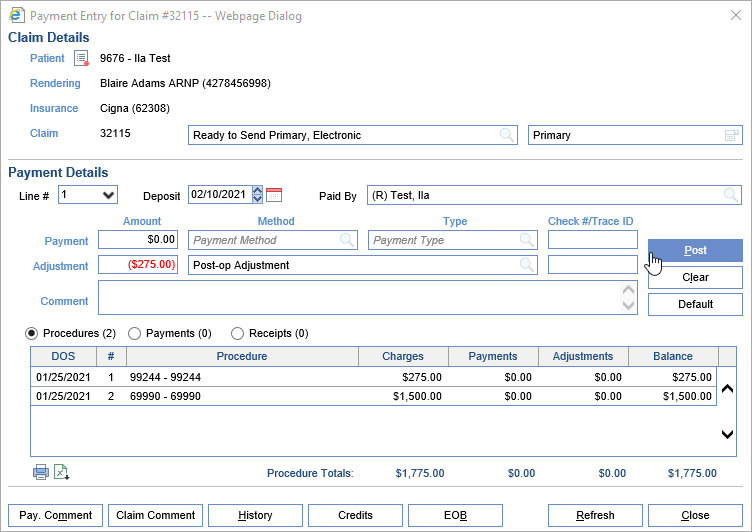
- Click Post
- Repeat steps 3 and 4 for each Procedure line with a balance until the balance for the claim and each line displays $0.00
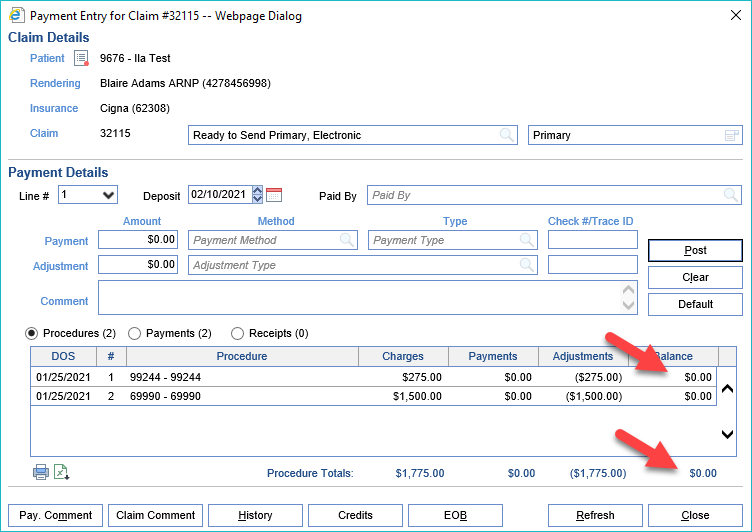
- Click Close
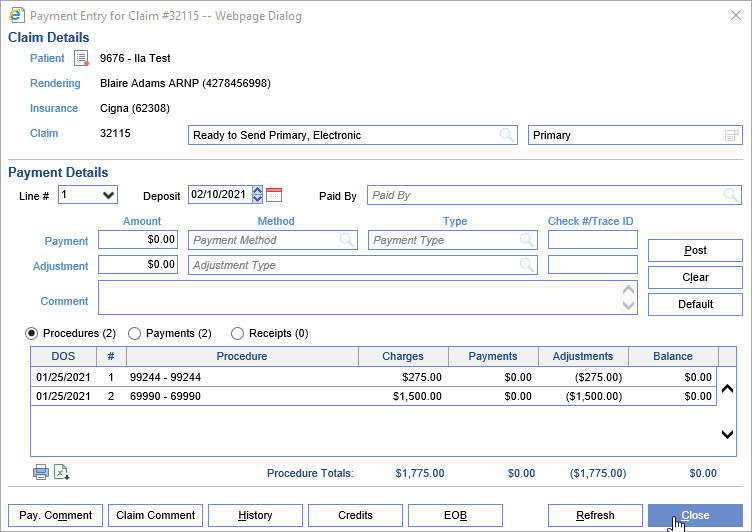
When working on claims, it's important to document your work. It's important to clarify what's happened, both so that the system can track biller productivity and the next biller can follow your work and continue to pursue payment.

Key items when creating a Claim Comment for Billing needs:
Default Comments may be utilized to store specific phrasing used often. These can be added to a particular Claim or Patient Comment and edited to save from having to type it out each time.
Biller Action is used to document any follow-up needed by billing. This will be used for reporting as well as tracking and is especially helpful when working on Aged Receivables.
Followup Date is important as this will alert the date the action needs to be taken.
Assigned To is used to identify who the follow-up is assigned to.
Biller Action Completed is used to record that an action (Adjustment Taken, Appeal Submitted, etc.) was taken for future reporting on Biller Productivity.
Include Claim Comment in Statement Allows the comment to be printed in the Patient Statement as a detailed line underneath the specific claim it's associated with.
- Open the Claim Details as seen here. This can be accessed from Claim Query or linked from related deposits:

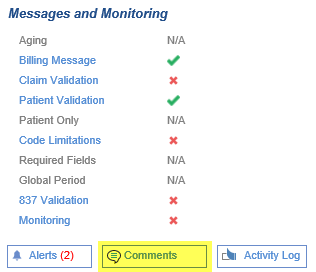
- Begin by clicking the Comments button under the Messages and Monitoring portion of the Claim Details:
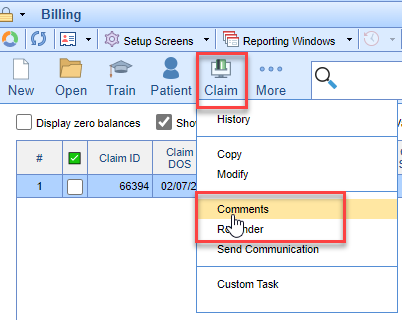
 You can also utilize the Claim Comment from the toolbar:
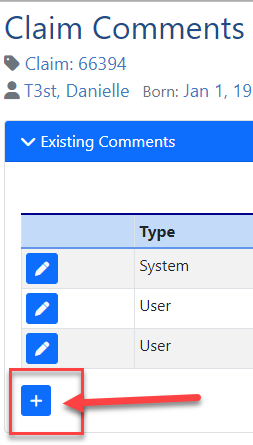
- Click "+" to Add Comment or the pencil icon to Edit Comments:
- Add Comment: Use Default Comments, Biller Action, Followup Date, Assigned To, Biller Action Completed, and Include Claim Comment in Statement options as needed. Then Save.
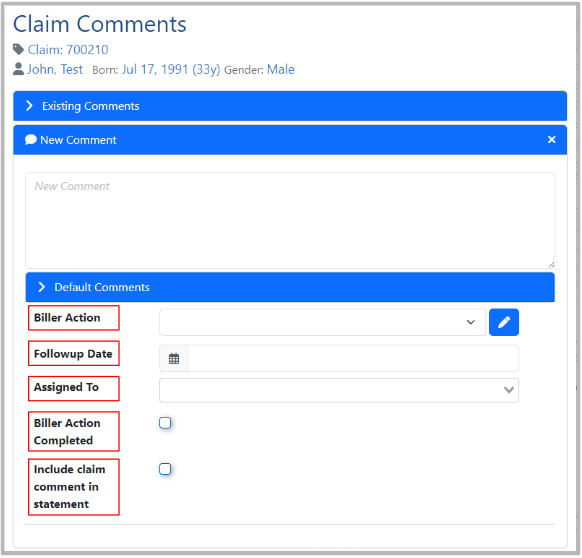
Key items when creating a Claim Comment for Billing needs:
Default Comments may be utilized to store specific phrasing used often. These can be added to a particular Claim or Patient Comment and edited to save from having to type it out each time.
Biller Action is used to document any follow-up needed by billing. This will be used for reporting as well as tracking and is especially helpful when working on aged receivables.
Followup Date Set the date that a biller should follow up if this claim is not resolved. This is an alert of the date the action needs to be taken.
Assigned To is used to identify who the follow-up is assigned to.
Biller Action Completed is used to record that a biller action (Adjustment Taken, Appeal Submitted, etc.) was taken for future reporting on Biller Productivity.
Include Claim Comment in Statement Allows the comment to be printed in the Patient Statement as a detailed line underneath the specific claim it's associated with.
- Open the Transaction History as seen here. This can be accessed from Claim Details or linked from related deposits:

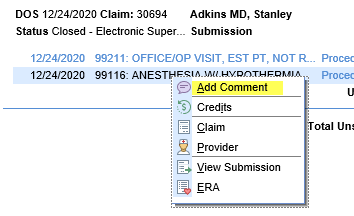
- Right-click any text on the right-hand side of the screen other than the balances. Select Add Comment:
- This will bring you to the Claim comment window as seen here:
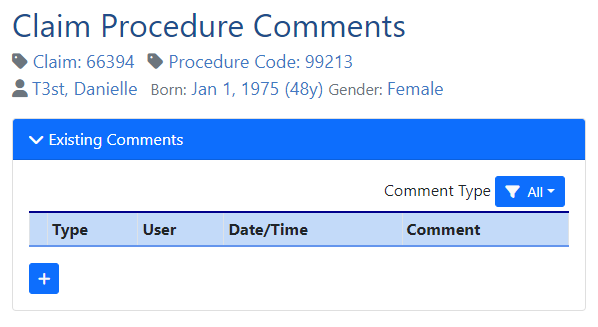
- Comments can be added by clicking the "+" button and entered as shown in Creating a Claim Comment.


 You can also utilize the Claim Comment from the toolbar:


