Below you will find an explanation for each company setting and rule along with the default values that are applied. These settings and rules will affect exactly how receipts are posted (or not posted) to claims.
As a practice, you will be responsible for updating these settings to meet your business rules.
Company Settings
- Receipt Co-Pay Hold Days
- Description: This company setting will be used to determine the number of days that a co-pay receipt will stay in the receipt association queue before becoming an error.
- Default Value: 7
- Business Use Case and Recommendation: Ideally, when a receipt for a co-pay is collected, it is ideal to associate that money to the claim that correlates with that visit that the co-pay was intended for. In a perfect world, the receipt and the claim would be created on the same day and be reconciled automatically. However, the reality is that sometimes the co-pay is collected, but the claim may be created a few days later. This setting allows for this scenario. So, if a payment is collected and there is no claim on day 1, the receipt will be held until day 2. Again, the system will check to see if a claim exists to link this payment to. This process will continue until the money gets associated with a claim or the days that are allowed for in the company setting passes. The recommendation is to set this value based on your practice’s workflow. If you know that your providers consistently add their claims 2-3 days after the visit, it is probably a good idea to have this setting set to 7 days. This allows for the more extreme circumstances where a provider is very far behind.
- Credit Receipt Hold Days
- Description: This company setting will be used to determine the number of days that a non co-pay receipt will stay in the receipt association queue before becoming a credit.
- Default Value: 30
- Business Use Case and Recommendation: Dealing with over payments/ credits from a patient is a pretty common thing that happens which requires a practice to issue a refund. While this is inevitable in medical billing, we wanted to limit the need for this. This setting is intended to help solve this problem. The idea here is that if a patient makes a payment that would result in a credit, iSalus will not apply this payment to a claim to result in a refund. Rather, we will hold the payment for as many days that you set in the setting. So, if a patient were to come in for a visit 2-3 weeks after making an overpayment and was seen again, this outstanding payment can then be applied to this new visit for the patient without you having to think about it. Again, you want to set this value to be in-line with your business practices. If it is common for your patients to return for a follow-up visit every 2 months, it may make sense to change this setting to ‘60’. However, if you have a practice policy that mandates you to issue refunds within 7 days, change that setting to ‘7’.
- Credit Receipt Claim Status
- Description: This company setting will be used to determine the status that a claim will be set to if a receipt payment results in a credit for a patient
- Default Value: Refund
- Business Use Case and Recommendation: Within iSalus, the status of a claim is used to drive workflow and shift claims into logical “buckets” that can be worked by the billing department. If a payment by a patient create a credit, iSalus’ receipt logic will change the status of the claim accordingly. By default, iSalus will set claims that need a refund issued to ‘Refund’. However, because iSalus allows billing departments to customize their own claim statuses, you may find it beneficial to change this default setting.
- Receipt Disbursement Logic
- Description: This company setting will be used to determine how non co-pay payments are applied to a patient balance.
- Options: Oldest to Newest or Newest to Oldest
- Default: Oldest to Newest
- Business Use Case and Recommendation: As patients are making payments, those payments are associated with past due balances. Patients may have a balance past due spanning hundreds of days and several claims. Depending on your business rules, it may make sense to have payments associated with older balances first then progressively work up to newer balances. Or, you may want to have the most recent balances paid off first. Be sure to set this setting to be in line with your business rules.
Procedure Code Setup Settings
The following option will be added to the Procedure Code Setup screen under the 'Code' section:
- Apply Co-Pay to this Procedure First
- Description: This indicator will be used to determine how a Co-Pay payment will be applied. Generally, the acceptable practice is to apply the co-pay towards the E&M code first.
- Options: On or Off
- Default: Set to 'Off' by default.
- Business Use Case and Recommendations: It is a generally accepted billing practice to assign co-payments to the Evaluation and Management Code for a visit. However, not all practices follow this rule. Therefore, iSalus has made a setting available on the Procedure Code Setup screen to allow a practice to determine which code a co-pay will be applied to. By default, the below code list will be set to do this. As a practice, it is important to review this list and update any other codes in your system that should follow this rule.
- 99201-99215 - Office or Other Outpatient Services
- 99217-99226 - Hospital Observation Services
- 99221-99239 - Hospital Inpatient Services
- 99241-99255 - Consultation Services
- 99281-99288 - Emergency Department Services
- 99291-99292 - Critical Care Services
- 99304-99318 - Nursing Facility Services
- 99324-99337 - Domiciliary, Rest Home (e.g., Boarding Home), or Custodial Care Services
- 99339-99340 - Domiciliary, Rest Home (e.g., Assisted Living Facility), or Home Care Plan Oversight Services
- 99341-99350 - Home Services
- 99354-99416 - Prolonged Services
- 99366-99368- Case Management Services
- 99374-99380 - Care Plan Oversight Services
- 99381-99429 - Preventive Medicine Services
- 99441-99452 - Non-Face-to-Face Services
- 99450-99457 - Special Evaluation and Management Services
- 99453-99091 - Digitally Stored Data and Remote Physiologic Monitoring Services
- 99457-99457 - Remote Physiologic Monitoring Treatment Management Services
- 99460-99463 - Newborn Care Services
- 99464-99465 - Delivery/Birthing Room Attendance and Resuscitation Services
- 99466-99467- Inpatient Neonatal Intensive Care Services and Pediatric and Neonatal Critical Care Services
- 99483 - Cognitive Assessment and Care Plan Services
- 99484 - General Behavioral Health Integration Care Management
- 99487-99490 - Care Management Evaluation and Management Services
- 99492-99494 - Psychiatric Collaborative Care Management Services
- 99495-99496 - Transitional Care Evaluation and Management Services
- 99497-99498 - Advance Care Planning Evaluation and Management Services
- 99499 - Other Evaluation and Management Services
Claim Status Settings
The following option will be added to the Claim Status Setup screen.
- Go to Setup: Billing Setup: Payers

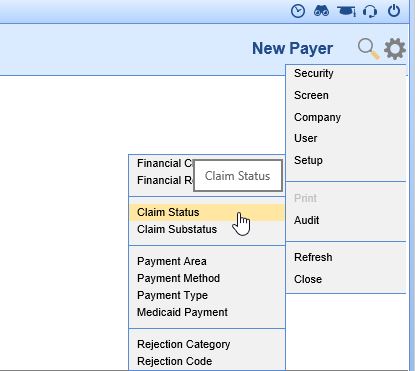
- In the upper right corner, next to the magnifying glass, click on the gear icon to open the Window Settings menu. Go to Setup, then Claim Status. The Claim Status dialog box will open.

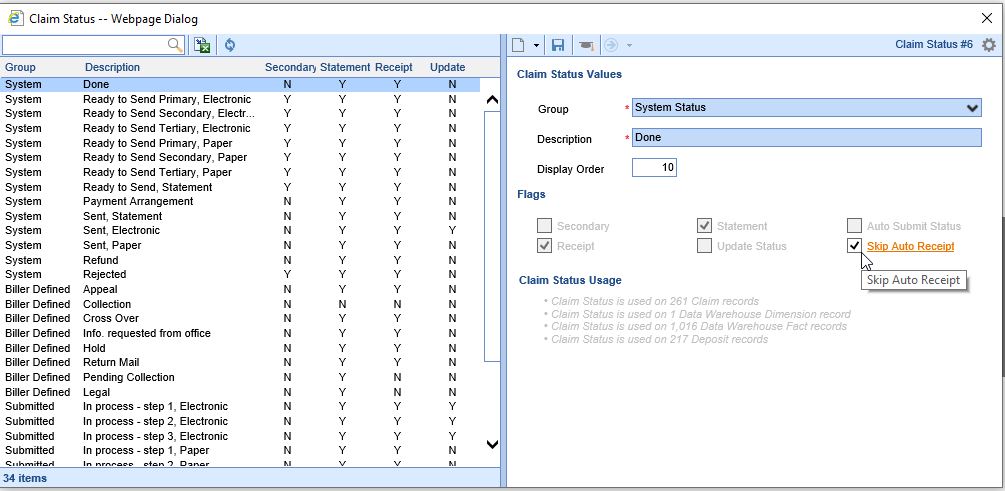
- Select a Claim Status on the left side of the screen. On the right side of the screen, check the Skip Auto Receipt checkbox. Save.

- Repeat as necessary for each Claim Status. At this time, each Claim Status will need to be marked individually.
If the Claim Status option is not available on the menu, and the user has the Admin role, please contact the iSalus Customer Success team to turn this functionality on.


