OfficeEMR is integrated with CoverMyMeds Real-Time Benefit Checks & Electronic Prior Authorizations to provide prescribers with prescription price transparency and an electronic prior authorization module directly within the EHR. This feature set is available to all practices at no cost. If you are interested in signing up please complete the Type Form. A support representative will be reaching out once this has been enabled. Before you are ready to begin using the feature you will want to configure the User & Company settings appropriately to initiate the ePA during the prescribing process appropriately. See the Step By Step Guide to review the necessary configurations and gain a deeper understanding of the feature.
Real-Time Benefit Checks (RxBC)
The CoverMyMeds Real-Time Benefit Check module provides prescription cost information at the time of prescribing. This unique algorithm provides the cost based on the patient's insurance, pharmacy, and drug selected during the prescribing process. This solution also identifies if a Prior Authorization is required and if a discount card might be available to save the patient some money.
Electronic Prior Authorization (ePA)
For years, practices across the country have used the CMM ePA website at no charge to streamline the process of submitting Prior Authorizations on high-dollar medications to ensure patients can get the care they need. The OfficeEMR - CoverMyMeds Electronic Prior Authorization (CMM ePA) module allows users to automatically submit an ePA within the prescribing workflow. ePAs can be completed within the My Task List - CoverMyMeds ePA.
In order for the CoverMyMeds integration to work, a few things must be pre-configured. This article describes these requirements.
Product Setup
The CoverMyMeds integration can be turned on/off by adding a new product to the practice. This step can only be completed by the iSalus Support team. Please reach out to request this: support@isalushealthcare.com.
Company Settings
Decide if the Benefit Check option is enabled or hidden for your company: Run real time prescription benefit check (RxBC)
User Settings
Decide if the Benefit Check option is checked or not checked by default for your user: Run real time prescription benefit check (RxBC)
Our application has the ability to retrieve prescription cost information based on a patient/drug/pharmacy combination via the CoverMyMeds Real Time Benefit Check integration (RxBC). Once this feature has been setup for your practice, the following options become available:
Benefit Check Process
- Navigate to the EMR
- Open a patient chart
- Open the medications chart tab
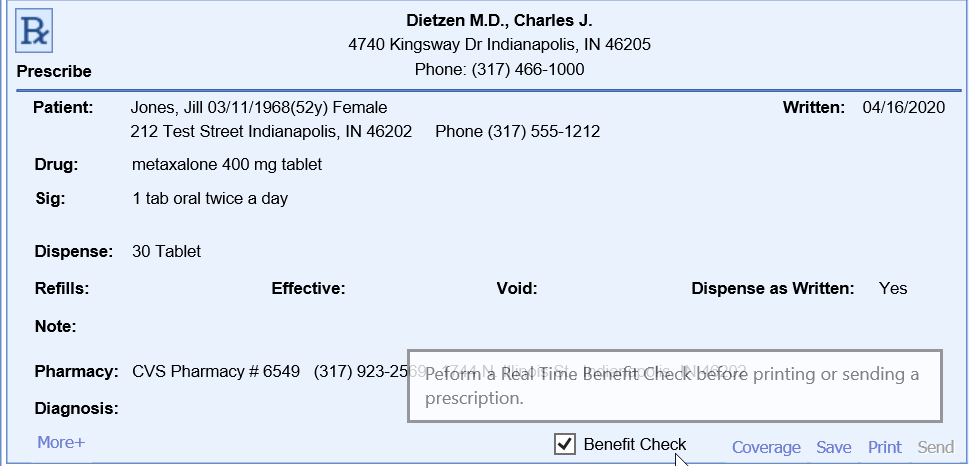
- Fill out the prescription and select the desired pharmacy
- If you would like for a benefit check to occur, be sure the Benefit Check option is selected. If the product has been activated for your practice, this will be selected by default. Users can override this option by updating their user settings.
- If you would like for a benefit check to occur, be sure the Benefit Check option is selected. If the product has been activated for your practice, this will be selected by default. Users can override this option by updating their user settings.
- Click Send
- Before the prescription is actually sent, a benefit check will be displayed providing details on the expected cost.
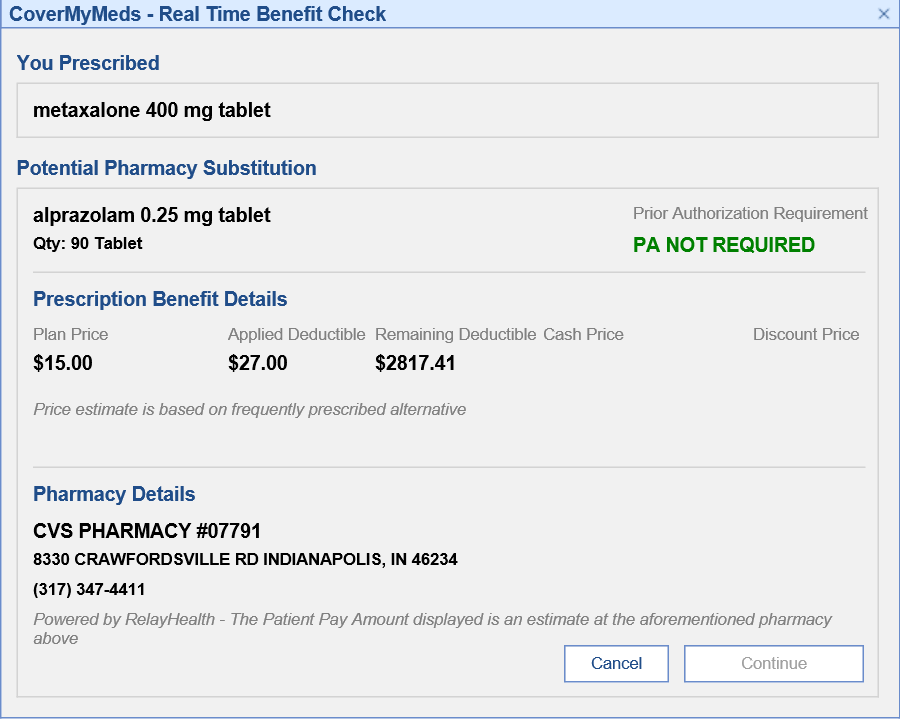
- If you would like to continue sending the prescription, click Continue. Otherwise, click Cancel to make any necessary changes and restart the process.


Benefit Check Details
| Field | Description |
|---|---|
| Potential Pharmacy Substitution | This provides the drug most commonly dispensed at the pharmacy. This is a true representation of what the patient would experience at the pharmacy. For example, a brand medication is selected during prescribing but the Benefit Check may indicate that the pharmacy selected when receiving this brand medication would typically dispense a generic medication. This would provide the payment and coverage details for the generic medication. If ‘Dispense as Written’ is selected during prescribing, drug substitution will not occur. |
| Prior Authorization Check | Indicates if a Prior Authorization will be required by the pharmacy. |
| Plan Price | A single co pay amount will be returned when the plan/PBM is able to respond with an exact price In the event a single patient pay amount value is unable to be returned, historical pharmacy data is used to return a price range reflective of when the patient’s insurance is used. |
| Applied Deductible/ Remaining Deductible | The response has the ability to provide details around how much of the copay amount applies toward the deductible and what would be remaining of the patient’s deductible. |
| Cash Price | A price range reflective of what a patient would pay when not using their insurance. |
| Discount Price | The discount price field represents the price a patient would pay if they present the associated discount card to the pharmacy. A link will be provided that you must click to print off the discount card. |
On August 31, 2023, CoverMyMeds is sunsetting the current integrated electronic prior authorization portal within OfficeEMR. This integration enables providers to initiate and submit prior authorizations for any medication to payers. In order to continue using the CoverMyMeds prior authorization services, OfficeEMR users will need to create a new free login to the CoverMyMeds standalone portal. Follow the steps below to setup your free CoverMyMeds portal account and transition your eRx prior authorization workflow by August 31, 2023.
Note: This workflow will be replaced early Fall 2023 by a new integrated prior authorization workflow.
Step 1: Create a CoverMyMeds Login
- Navigate to CoverMyMeds.com.
- Click on the Create an Account menu.

- Fill out the required fields and press the Get Started button.
Note: If you receive an alert that your email address is already in use, Reset Your Password.


Step 2: Group User Logins Together
Once your practice has setup all the appropriate CoverMyMeds logins, email Corey Bradham cbradham@covermymeds.com and Erin Adler eadler@covermymeds.com to request those logins get grouped together. This will allow all users to see each other's prior authorization requests.
Step 3: Complete New and Open Prior Authorizations in the CMM Portal
Prior authorizations that have been started using the integrated CoverMyMeds portal can be completed in the new CoverMyMeds portal. Users need to document the following information to access the prior authorizations:
- Prior Authorization Key
- Patient Last Name
- Patient DOB
All new prior authorizations should be started within the CoverMyMeds portal.
Step 4: Sign-up As an Integrated Prior Authorization Beta Customer
Anxious to help us validate our new integrated prior authorization workflow within OfficeEMR? iSalus will be launching our beta version of integrated prior authorization workflows in mid-September. If you're willing to be a beta customer for this new product, please sign-up here.
